Hello and welcome to Makerguides!
Makerguides is a website dedicated to DIY electronics, programming and 3D printing projects, for hobbyists, students, and educators. All levels of expertise are welcome; from first time starters, over beginners and intermediate to advanced makers.
We provide step-by-step tutorials on electronics projects in the Arduino ecosystem with a focus on popular microcontrollers such as the Arduino, the ESP8266 and the ESP32. If you want to learn basic electronics and programming or build more advanced projects, this website is for you.

We will teach you how to integrate switches, sensors, displays, motors, lights and communication devices with microcontrollers to make amazing things!
Contact
If you want to get in contact with us here is our email address:

History
A little bit of history. Makerguides was initiated by Benne de Bakker mid of 2015 and the website started to attract interest at the beginning of 2017. Benne’s original articles on stepper motors and stepper motor drivers are still some of our most popular articles.
In 2021, Adam Sayner took over and engaged additional technical experts and writers such as Hiren Tailor and Puneeth Kumar to extend the content of the site.
Finally, in July 2023 yours truly acquired the site and since then I am having a lot fun adding new projects and updating existing articles with fresh information.
About me

I am a professional software engineer and researcher with over 30 years of work experience. My main expertise is in AI and Machine Learning, applied to various fields such as automation, vision, bioinformatics and advertising.
I started as a software engineer in R&D at Siemens, Germany, where I developed kinematic and dynamic robot models to improve trajectorial accuracy.
In 2004, I moved to Australia to study computer science at the University of Queensland (UQ) in Brisbane, and acquired my PhD in 2007.
After the completion of my PhD, I worked as a Associate lecturer and Course coordinator for software engineering courses at the School of Information Technology and Electrical Engineering (ITEE). At the same time, I was also employed part-time as a Research Officer at the Institute for Molecular Bioscience (IMB) in Brisbane with a focus on the computational inference of biological networks.
From 2013 to 2016, I lived in the United States (US) and worked for Google in Mountain View, where I implemented infrastructure and deep-learning methods for the privacy protection of Street View imagery.
After my return to Australia, I joined IBM Research in Melbourne as an Advisory Software Engineer and was responsible for the development of deep learning methods to diagnose eye diseases.
Currently, I am working 50% part-time as a Data Scientist and Senior Software Engineer for QSIC, where I apply Generative AI and Machine Learning to create and optimize audio ads for retail.
In the half of my time, I create projects and content for Makerguides. While my main expertise is in Software Development with a focus on AI and Machine Learning, I have a deep interest in electronics, microcontroller programming and 3D-printing. I generally, love to make things and to educate.
Projects
Here are some of my favourite projects.
Flower pot
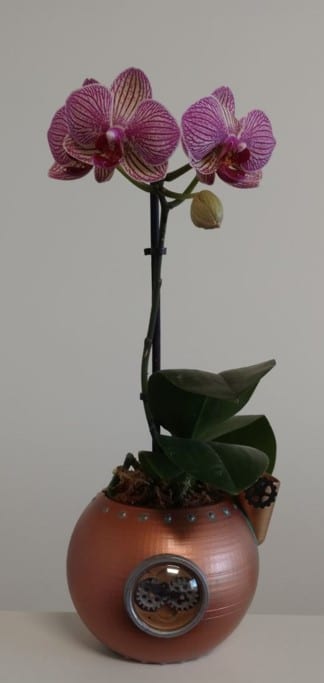
When I got my first 3D printer, an Anycubic I3 Mega, I started to printed simple things, among them different kinds of flower pots. I love the look of Steampunk, so most of my builds follow a Steampunk aesthetics.
At that time, I was using OpenScad as CAD modelling tool, which is great for programmatically controlled designs that have regularity. While it is not well suited for more complex design it still gets you pretty far.
This flower pot, for instance, has an inner and an our shell. The space in-between can be filled with water using the little inlet a the top right. It has a flap than can be opened and closed by turning the little black wheel.
And at the front you can see a gauge for the water level in the pot. It features two cogs and a hand that are actuated by a floating device inside of the pot. Rising water levels lift the floater attached to a lever, which in turn moves the cogs and the hand.
Differential
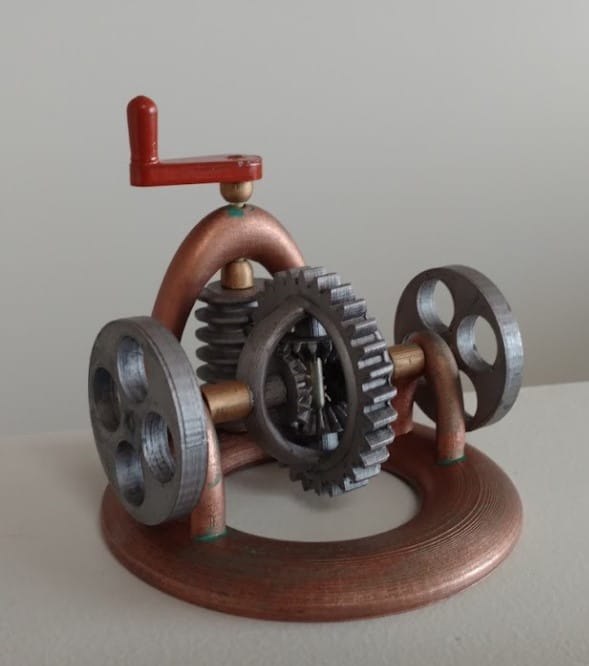
I experimented with various with mechanical designs and this picture shows the model of a differential gear. It has a red crank with an worm gear at the back that drives the differential with the two wheels at the side.
This model was printed with my Anycubic I3 Mega and designed with OpenScad. Overall, I am not too happy with the look but it was a good learning experience. You may notice the green patina, where I started to try weathering effects on copper.
Maze Game
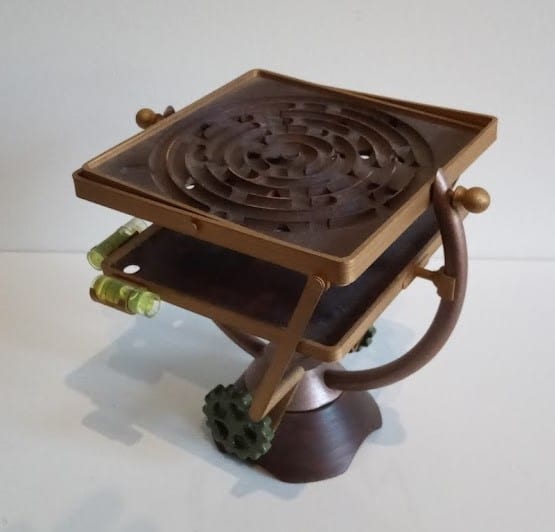
Later, I built a tilt maze game where you turn two knobs (the green knobs) to control the movement of a ball though a maze with holes.
It was a nice use case for exploring wood filaments for 3D printing and I was very happy with the results. Wood filament when printed feels, looks and smells very similar to wood and with wood color becomes very similar to real wood.
As you can see, I am still aiming for a Steampunk look, with a bronze frame, green cogs as knobs and dark wood for the maze and the base.
Jewellery Box
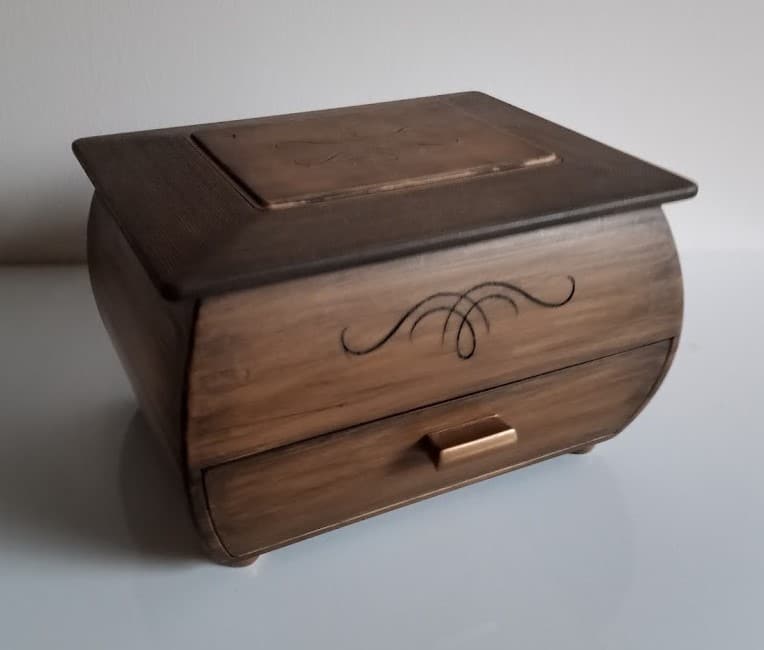
Since I was so satisfied with the look and feel of wood filament, I also printed this Jewellery Box.
It has a lid at the top, a drawer at the bottom and several compartments inside for jewellery.
The original wood filament was of of a very bright color but after staining with walnut it became beautifully dark.
Another advantage of wood filament is that sanding is very easy and with wet sanding it becomes very smooth like polished wood.
T-Rex Skeleton
The most challenging 3D printing project was the T-Rex Skeleton model shown below. The ribs are thin and fragile and needed to be printed with strong supports, which however were difficult to remove.
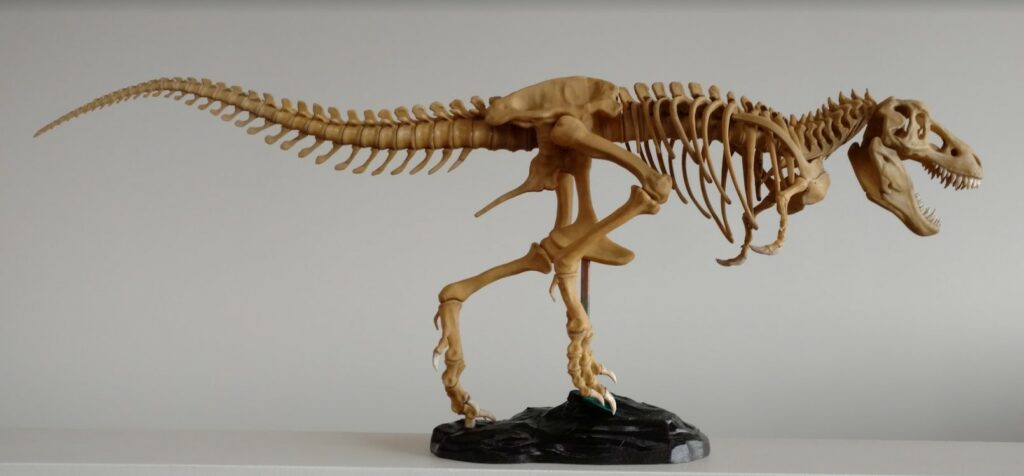
The model required a tremendous amount of postprocessing but the result is a fantastic looking T-Rex. During this project I learned a lot about weathering. The main reason, why the model looks so good is due to the weathering effects that bring out all the details and give the bones a realistic color.
Radio
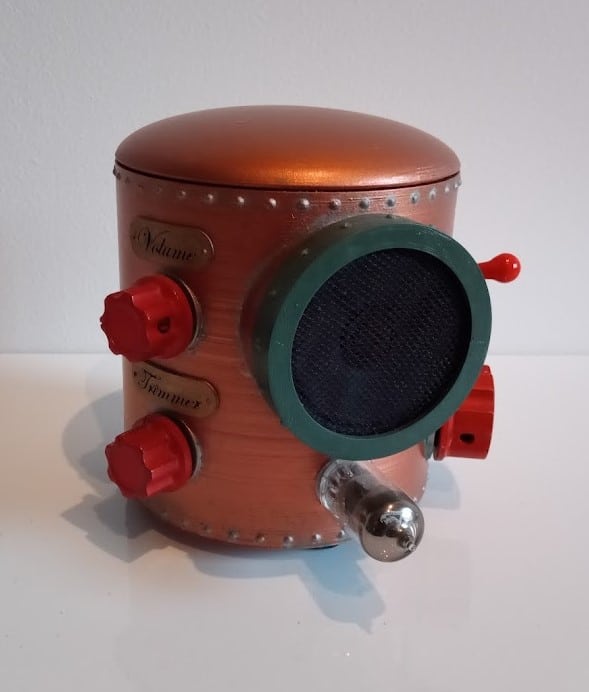
In later projects, I started to integrate more electronics in my 3D prints. Here we a have a tube radio in Steampunk style.
The original radio kit was a Christmas gift and came with a simple cardboard housing. I decided to give it this boiler shaped enclosure. I kept the knobs but painted them red and added the green frame for the speaker.
During this project I started to really appreciate Rub & Buff, which is fantastic to highlight rivets and create bronze labels or other metal effect.
Lamp
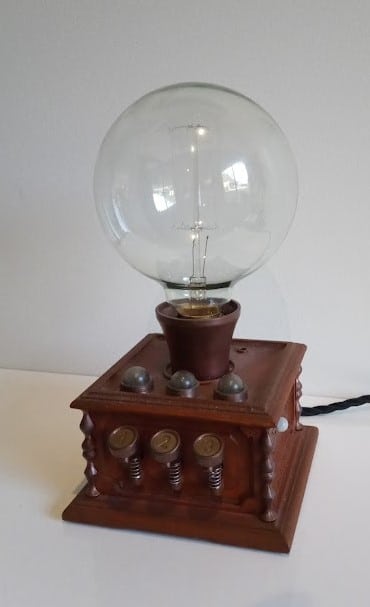
After several years of relying on my trusted Anycubic I3 Mega and OpenScad, I finally bought a Prusa i3 MK3S+ and switched to Fusion 360 for CAD modelling. The lamp on the right is one of the outcomes.
The housing is printed with wood filament and contains a Wemos D1 mini microcontroller that connects via WiFi to my IoT server at home.
It is controlled using the MQTT protocol and is equipped with two PIR motion sensors, a light sensor, a temperature sensor and a relay to switch the lamp.
Klann Walker

My mechanically most challenging project was this Klann Walker, which you also see as the banner image for the Makerguides site.
I was always fascinated by the elegant motion of the Strandbeesten, and the Klann Walker is a simplified version of it. However, most of the Walkers, I found on the internet looked rather ugly.
So, this is my Steampunk inspired version of a Klann Walker. It contains a Wemos D1, two motors and two lights and light sensors in the “eyes”. The walker can switch from a light searching mode like a Braitenberg vehicle to a line following mode.
Audio Streamer
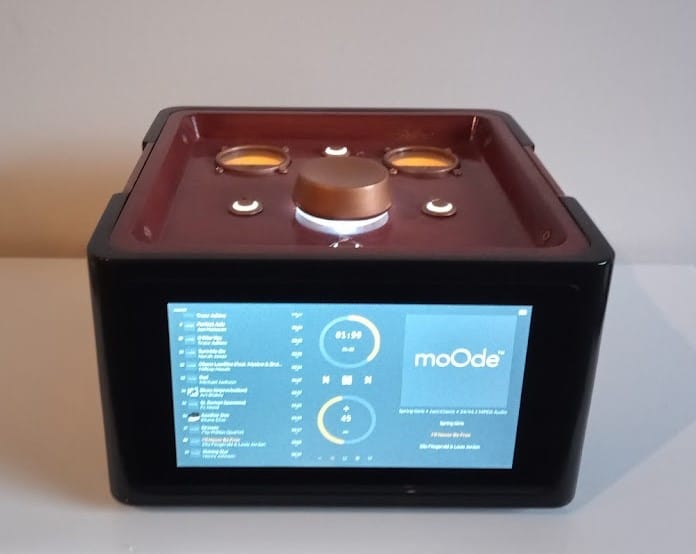
Finally, one of my more recent projects and most advanced builds. An Audio Streamer – as usual with a bit of Steampunk flavor.
The housing is standard PLA but painted with a primer and then polished. The top panel is wood filament with a lacquer finish. And the front is a 7-inch touch display.
Inside is a Raspberry Pi with an HiFiberry Audio DAC, running the moOde audio player software. I tried several other audio players but found moOde to be the most reliable and easy one to use.
The music is stored on a 128GB USB drive. The player can be controlled with via the touch display and the buttons and the volume control at the top, or with the web interface that the moOde software offers.
I hope you feel inspired and join me on the journey of building amazing things!