In this tutorial, you will learn how to use the AM2320 digital temperature and humidity sensor with Arduino. I have included wiring diagrams and two code examples to get started!
For this tutorial, we will be using the Adafruit AM2320 sensor library. This library makes communicating with the sensor via I2C super easy. We will use this library in our first example to read temperature and humidity data from the AM2320 sensor and display them in the Serial Monitor.
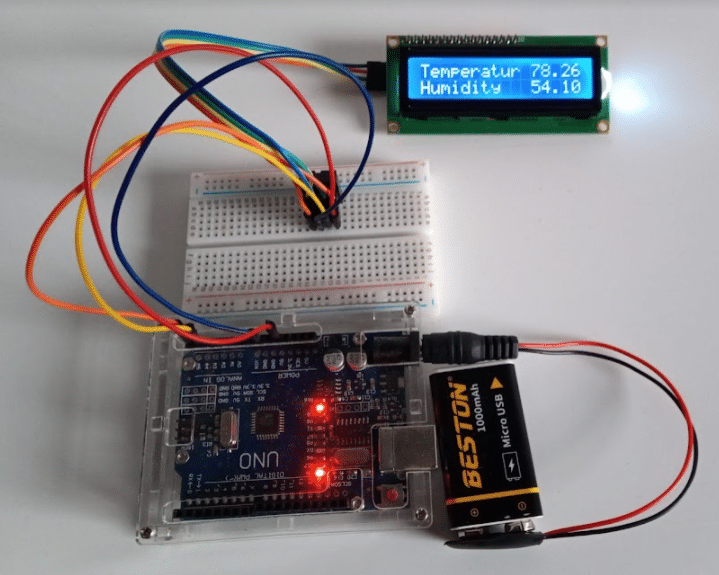
In the second example, we extend this by adding a 16×2 character LCD. This will be also connected via the I2C bus and allows us to display the readings on the LCD. The complete project will look like this:
If you would like to learn more about other temperature sensors, see our other tutorials below:
- The complete guide for DS18B20 digital temperature sensors with Arduino
- How to use DHT11 and DHT22 sensors with Arduino
- TMP36 analog temperature sensor with Arduino tutorial
- LM35 analog temperature sensor with Arduino tutorial
Let’s get started!
Required Parts
Below you will find the parts required for this project. Apart from an Arduino you will need a breadboard, some wires and the AM2320 sensor, of course. For this tutorial, I am going to use the classic Arduino Uno (REV3) but any other Arduino (or ESP32/ESP8266), will be fine as well.
I also included a 16×2 LCD display in the list of required parts, which you will need for the second application example of this tutorial. If you are happy displaying temperature and humidity on the Serial Monitor only, you would not need this.

Arduino Uno

Dupont Wire Set

Breadboard

USB Cable for Arduino UNO
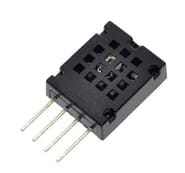
AM2320 Temperature Sensor
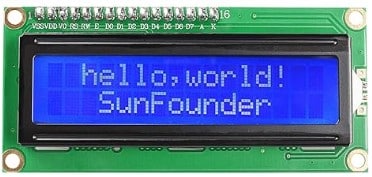
16×2 Character LCD I2C
Arduino IDE
Makerguides.com is a participant in the Amazon Services LLC Associates Program, an affiliate advertising program designed to provide a means for sites to earn advertising fees by advertising and linking to products on Amazon.com. As an Amazon Associate we earn from qualifying purchases.
About the AM2320
The AM2320 is a low-cost digital temperature and humidity sensor made by ASAIR. This sensor is similar to the popular DHT11/DHT22 sensors but features an I2C interface instead of the single bus communication protocol that many of the other DHTxx sensors use. You can find our tutorial for the DHT11 and DHT22 here:
The sensor consists of a capacitive moisture sensing element and a high precision integrated temperature measuring element connected to a microprocessor. The temperature measuring range of the sensor is -40 to 80 degrees Celsius, with a stated accuracy of ± 0.5 °C.
Relative humidity
When you look at the datasheet of the sensor, you will see that it measures the relative humidity (RH) of the air and not the absolute humidity. But what’s the difference? The absolute humidity is the amount of water vapor in the air (expressed in g/m³), regardless of temperature. The relative humidity does take temperature into account.
The relative humidity is the ratio between the actual amount of water vapor present in the air and the maximum amount of water vapor that the air can hold at a given temperature.
Warm air can hold more water than cold air. This means that for the same amount of water vapor in the air, the relative humidity in cool air will be higher than that in warm air. At 100 percent relative humidity, the air is saturated and is at its dewpoint.
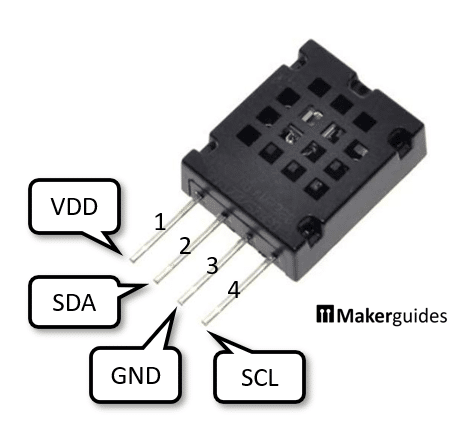
AM2320 pinout
The pinout of the AM2320 sensor is as follows:
| Pin | Name | Description |
|---|---|---|
| 1 | VDD | Positive power supply pin (3.1 – 5.5 V) |
| 2 | SDA | Serial Data, bidirectional port |
| 3 | GND | Ground |
| 4 | SCL | Serial Clock input port (single bus ground) |
Note that the default I2C address of the sensor is 0x5C and cannot be changed.
The following table gives you the most important features of the AM2320:
AM2320 specifications
| Supply voltage | 3.1 – 5.5 V |
| Power consumption | Sleep: 10 μA Measuring: 950 μA |
| Humidity range | 0 – 99.9 % RH ± 3 % RH |
| Temperature range | -40 – 80 °C ± 0.5 °C |
| Interface | I2C 1-Wire |
| Sampling period | 2.0 s |
| Body dimensions | 15 x 12.1 x 4.5 mm |
| Cost | Check price |
For more information, you can check out the datasheet here:
Connecting the AM2320 to Arduino
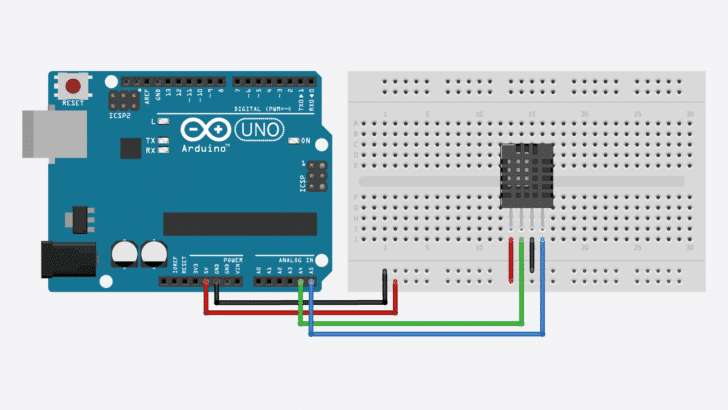
Connecting the AM2320 to the Arduino is very easy as you can see in the diagram below.
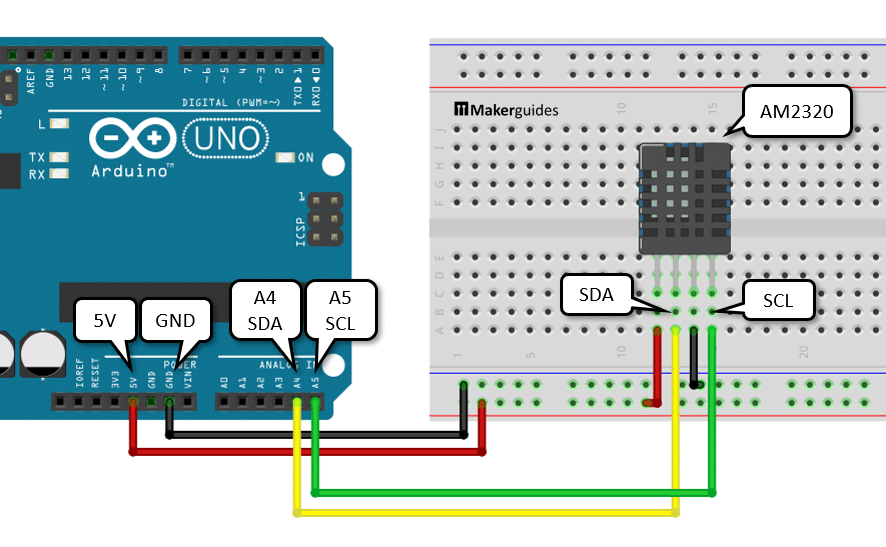
Just connect 5V (or 3.3V) of the Arduino to P1 (VDD) of the AM2320 and similarly Ground (GND) to GND. A4 goes to Pin 2 (SDA) and A5 is connected to Pin 4 (SCL) of the AM2320. The connections are also given in the table below
AM2320 connections
| AM2320 | Wire | Arduino |
|---|---|---|
| Pin 1 (VDD) | red | 5 V |
| Pin 2 (SDA) | yellow | A4 |
| Pin 3 (GND) | black | GND |
| Pin 4 (SCL) | green | A5 |
If you are not using an Arduino Uno, the SDA and SCL pins can be at a different location. Check the table below for more details.
| Board | SDA | SCL |
|---|---|---|
| Arduino Uno | A4 | A5 |
| Arduino Nano | A4 | A5 |
| Arduino Micro | 2 | 3 |
| Arduino Mega 2560 | 20 | 21 |
| Arduino Leonardo | 2 | 3 |
| Arduino Due | 20 | 21 |
An Arduino Uno with the R3 layout (1.0 pinout), also has the SDA (data line) and SCL (clock line) pin headers close to the AREF pin. The following diagram shows you an alternative circuit that connects the AM2320 to those SDA and SCL pins:
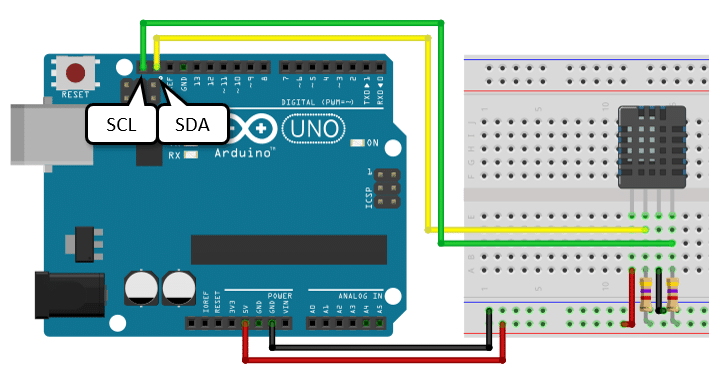
You will note, that there also two additional Pullup resistors with a value of 4.7KΩ on the SDA and SCL lines. In many cases, you will not need them, since the Arduino UNO has internal pullup resistors that are often sufficient. However, they are fairly high in value and if you encounter communication problems with an I2C device you should add your own. Especially, if you use longer cables.
Installing the required Arduino libraries
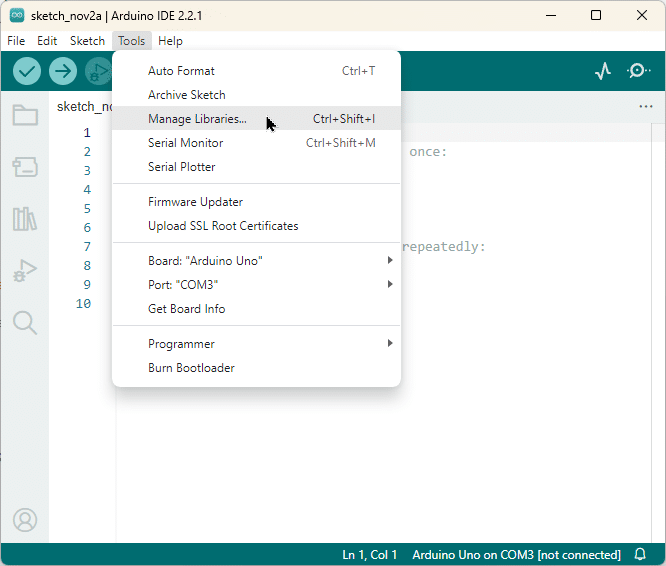
For this tutorial, we will be using the the Adafruit AM2320 sensor library. To install the library, go to Tools > Manage Libraries in the Arduino IDE. The Library Manager will open.
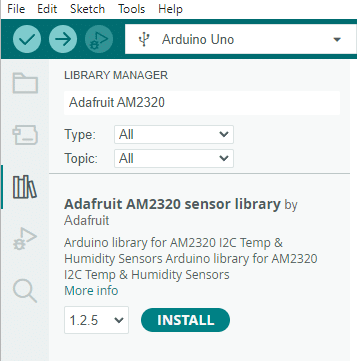
In the LIBRARY MANAGER search for ‘Adafruit AM2320‘ and click INSTALL.
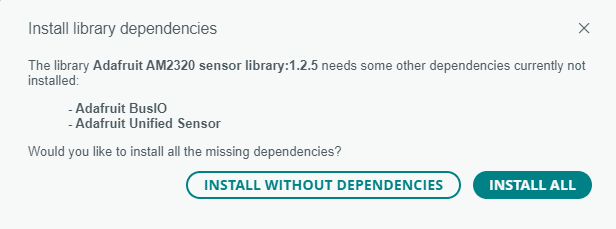
Depending on the other libraries you already have installed, you may or may not see the following message. It tells you that you need to install furthers libraries needed by the AM2320 library. That is perfectly fine. Just click on INSTALL ALL.
Now you have all the libraries installed that we need to run the code provided in the next section.
Code to read Temperature and Humidity with AM2320
The following example code shows you how to read temperature and humidity from the AM2320 sensor and display the data in the Serial Monitor and the Serial Plotter. Have a quick look first, and then we will discuss the details of the code
// Read Temperature and Humidity with AM2320

#include "Adafruit_Sensor.h"
#include "Adafruit_AM2320.h"

Adafruit_AM2320 sensor = Adafruit_AM2320();

void setup() {
  Serial.begin(9600);
  sensor.begin();
}

void loop() {
  float tempC = sensor.readTemperature();
  float tempF = tempC * 1.8 + 32;
  float humidity = sensor.readHumidity();

  Serial.print("Temperatur:");
  Serial.println(tempF);
  Serial.print("Humidity:");
  Serial.println(humidity);

  delay(2000);
}
Importing the Libraries
In the first step we include the Adafruit_AM2320 and the Adafruit_Sensor libraries.
#include "Adafruit_Sensor.h"
#include "Adafruit_AM2320.h"
Create Sensor Instance
Next, we create a new instance of the Adafruit_AM2320 class. In this case, I called it “sensor” but you can pick any other name, as long as you adjust the following code accordingly
Adafruit_AM2320 sensor = Adafruit_AM2320();
Setup function
In the setup(), we start the serial communication at a baud rate of 9600. Make sure that the Serial Monitor is also set to 9600. We also initialize the AM2320 sensor with sensor.begin().
void setup() {
  Serial.begin(9600);
  sensor.begin();
}
Loop function
In the loop section of the code, we read the temperature and humidity data from the AM2320 sensor with the functions readTemperature() and readHumidity().
Note that readTemperature() returns the temperature in Degree Celsius. We can easily convert it to Fahrenheit using the formula tempF = tempC * 1.8 + 32.
  // Read the temperature and the humidity:
  float tempC = sensor.readTemperature();
  float tempF = tempC * 1.8 + 32;
  float humidity = sensor.readHumidity();
Lastly, we print the results in the Serial Monitor and add a delay between the readings. The minimum interval between readings is 2 seconds (see Datasheet), so we use a 2000 msec (=2 sec) delay between readings.
  Serial.print("Temperatur:");
  Serial.println(tempF);
  Serial.print("Humidity:");
  Serial.println(humidity);

  delay(2000);
And that’s it! We have a temperature and humidity reader. Now let’s try it.
Output in Serial Monitor
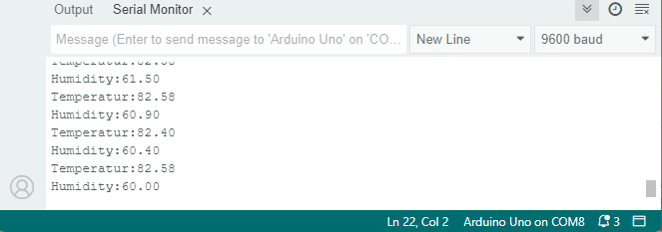
If run this code and open the Serial Monitor you should see temperature and humidity readings similar to the the ones below. Make sure the baud rate is set to 9600 baud.
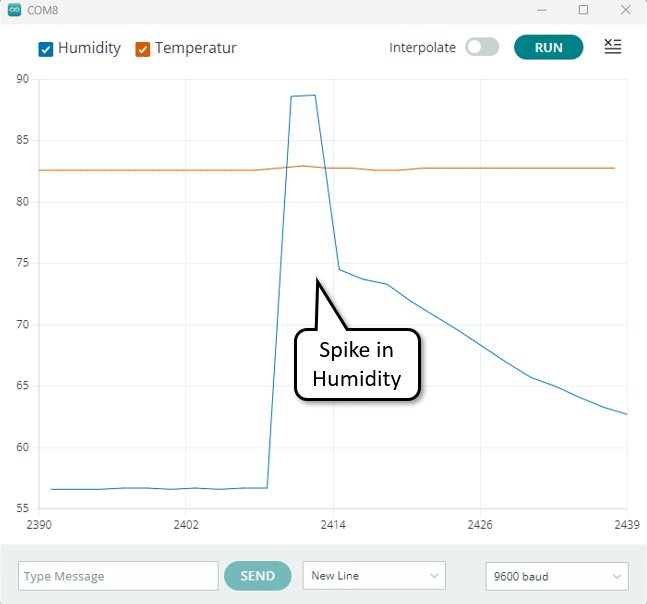
Output in Serial Plotter
If you now open your Serial Plotter and blow on the AM2320 sensor you should see a spike in humidity and a slight rise in temperature, similar to the plot below:
Adding an LCD to Display the Data
In this part I show you how to add an 16×2 character LCD to display the data. Luckily it is very simple.
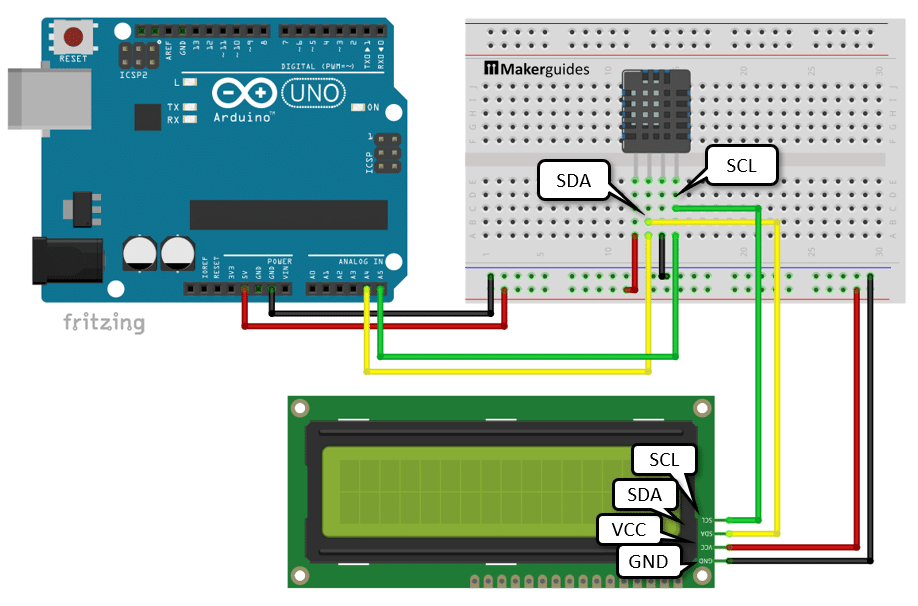
Wiring of the LCD
The following diagram shows the complete wiring. The AM2320 is connected exactly the same as before. We add the LCD by connecting its power (VCC, GND) to the power rail and its SDA and SCL to the same SDA and SCL lines the AM2320 is connected to.
So, both the LCD and the AM2320 are connected via I2C to the Arduino. I2C is a serial bus that can enable up to 128 devices to communicate.
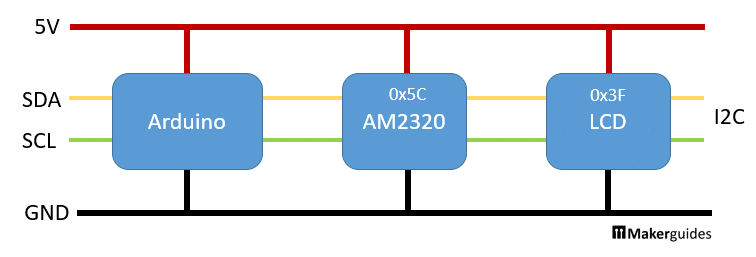
The devices on the bus are distinguished by their I2C address. The I2C address of the AM2320 is fixed at 0x5C. The I2C address of your LCD may vary, however. Typical addresses are 0x27 or 0x3F, and often printed on the back. If you are not sure you can run an I2C scanner to find out the address. Have a look at our tutorial Character I2C LCD with Arduino Tutorial.
Displaying AM2320 readings on LCD
The code to show data on the LCD is pretty simple. We are going to use the LiquidCrystal library by Frank de Brabander to control the LCD.
If you have not installed it yet, then you will need to installed the same way as you installed the AM2302 library. And if you need some help, have a look at our tutorial on How to use the MQ-7 Gas Sensor with an LCD display and Arduino, where we do exactly that with detailed steps.
Have a quick look at the code first before we explain the details
// Display temperature and humidity readings from AM2320 sensor
// on 16x2 LCD display at I2C address 0x3F

#include "LiquidCrystal_I2C.h"
#include "Adafruit_Sensor.h"
#include "Adafruit_AM2320.h"

Adafruit_AM2320 sensor = Adafruit_AM2320();
LiquidCrystal_I2C lcd = LiquidCrystal_I2C(0x3F, 20, 2);

void setup() {
  Serial.begin(9600);
  sensor.begin();
  lcd.init();
  lcd.backlight();
}

void loop() {
  float tempC = sensor.readTemperature();
  float tempF = tempC * 1.8 + 32;
  float humidity = sensor.readHumidity();

  lcd.clear();

  lcd.setCursor(0, 0);
  lcd.print("Temperatur");
  lcd.setCursor(11, 0);
  lcd.print(tempF);

  lcd.setCursor(0, 1);
  lcd.print("Humidity");
  lcd.setCursor(11, 1);
  lcd.print(humidity);

  delay(2000);
}
We start by including the required libraries.
Libraries
To use the AM2320 sensor and the LCD display, we need to include the necessary libraries. We include the “LiquidCrystal_I2C.h” library for the LCD display, the “Adafruit_Sensor.h” library for the sensor, and the “Adafruit_AM2320.h” library for the AM2320 sensor.
#include "LiquidCrystal_I2C.h"
#include "Adafruit_Sensor.h"
#include "Adafruit_AM2320.h"
Objects
We first create two objects: one for the AM2320 sensor and one for the LCD display. We then initialize the sensor object as “sensor” and the LCD display object as “lcd”. To create the lcd object we need to pass the I2C address of the LCD display (0x3F) and the dimensions of the display (20 columns and 2 rows) to the “LiquidCrystal_I2C” constructor.
Adafruit_AM2320 sensor = Adafruit_AM2320();
LiquidCrystal_I2C lcd = LiquidCrystal_I2C(0x3F, 20, 2);
Setup function
In the “setup()” function, we initialize the serial communication at a baud rate of 9600. We also call the “begin()” function on the sensor object to initialize the AM2320 sensor. Then, we call the “init()” function on the lcd object to initialize the LCD display. Finally, we turn on the backlight of the LCD display using the “backlight()” function.
void setup() {
  Serial.begin(9600);
  sensor.begin();
  lcd.init();
  lcd.backlight();
}
Loop function
In the “loop()” function, we read the temperature and humidity values from the sensor using the “readTemperature()” and “readHumidity()” functions respectively.
As before, we store the temperature in Celsius in the “tempC” variable and convert it to Fahrenheit by multiplying it by 1.8 and adding 32, storing the result in the “tempF” variable. Similarly, we store the humidity value in the “humidity” variable.
We clear the LCD display using the “clear()” function. Then, we set the cursor position to the first column of the first row using the “setCursor()” function and print “Temperature”. We set the cursor position to the twelfth column of the first row and print the temperature in Fahrenheit.
Next, we set the cursor position to the first column of the second row and print “Humidity”. We set the cursor position to the twelfth column of the second row and print the humidity value.
Finally, we add a delay of 2000 milliseconds (2 seconds) using the “delay()” function to allow time for the readings to be displayed before repeating the loop.
void loop() {
  float tempC = sensor.readTemperature();
  float tempF = tempC * 1.8 + 32;
  float humidity = sensor.readHumidity();

  lcd.clear();

  lcd.setCursor(0, 0);
  lcd.print("Temperature");
  lcd.setCursor(11, 0);
  lcd.print(tempF);

  lcd.setCursor(0, 1);
  lcd.print("Humidity");
  lcd.setCursor(11, 1);
  lcd.print(humidity);

  delay(2000);
}
And that’s it. Now you have a fully functional system to display temperature and humidity data on an LCD.
Conclusion
In this tutorial, I have shown you how to use the AM2320 temperature and humidity sensor with Arduino. I hope you found it useful and informative. If you did, please share it with a friend who also likes electronics and making things!
Frequently Asked Questions
Here are some frequently asked questions about using the AM2320 sensor to read temperature and humidity and displaying the data on a 16×2 LCD with Arduino.
Q: What is the AM2320 sensor?
A: The AM2320 is a digital temperature and humidity sensor that uses the I2C serial bus to communicate with microcontrollers like Arduino. It provides accurate readings of temperature and humidity, making it ideal for various applications such as weather monitoring, home automation, and greenhouse control.
Q: What is I2C and how does it work?
A: I2C (Inter-Integrated Circuit) is a serial communication protocol that allows multiple devices to communicate with each other using only two wires – SDA (data line) and SCL (clock line). It enables efficient communication between microcontrollers and sensors, minimizing the number of pins required for connection.
Make sure you are using the correct I2C addresses of the connected devices in your code. Also make sure that SDA and SCL lines are not swapped.
Q: How do I connect the AM2320 and LCD to Arduino via I2C?
A: To connect the AM2320 and LCD to Arduino via I2C, you will need to make the following connections:
- Connect the SDA pin of the AM2320 sensor to the SDA pin of the Arduino.
- Connect the SCL pin of the AM2320 sensor to the SCL pin of the Arduino.
- Connect the SDA pin of the LCD to the SDA pin of the Arduino.
- Connect the SCL pin of the LCD to the SCL pin of the Arduino.
Q: How do I read temperature and humidity via the AM2320 sensor?
A: To read temperature and humidity via the AM2320 sensor, you need to initialize the sensor and then use the appropriate functions to retrieve the temperature and humidity values. The AM2320 library provides functions like begin() to initialize the sensor and readTemperature() and readHumidity() to get the temperature and humidity readings respectively.
Q: How do I display the data on a 16×2 LCD?
A: To display the temperature and humidity data on a 16×2 LCD, you need to initialize the LCD and then use the LCD library functions to write the data on the LCD screen. The LiquidCrystal library provides functions like begin() to initialize the LCD and print() to display the data on the LCD.
Q: Are there any troubleshooting tips for using the AM2320 sensor and LCD?
A: If you encounter any issues while using the AM2320 sensor and LCD, here are a few troubleshooting tips:
- Double-check your connections to ensure they are properly wired.
- Verify that you have installed the necessary libraries for the AM2320 sensor and LCD.
- Make sure you have the correct I2C addresses for both the sensor and LCD.
- Check for any conflicts with other devices using the I2C bus.
- Test your code step by step to identify any potential errors.
These frequently asked questions should help you get started with using the AM2320 sensor to read temperature and humidity and displaying the data on a 16×2 LCD with Arduino. If you have any further questions, feel free to ask in the comments section below.

This work is licensed under a Creative Commons Attribution-NonCommercial-ShareAlike 4.0 International License.
Other Useful Links From Around The Web:
Benne is professional Systems Engineer with a deep expertise in Arduino and a passion for DIY projects.