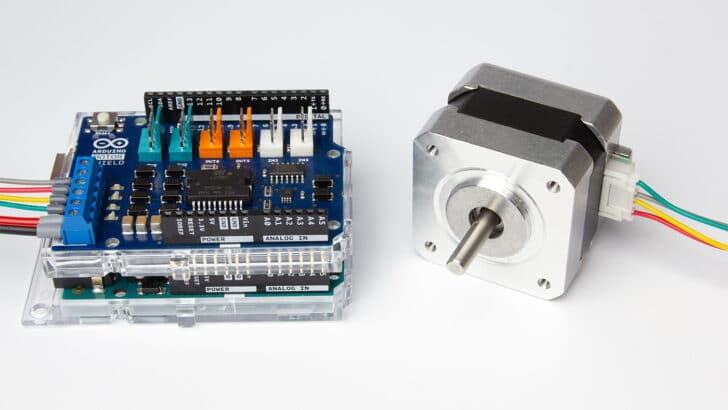
In this tutorial, you will learn how to control a stepper motor with the Arduino Motor Shield Rev3. I have included a wiring diagram and many example codes.
First we take a look at an example that uses the Arduino Stepper library. This library is great for basic stepper motor control but doesn’t have many extra features.
I highly recommend to also take a look at the example codes for the AccelStepper library at the end of this tutorial. This library is fairly easy to use and can greatly improve the performance of your hardware.
After each example, I break down the code into smaller section and explain how it works. You should have no problems modifying the code to suit your needs, but if you have any questions, just leave a comment below.
If you want to learn more about other (microstepping) drivers like the A4988, check out the articles below.
Other stepper motor tutorials:
- Control a stepper motor with L298N motor driver and Arduino
- 28BYJ-48 Stepper Motor with ULN2003 Driver and Arduino Tutorial
- How to control a stepper motor with A4988 driver and Arduino
- How to control a stepper motor with DRV8825 driver and Arduino
Supplies
Hardware components
| Arduino Motor Shield Rev3 | × 1 | Amazon | |
| NEMA 17 stepper motor* | × 1 | Amazon | |
| Arduino Uno Rev3 | × 1 | Amazon | |
| Power supply (5-12 V) | × 1 | Amazon | |
| USB cable type A/B | × 1 | Amazon |
In this tutorial I used a bipolar stepper motor with 4 wires. Try to find a stepper motor that can run at 5-12 V and doesn’t exceed the 2 A current limit. This one from Adafruit works great at 12 V and doesn’t draw too much current (350 mA).
Software
Makerguides.com is a participant in the Amazon Services LLC Associates Program, an affiliate advertising program designed to provide a means for sites to earn advertising fees by advertising and linking to products on Amazon.com. As an Amazon Associate we earn from qualifying purchases.
Information about the Arduino Motor Shield Rev3
The Arduino Motor Shield Rev3 is built around the L298 dual full-bridge driver, made by STMicroelectronics. With the shield, you can drive DC motors, a stepper motor, relays, and solenoids. It comes with two separate channels, called A and B, that you can use to drive 2 DC motors, or 1 stepper motor when combined.
One thing that is very important to remember is that the L298 is a constant voltage driver. This means that the current draw depends on the relationship between the inductance and resistance (L/R) of the motor that you connect to it.
What this means for you, is that you need to be careful when selecting the stepper motor and power supply to use with this shield. Not all stepper motors will work! The shield’s operating voltage is between 5 and 12 volts. Since the shield can supply a maximum of 2 amperes per channel, you need to find a stepper motor that can be used in this voltage range and doesn’t exceed the maximum current rating. The motor I used for this tutorial draws around 1A at 5V. I also found this stepper motor from Adafruit that works great at 12V and only draws 350mA.
If the motor you want to drive doesn’t work with this shield, I recommend using a chopper drive instead. I wrote tutorials for the A4988 and DRV8825 driver that work great with many stepper motors.
Arduino Motor Shield Rev3 Specifications
| Operating voltage | 5 V to 12 V |
| Motor controller | L298P, Drives 2 DC motors or 1 stepper motor |
| Max current | 2A per channel or 4A max (with external power supply) |
| Current sensing | 1.65V/A |
| Functions | Free running, stop and brake |
| Cost | Check price |
For more information you can check out the datasheets here.
Input and Output
| Function | Pins Channel A | Pins Channel B |
|---|---|---|
| Direction | D12 | D13 |
| PWM | D3 | D11 |
| Brake | D9 | D8 |
| Current sensing | A0 | A1 |
Wiring – Connecting a stepper motor to the Arduino Motor Shield Rev3
The wiring diagram/schematic below shows you how to connect a stepper motor and power supply to the Arduino motor shield.
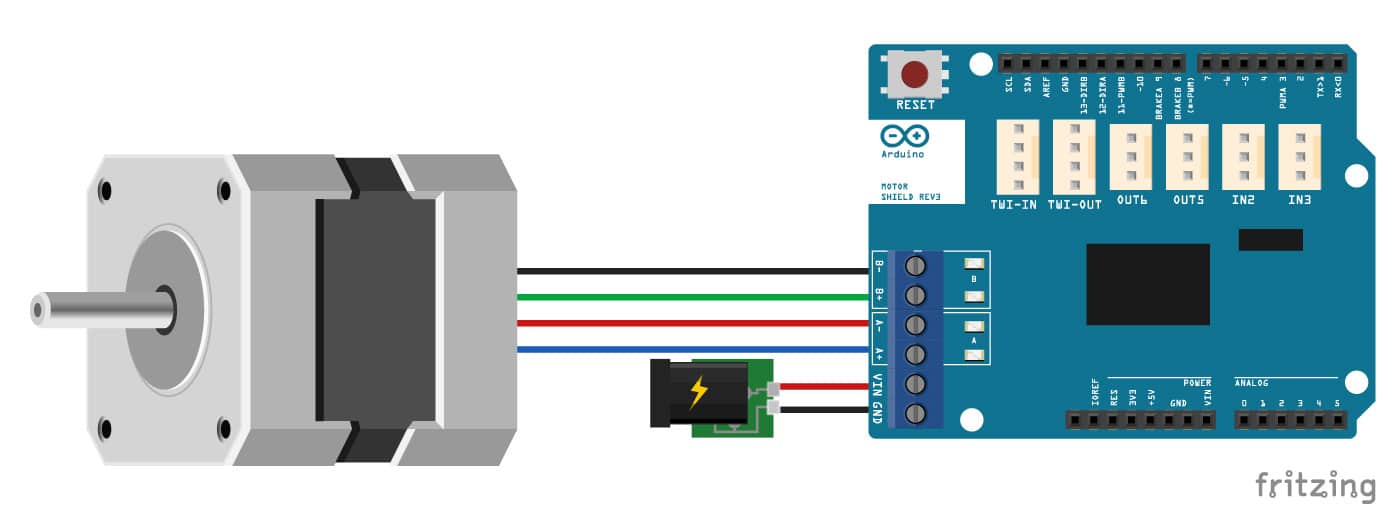
The connections are also given in the table below.
Arduino Motor Shield Rev3 Connections
| Arduino Motor Shield Rev3 | Connection |
|---|---|
| Vin | 5 – 12 V |
| GND | Power supply ground |
| A- | Coil 1 of the stepper motor |
| A+ | Coil 1 of the stepper motor |
| B- | Coil 2 of the stepper motor |
| B+ | Coil 2 of the stepper motor |
Warning
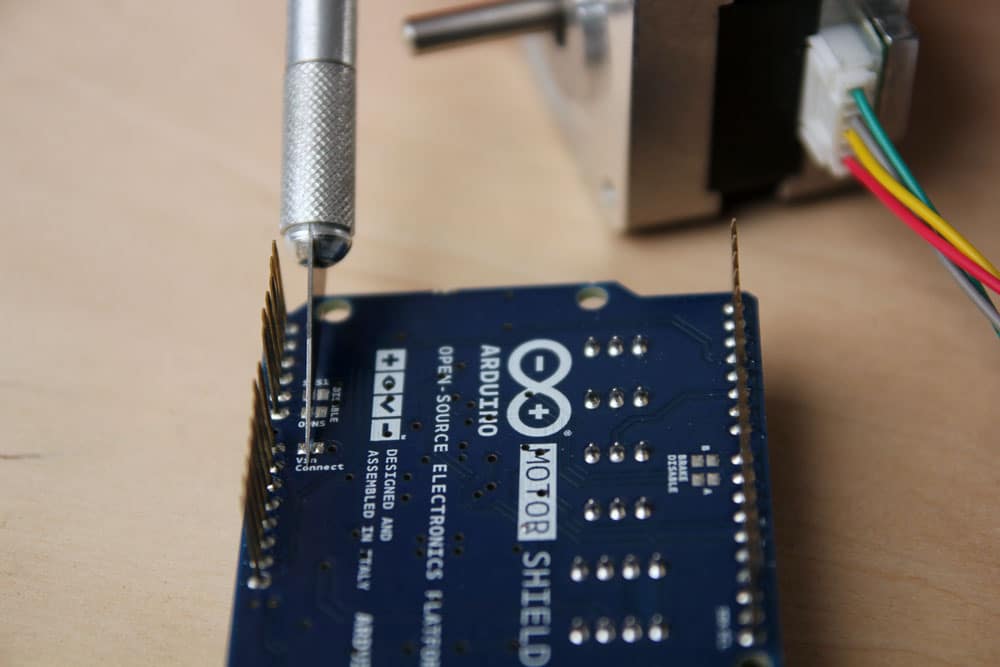
It is possible to directly power the shield from the Arduino, but this is not recommended. When the stepper motor draws too much current, you can damage both the shield and the Arduino. I therefore recommend to use an external power supply for the motors.
To do this you have to cut the Vin Connect jumper on the back of the shield. After doing this you can power the Arduino separately with a USB cable or via the 5.5 mm DC power jack.
How to determine the stepper motor wiring?
If you can not find the datasheet of your stepper motor, it can be difficult to figure out which color wire goes where. I use the following trick to determine how to connect 4 wire bipolar stepper motors:
The only thing you need to identify is the two pairs of wires which are connected to the two coils of the motor. The wires from one coil get connected to A- and A+ and the other to B- and B+, the polarity doesn’t matter.
To find the two wires from one coil, do the following with the motor disconnected:
- Try to spin the shaft of the stepper motor by hand and notice how hard it is to turn.
- Now pick a random pair of wires from the motor and touch the bare ends together.
- Next, while holding the ends together, try to spin the shaft of the stepper motor again.
If you feel a lot of resistance, you have found a pair of wires from the same coil. If you can still spin the shaft freely, try another pair of wires. Now connect the two coils to the pins shown in the wiring diagram above.
Basic Arduino example code for stepper motor and Arduino Motor Shield with Stepper.h library
You can upload the following example code to your Arduino using the Arduino IDE.
This example uses the Stepper.h library, which should come pre-installed with the Arduino IDE. This sketch turns the stepper motor 1 revolution in one direction, pauses, and then turns 1 revolution in the other direction.
/* Example sketch to control a stepper motor with
  Arduino Motor Shield Rev3, Arduino UNO and Stepper.h library.
  More info: https://www.makerguides.com */

#include "Stepper.h"

// Define number of steps per revolution:
const int stepsPerRevolution = 200;

// Give the motor control pins names:
#define pwmA 3
#define pwmB 11
#define brakeA 9
#define brakeB 8
#define dirA 12
#define dirB 13

// Initialize the stepper library on the motor shield:
Stepper myStepper = Stepper(stepsPerRevolution, dirA, dirB);

void setup() {
  // Set the PWM and brake pins so that the direction pins can be used to control the motor:
  pinMode(pwmA, OUTPUT);
  pinMode(pwmB, OUTPUT);
  pinMode(brakeA, OUTPUT);
  pinMode(brakeB, OUTPUT);

  digitalWrite(pwmA, HIGH);
  digitalWrite(pwmB, HIGH);
  digitalWrite(brakeA, LOW);
  digitalWrite(brakeB, LOW);

  // Set the motor speed (RPMs):
  myStepper.setSpeed(60);
}


void loop() {
  // Step one revolution in one direction:
  myStepper.step(200);

  delay(2000);

  //Step on revolution in the other direction:
  myStepper.step(-200);

  delay(2000);
}
Code explanation:
The sketch starts by including the Stepper.h Arduino library. More information about this library can be found on the Arduino website.
#include "Stepper.h"
Next I defined how many steps the motor takes to rotate 1 revolution. In this example we will be using the motor in full-step mode. This means it takes 200 steps to rotate 360 degrees. You can change this value if you want if you are using a different type of stepper motor or setup.
// Define number of steps per revolution:
const int stepsPerRevolution = 200;
After this, we define the motor connections (see specifications and wiring diagram above).
The statement #define is used to give a name to a constant value. The compiler will replace any references to this constant with the defined value when the program is compiled. So everywhere you mention pwmA, the compiler will replace it with the value 3 when the program is compiled.
// Give the motor control pins names:
#define pwmA 3
#define pwmB 11
#define brakeA 9
#define brakeB 8
#define dirA 12
#define dirB 13
Next, you need to create a new instance of the Stepper class, which represents a particular stepper motor connected to the Arduino. For this we use the function Stepper(steps, pin1, pin2) where steps is the number of steps per revolution and pin1 and pin2 are the pins used to drive the stepper motor. In our case this are dirA and dirB.
// Initialize the stepper library on the motor shield:
Stepper myStepper = Stepper(stepsPerRevolution, dirA, dirB);
In this case I called the stepper motor ‘myStepper’ but you can use other names as well, like ‘z_motor’ or ‘liftmotor’ etc. Stepper liftmotor = Stepper(stepsPerRevolution, dirA, dirB);.
In the setup, we start by setting the brake and PWM pins as output with the function pinMode(). The PWM pins need to be set HIGH and the brake pins LOW with the function digitalWrite().
  // Set the PWM and brake pins so that the direction pins can be used to control the motor:
  pinMode(pwmA, OUTPUT);
  pinMode(pwmB, OUTPUT);
  pinMode(brakeA, OUTPUT);
  pinMode(brakeB, OUTPUT);

  digitalWrite(pwmA, HIGH);
  digitalWrite(pwmB, HIGH);
  digitalWrite(brakeA, LOW);
  digitalWrite(brakeB, LOW);
You can set the speed of the motor in rpm with the function setSpeed(rpm). I set it to 60, so we should see 1 revolution per second.
  // Set the motor speed (RPMs):
  myStepper.setSpeed(60);
Loop
In the loop section of code, we simply call the step(steps) function which turns the motor a specific number of steps at a speed determined by the setSpeed(rpm) function. Passing a negative number to this function reverses the spinning direction of the motor.
void loop() {
  // Step one revolution in one direction:
  myStepper.step(200);

  delay(2000);

  //Step on revolution in the other direction:
  myStepper.step(-200);

  delay(2000);
}
Note that the step(steps) function is blocking, this means it will wait until the motor has finished moving to pass control to the next line in your sketch.
Example codes for Arduino Motor Shield and AccelStepper library
In the following three examples I will show you how you can control both the speed, the direction, and the number of steps the stepper motor should take. In these examples, I will be using the AccelStepper library.
The AccelStepper library written by Mike McCauley is an awesome library to use for your project. One of the advantages is that it supports acceleration and deceleration, but it has a lot of other nice functions too.
You can download the latest version of this library here or click the button below.
You can install the library by going to Sketch > Include Library > Add .ZIP Library… in the Arduino IDE.
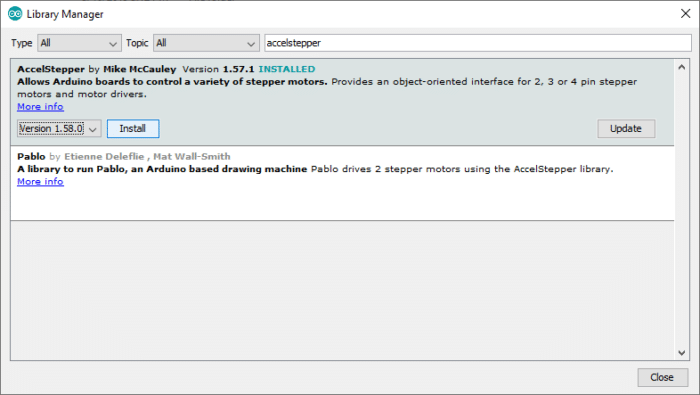
Another option is to navigate to Tools > Manage Libraries… or type Ctrl + Shift + I on Windows. The Library Manager will open and update the list of installed libraries.
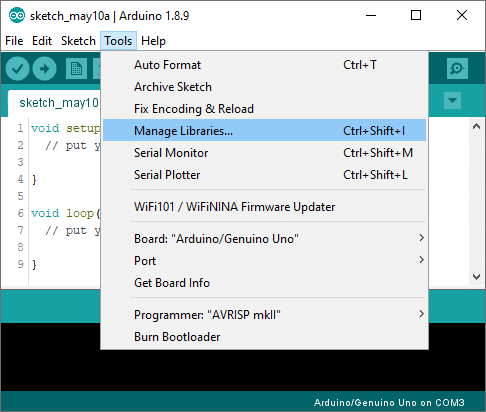
You can search for ‘accelstepper‘ and look for the library by Mike McCauley. Select the latest version and then click Install.
1. Continuous rotation example code
The following sketch can be used to run one or more stepper motors continuously at a constant speed. (No acceleration or deceleration is used).
You can copy the code by clicking on the button in the top right corner of the code field.
/* Example sketch to control a stepper motor with
   Arduino Motor Shield Rev3, Arduino UNO and AccelStepper.h library:
   continuous rotation. More info: https://www.makerguides.com */

// Include the AccelStepper library:
#include "AccelStepper.h"

// Define number of steps per revolution:
const int stepsPerRevolution = 200;

// Give the motor control pins names:
#define pwmA 3
#define pwmB 11
#define brakeA 9
#define brakeB 8
#define dirA 12
#define dirB 13

// Define the AccelStepper interface type:
#define MotorInterfaceType 2

// Create a new instance of the AccelStepper class:
AccelStepper stepper = AccelStepper(MotorInterfaceType, dirA, dirB);

void setup() {
  // Set the PWM and brake pins so that the direction pins can be used to control the motor:
  pinMode(pwmA, OUTPUT);
  pinMode(pwmB, OUTPUT);
  pinMode(brakeA, OUTPUT);
  pinMode(brakeB, OUTPUT);

  digitalWrite(pwmA, HIGH);
  digitalWrite(pwmB, HIGH);
  digitalWrite(brakeA, LOW);
  digitalWrite(brakeB, LOW);

  // Set the maximum steps per second:
  stepper.setMaxSpeed(600);
}

void loop() {
  // Set the speed of the motor in steps per second:
  stepper.setSpeed(500);
  // Step the motor with constant speed as set by setSpeed():
  stepper.runSpeed();
}
How the code works:
Again the first step is to include the library with #include <AccelStepper.h>.
#include "AccelStepper.h"
After specifying the connections like before, we need to define the motor interface type for the AccelStepper library. In this case we will be driving the stepper motor in full step mode, with two wires, so we set the mode to 2. You can find the other interface types here.
// Define the AccelStepper interface type:
#define MotorInterfaceType 2
Next, you need to create a new instance of the AccelStepper class with the appropriate motor interface type and connections.
In this case I called the stepper motor ‘stepper’ but you can use other names as well, like ‘z_motor’ or ‘liftmotor’ etc. AccelStepper liftmotor = AccelStepper(MotorInterfaceType, dirA, dirB);.
// Create a new instance of the AccelStepper class:
AccelStepper stepper = AccelStepper(MotorInterfaceType, dirA, dirB);
The setup section of the code is mostly the same as the previous example, but I also defined the maximum speed in steps/second. Speeds of more than 1000 steps per second can be unreliable, so I set it to 600 (you will have to experiment to see what the maximum speed is for your setup). Note that I specify the name of the stepper motor (‘stepper’), for which I want to define the maximum speed.
  // Set the maximum steps per second:
  stepper.setMaxSpeed(600);
Loop
In the loop section, we first set the speed that we want the motor to run at with the function setSpeed(). (you can also place this in the setup section of the code).
The function stepper.runSpeed() polls the motor and when a step is due it executes 1 step. This depends on the set speed and the time since the last step. If you want to change the direction of the motor, you can set a negative speed: stepper.setSpeed(-400); turns the motor the other way.
void loop() {
  // Set the speed of the motor in steps per second:
  stepper.setSpeed(500);
  // Step the motor with constant speed as set by setSpeed():
  stepper.runSpeed();
}
2. Sketch to control the number of steps or revolutions
With the following sketch, you can control both the speed, direction, and the number of steps/revolutions. No acceleration or deceleration is used.
In this case, the stepper motor turns 1 revolution clockwise with 400 steps/sec, then turns 1 revolution counterclockwise at 200 steps/sec, and lastly turns 3 revolutions clockwise at 600 steps/sec.
/* Example sketch to control a stepper motor with
  Arduino Motor Shield Rev3, Arduino UNO and
  AccelStepper.h library: number of steps or revolutions.
  More info: https://www.makerguides.com */

#include "AccelStepper.h"

// Define number of steps per revolution:
const int stepsPerRevolution = 200;

// Give the motor control pins names:
#define pwmA 3
#define pwmB 11
#define brakeA 9
#define brakeB 8
#define dirA 12
#define dirB 13

// Define the AccelStepper interface type:
#define MotorInterfaceType 2

// Create a new instance of the AccelStepper class:
AccelStepper stepper = AccelStepper(MotorInterfaceType, dirA, dirB);

void setup() {
  // Set the PWM and brake pins so that the direction pins can be used to control the motor:
  pinMode(pwmA, OUTPUT);
  pinMode(pwmB, OUTPUT);
  pinMode(brakeA, OUTPUT);
  pinMode(brakeB, OUTPUT);

  digitalWrite(pwmA, HIGH);
  digitalWrite(pwmB, HIGH);
  digitalWrite(brakeA, LOW);
  digitalWrite(brakeB, LOW);

  // Set the maximum steps per second:
  stepper.setMaxSpeed(600);
}

void loop() {
  // Set the current position to 0:
  stepper.setCurrentPosition(0);

  // Run the motor forward at 400 steps/second until the motor reaches 200 steps (1 revolution):
  while (stepper.currentPosition() != 200) {
    stepper.setSpeed(400);
    stepper.runSpeed();
  }

  delay(1000);

  // Reset the position to 0:
  stepper.setCurrentPosition(0);

  // Run the motor backwards at 200 steps/second until the motor reaches -200 steps (1 revolution):
  while (stepper.currentPosition() != -200) {
    stepper.setSpeed(-200);
    stepper.runSpeed();
  }

  delay(1000);

  // Reset the position to 0:
  stepper.setCurrentPosition(0);

  // Run the motor forward at 600 steps/second until the motor reaches 600 steps (3 revolutions):
  while (stepper.currentPosition() != 600) {
    stepper.setSpeed(600);
    stepper.runSpeed();
  }

  delay(3000);
}
Code explanation
The first part of the code up to the loop() section is exactly the same as in the previous example.
In the loop I make use of a while loop in combination with the currentPosition() function. First, I set the current position of the stepper motor to zero with stepper.setCurrentPosition(0).
  // Set the current position to 0:
  stepper.setCurrentPosition(0);
Next we make use of the while loop. A while loop will loop continuously, and infinitely, until the expression inside the parenthesis, () becomes false. So in this case I check if the current position of the stepper motor is not equal to 200 steps (!= means: is not equal to). While this is not the case, we run the stepper motor at a constant speed as set by setSpeed().
  // Run the motor forward at 400 steps/second until the motor reaches 200 steps (1 revolution):
  while (stepper.currentPosition() != 200) {
    stepper.setSpeed(400);
    stepper.runSpeed();
  }
In the rest of the loop, we do exactly the same, just with a different speed and target position.
3. Acceleration and deceleration example code
In this example we will look at one of the main features of the AccelStepper library: adding acceleration and deceleration.
With the following sketch you can add acceleration and deceleration to the movements of the stepper motor, without any complicated coding. The first section of this sketch is the same as in example 1, but the setup and the loop are different.
The motor will run five revolutions back and forth with a speed of 200 steps per second and an acceleration of 50 steps/second2.
/* Example sketch to control a stepper motor with
  Arduino Motor Shield Rev3, Arduino UNO and
  AccelStepper.h library: acceleration and deceleration
  More info: https://www.makerguides.com */

#include <AccelStepper.h>

// Define number of steps per revolution:
const int stepsPerRevolution = 200;

// Give the motor control pins names:
#define pwmA 3
#define pwmB 11
#define brakeA 9
#define brakeB 8
#define dirA 12
#define dirB 13

// Define the AccelStepper interface type:
#define MotorInterfaceType 2

// Create a new instance of the AccelStepper class:
AccelStepper stepper = AccelStepper(MotorInterfaceType, dirA, dirB);

void setup() {
  // Set the PWM and brake pins so that the direction pins can be used to control the motor:
  pinMode(pwmA, OUTPUT);
  pinMode(pwmB, OUTPUT);
  pinMode(brakeA, OUTPUT);
  pinMode(brakeB, OUTPUT);

  digitalWrite(pwmA, HIGH);
  digitalWrite(pwmB, HIGH);
  digitalWrite(brakeA, LOW);
  digitalWrite(brakeB, LOW);

  // Set the maximum steps per second:
  stepper.setMaxSpeed(200);
  // Set the maximum acceleration in steps per second^2:
  stepper.setAcceleration(50);
}

void loop() {
  // Set target position:
  stepper.moveTo(1000);
  // Run to position with set speed and acceleration:
  stepper.runToPosition();

  delay(1000);

  // Move back to original position:
  stepper.moveTo(0);
  // Run to position with set speed and acceleration:
  stepper.runToPosition();

  delay(1000);
}
How the code works
In the setup, besides the maximum speed, we need to define the acceleration/deceleration. For this we use the function setAcceleration().
  // Set the maximum steps per second:
  stepper.setMaxSpeed(200);
  // Set the maximum acceleration in steps per second^2:
  stepper.setAcceleration(50);
In the loop section of the code, I used a different way to let the motor rotate a predefined number of steps. First I set the target position with the function moveTo(). Next, we simply use the function runToPosition() to let the motor run to the target position with the set speed and acceleration. The motor will decelerate before reaching the target position.
  // Set target position:
  stepper.moveTo(1000);
  // Run to position with set speed and acceleration:
  stepper.runToPosition();
Finally, we set the new target position back to the 0, so that we return to the origin.
Conclusion
In this article, I have shown you how you can control a stepper motor with the Arduino Motor Shield Rev3. We have looked at 4 examples, using both the Stepper and AccelStepper library. I hope you found it useful and informative. If you did, please share it with a friend that also likes electronics!
I would love to know what projects you plan on building (or have already built) with this Arduino Motor Shield. If you have any questions, suggestions, or if you think that things are missing in this tutorial, please leave a comment down below.
Note that comments are held for moderation to prevent spam.
Benne is professional Systems Engineer with a deep expertise in Arduino and a passion for DIY projects.
Morgan
Saturday 9th of March 2024
In the picture at the beginning of the tutorial the motor shield and Arduino are mounted in plastic cases. Where did you get them? I cannot find them anywhere.
Stefan Maetschke
Sunday 10th of March 2024
I don't know where to find a case for the motor shield either. For the Arduino itself, I use this one: https://amzn.to/4ca3GZb
Ollivier
Monday 9th of October 2023
Dear people, Thank to you with the webpage, it works fine with my stepper motor. Edern Ollivier.
Stefan Maetschke
Wednesday 11th of October 2023
Thanks, good to hear ; )
Alex
Tuesday 17th of January 2023
Hi There,
Thanks so much for the tutorial. Is there any way this could be combined with a potentiometer to control the motor speed, or is there an Arduino programme that I could run where I could control the speed of the motor in real time. Being able to fine tune the exact rate of rotation would be very useful to the project I am currently doing.
Once again thank you for this post
Best Wishes
Alex
Axel
Monday 2nd of January 2023
Hi,
I am building a camera slider so I bought a linear slider together with a stepper motor. I am going to control that with an Arduino Uno R3 and an Arduino Motor Shield (L298P). The external power supply is adjusted to 12VDC and I limited its output current to 1.5A. I followed your code examples (THANKS a lot for providing all these variants!)
Issue: - When I power up while the motor connected, it just clicks and doesn't move. Sometimes, I need to disconnect and reconnect the motor and it works. Sometimes, it doesn't. - When I power up while the motor disconnected and then connect the motor, it moves as expected. BUT: The motor shield gets hot. - A soon as the motor is connected, the voltage of the supply drops down from 12V to 6V. - Same behavior with higher current limit. - Same behavior with "stepper" library and "AccelStepper" library.
I assume the driver and the motor don't fit together: The stepper specifications: NEMA 17 Schrittwinkel: 1,8 Grad (200 steps) Motorflanschgröße: 42 mm. Motorlänge: 47 mm. Haltemoment: 1,2 N.m Spannung: 24 V max Stromstärke: 1,5 A. Widerstand: 0,8 Ohm <--- !!! Induktivität: 2,4 mH Rotor-Trägheit: 87,3 g.
I want to keep that stepper because it is one assembled mechnical unit and I don't want to get any unaccuracy.
Which driver do you recommend? Should I use DRV8825? Or is it a good idea to connect a 10 Ohms 20W resistor in series to each coil and keep the L298P?
Best regards, Axel