This tutorial will provide the essential details about the Potentiometer and how to use Arduino to control LED brightness with the Potentiometer.
You will learn how to generate the Pulse Width Modulation (PWM) with different duty cycles to adjust the brightness of LED with potentiometer.
With PWM signals you can set a different power to LED and hence the brightness of LED will vary.
Hardware components
| Arduino Uno Rev3 | x1 | Amazon |
| Arduino Mega (Optional) | x1 | Amazon |
| LED | x1 | Amazon |
| 220Ω Resistor | x1 | Amazon |
| 10K Potentiometer | x1 | Amazon |
| Breadboard | x1 | Amazon |
| Jumper wires | x15 | Amazon |
| USB cable type A/B | x1 | Amazon |
Software
| Arduino IDE | Arduino IDE |
Makerguides.com is a participant in the Amazon Services LLC Associates Program, an affiliate advertising program designed to provide a means for sites to earn advertising fees by advertising and linking to products on Amazon.com.
What is a resistor?
The resistor is an electrical component that regulates or reduces the flow of electric current in electrical circuits.
There are many different types of resistors. Some are for special applications, like being used as variable resistors.
It doesn’t have a specific value, and the values can change with the help of a dial, knob, and screw.
What is a Potentiometer?
A potentiometer, or pot, is an electro-mechanical resistor. It contains three terminals and is the most commonly used variable resistor.
The resistance is manually varied to control the flow of electric current. It acts as an adjustable voltage divider.
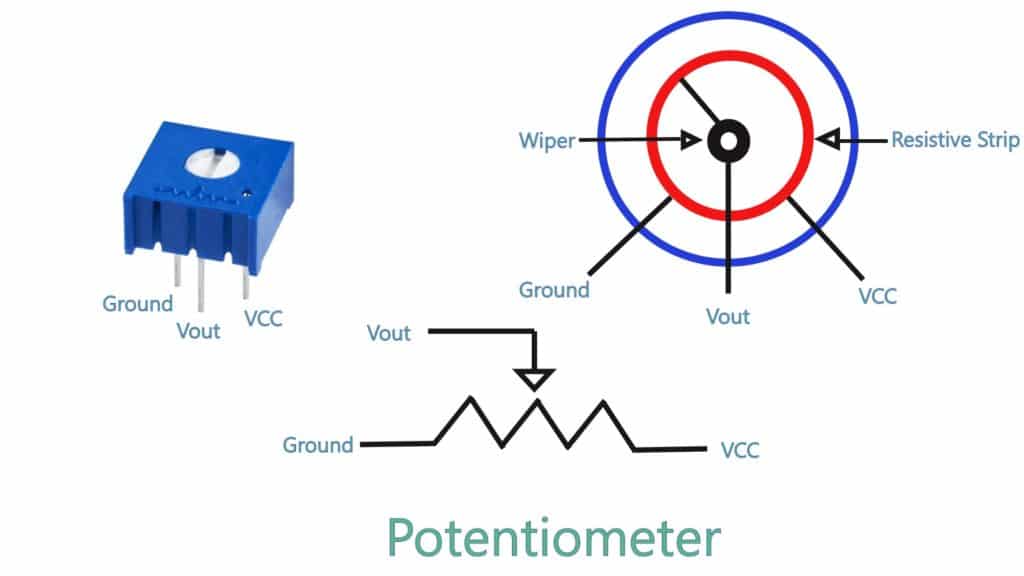
Potentiometer Pin Configuration
| Pin No. | Pin Name | Description |
| 1 | Ground | This end To connect the Ground |
| 2 | Output | This end is connected to the wiper to provide variable voltage |
| 3 | VCC | This end is required to power the module. |
How do you use a potentiometer with an Arduino with LED?
Wiring Diagram
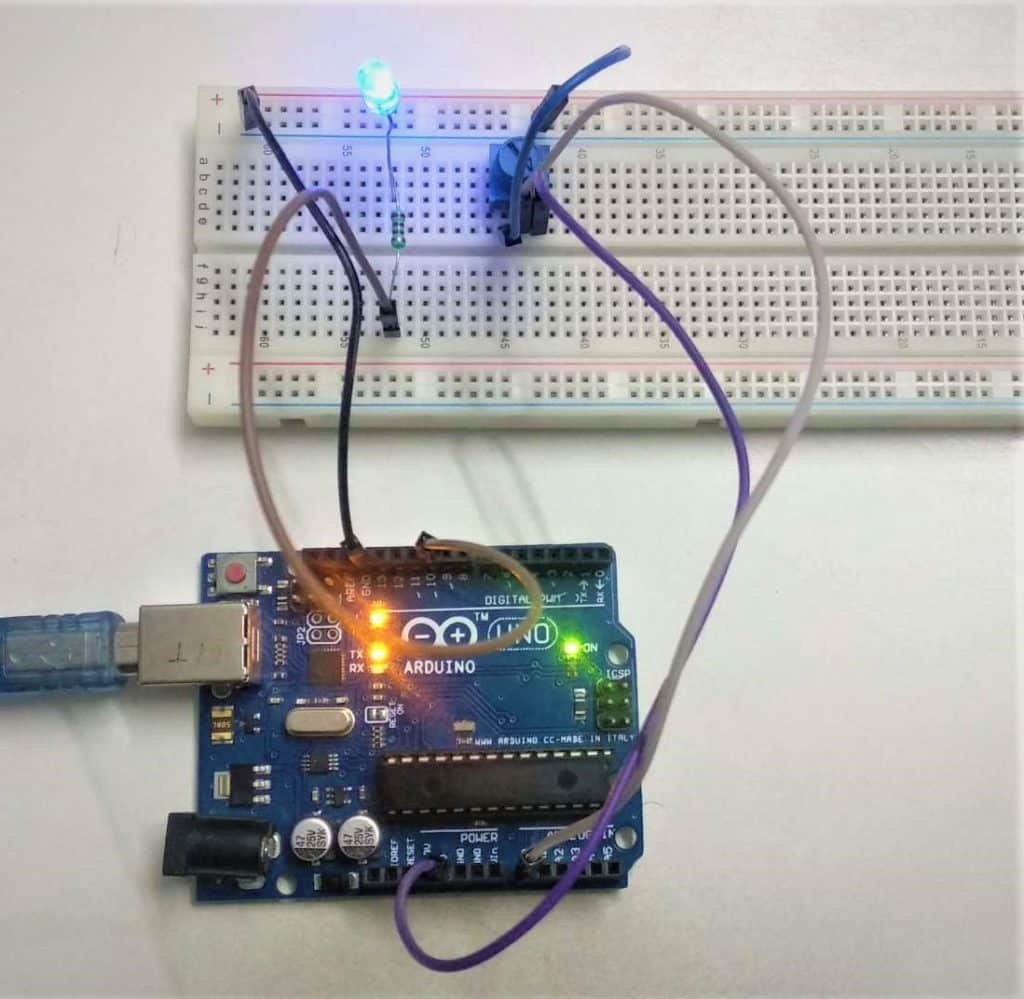
Following section provides the details about wiring of LED and potentiometer with Arduino Uno board.
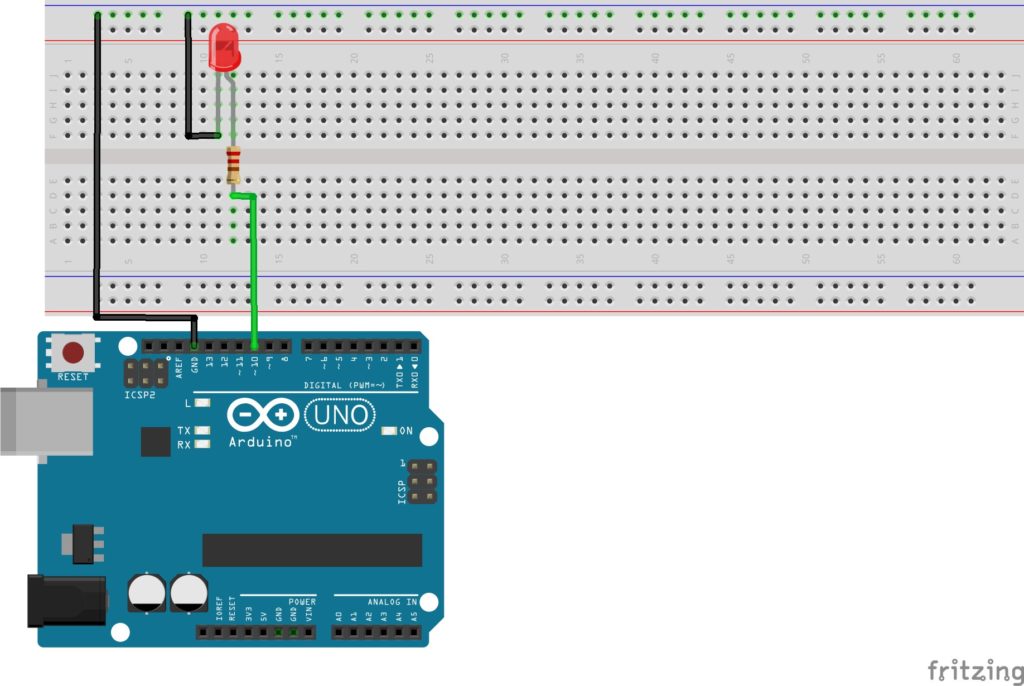
How To Add LED With Arduino board
It is straightforward to connect LEDs to the Arduino Board.
Step 1: Firstly, Connect the LED cathode (-) to the Ground.
Step 2: Plug the Anode (+) of the LED to 220 Ohm resistor to digital pin 10 of the Arduino.
It is better to take common Ground for all, and you can connect the Arduino ground, and cathode of the LED to the breadboard.
With this connection, you can turn ON and OFF the LED using Arduino Uno.
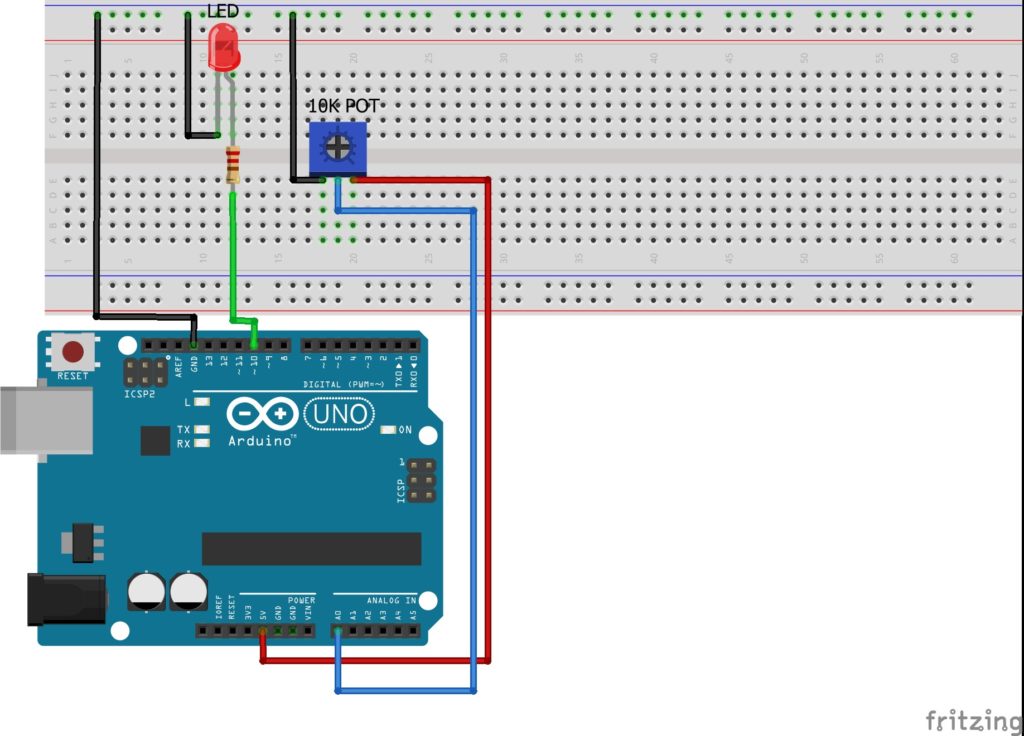
How To Add Potentiometer With Arduino board
Step 1: Plug the three legs of the potentiometer into three different lines on the breadboard.
Step 2: Connect the potentiometer terminal 1 to the Ground.
Step 3: Connect the potentiometer terminal 3 to +5V VCC on the Arduino.
Step 4: And terminal 2 is connected to the A0 pin of the Arduino Uno board. You can read the output from terminal 2 of the potentiometer.
How does a potentiometer light up an LED?
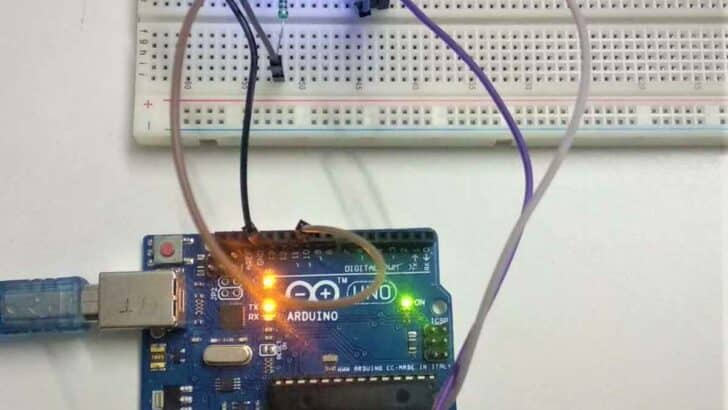
When you rotate the potentiometer knob, the output voltage is changed, and the Arduino Uno reads this changing output voltage as the input voltage.
And connected LEDs light up, and also brightness varies.
After the above steps, your hardware is ready to use to control the LED brightness with potentiometer.
Arduino Code For Potentiometer With LED
#define Blink_LED 10
#define POT_PIN   A0

void setup() {
  Serial.begin(9600);
  pinMode(Blink_LED, OUTPUT);
}

void loop() {
  // reads the input on analog pin A0 (value between 0 and 1023)
  int In_POT_Value = analogRead(POT_PIN);

  // scales it to brightness (value between 0 and 255)
  int Brightness = map(In_POT_Value, 0, 1023, 0, 255);

  // sets the brightness LED that connects to  pin 3
  analogWrite(Blink_LED, Brightness);

  // print out the value
  if((In_POT_Value >= 0 && In_POT_Value <=1023) || (Brightness>=0 && Brightness<=255)) {
    Serial.print("POT Value: ");
    Serial.print(In_POT_Value);
    Serial.print(", Brightness Value: ");
    Serial.println(Brightness);
  }
  else
  {
    Serial.println("Undefined value");
  }

  delay(500);
  Serial.println("*******************************************");
}
How The Code Works
Step 1: First, I define the LED on the Arduino 10 Pin. The Potentiometer determines an Arduino A0 Pin, which is an Analog pin.
#define Blink_LED 10
#define POT_PIN   A0
Step 2:
void setup() {
  Serial.begin(9600);
  pinMode(Blink_LED, OUTPUT);
}
In the setup() function, set up the baud rate at 9600 speed using Serial.begin(); function.
You want to control the LED, so you must choose the OUTPUT mode using the pinMode(); function.
Step 3:
void loop() {
  // reads the input on analog pin A0 (value between 0 and 1023)
  int In_POT_Value = analogRead(POT_PIN);

  // scales it to brightness (value between 0 and 255)
  int Brightness = map(In_POT_Value, 0, 1023, 0, 255);

  // sets the brightness LED that connects to  pin 3
  analogWrite(Blink_LED, Brightness);

  // print out the value
  if((In_POT_Value >= 0 && In_POT_Value <=1023)|| (Brightness>=0 && Brightness<=255)) {
    Serial.print("POT Value: ");
    Serial.print(In_POT_Value);
    Serial.print(", Brightness Value: ");
    Serial.println(Brightness);
  }
  else
  {
    Serial.println("Undefined value");
  }

  delay(500);
  Serial.println("*******************************************");
}

int In_POT_Value = analogRead(POT_PIN);
In the void loop() function, read the value from the analog pin connected to the potentiometer.
This value is between 0 and 1023.
How does an Arduino control the brightness of LED using a potentiometer?
Take a sample of the potentiometer with an A0 pin of the Arduino, which has a resolution of 1024 values (10 bits), and convert the potentiometer output voltage into an integer value between the range of 0 to 1023 volts as input.
For this purpose, I have used the analogRead() function.
Using the analogRead(); function to read input voltage values by the potentiometer, and then use the analogWrite() function to control the brightness of the LED light.
Step 4: int Brightness = map(In_POT_Value, 0, 1023, 0, 255);
The map() function easily converts a value from one range into a proportional value of another range.
And a common use is to read analog input and change the output to a byte so the output would be from 0 to 255.
I have read the potentiometer’s value. With the map() function, Map analog values 0-1024 to change pulse width modulation values 0-255.
You can understand the go deep following this link Arduino map() function.
Step 5: analogWrite(Blink_LED, Brightness);
How To Generate Pulse Width Modulation?
You can generate the PWM using the analogWrite() function.
analogWrite() function is used to light a LED at varying brightnesses.
After a call to analogWrite(), the pin will generate a square wave of the specified duty cycle until the next call to analogWrite().
analogWrite(0) means a signal of 0% duty cycle.
analogWrite(127) means a signal of 50% duty cycle.
analogWrite(255) means a signal of 100% duty cycle.
Step 6:
  if((In_POT_Value >= 0 && In_POT_Value <=1023) || (Brightness>=0 && Brightness<=255))
  {
    Serial.print("POT Value: ");
    Serial.print(In_POT_Value);
    Serial.print(", Brightness Value: ");
    Serial.println(Brightness);
  }
  else
  {
    Serial.println("Undefined value");
  }
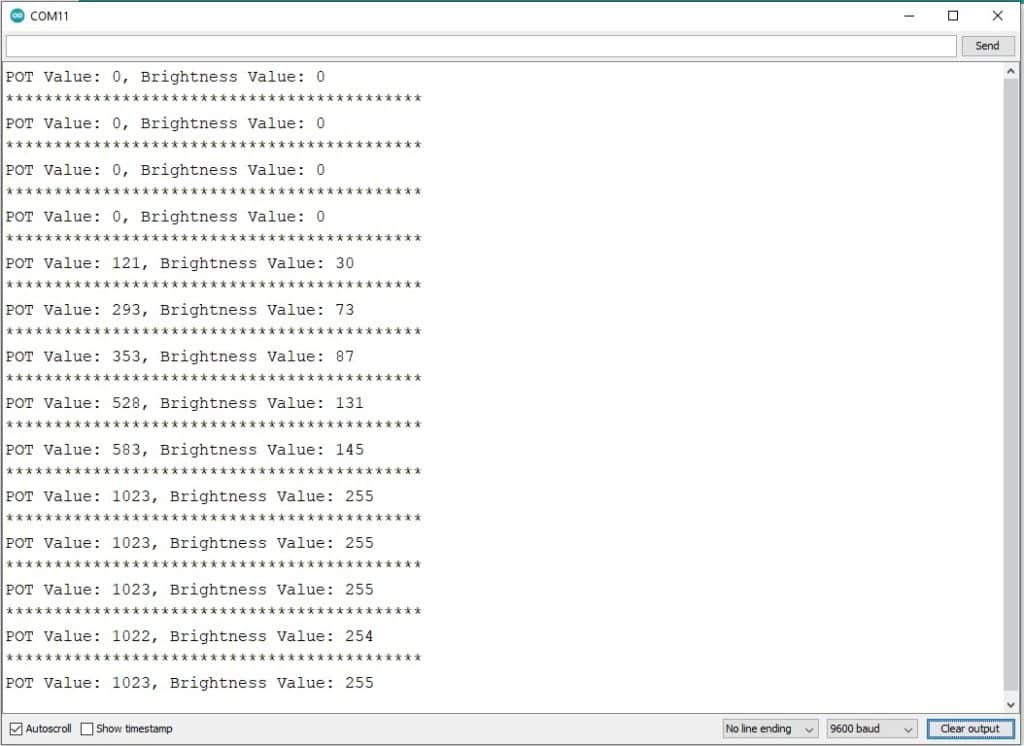
If the potentiometer value is 0 to 1023 and the brightness is 0 to 255, then print the value on the serial terminal.
Otherwise, the message on the serial terminal is an Undefined value.
Output On The Serial Terminal
How do I turn ON the LED on my Arduino?
By turning the Potentiometer’s shaft position change, the brightness of the LED varies depending upon shaft position.
Using digitalWrite(); function LED turns to ON. If analogWrite(); value is 255, the brightness of the LED is maximum.
You can refer to the OUTPUT of the serial monitor.
How do I turn Off the LED on my Arduino?
Using digitalWrite(); function LED turns to OFF. If analogWrite(); value is 0, brightness of the LED is minimum.

Conclusion
In this article, you have learned about the basics of a Potentiometer and how to use a Potentiometer with an Arduino Uno board to control the LED brightness.
I hope you found this article informative. I would love to know what project you plan on building or have already made with the Arduino.
If you have any queries or suggestions or think things are missing in this tutorial, please comment below.
Note that comments are held for moderation to prevent spam.

Hiren is a professional Embedded Engineer with a Master’s Degree
in Electronics and Communication Engineering. He is proficient in C and
C++ and enjoys building DIY projects on Arduino, ESP32, PIC32, STM32 & Raspberry PI boards.