Do you know that oxygen sensors are widely used to save thousands of lives? The sensors monitor air quality in hospitals, houses, mines, industries, and labs.
The oxygen sensor is used in smart home projects, IoT applications and more.
The sensors help to warn and remove the danger of suffocation where airflow is limited.
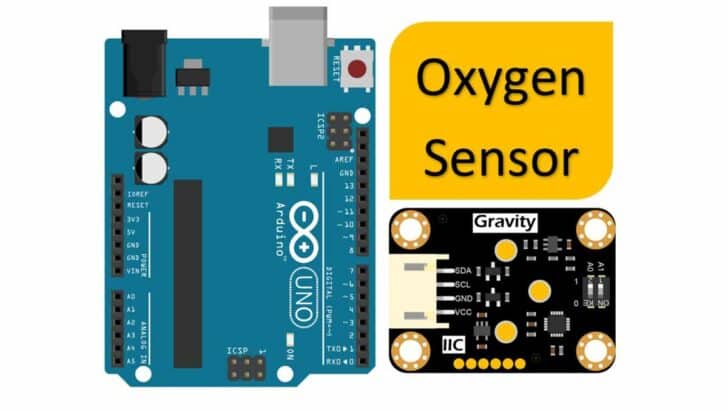
In this tutorial, the DFrobot oxygen sensor is covered in detail.
You will learn about the sensor, interface, features, and applications.
I also share with you example code and connection diagrams.
At the end of the article, you will find a collection of the most frequently asked questions on the oxygen sensor modules with answers.
Let’s get started!
Components Needed To Build Arduino And Oxygen Sensor Project
Hardware Components
- Dupont wire x 1 set
- Arduino USB cable (for powering Arduino and programming) x 1
Software
Makerguides.com is a participant in the Amazon Services LLC Associates Program, an affiliate advertising program designed to provide a means for sites to earn advertising fees by advertising and linking to products on Amazon.com.
Basics of The Oxygen Sensor By DFRobot
In this section, we will understand the basics of the Oxygen sensor by DFRobot.
The Oxygen sensor SEN0322 is a very accurate and easy-to-use sensor.
The sensor is widely used in air quality monitoring systems in mines, industries, etc., because of its high reliability and stability.
In this section, we will learn about the features, connections, pin descriptions, and applications of oxygen sensors.
The oxygen sensor is a critical part in the system of sensors used to monitor air quality.
The sensor supports the I2C protocol and is compatible with both 3.3 V and 5 V systems.
Hence you can use the sensor module with several boards such as Arduino UNO, Arduino mini, Arduino mega and Raspberry Pi, etc.
Features of the DFRobot oxygen sensors
- Quick and easy sensor calibration
- High Sensitivity
- Serial I2C interface
- Supports both 3.3 V and 5 V Arduin boards
- Reverse polarity protection
- Longer sensor life
What are the specifications of the DFRobot Oxygen sensor?
The features of the sensor are listed in the table below
| Parameter | Value | Remarks |
| Operating Voltage range | 3.3 V to 5 V | Arduino UNO, Mega, Micro, Mini compatible |
| Communication interface | I2C | Arduino supports I2C communication. Use pins A5 and A4. |
| Sensor lifetime | 2 years | In the air |
| Operating temperature | -20 ℃ to 50 ℃ | |
| Operating humidity | 0 to 99 %RH | |
| Measurement range | 0 to 25 %vol | The air atmosphere is about 78% Nitrogen and 21% oxygen. Hence, 25% covers very good |
| Maximum measurement limit | 30% vol | The atmospheric oxygen is about 21% |
| Stability | < 2% | |
| Response time | <15 sec | Minimum amount of time to consider the change of oxygen levels |
| Resolution | 0.15 % vol |
The response time is the time the sensor takes to read 63% of the final value of the atmospheric oxygen.
Hence, you can wait a minute or two to get accurate readings.
Let us have a look at the pinout and the components on the board in the next section.
| Pin name | Pin function |
| SDA | I2C serial data pin |
| SCL | I2C serial clock pin |
| GND | Ground |
| VCC | Power Supply |
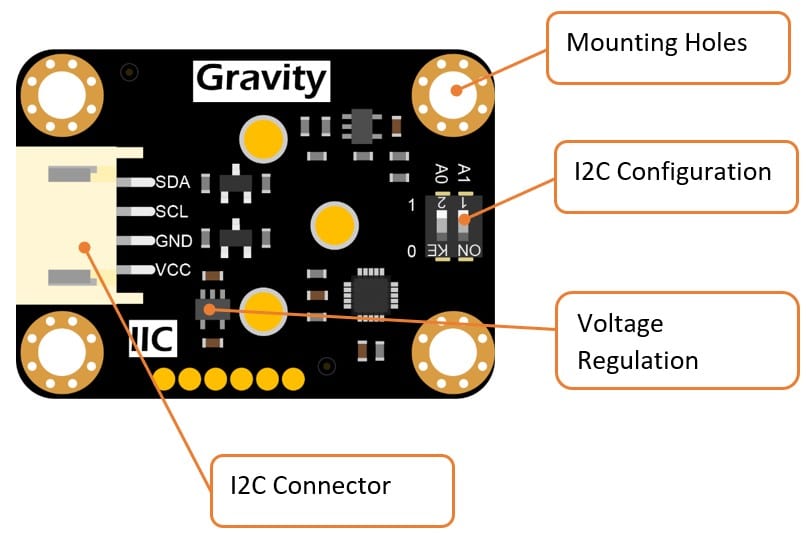
Board configuration and pinout
The below image shows the top view of the oxygen sensor module.
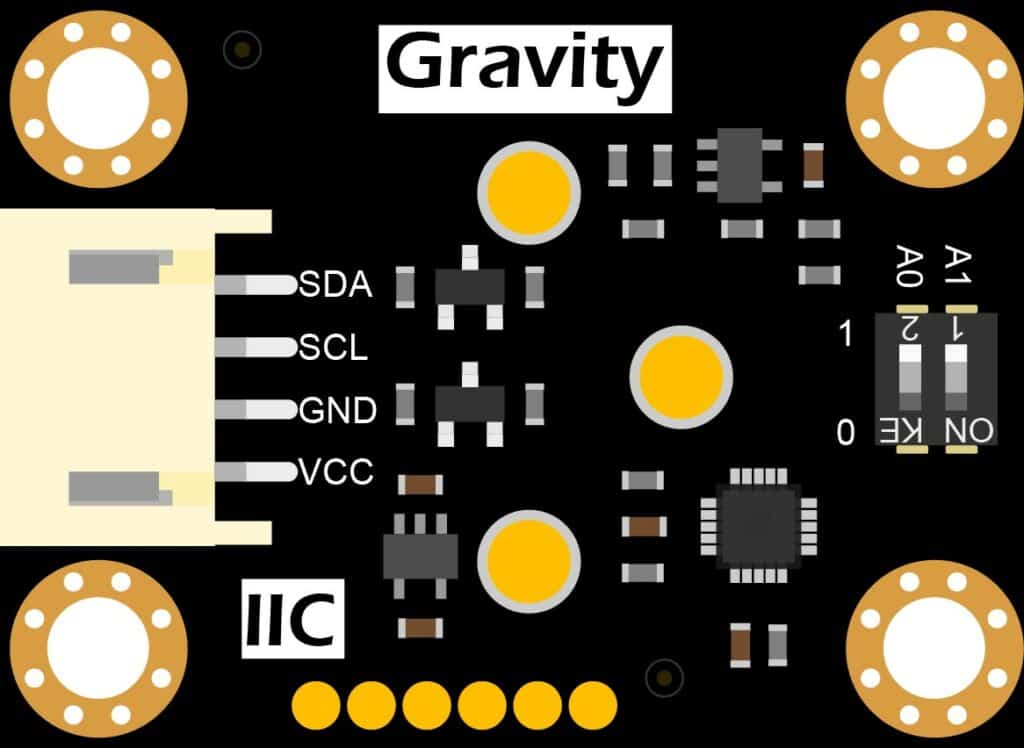
Let us understand the components and the purpose of them in the coming sections.
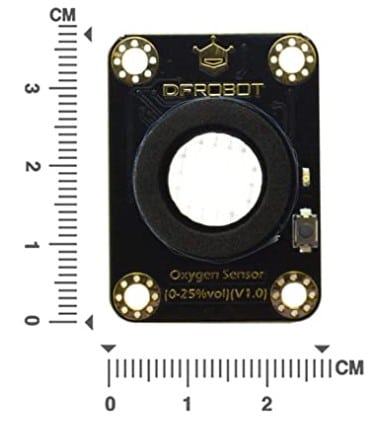
The rear side of the sensor module has the sensor.
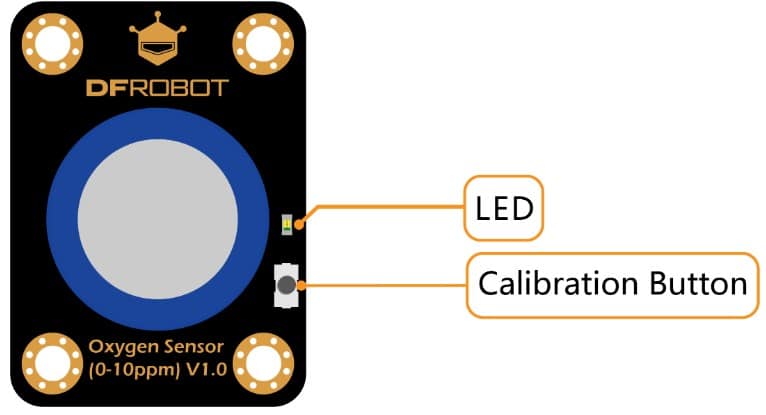
The calibration button is used to calibrate the sensor.
The I2C address of the oxygen sensor is configurable.
- ADDRESS_0:0x70, A0 = 0, A1 = 0
- ADDRESS_1:0x71, A0 = 1, A1 = 0
- ADDRESS_2:0x72, A0 = 0, A1 = 1
- ADDRESS_3:0x73, A0 = 1, A1 = 1
You can use the dials on the sensor module to set the I2C address for the sensor.
You can choose from four different addresses.
Hence, you can connect up to 4 oxygen sensors to an Arduino UNO.
| Product → | SEN0322 | SEN0465 | SEN0496 |
| Range | 0~25%Vol | 0~25%Vol | 0~100%Vol |
| Calibration Method | Manual calibration | Factory calibration | Manual calibration |
| Output Signal | I2C | I2C、UART、Analog | I2C |
| Working Principle | Electrochemical | Electrochemical | Electrochemical |
| Stability | <2%/Month | <2%/Month | <10%/Year |
| Response Time | ≤15S | ≤15S | 0.1%~20.9%<40S 20.9%~100%<5S |
| Operating Pressure Range | 101kPa±10% | 101kPa±10% | 0.5 – 2.0 Bar |
| Temperature Compensation | × | √ | × |
How to calibrate the Arduino oxygen sensor?
You can easily calibrate the oxygen sensor anytime. To calibrate the Arduino compatible DFrobot oxygen sensor, you have to follow the steps below.
- Power on the oxygen sensor
- Keep the oxygen sensor in the outdoor environment
- Monitor the sensor data and wait for the data to be stable
- Press and hold the calibration button present on the sensor module for more than 2 seconds. The calibration is done.
Step-By-Step Instructions To Connect The Oxygen Sensor With Arduino UNO
In this section, we will build a project using Arduino UNO and the DFRobot oxygen sensor.
The connections are easy to take significantly less time to complete.
The sensor communicates with the Arduino via I2C serial interface.
Let’s get started with the hardware connections!
How To Connect The Atmospheric Oxygen sensor to the Arduino UNO?
Below is the step-by-step connection guide to complete the Arduino and the oxygen sensor project.
Step 1: Start with the GND connections
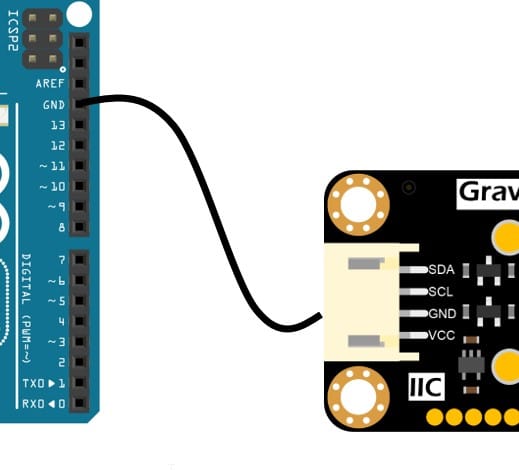
Connect the GND pin of the module to the GND of the Arduino.
Choose any GND pins available on the Arduino for the connection.
It is an excellent practice to start with the GND connections.
Step 2: Connect the I2C SCL line
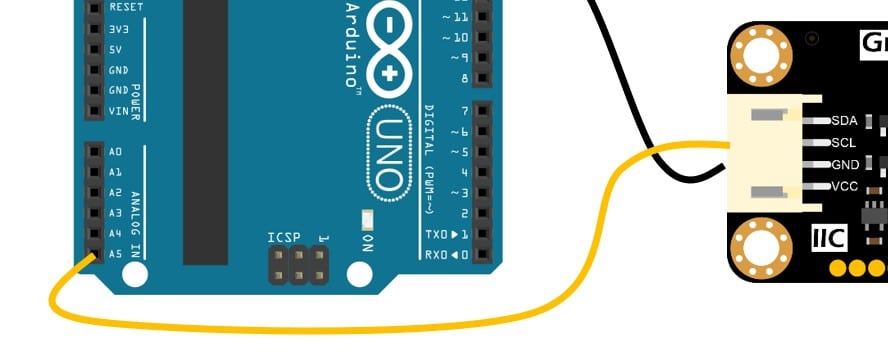
You can connect the A5 pin of the Arduino UNO to the SCL pin of the oxygen sensor.
Analog pin A5 is the I2C clock line pin of the Arduino.
Step 3: Connect the I2C SDA line
You can connect the A4 pin of the Arduino UNO to the SDA pin of the oxygen sensor.
Analog pin A4 is the I2C data line pin of the Arduino.
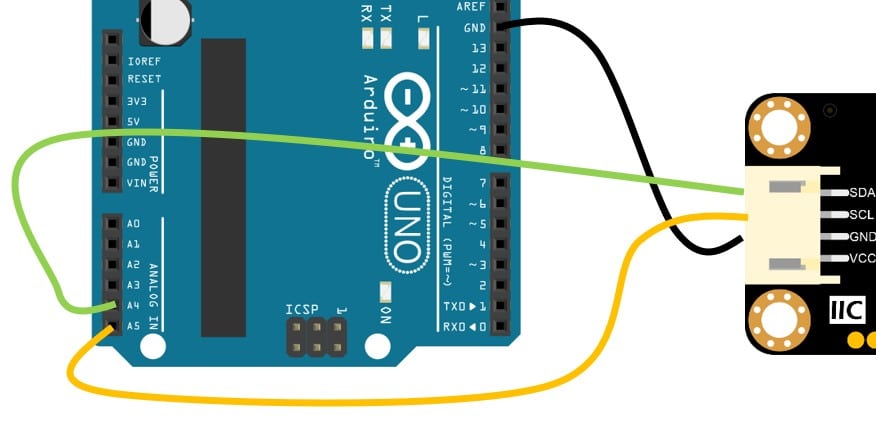
Step 4: Connect the Power line (Red wire)
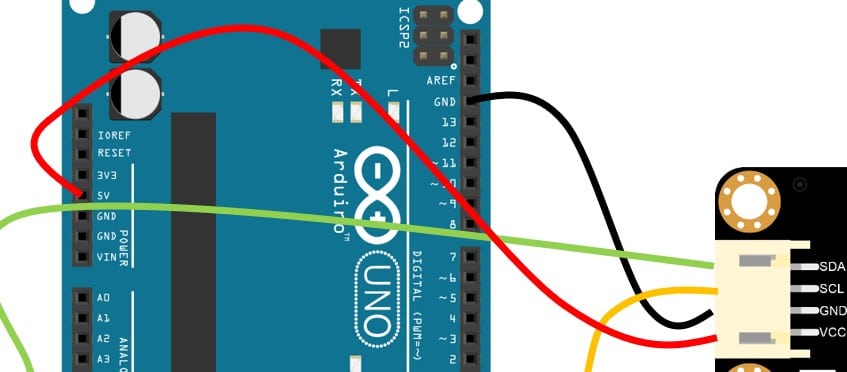
Connect the 5 V line of the Arduino UNO to the VCC pin of the oxygen sensor module.
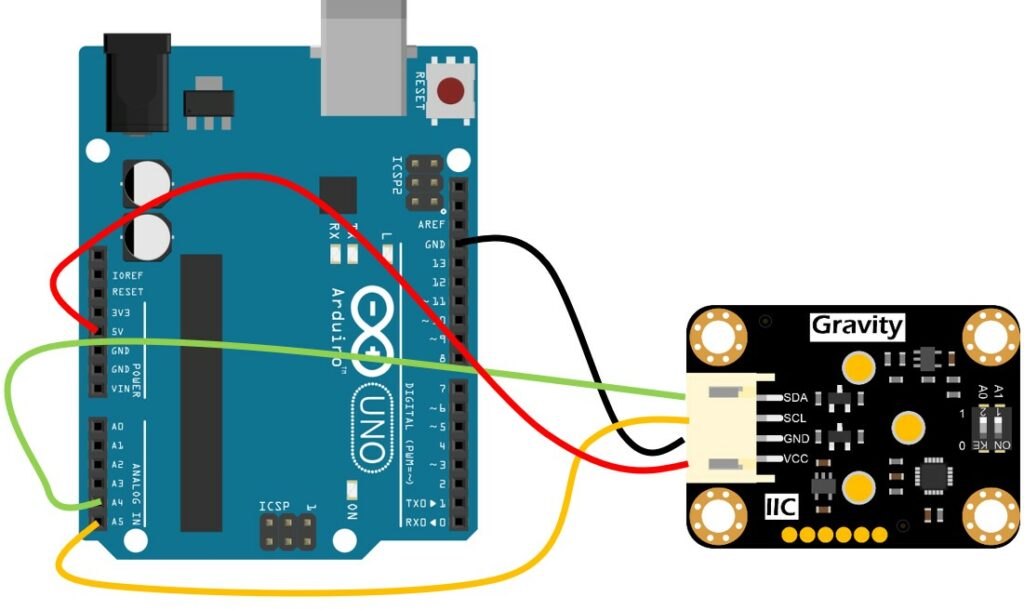
Step 5: The complete connection
Arduino Code Example For The Oxygen Sensor Project
In this section, you can find the complete Arduino sketch and the information on installing the necessary libraries.
The complete Arduino Code For The DFRobot Oxygen Sensor
The default I2C address is 0x73. If you modify the hardware address, make sure you also update the code accordingly.
#include "DFRobot_OxygenSensor.h"

#define COLLECT_NUMBER    10             // collect number, the collection range is 1-100.
#define Oxygen_IICAddress ADDRESS_3
/*   iic slave Address, The default is ADDRESS_3.
       ADDRESS_0               0x70      // iic device address.
       ADDRESS_1               0x71
       ADDRESS_2               0x72
       ADDRESS_3               0x73
*/

DFRobot_OxygenSensor Oxygen;
void setup()
{
  Serial.begin(9600);
  while (!Oxygen.begin(Oxygen_IICAddress)) {
    Serial.println("I2c device number error !");
    delay(1000);
  }
  Serial.println("I2c connect success !");
}

void loop()
{
  float oxygenData = Oxygen.ReadOxygenData(COLLECT_NUMBER);
  Serial.print(" Oxygen concentration is ");
  Serial.print(oxygenData);
  Serial.println(" %vol");
  delay(1000);
}
The Arduino Code To Calibrate The Sensor
#include "DFRobot_OxygenSensor.h"

/**
 * i2c slave Address, The default is ADDRESS_3.
 * ADDRESS_0   0x70  i2c device address.
 * ADDRESS_1   0x71
 * ADDRESS_2   0x72
 * ADDRESS_3   0x73
 */
#define Oxygen_IICAddress ADDRESS_3
#define OXYGEN_CONECTRATION 20.9  // The current concentration of oxygen in the air.
#define OXYGEN_MV           0     // The value marked on the sensor, Do not use must be assigned to 0.
DFRobot_OxygenSensor oxygen;

void setup(void)
{
  Serial.begin(9600);
  while(!oxygen.begin(Oxygen_IICAddress)){
    Serial.println("I2c device number error !");
    delay(1000);
  }
  Serial.println("I2c connect success !");

  /**
   * Choose method 1 or method 2 to calibrate the oxygen sensor.
   * 1. Directly calibrate the oxygen sensor by adding two parameters to the sensor.
   * 2. Waiting for stable oxygen sensors for about 10 minutes,
   *    OXYGEN_CONECTRATION is the current concentration of oxygen in the air (20.9%mol except in special cases),
   *    Not using the first calibration method, the OXYGEN MV must be 0.
   */
  oxygen.calibrate(OXYGEN_CONECTRATION, OXYGEN_MV);
}

void loop(void)
{
  Serial.println("The oxygen sensor was calibrated successfully.");
  delay(1000);
}
FAQs About The Oxygen Sensor And Arduino Projects
I have included a list of the most frequently asked questions about projects built using Arduino and the DFRobot Oxygen sensor.
If you have more questions, please post them in the comments section.
I will be happy to answer them.
1. How do you calibrate the oxygen Sensor?
You can calibrate the DFrobot oxygen sensor in the outdoor environment. To calibrate the sensor, wait 10 minutes in the outdoor environment.
Press the calibrate button for more than 2 seconds. The sensor is now calibrated.
2. How do you connect the DFrobot oxygen sensor to Arduino?
The DFrobot oxygen sensor comes with the I2C serial interface.
You can connect the Arduino UNO pins A5 and A4 to the SCl and SDA pins of the sensor.
The I2C address can be 0x70, 0x71, 0x72, and 0x73.
3. What are the applications of the oxygen sensor?
The applications of the DFRobot oxygen sensor are listed below.
- Air Quality monitoring in urban streets – Especially in the areas where there is huge traffic or longer waiting time near traffic signals.
- Oxygen level monitoring in industrial environments – Industries that are processing chemicals or fertilizers have a higher risk of working in a polluted environment. There are possibilities of having lower oxygen levels which can pose serious health hazards.
- The safer work environment for people working in harsh environments such as mines. Mines are places where there is very poor airflow. Hence it would be best if you always kept an eye on the oxygen levels.
- Air quality monitoring at schools
- Oxygen level monitoring at public places such as theatres, halls, and parties.
Conclusion
In this article, we covered the basics of the DFRobot Gravity oxygen sensor.
We walked through the connection diagram and the Arduino code required to read the oxygen concentration in the atmosphere using the sensor.
You can now successfully complete the connections and program your Arduino UNO.
Once you read the oxygen concentration level, you have to take action based on the limits defined.
You can sound an alarm, send a message over GSM or just record the oxygen concentration’s duration and levels.
What applications are you planning with the Arduino oxygen sensor?
Please let me know in the comments section below.
If you have any feedback to improve the article, please share it in the comments section.
Your valuable input helps me to improve the article quality and bring more helpful content in the future.
Please remember to share the Arduino and the oxygen sensor article with your fellow Arduino enthusiasts.
Benne is professional Systems Engineer with a deep expertise in Arduino and a passion for DIY projects.
Dennis
Saturday 18th of March 2023
Where do I get "DFRobot_OxygenSensor.h" ?