In this article, you will learn how to interface a thermocouple to the Arduino UNO.
There are several types of thermocouples with a wide range of measurement temperature range, however, you cannot directly connect a thermocouple to an Arduino UNO.
The thermocouples generate a small voltage when you subject the thermocouple junction to a hot or cold temperature.
The induced voltage amplitude is low, and you cannot use the built-in ADC in the Arduino UNO to measure the temperature.
The MAX31855 is a thermocouple amplifier, and in this article, you will learn how to interface Arduino UNO to the MAX31855 so that you can read the temperature using a thermocouple.
We will learn the types of thermocouples and how to choose the suitable thermocouple for your specific application.
You will find understand the essential info about the MAX31855 thermocouple amplifier, and learn how to make the wiring connections to build a working project using Arduino UNO.
I will also share with you some example Arduino code and a collection of frequently asked questions about the MAX31855 thermocouple amplifier for temperature sensor applications with answers.
Let’s get started!
Components Needed To Build Arduino And MAX31855 Amplifier Project
Hardware Components
- Dupont wire x 1 set
- Arduino USB cable (for powering Arduino and programming) x 1
Software
Makerguides.com is a participant in the Amazon Services LLC Associates Program, an affiliate advertising program designed to provide a means for sites to earn advertising fees by advertising and linking to products on Amazon.com.
Basics of The Thermocouple Amplifier MAX31855
This section will explain the features, specifications, and connection interface available on the MAX31855 module.
The MAX31855 is a sophisticated thermocouple-to-digital converter with a built-in 14-bit analog-to-digital converter.
The MAX31855 incorporates a cold junction sensing and compensation, a digital controller, and an SPI interface for communication with the host Microcontroller.
There are several versions of the MAX31855 thermocouple amplifier.
Each version is specifically tuned to one particular type of thermocouple.
What is a thermocouple?
Thermocouples are electrical devices formed using two dissimilar metal junctions. The junction produces the voltage proportional to the temperature.
The thermocouples don’t need an external excitation. The thermocouples are used in industrial processes, kilns, automobiles, etc.
There are different types of thermocouples. I have summarised the types of thermocouples in the table below.
| Thermocouple Type | Alloy Combination | Temperature Range | Specific Applications |
| Type K | Chromel / Alumel | 0 ℃ to 1260 ℃ | Neutral atmosphere |
| Type J | Iron / Constanton | 0 ℃ to 760 ℃ | Vacuum, reducing and oxidizing atmosphere |
| Type T | Copper / Constanton | – 200 ℃ to 370 ℃ | Vacuum condition and reducing atmosphere |
| Type E | Chromel / Constanton | 0 ℃ to 870 ℃ | Continuously oxidizing and inert atmosphere |
| Type N | Nicrosil / Nisil | 0 ℃ to 1260 ℃ | Where there is a need for longer life and stability |
| Type S/R | Platinum / Platinum (13% Rhodium) | 538 ℃ to 1481℃ | High-temperature applications |
| Type B | Platinum (6% Rhodium) / Platinum (30% Rhodium) | 871 ℃ to 1704 ℃ | High-temperature applications |
Every thermocouple has a different sensitivity. In the table below, let us look at the thermocouple types and the sensitivity measured in µV per ℃.
| Thermocouple Type | Sensitivity ( µV / ℃ ) | Cold Junction sensitivity ( µV / ℃ ) |
| K | 41.276 | 40.73 |
| J | 57.953 | 52.136 |
| N | 36.256 | 27.171 |
| S | 9.587 | 6.181 |
| T | 52.18 | 41.56 |
| E | 76.373 | 44.123 |
| R | 10.506 | 6.158 |
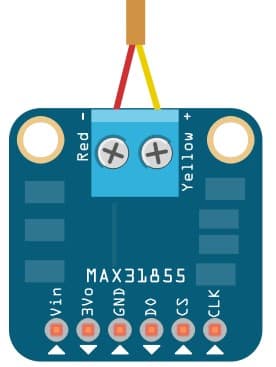
Pin Description
The MAX31855 is an eight-pin IC. I have summarized the pin details in the table below.
| Pin Number | Pin Function | Pin Function |
| 1 | GND | Ground |
| 2 | T- | Thermocouple input |
| 3 | T+ | Thermocouple input |
| 4 | VCC | Power supply voltage |
| 5 | SCK | Serial clock input |
| 6 | CS# | Active low chip select. Set CS# low to enable the serial interface |
| 7 | SO | Serial-Data Output |
| 8 | DNC | Do Not Connect |
The block diagram of the MAX31855 thermocouple amplifier is shown below.
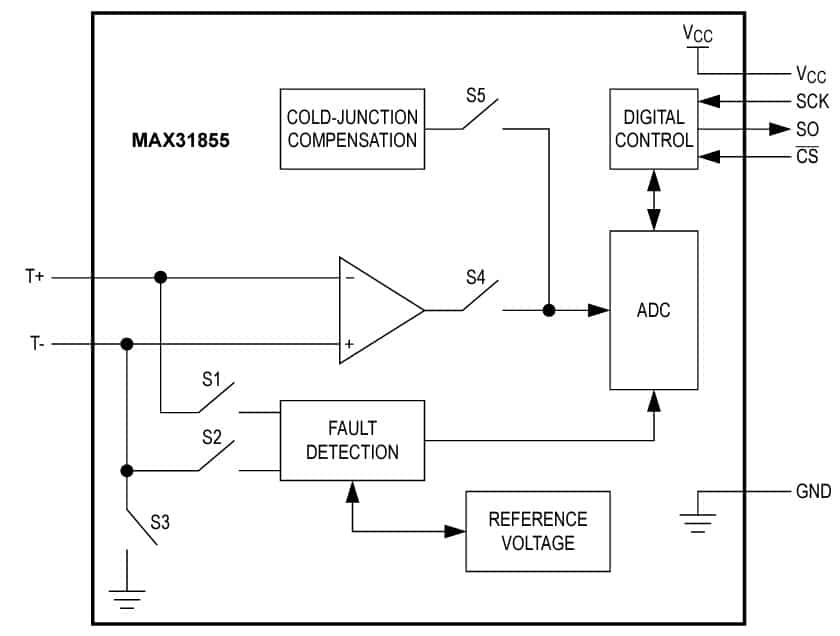
The functional block diagram reveals that the chip has an internal amplifier that amplifies the voltage generated by the thermocouple.
The ADC converts the amplifier output voltage to digital voltage.
The digital controller communicates with the host via SPI and transfers the ADC values.
The block diagram below shows you the typical MAX31855 and a host interface.
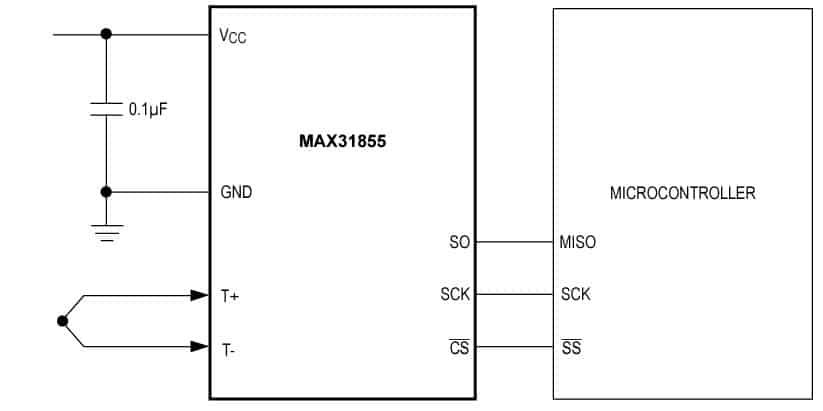
The MAX31885 is a 3.3 V powered module. If you want to connect it to a 5 V supply, you should use a 5 V to 3.3 V regulator. The IC consumes a typical 900 µA.
Each MAX31855 is tuned explicitly to one type of thermocouple.
You should choose the appropriate MAX31855 thermocouple amplifier.
For example, the MAX31855K chip is tuned to work with a Type K thermocouple.
Here is the list of MAX31885 IC variants
- MAX31855K
- MAX31885J
- MAX31885N
- MAX31855T
- MAX31855E
- MAX31855R
- MAX31855S
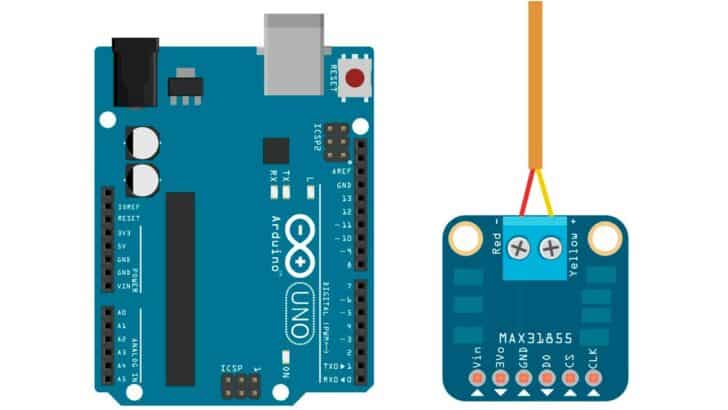
Step-By-Step Instructions To Connect The MAX31855 Thermocouple Amplifier
In this section, we will build a project using Arduino UNO and the MAX31855 thermocouple amplifier.
The SPI lines of the MAX31855 module are available to connect to the Arduino UNO.
Let’s get started with the hardware connections!
Below is the board we will use to complete the connections.
CLK (clock input) is the Arduino UNO’s output pin. The CLK pin is the input pin for the thermocouple amplifier.
DO (Data Output) is an output from the amplifier. The DO is the input pin for the Arduino UNO.
CS (chip select) is the input pin for the MAX31855 module.
In our example, the CLK pin goes to pin 5 of the UNO. The DO and the CS pin connect to pin 3 and 4, respectively.
How To Connect The MAX31855 Thermocouple Amplifier To The Arduino UNO?
Below is the step-by-step guide to complete the hardware connections needed to connect the Arduino and the MAX31855 Thermocouple amplifier module.
Step 1: Start with the GND connections.
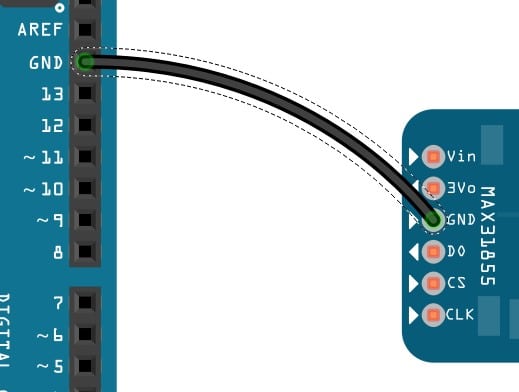
You can connect any GND pins available on the Arduino UNO board.
Connect the ground pin on the MAX31855 sensor to the GND pin of the Arduino.
Always start with the ground connections.
Connecting the GND pins first avoids accidental damage to the boards.
Step 2: Connect the CS Pin
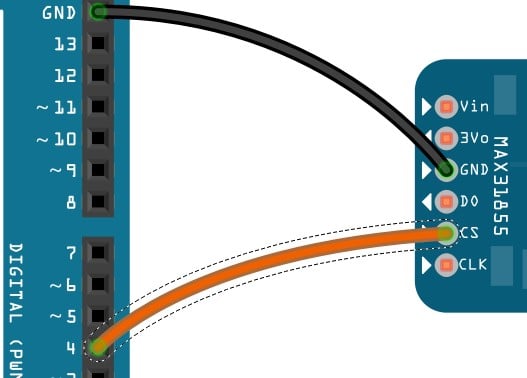
Connect the Arduino UNO’s pin 4 to the CS pin of the module.
Step 3: Connect the data out pin
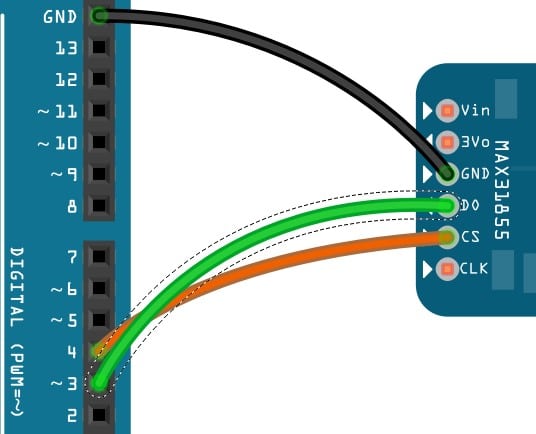
Connect the Arduino UNO’s pin 3 to the DO pin of the MAX31855.
Step 4: Connect the Power pin
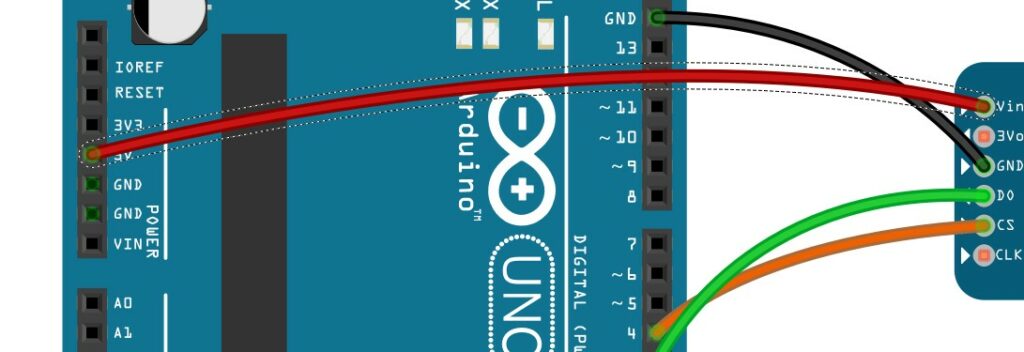
Connect the Arduino UNO’s 5 V pin to the VIN pin of the MAX31855 thermocouple amplifier.
Step 5: Connect the Clock pin
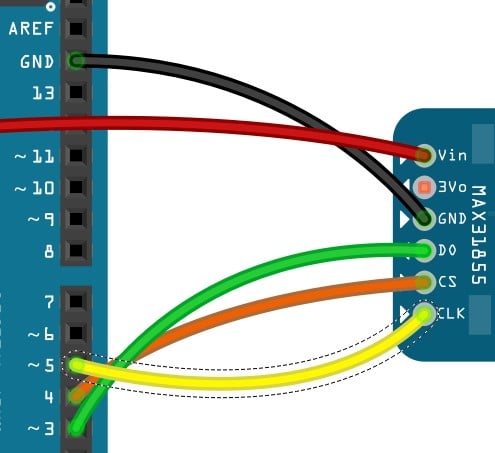
Connect the MAX31855’s CLK pin to pin 5 of the UNO. Connect the thermocouple sensor to the MAX31855 sensor.
You have now completed the required connections to communicate with the thermocouple.
In the next section, you will find the Arduino sketch you can use!
Arduino Code Example For The Arduino and MAX31855 Project
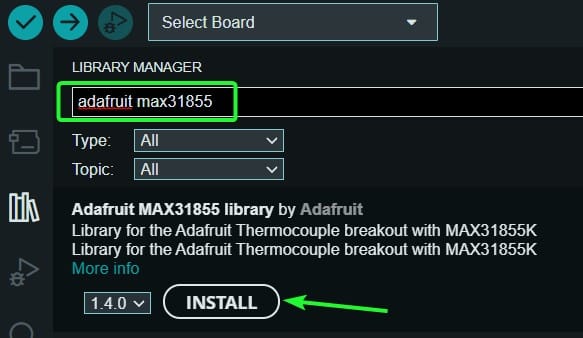
In this section, we will walk through the example Arduino code to verify the MAX31855 thermocouple amplifier module.
You have to install the Adafruit MAX31855 library to use the example code.
- Go to Tools → Manage Libraries
- Search for the Adafruit MAX31855 in the search bar and hit Enter
- Please click the INSTALL button once you locate the Adafruit MAX31855 library
You may be prompted to install dependent libraries. Say Yes to all.
Project 1: Print Thermocouple readings on the Serial Terminal
The Arduino code below reads the sensor data over SPI. The data will be printed on the serial terminal.
You can open the terminal to watch the messages.
#include "SPI.h"
#include "Adafruit_MAX31855.h"

// Default connection is using software SPI, but comment and uncomment one of
// the two examples below to switch between software SPI and hardware SPI:

// Example creating a thermocouple instance with software SPI on any three
// digital IO pins.
#define MAXDO   3
#define MAXCS   4
#define MAXCLK  5

// initialize the Thermocouple
Adafruit_MAX31855 thermocouple(MAXCLK, MAXCS, MAXDO);

// Example creating a thermocouple instance with hardware SPI
// on a given CS pin.
//#define MAXCS   10
//Adafruit_MAX31855 thermocouple(MAXCS);

// Example creating a thermocouple instance with hardware SPI
// on SPI1 using specified CS pin.
//#define MAXCS   10
//Adafruit_MAX31855 thermocouple(MAXCS, SPI1);

void setup() {
  Serial.begin(9600);

  while (!Serial) delay(1); // wait for Serial on Leonardo/Zero, etc

  Serial.println("MAX31855 test");
  // wait for MAX chip to stabilize
  delay(500);
  Serial.print("Initializing sensor...");
  if (!thermocouple.begin()) {
    Serial.println("ERROR.");
    while (1) delay(10);
  }

  // OPTIONAL: Can configure fault checks as desired (default is ALL)
  // Multiple checks can be logically OR'd together.
  // thermocouple.setFaultChecks(MAX31855_FAULT_OPEN | MAX31855_FAULT_SHORT_VCC);  // short to GND fault is ignored

  Serial.println("DONE.");
}

void loop() {
  // basic readout test, just print the current temp
   Serial.print("Internal Temp = ");
   Serial.println(thermocouple.readInternal());

   double c = thermocouple.readCelsius();
   if (isnan(c)) {
     Serial.println("Thermocouple fault(s) detected!");
     uint8_t e = thermocouple.readError();
     if (e & MAX31855_FAULT_OPEN) Serial.println("FAULT: Thermocouple is open - no connections.");
     if (e & MAX31855_FAULT_SHORT_GND) Serial.println("FAULT: Thermocouple is short-circuited to GND.");
     if (e & MAX31855_FAULT_SHORT_VCC) Serial.println("FAULT: Thermocouple is short-circuited to VCC.");
   } else {
     Serial.print("C = ");
     Serial.println(c);
   }
   //Serial.print("F = ");
   //Serial.println(thermocouple.readFahrenheit());

   delay(1000);
}
Project 2: Display the data from MAX31855 IC on the LC Display
The Arduino code below reads the MAX31855 thermocouple amplifier and displays the result on the LCD module.
#include "SPI.h"
#include "Wire.h"
#include "Adafruit_MAX31855.h"
#include "LiquidCrystal.h"

// Example creating a thermocouple instance with software SPI on any three
// digital IO pins.
#define MAXDO   3
#define MAXCS   4
#define MAXCLK  5

// Initialize the Thermocouple
Adafruit_MAX31855 thermocouple(MAXCLK, MAXCS, MAXDO);

// initialize the library with the numbers of the interface pins
LiquidCrystal lcd(7, 8, 9, 10, 11, 12);

void setup() {
  #ifndef ESP8266
    while (!Serial);     // will pause Zero, Leonardo, etc until serial console opens
  #endif
  Serial.begin(9600);
  // set up the LCD's number of columns and rows:
  lcd.begin(16, 2);

  lcd.clear();
  lcd.print("MAX31855 test");
  // wait for MAX chip to stabilize
  delay(500);
  if (!thermocouple.begin()) {
    lcd.print("ERROR.");
    while (1) delay(10);
  }
  lcd.print("DONE.");
}

void loop() {
  // basic readout test, just print the current temp
   lcd.clear();
   lcd.setCursor(0, 0);
   lcd.print("Int. Temp = ");
   lcd.println(thermocouple.readInternal());
   Serial.print("Int. Temp = ");
   Serial.println(thermocouple.readInternal());

   double c = thermocouple.readCelsius();
   lcd.setCursor(0, 1);
   if (isnan(c))
   {
     lcd.print("T/C Problem");
   }
   else
   {
     lcd.print("C = ");
     lcd.print(c);
     lcd.print("  ");
     Serial.print("Thermocouple Temp = *");
     Serial.println(c);
   }

   delay(1000);
}
FAQs About The MAX31855 Thermocouple Sensor Amplifier And Arduino Projects
I have included a list of the most frequently asked questions about projects built using Arduino and the MAX31855 thermocouple amplifier module.
If you have further questions, please post them in the comments section.
I will be glad to answer them.
1. What does a MAX31855 do?
MAX31855 is a thermocouple to the digital sensor. If you need to sense the temperature, you can use the MAX31855 module to interface the thermocouple to your projects.
The thermocouples support a wide range of temperatures. MAX13855 had a built-in ADC.
You can connect the Arduino directly to the MAX31855 to read the ADC values.
2. Can you use a thermocouple with an Arduino?
You can use the thermocouple to monitor the temperature. The thermocouple is formed using two different metal junctions.
The physical properties of the intersection generate a small voltage based on the junction’s temperature.
The voltage is tiny. It would be best if you had a dedicated thermocouple amplifier such as MAX31855 IC.
The MAX31855 converts the small voltage into digital values, which you can read using Arduino.
3. How do thermocouples work?
You use thermocouples to measure the temperature. The conventional temperature sensors won’t work beyond 85 ℃ or 125 ℃ due to limitations with the technology they are built on.
You can build a thermocouple by bringing two dissimilar metals together and forming a junction.
The junction formed will generate a small amount of voltage whenever you heat or cool the thermocouple.
You can measure the voltage and translate it into the temperature value.
The MAX31855 is a thermocouple amplifier module to read the digital values corresponding to the measured temperature.
4. What is a thermocouple amplifier?
The thermocouple amplifier amplifies the small voltage that the junction of the thermocouple generates.
The voltage is minimal, and an ADC on the Arduino UNO doesn’t have sufficient resolution to read the small voltage.
Hence, we need a thermocouple amplifier that can amplify the small signal generated to a reasonable value so that the ADCs can sample the voltage.
The MAX31855 is a thermocouple amplifier with temperature compensation.
You can use the MAX31855 thermocouple amplifier to read the temperature using the thermocouple.
Conclusion
In this article, we covered the operation and features of the MAC31855 thermocouple amplifier.
We connected the module to the Arduino UNO via the serial interface.
You should now be able to verify the connections and program the board with the provided Arduino sketch examples for the MAX31855.
The thermocouple amplifier is a must when using thermocouples to measure the temperature.
I have used a thermocouple and the MAX31855 in a hobby project related to a kiln.
The kiln was used to heat the clay pots.
It was fun to learn and use the MAX31855 module in the project with the absolute need for thermocouple sensors.
Please let me know in the comments section if you have any trouble. If you have any feedback to improve the article, please share it in the comments section.
Your valuable input helps me to improve the article quality and bring more helpful articles down the line.
Don’t forget to share the article with your fellow Arduino enthusiasts.

I am Puneeth. I love tinkering with open-source projects, Arduino, ESP32, Pi and more. I have worked with many different Arduino boards and currently I am exploring, Arduino powered LoRa, Power line communication and IoT.
Must
Tuesday 11th of July 2023
When you connect 2 max31855 thermocouple sensors to a single arduino, the output from the serial monitor gives 0 (zero) value in 2 max31855 thermocouple sensors. I haven't been able to fix the problem. Can you help me? Thanks.