
Arduino and Raspberry Pi are the two most popular hardware platforms in the maker community for building electronic projects. While both are widely used, they have distinct differences in terms of hardware and software capabilities. Understanding these differences is important in choosing the right platform for your project.
Arduino
Arduino is a microcontroller-based platform that is known for its simplicity and ease of use. It consists of a single-board microcontroller, which is programmed using the Arduino IDE (Integrated Development Environment). Arduino boards are designed to be low-cost and low-power, making them ideal for small-scale projects.

The Arduino platform offers a wide range of boards, each with different features and capabilities. These boards are equipped with various input and output pins, allowing users to connect sensors, actuators, and other electronic components easily. Arduino boards are typically programmed using the C/C++ programming language, making it accessible to beginners and experienced developers alike.
Raspberry Pi
On the other hand, Raspberry Pi is a single-board computer that runs a full-fledged operating system, such as Linux. In contrast to Arduino, Raspberry Pi is more powerful and versatile, capable of running complex applications and performing tasks that require more computational power.
Raspberry Pi boards are equipped with a processor, memory, storage, and various connectivity options. They also have a range of input and output pins, similar to Arduino, allowing for easy integration with electronic components. Raspberry Pi boards are programmed using a variety of programming languages, including Python, C/C++, and Java.
Key Differences
The main difference between Arduino and Raspberry Pi lies in their hardware and software capabilities. Arduino is designed for simpler, low-power projects, while Raspberry Pi is more suitable for projects that require more processing power and the ability to run an operating system.
In the following sections we will look at the differences in hardware and software in more detail. We specifically will look at two Arduino boards, the smaller Arduino UNO and the bigger Arduino Mega, and two Raspberry Pi versions the PI 3 and the PI 4.
Supplies
If you want one of the four boards mentioned above, here are the links.
Arduino Uno REV3
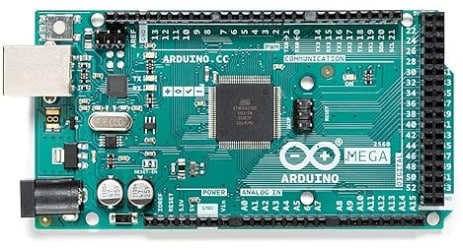
Arduino Mega 2560 REV3
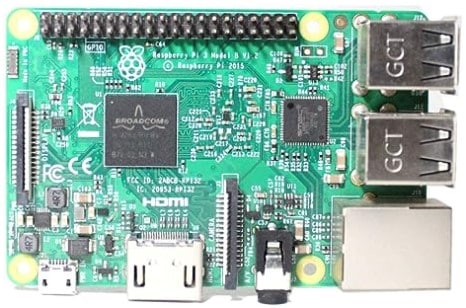
Raspberry Pi 3 Model B
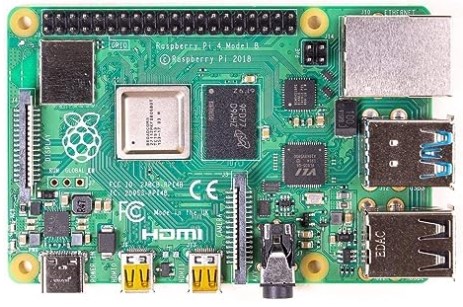
Raspberry Pi 4 Model B
Makerguides.com is a participant in the Amazon Services LLC Associates Program, an affiliate advertising program designed to provide a means for sites to earn advertising fees by advertising and linking to products on Amazon.com. As an Amazon Associate we earn from qualifying purchases.
Hardware Comparison
In this section we compare the hardware capabilities of the two platforms.
Arduino
Arduino boards are microcontrollers, which means they are designed to perform specific tasks with a focus on simplicity and low power consumption. The hardware of Arduino boards is optimized for controlling physical devices and interacting with the environment.
Arduino boards typically have a limited amount of RAM and storage, which is sufficient for most small-scale projects. But they have a wide range of input and output pins, allowing you to connect various sensors, actuators, and other components directly to the board.
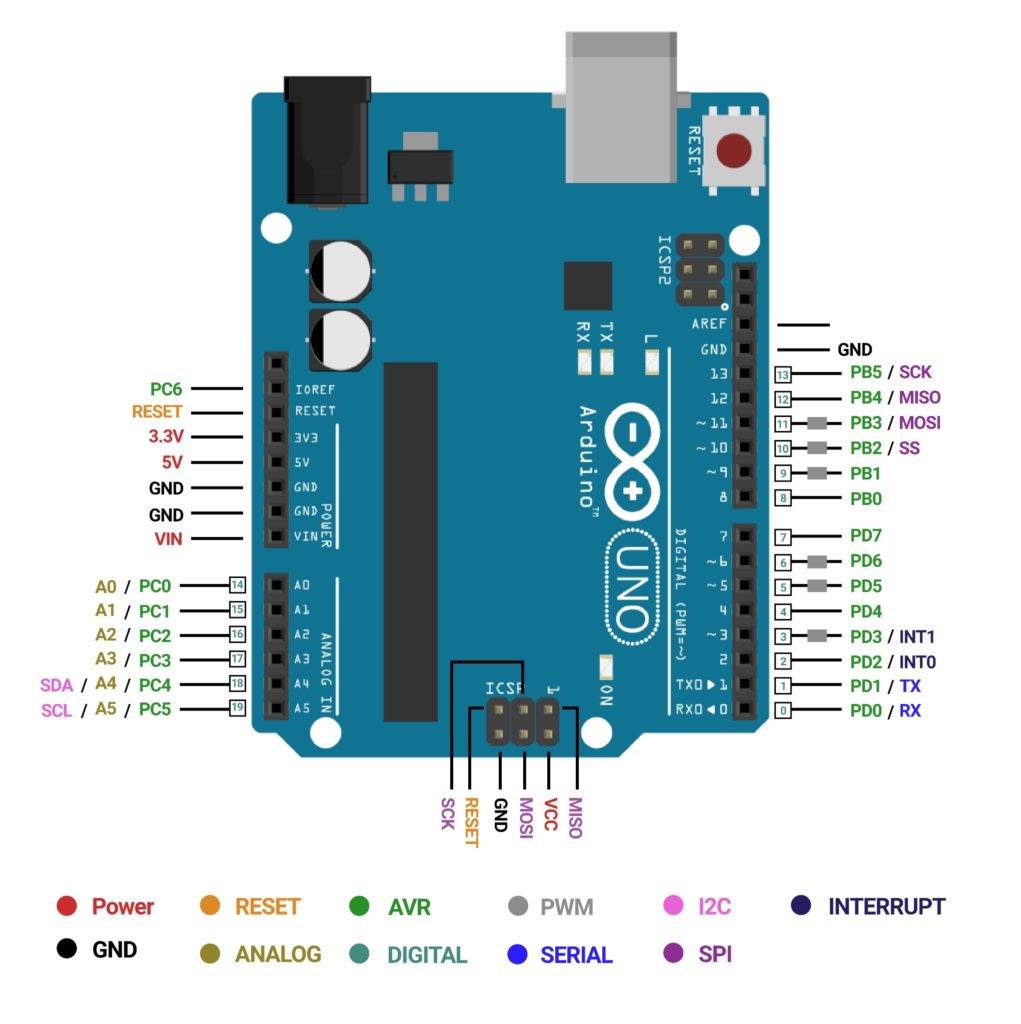
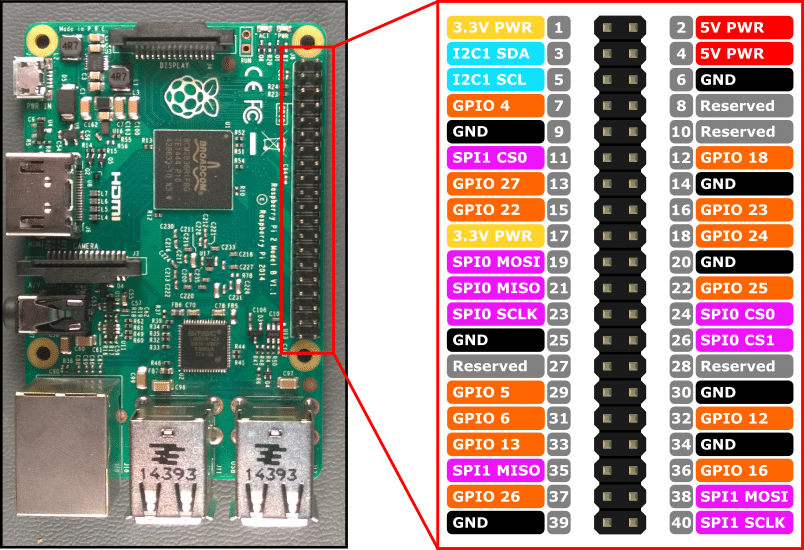
The following picture shows the pinout of the Arduino UNO.
Raspberry Pi
Raspberry Pi boards are single-board computers that offer more processing power and capabilities compared to Arduino. They are essentially small Linux computers that can run a full operating system and perform tasks similar to a regular desktop computer.
Since Raspberry Pi boards have more RAM and storage capacity they are suitable for projects that require more computational power or involve running complex software applications. They also have built-in HDMI ports, USB ports, and Ethernet connectivity, allowing you to easily connect them to displays, keyboards, and other peripherals.
Specification
The following table gives you an overview of the hardware specs of the Arduino UNO, the Arduino Mega, the Raspberry Pi 3 and Raspberry Pi 4.
| Function | Arduino Uno | Arduino Mega | Raspberry Pi 3 | Raspberry Pi 4 |
| Processing Unit | ATmega328P microprocessor | ATmega2560 microprocessor | Broadcom BCM2837B0 SoC | Broadcom BCM2711 SoC |
| CPU Architecture | 8 bits | 8 bits | Cortex-A53 64-bit | Cortex-A72 (ARM v8) 64-bit |
| Hardware Structure | Simple | Simple | Complex | Complex |
| Clock frequency | 16 MHz | 16 MHz | Up to 1.4 GHz | Up to 1.5 GHz |
| Power | 6 – 20V | 5V | 5V 3A | 5V 3A |
| RAM | 2KB (SRAM) | 8KB (SRAM) | 1 GB DDR2 | 1 GB, 2 GB, 4GB, 8GB LPDDR4(depending on model) |
| Memory | 32 KB (Flash Memory) | 256 KB (Flash Memory) | Supports up to 32GB or more. (External SD card) | Supports up to 128GB or more. (External SD card) |
| GPIO | 14 | 54 | 40 | 40 |
| UART | 1 | 4 | 2 | 6 |
| SPI | 1 | 1 | 2 | 5 |
| I2C | 1 | 1 | 2 | 6 |
| PWM Pins | 6 | 15 | 4 | 4 |
| Analog Pins | 6 | 16 | NA | NA |
| USB connectivity | Standard A/B USB | Standard A/B USB | OTG Port for USB device support like keyboard, Mouse, etc. | OTG Port for USB device support like keyboard, Mouse, etc. |
| Wireless connectivity | – | – | Bluetooth and Wi-Fi | Bluetooth and Wi-Fi |
Choosing the Right Hardware Platform
If you need to control simple electronic components and interact with the physical world, Arduino is a great choice. Its low power consumption and extensive library of compatible sensors and actuators make it ideal for projects like home automation, robotics, and wearable devices.
On the other hand, if your project involves more complex tasks, requires internet connectivity, or needs to run software applications, Raspberry Pi is the better option. Its higher processing power and ability to run a full operating system make it suitable for projects like media centers, home servers, and IoT gateways.
Programming Capabilities
When it comes to programming capabilities, both Arduino and Raspberry Pi differ as well. Let’s take a closer look at what each platform has to offer.
Arduino Programming Capabilities
Arduino boards are programmed using the Arduino IDE (Integrated Development Environment), which is based on the C and C++ programming languages. The IDE provides a simple and user-friendly interface, making it easy for beginners to get started with programming.
Arduino programming is primarily focused on microcontroller-based projects. The code written for Arduino is compiled and uploaded directly to the microcontroller, allowing for real-time control of hardware components. This makes Arduino an excellent choice for projects that require precise timing and low-level control.
The Arduino programming language is relatively straightforward and easy to learn. It provides a rich set of libraries and functions that simplify the process of interacting with sensors, actuators, and other electronic components.
Raspberry Pi Programming Capabilities
Raspberry Pi, on the other hand, is a complete computer that runs a Linux-based operating system. You can use various programming languages such as Python, C, C++, Java, and more to program it.
With Raspberry Pi, you have the flexibility to develop complex software applications and leverage the power of a complete operating system. This makes it suitable for projects that require advanced processing capabilities, multitasking, and network connectivity.
Python is a popular programming language for Raspberry Pi due to its simplicity and extensive libraries. It allows you to easily interface with sensors, control GPIO pins, and create graphical user interfaces.
Choosing the Right Software Platform
If you need real-time control and low-level hardware interaction in your software, Arduino is the way to go. On the other hand, if you require advanced software capabilities, multitasking, and network connectivity, Raspberry Pi is the better choice.
It’s worth noting that Arduino and Raspberry Pi are not mutually exclusive. In fact, they can be used together in a single project, with Arduino handling the hardware control and Raspberry Pi managing the higher-level tasks. This combination allows you to leverage the strengths of both platforms and create powerful and versatile projects.
Connectivity and Communication Features
Connectivity and communication are another important aspect to consider when choosing between Arduino and Raspberry Pi.
Arduino Connectivity and Communication
Arduino boards are known for their simplicity and ease of use when it comes to connectivity. They have a wide range of built-in communication options, including digital and analog pins, serial communication (UART), and I2C and SPI interfaces. These features allow Arduino to easily connect to various sensors, actuators, and other external devices. Have a look at our sensor overview and communication protocols overview to see the available options.
Arduino’s digital and analog pins can be used to read and write digital and analog signals, respectively. This makes it straightforward to interface with sensors and control actuators such as LEDs and motors. Serial communication enables Arduino to communicate with other devices, such as a computer or another Arduino, using a simple serial protocol.
Additionally, Arduino supports I2C and SPI interfaces, which are often used for communication between microcontrollers and peripheral devices. These interfaces allow Arduino to connect to a wide range of sensors, displays, and other modules.
Raspberry Pi Connectivity and Communication
Raspberry Pi, on the other hand, offers more advanced connectivity options compared to Arduino. It has built-in Ethernet and USB ports, which provide easy access to wired networks and allow connection to a wide range of USB devices, including keyboards, mice, and external storage.
Moreover, Raspberry Pi also supports Wi-Fi and Bluetooth connectivity, which opens up possibilities for wireless communication. Wi-Fi allows the Raspberry Pi to connect to the internet and communicate with other devices on the network. Bluetooth enables wireless communication with peripherals such as speakers, headphones, and smartphones.
Raspberry Pi’s HDMI port allows it to connect to displays, making it suitable for projects that require a graphical user interface. It also has a camera interface, which enables the connection of a camera module for capturing images and videos.
Choosing the Right Communications Platform
If you need simple and straightforward connectivity with sensors and actuators, Arduino’s built-in communication options is the better choice. Arduino’s simplicity and low power consumption make it ideal for projects where size and power constraints are critical.
On the other hand, if your project requires more advanced connectivity options, such as internet connectivity, wireless communication, or the ability to connect to displays and cameras, Raspberry Pi may be the better choice. Due to its higher processing power and advanced connectivity features, it is suitable for projects that involve data processing, web connectivity, or multimedia applications.
Power Consumption
When it comes to power consumption, there is a significant difference between Arduino and Raspberry Pi.
Arduino Power Consumption
Arduino boards are designed to be power-efficient, making them ideal for low-power applications. While the power consumption of an Arduino board depends on the specific model, typically Arduino board consume around 20-50 mA of current.
Raspberry Pi Power Consumption
In contrast, Raspberry Pi boards consume more power due to their more complex hardware and software setup. Since a Raspberry Pi board includes a microprocessor, memory, storage, and other components, making it more power-hungry than an Arduino board. On average, a Raspberry Pi board consumes around 200-700 mA of current.
Considerations for Power-Conscious Projects
If your project requires long battery life or operates on limited power sources, Arduino is the better choice due to its low power consumption.
On the other hand, if power consumption is not a significant concern, and you need the additional processing power and features provided by a Raspberry Pi, then it might be the more suitable option.
It’s worth noting that both Arduino and Raspberry Pi offer power-saving techniques that can be implemented to optimize power consumption. For example, Arduino boards can be put into sleep mode to reduce power usage during idle periods, while Raspberry Pi boards can be configured to disable unnecessary peripherals or underclock the CPU to save power.
Choosing the Right Platform for Your Project
Here a summary of the key factors to consider when deciding between an Arduino or a Raspberry Pi for a project.
Arduino
Pros:
- Simplicity: Arduino boards are designed to be beginner-friendly, with a simple and easy-to-understand programming language. This makes it a great choice for those new to electronics and programming.
- Real-time Control: Arduino excels at real-time control applications, where precise timing and responsiveness are crucial. It is ideal for projects that require fast and accurate sensor readings or controlling actuators in real-time.
- Low Power Consumption: Arduino boards are known for their low power consumption, making them suitable for battery-powered projects or applications where power efficiency is important.
- Cost-effective: Arduino boards are generally more affordable compared to Raspberry Pi, making them a budget-friendly option for many projects.
Cons:
- Limited Processing Power: Arduino boards have limited processing power and memory, which can be a limitation for complex projects that require heavy computation or running multiple tasks simultaneously.
- Lack of Operating System: Arduino does not have a full-fledged operating system like Raspberry Pi. This means it cannot run complex software applications or handle tasks that require an operating system.
- Limited Connectivity Options: Arduino boards have limited connectivity options compared to Raspberry Pi. They lack built-in Wi-Fi or Bluetooth capabilities, requiring additional modules or shields for wireless communication.
Raspberry Pi
Pros:
- Processing Power: Raspberry Pi boards are equipped with more powerful processors and larger memory, making them capable of handling more complex tasks and running full-fledged operating systems like Linux.
- Versatility: Raspberry Pi can be used for a wide range of projects, from simple electronics projects to multimedia centers, home automation systems, and even small-scale servers.
- Connectivity Options: In addition, Raspberry Pi boards come with built-in Wi-Fi and Bluetooth capabilities, allowing for easy wireless communication and connectivity with other devices.
- Community and Resources: Raspberry Pi has a large and active community, with plenty of online resources, tutorials, and projects available. This makes it easier to find support and inspiration for your own projects.
Cons:
- Power Consumption: Raspberry Pi boards consume more power compared to Arduino, making them less suitable for battery-powered projects or applications where power efficiency is crucial.
- Complexity: Raspberry Pi can be more complex to set up and program compared to Arduino, especially for beginners. It requires some knowledge of Linux and command-line interfaces.
- Cost: Raspberry Pi boards are generally more expensive than Arduino boards, which can be a limiting factor for those on a tight budget.
Comparison table
| Arduino Uno | Raspberry Pi 4 |
| Arduino Uno is an 8 bit ATmega328P Microcontroller. | Raspberry Pi is a 64-bit SBC. It is based on Broadcom SoC, an ARM Cortex-A Series Microprocessor. |
| There is no need for an operating system. | It needs an Operating System to run. |
| Arduino is open-source, which means the design files and the source code for software and libraries are freely available. | Both hardware and software of Raspberry Pi are closed source. |
| Arduino Uno can be programmed using C / C++ Programming Languages. | Using Raspberry Pi, you can develop applications in Python, Scratch, Ruby, C, C++, etc. |
| Arduino Uno voltage level is 5V. | Raspberry Pi Voltage level is 3V. |
| Arduino Uno needs additional modules or shields to connect to the Internet. | You can easily connect to the Internet using Wi-Fi or Ethernet. |
| Arduino Uno has no in-built wireless connectivity and Bluetooth. | Raspberry Pi has the hardware for Bluetooth and Wi-Fi onboard. |
| It consumes about 200 mW of power. | It consumes about 700 mW of power. |
| Arduino Uno GPIO Pins can each drive 40mA. | Raspberry Pi GPIO pins can each drive a maximum of 16mA. |
| Arduino Uno is used to perform single tasks. | Raspberry Pi can perform multiple tasks simultaneously. It is more beneficial to users. |
| It has a higher I/O current drive strength. | It has a lower I/O current drive strength. |
| Arduino boards are cheaper. | Raspberry Pi boards are expensive. |
| Arduino Uno can’t be used as a computer. | Raspberry Pi can be used as a computer. |
Typical Applications
Both Arduino and Raspberry Pi are used in a wide range of real-world applications. Here some typical applications that suit the specific features of the two platforms.
Arduino Applications
- Home Automation: Arduino’s simplicity and low power consumption make it an ideal choice for home automation projects. You can use Arduino to control lights, temperature, security systems, and more.
- Robotics: Arduino’s ability to interface with sensors and actuators makes it a popular choice for robotics projects. From simple line-following robots to complex robotic arms, Arduino provides a flexible platform for building and controlling robots.
- Environmental Monitoring: Arduino’s compact size and low power requirements make it suitable for environmental monitoring applications. You can use Arduino to measure temperature, humidity, air quality, and other environmental parameters.
- Wearable Devices: Arduino’s small form factor and low power consumption make it suitable for wearable technology projects. You can use Arduino to build smartwatches, fitness trackers, and other wearable devices.
Raspberry Pi Applications
- Home Media Center: Raspberry Pi’s multimedia capabilities make it an excellent choice for building a home media center. This means, you can use a Raspberry Pi to stream movies, play music, and even run retro gaming emulators.
- Internet of Things (IoT): Raspberry Pi’s connectivity options and processing power make it a popular choice for IoT projects. You can use Raspberry Pi to collect data from sensors, control devices remotely, and build smart home systems.
- Home Server: Raspberry Pi’s low power consumption and compact size make it suitable for building a home server. You can use Raspberry Pi to host websites, store files, and run various server applications.
- Education: Raspberry Pi’s affordability and versatility make it a valuable tool for educational purposes. It can be used to teach programming, electronics, and computer science concepts to students of all ages.
Conclusions
In conclusion, both Arduino and Raspberry Pi have their own unique strengths and weaknesses, making them suitable for different types of projects.
For projects that rely on battery power, or that require real-time processing of sensor data, or need easily recover from power loss, go with an Arduino. Especially the latter one is usually the deciding factor. You cannot just switch on/off an Raspberry Pi. It needs to shutdown properly and the restart is time considerable.
On the other hand, if you need a full-blown computer, with plenty memory but with a small form factor and IO capabilities, the Raspberry PIs are great. For instance, a home media center with hardware buttons and music controlled lights is a perfect fit. While Raspberry PIs are often used for home servers there are actually better and cheaper solutions, since a home server doesn’t need GPIO.
However, for both platforms there are hardware add-ons to overcome their weaknesses. For instance, there are Wi-Fi shields for the Arduino and power-down solutions for Raspberry Pi computers.
In addition, nothing stops you from combining Arduinos and Raspberry Pis in a single project. For example, you can use Arduino for controlling sensors and actuators while using Raspberry Pi for data processing and communication.
Finally, don’t forget about ESP32 based boards, which have built-in Wi-Fi and considerably more compute power than an Arduino Uno. They still will run fine on battery and can serve simple web apps, while being easily programmed very similar to an Arduino using the Arduino IDE.
Whether you choose Arduino, Raspberry Pi, or a combination of both, have fun in making amazing things!
Frequently Asked Questions
Here are some frequently asked questions about Arduino and Raspberry Pi:
What is the main difference between Arduino and Raspberry Pi?
Arduino is a microcontroller-based platform, while Raspberry Pi is a single-board computer. The main difference lies in their processing power and capabilities. Arduino is designed for simple and specific tasks, whereas Raspberry Pi can handle more complex tasks and run a full operating system.
Which one should I choose for my project?
The choice between Arduino and Raspberry Pi depends on the requirements of your project. If you need a simple and cost-effective solution for a specific task, Arduino is a good choice. On the other hand, if you require more processing power, advanced connectivity options, or want to run complex software, Raspberry Pi is the way to go.
Generally, I recommend starting with an Arduino. If its computational power is insufficient upgrade to an ESP32 or a Raspberry Pi.
Which platform is more beginner-friendly?
Both Arduino and Raspberry Pi have their own learning curves, but Arduino is generally considered more beginner-friendly. Arduino’s simplicity and focus on physical computing make it easier to understand and get started with. Raspberry Pi, being a full computer, requires some familiarity with operating systems and software development.
Which platform is more cost-effective?
Arduino boards are generally more affordable compared to Raspberry Pi. Arduino’s simplicity and focus on specific tasks allow for cost-effective designs. Raspberry Pi, being a full computer, requires more components and resources, making it relatively more expensive.
Can I program Arduino and Raspberry Pi using the same language?
Arduino uses a simplified version of C/C++ programming language, while Raspberry Pi supports a wide range of programming languages, including Python, C/C++, and Java. However, both platforms have their own specific libraries and frameworks that you can utilize for programming.
Can I use Arduino code on Raspberry Pi?
Arduino code, written in the Arduino IDE using the Arduino programming language, is not directly compatible with Raspberry Pi. However, you can port Arduino code to Raspberry Pi by rewriting it in a language supported by Raspberry Pi, such as Python or C++. Additionally, libraries and frameworks are available that provide similar functionality to Arduino on Raspberry Pi, making the transition easier.
How much power do Arduino and Raspberry Pi consume?
Arduino boards are designed to be power-efficient and consume very little power, typically in the range of milliwatts. On the other hand, Raspberry Pi boards consume more power, typically in the range of watts, due to their more powerful processors and additional components. For battery powered projects, definitely start with an Arduino.
Are Arduino and Raspberry Pi compatible with each other?
While Arduino and Raspberry Pi are not directly compatible in terms of hardware, they can communicate with each other using various methods. For example, you can connect Arduino to Raspberry Pi via serial communication, I2C, or SPI protocols.
Can I use Arduino and Raspberry Pi together in a project?
Yes, you can! In fact, combining Arduino and Raspberry Pi can be a powerful combination. Arduino can handle real-time tasks and control sensors and actuators, while Raspberry Pi can provide a user interface, internet connectivity, and advanced processing capabilities.
Can I use Arduino shields with Raspberry Pi?
Arduino shields, which are expansion boards designed for Arduino, are not directly compatible with Raspberry Pi. However, there are adapter boards available that allow you to use Arduino shields with Raspberry Pi.
Can I use Arduino and Raspberry Pi for Internet of Things (IoT) projects?
Both Arduino and Raspberry Pi are widely used in IoT projects. Arduino’s low power consumption and real-time capabilities make it suitable for battery-powered and sensor-based IoT devices. Raspberry Pi, with its networking capabilities and ability to run complex software, is often used for IoT gateways, data processing, and cloud connectivity. The choice between the two depends on the specific requirements of your IoT project.

Hiren is a professional Embedded Engineer with a Master’s Degree
in Electronics and Communication Engineering. He is proficient in C and
C++ and enjoys building DIY projects on Arduino, ESP32, PIC32, STM32 & Raspberry PI boards.