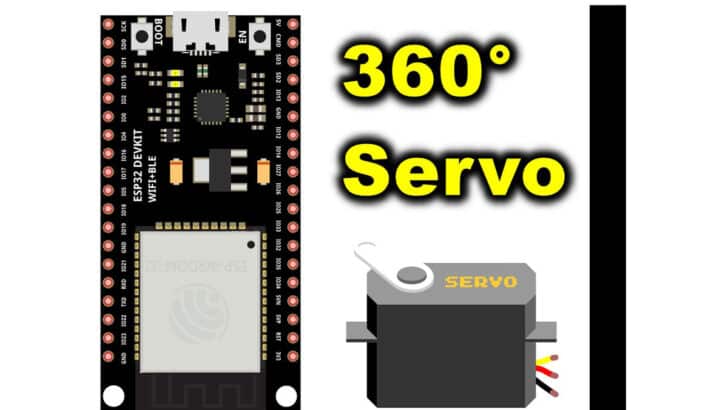
In this article, I will show how to control a 360-degree servo motor using an ESP32.
Servo motors are commonly used in robotics and automation systems. You can get precise control over movements using a servo motor.
Most servo motors are designed to rotate only up to 180 degrees, but there are special servo motors which can turn a complete 360 degrees.
By the end of this article, you will have learnt the basics, applications, and a working example of ESP32 and a 360-degree servo motor.
I have provided a step-by-step guide to connect a 360 degrees servo motor to an ESP32 controller. I have also provided an example code with explanations.
You will find a set of the most frequently asked questions about the ESP32 and 360-degree servo motors.
So, grab your breadboard and let’s get started!
Components Needed To Build ESP32 And 360-degree Servo Motor
Hardware Components
- Dupont wire x 1 set
- Micro USB Cable for ESP32 (for powering Arduino and programming) x 1
Software
Guide
Makerguides.com is a participant in the Amazon Services LLC Associates Program, an affiliate advertising program designed to provide a means for sites to earn advertising fees by advertising and linking to products on Amazon.com.
Basics of The ESP32 And 360-degree Servo Motor
In this section, we will understand the basics of the 360-degree servo motor and the necessary peripherals on ESP32 to make it work.
A 360-degree servo motor is also called a continuous servo motor because it can keep rotating in the same direction infinitely, unlike other servo motors, which can rotate only up to 180-degree.
There are usual hobby servo motors that rotate only from 0 degrees to 180 degrees and back. The 360-degree servo motors, on the other hand, can make a 360-degree turn.
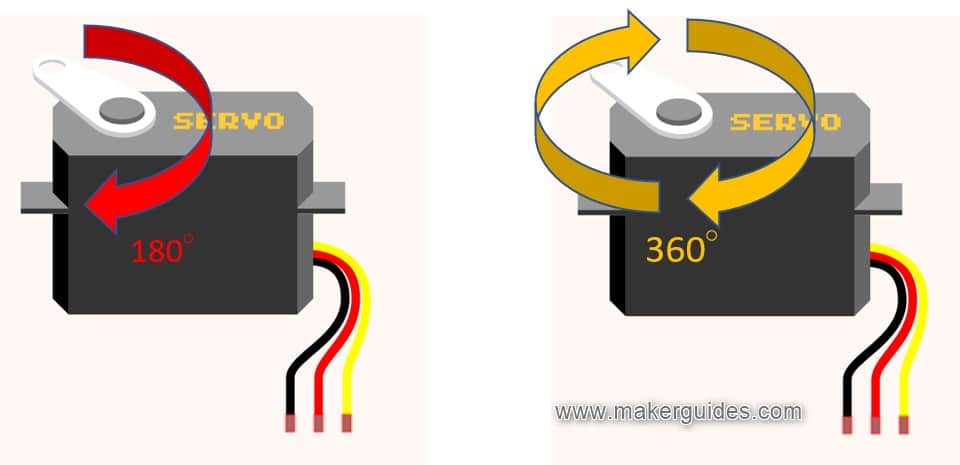
Before understanding how to do a 360-degree servo motor work, let’s see the differences between the conventional and the 360-degree servo motor.
A conventional servo motor has a limited range of motion between 0 and 180 degrees. At the same time, a 360-degree servo motor can do a full circle.
Though both use PWM as a control signal, the PWM signal will define the servo motor’s position in a conventional servo motor.
In contrast, in the case of a 360-degree servo motor, the PWM signal will determine the direction of rotation.
You can control the position in the case of a conventional servo motor, while you can control the direction in the case of a 360-degree servo motor.
The below image shows simplified functional blocks of a continuous servo motor.
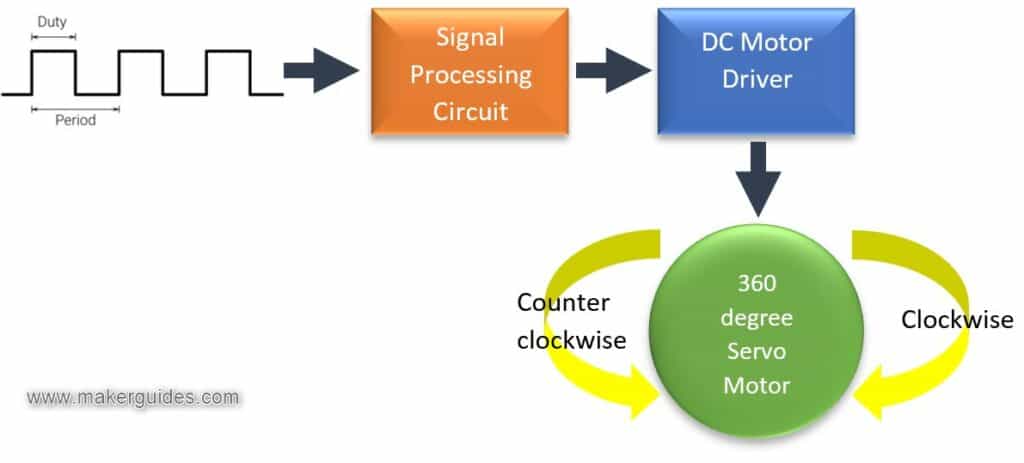
The usual pulse width of the control signal for a 360-degree servo motor varies between 0.5 ms to 2 ms.
A 1 ms pulse drives the servo motor in a clockwise direction. A 2 ms pulse will drive the motor in the anticlockwise direction. A 1.5 ms pulse width will stop the servo motor.
It is critical to understand the actual pulse width requirements of the servo motor you are using.
Firstly, you have to calibrate the servo motor. Start experimenting with the pulse width starting from 100 us until 1 ms. Note the pulse width at which the servo motor starts rotating. Please make a note of it.
Now, continue increasing the pulse width until the servo motor stops rotating. It could be 1 ms or 1.2 ms. It entirely depends on the servo motor you are using.
Now, continue increasing the pulse width until the servo motor rotates in the opposite direction.
Note down all three values.
You can use three values in your ESP32 code to control the continuous servo motor.
I will take you through the continuous servo motor datasheet in the coming sections.
Datasheet link: https://media.digikey.com/pdf/Data%20Sheets/Adafruit%20PDFs/154_Web.pdf
| Position | Pulse width | Direction |
| “0” | 1 ms | Full speed, backward |
| “90” | 1.5 ms | Motor stops |
| “180” | 2 ms | Full speed, forward |
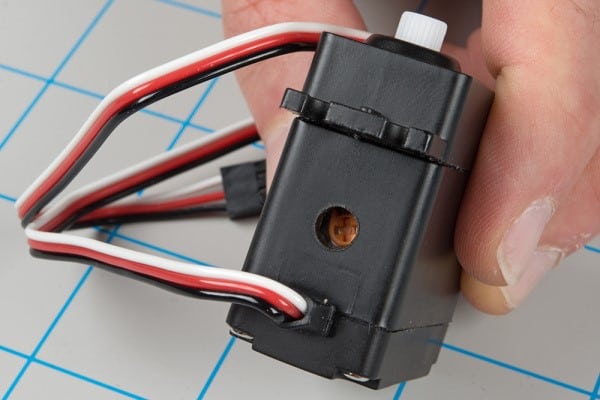
You can see that the datasheet also recommends that you do a calibration first. Adjust the potentiometer in the recessed hole with a small screwdriver until the servo stops moving.
I will present the technical details of the part from the datasheet.
| Operating Voltage | 4.8 V to 6 V |
| Average speed | ~0.18 sec / 60° |
| Stall Torque (4.8 V) | 3 kg.cm / 41.74 oz.in |
| Stall Torque (6 V) | 3.2 kg.cm / 44.52 oz.in |
| Required Pulse | 500 us – 2500 us |
| Connector wire length | 30 cm |
| Dimensions | 37 mm x 54 mm x 20 mm |
| Weight | 40 g |
| Spline count | 25 |
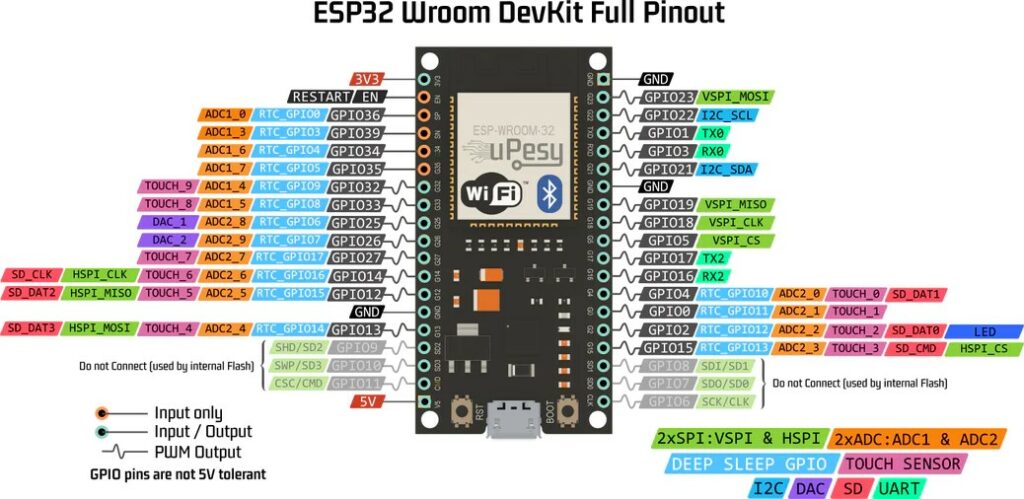
You will see a pinout of an ESP32 module in the below image:
There are several PWM pins on the ESP32. You can map the PWM function to any general-purpose pin acting like an output pin.
Various sources can power the ESP32. You can power it from USB, an external power supply, or batteries.
To enable long-term functionality, you should employ deep sleep modes. Sleep modes allow you to conserve power and extend battery life.
My personal preference is to always use USB power during development. A separate power supply to drive the servo motor is always recommended.
If no load is connected to the servo motor, you can power it from the supply pin of the ESP32 module.
Connecting A 360-degree Servo Motor To ESP32
In this section, I will give you a basic connection diagram to control a continuous servo motor with ESP32.
Let’s get started with the hardware connections!
How To Connect The 360° Degree Servo Motor with ESP32?
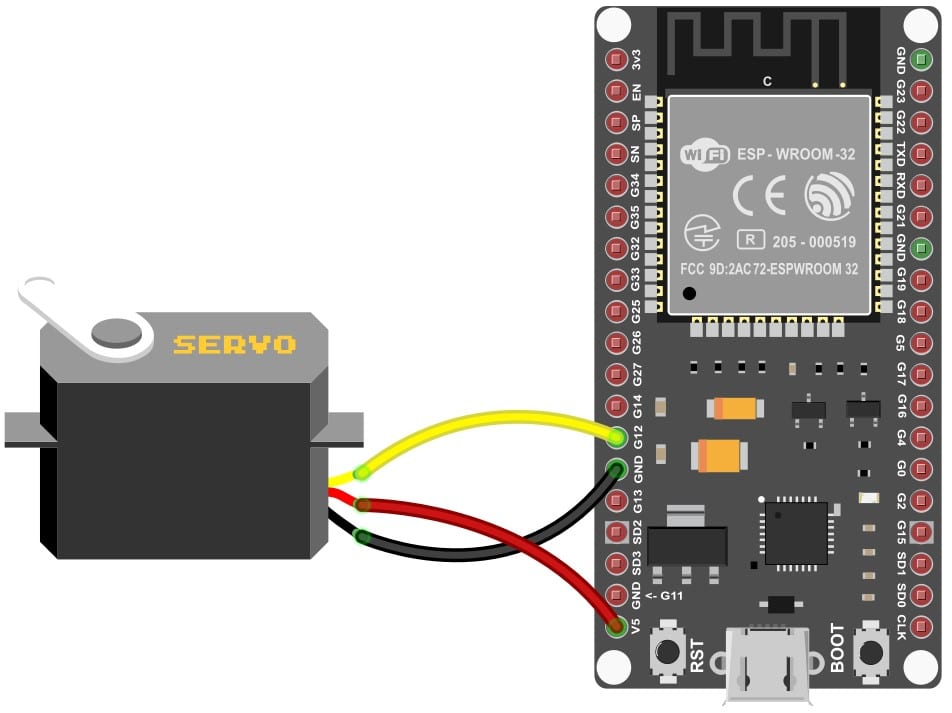
- Connect the GND pin of the ESP32 module to the GND of the Servo Motor. Choose any GND pins available on the ESP32 for the connection. It is an excellent practice to start with the GND connections.
- Connect the power supply pin of the Servo motor to the VBUS pin on the ESP32.
- The last connection is the control pin. This can be any GPIO of your preference which can act like an output. I have connected the GPIO12 pin to the signal pin of the servo motor.
ESP32 Code Example For The Continuous Servo Motor
In this section, you can find the complete ESP32 code to test the Servo motor connections. Please follow the instructions in the guide to install the ESP32 core on Arduino IDE.
/*
    Demonstration of Controlling Continuous Servo (360 servo)
    this code allows you to control 360 degree servo by a command from Serial Monitor

   Modified by Ahmad Shamshiri for Robojax.com
   on Sunday July 01, 2018 at 11:09 in Ajax, Ontario, Canada
   Watch video instruction of this video:https://youtu.be/b_xvu6wWafA
   Get this code from Robojax.com

  Original code by BARRAGAN <http://barraganstudio.com>
  This example code is in the public domain.
  modified 8 Nov 2013
  by Scott Fitzgerald
  http://www.arduino.cc/en/Tutorial/Sweep
*/

#include "Servo.h"

Servo myservo;  // create servo object to control a servo
// twelve servo objects can be created on most boards

int pos = 0;    // variable to store the servo position
int incomingByte = 0;   // for incoming serial data

void setup() {
  Serial.begin(9600);
  myservo.attach(12);  // attaches the servo on pin 12 to the servo object
}

void loop() {
  // send data only when you receive data:
  if (Serial.available() > 0) {
    // read the incoming byte:
    incomingByte = Serial.read();

    // say what you got:
    Serial.print("received: ");
    Serial.print (incomingByte);
    if (incomingByte == 108) {
      Serial.println(" sent 0 rotating CW ");
      myservo.write(0);
    } else if (incomingByte == 114) {
      Serial.println(" sent 180 rotating CCW ");
      myservo.write(180);
    } else if (incomingByte == 60) {
      Serial.println(" sent Stopped ");
      myservo.write(60);
    } else {
      Serial.println(" moving Random");
      myservo.write(incomingByte);
    }
  }
}
Let’s walk through the code.
#include "Servo.h"
The Servo.h header file declares the necessary classes, functions, and constants to interface with servo motors. This includes the Servo class. The Servo class controls the servo motor’s position and speed and the attach() and detach() functions.
You can use these functions to connect and disconnect the servo motor to the Arduino’s PWM pins.
int pos = 0;    // variable to store the servo position
int incomingByte = 0;   // for incoming serial data
The variables pos and incomingByte are used to control the servo motor. The incomingByte variable will hold the serial data that you can use to control the servo motor.
void setup() {
  Serial.begin(9600);
  myservo.attach(13);  // attaches the servo on pin 9 to the servo object
}
The setup function is called once when the program starts. In this function, you are opening the serial line at a 9600 baud rate. Also, I am attaching the servo pin. In this case, I am using ESP32 GPIO pin 12.
  if (Serial.available() > 0) {
    // read the incoming byte:
    incomingByte = Serial.read();

    // say what you got:
    Serial.print("received: ");
    Serial.print (incomingByte);
The loop function is repeatedly called after the setup function has been completed. In this code, you will check whether any data is in the serial receive buffer. If yes, you will read a byte and print the message in the terminal.
The servo can rotate in either direction. To rotate the servo motor in the left direction, send an `l`. It is a lowercase letter L. The ASCII value is 108. Similarly, send the ASCII value 114 to turn the servo motor right.
ASCII value 114 corresponds to the lower case letter r. To stop the servo motorASCII value 60 must be sent. To add fun, the code drives the servo motor randomly if you send any other data.
I hope you will change the code to your liking and build a more helpful project. I will be glad to learn about your projects.
FAQs About The ESP32 And The 360-degree Servo Motor Projects
I have included a list of the most frequently asked questions about projects built using ESP32 and the servo motors. If you have more questions, please post them in the comments section.
I will be happy to answer them.
1. What are 360-degree servo motors?
360-degree servo motors are a type of servo motor that can rotate continuously in either direction and provide full 360-degree rotation. You can find applications of such servo motors in camera pan and tilt, robotics and industrial automation projects.
2. Can I use ESP32 to control a 360-degree Servo motor?
Yes. You can definitely control a 360-degree servo motor using ESP32. You will need the ESP32 Servo library and a few GPIOs to complete the project. In this article, you will find a step-by-step connection guide and code examples to help you start with 360-degree servo motors.
3. What are some applications of 360-degree servo motors and ESp32?
There are several applications for a 360-degree servo motor. I have listed a few here.
- Camera systems – You can use a 360-degree servo motor to control the panning and tilting of the camera lens to track an object continuously. ESP32 is a powerful microcontroller which can process images and guide the servo motor so that the object always stays in focus even when it is moving.
- Industrial automation – Conveyor belts, packing systems, guides, and assembly lines employ 360-degree servo motors as they rotate a complete circle, and it is easy to change the direction of rotation.
- Gaming simulations – Steering wheels and other controls of game and flight simulators also use 360-degree servo motors.
- You will also find 360-degree servo motors in automobiles. Applications such as power steering, throttle control and other sub-systems need a 360-degree servo motor.
4. How do I select the right 360-degree servo motor?
It depends. You should first collect information regarding the speed, torque, voltage supply, and current you are expecting in your project. With precise requirements, it will be easy for you to choose the right servo motor.
5. How to connect an ESP32 to a 360-degree servo motor?
Driving a servo motor using ESP32 is very easy. You must connect any GPIOs capable of acting as an output to the servo motor control pin. You will find complete information regarding the 360-degree servo motor and ESP32 connections in the previous sections of this article.
Conclusion
In this article, I have covered all the steps needed to complete your first ESP32 and a 360-degree Servo motor project.
I have explained how a 360 sevo motor works and provided the the connection diagram and working ESP32 code example to help you build and test your connections quickly.
Let us know what projects you are going to use this for in the comments section, and feel free to leave any questions or feedback there too.

I am Puneeth. I love tinkering with open-source projects, Arduino, ESP32, Pi and more. I have worked with many different Arduino boards and currently I am exploring, Arduino powered LoRa, Power line communication and IoT.

