Welcome to my in-depth guide, where you can learn how to use ESP32 microcontrollers.
The ESP32 is the number one solution for connectivity and IoT projects. Be it for home automation, security, or remote sensing.
If you are looking for a straightforward guide to take you through all the basics of ESP32, you are in the right place.
In this article, I will discuss ESP32 boards, features, IO connection options, tips, powering options, valuable libraries, programming language options and more.
I have also written a second article in this series which covers all you need to know about programming the ESP32.
By the end of this article, you will be confident to take up your next ESP32 project and create more ESP32 projects on your own.
Comencemos.
Components Used
Componentes de hardware
- Micro USB Cable for ESP32 (for powering ESP32 and programming) x 1
Makerguides.com participa en el Programa de Asociados de Amazon Services LLC, un programa de publicidad de afiliados diseñado para proporcionar un medio para que los sitios ganen honorarios de publicidad mediante la publicidad y los enlaces a productos en Amazon.com.
Introduction to the ESP32
What is ESP32?
ESP32 is a low-cost and low-power SoC (System-on-Chip) with WiFi and Bluetooth capability. You can connect your phone via Bluetooth to the ESP32 module easily. Using the WiFi feature, you can use ESP32 to access weather information, time, and sensor data remotely.
The ESP32 board is similar to the Arduino board with more advanced features. You can program ESP32 the same way you program Arduino.
The ESP32 consumes low power, making it a good candidate for battery-driven applications. It’s also more powerful and faster than Arduino.
I will take you through the board types commonly seen and the features. I will also take you through the peripherals set that ESP32 has.
ESP32 History
Before I take you through the list of ESP32 boards, I will share the background of ESP32.
ESP32 was developed by a Chinese semiconductor company called Espressif Systems.
ESP32 was introduced as a successor to ESP8266. You will still see a lot of projects using ESP8266 for IoT applications.
The first ESP32 board – ESP32-DevkitC, was released in 2017. Now you will see a lot of products released by several vendors.
Below are the most famous ESP32 boards that have gained popularity among DIY electronic enthusiasts and professional engineers.
-> Lea nuestra guía sobre lo que puede construir con Adruino.
Main Blocks Of The ESP32 Board
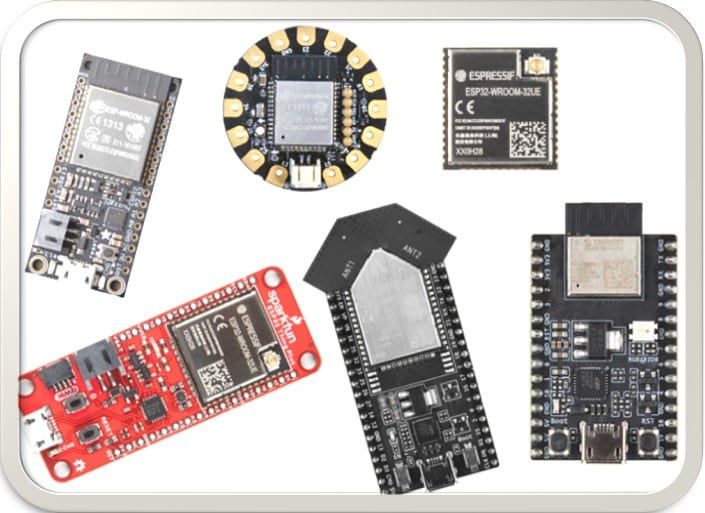
There are several ESP32 Boards on the market.
Some are easy to use, some are tiny, and some provide additional abilities by including other driver ICs on identical PCBs.
Depending on your application, you can choose the right one.
Let’s have a look at ESP32 -DevKitC
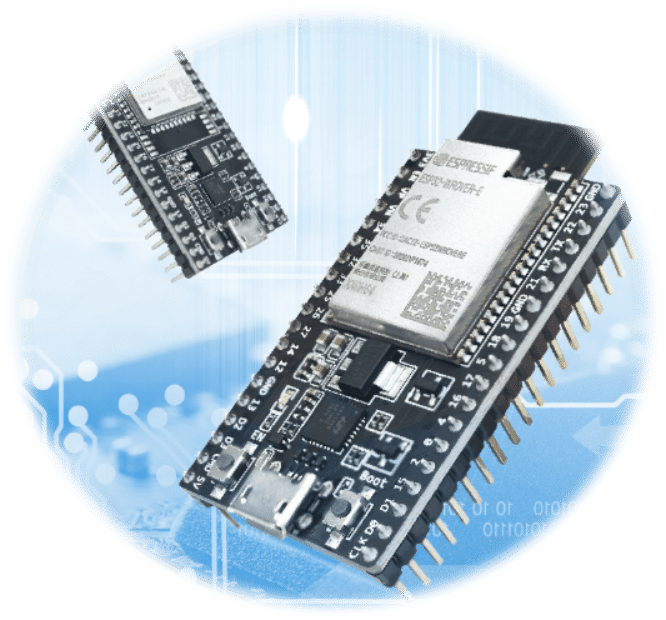
ESP32-DevKitC is an entry-level Development kit. The small size and built-in pinout help you to start prototyping quickly. Let’s look at the features:
- Wi-Fi & Bluetooth Connectivity – The module also has a rich peripheral set.
- Rapid Prototyping – You can jump into application development without the hassles of RF tuning and performance optimization. The basic system requirements are already taken care
- Flexible and Feature rich – USB-UART bridge, reset and boot-mode buttons, LDO regulator, and a micro USB connector. Every important GPIO is routed to the connector for the user
- Breadboard friendly – You can connect ESP32-DevKitC directly onto a standard breadboard
I will take you through the board peripherals.
Let’s have a closer look at the ESP32-DevKitC in this image below, where I have labelled the main features:
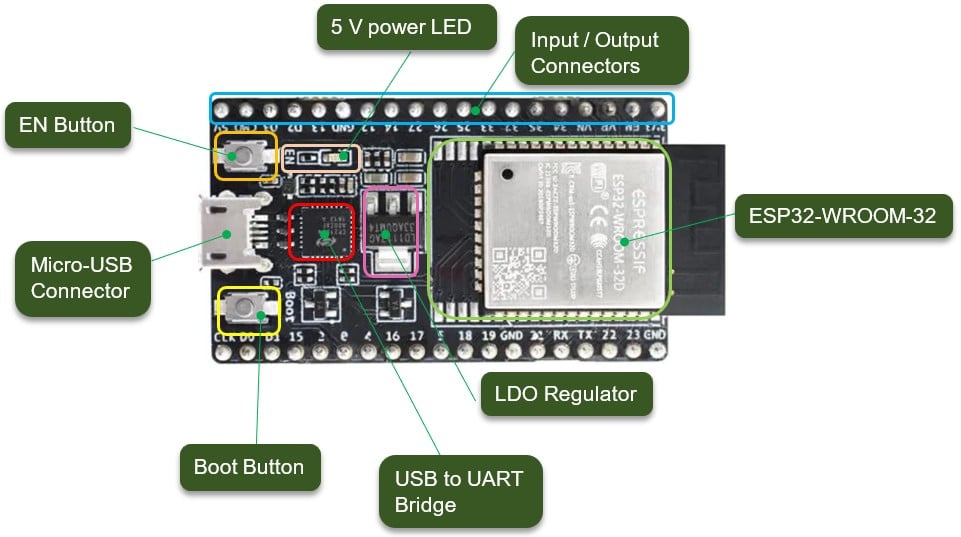
Let’s learn about the main blocks now. In each of the images below, I have highlighted the part of the board being discussed:
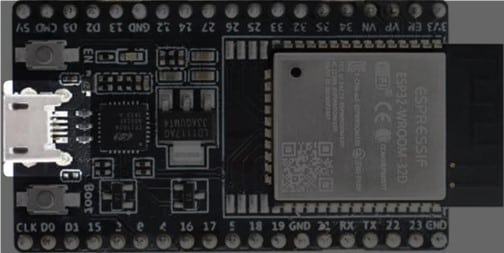
- The Micro-USB connector supplies power to the ESP32 board. It is also an interface between your computer and the ESP32 module. It is a Micro USB connector.
- The development boards will have one of the ESP32 SoC. You will find the name engraved using a laser on the part. The one in the image is ESP32-WROOM-32.
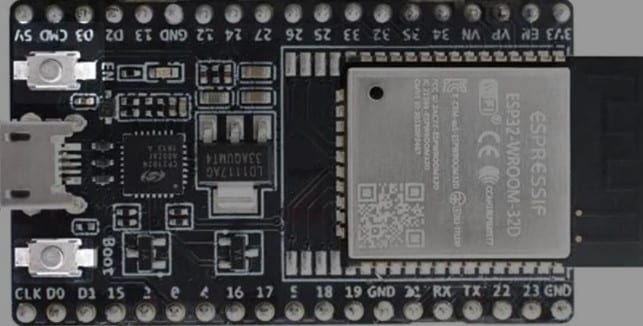
- There are two push buttons. Here are the functions of the two push buttons on ESP32
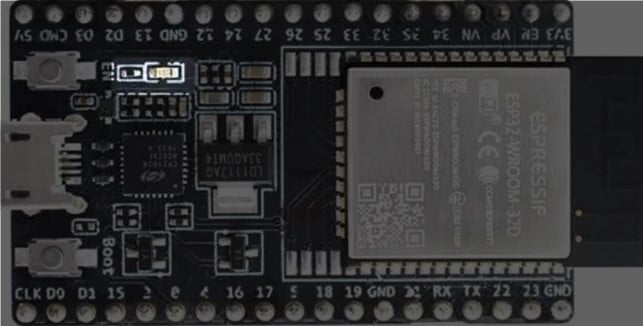
- EN Button – EN button is the reset button for ESP32. If you want to reset the ESP32, press the EN button momentarily and release it.
- BOOT button – The boot button helps to put ESP32 into software upgrade mode.
- Here is how you put the ESP32 into software upgrade mode:
- Hold down the Boot button on ESP32
- Press the EN button once
- Release the Boot button
- The 5 V LED will be ON as long as a 5 V source is available. It is used to indicate power availability. It will glow if you connect ESP32 to PC via USB or supply an external 5 V.
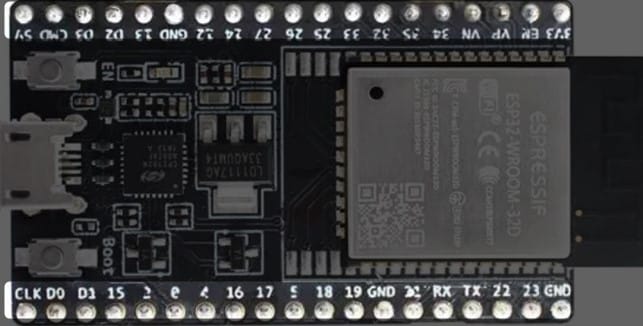
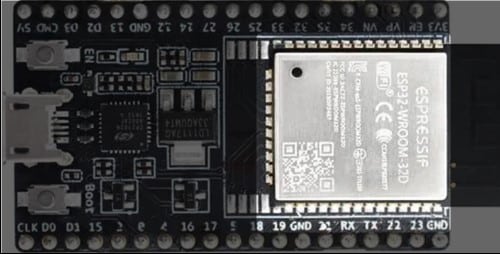
- All the useful pins of ESP32 are brought out on the I/O connector. Pins are available on the connector for all peripherals, such as ADC, DAC, SPI, I2C, PWM, etc. The I/O connector helps a lot in breadboard prototyping as well.
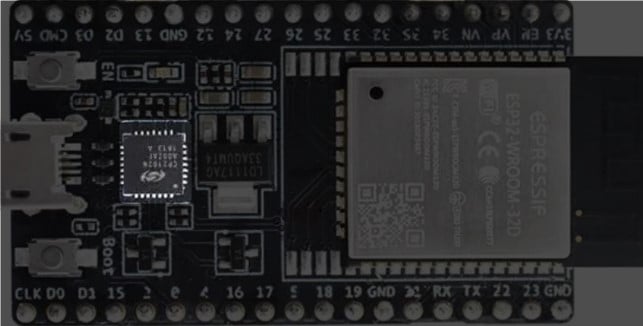
- The USB to UART bridge is an IC which acts like a bridge between your PC and the ESP32 chip. It converts the data from the PC over USB to serial data, which ESP32 can understand. It supports high-speed data transfer and is not a bottleneck for ESP32 programming and communication.
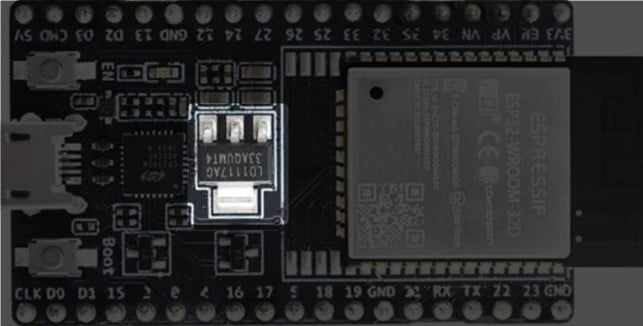
- The regulator converts the input 5 V into 3.3 V at which ESP32 operates.
Powering your ESP32
You have several options to power ESP32. You should only use one option at a time.
- Micro USB port, which is a default power supply
- 5 V via the header pins (shown in the image above)
- 3.3 V via the header pins (shown in the image above)
Connecting more than one power supply source at a time is strictly prohibited. You may permanently damage the ESP32 module or hurt yourself.
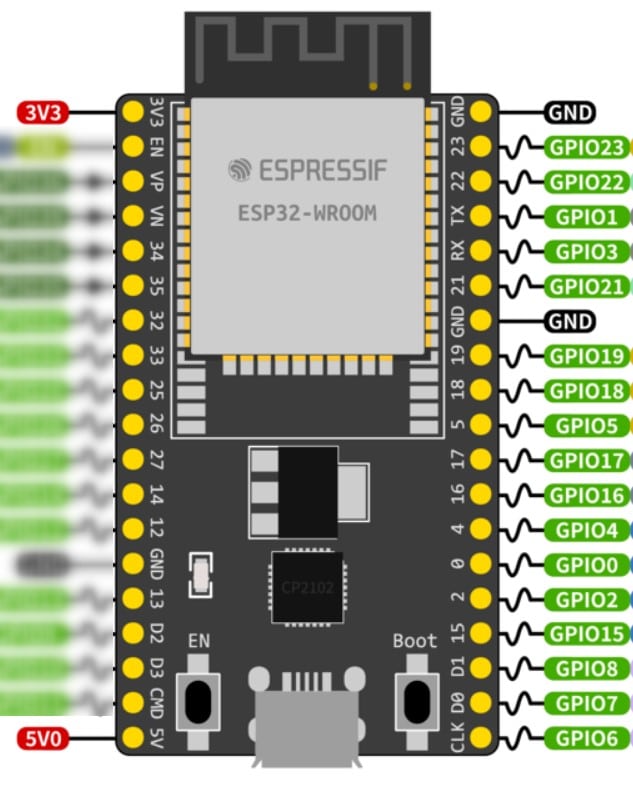
ESP32-DevkitC I/O Connector Pinout
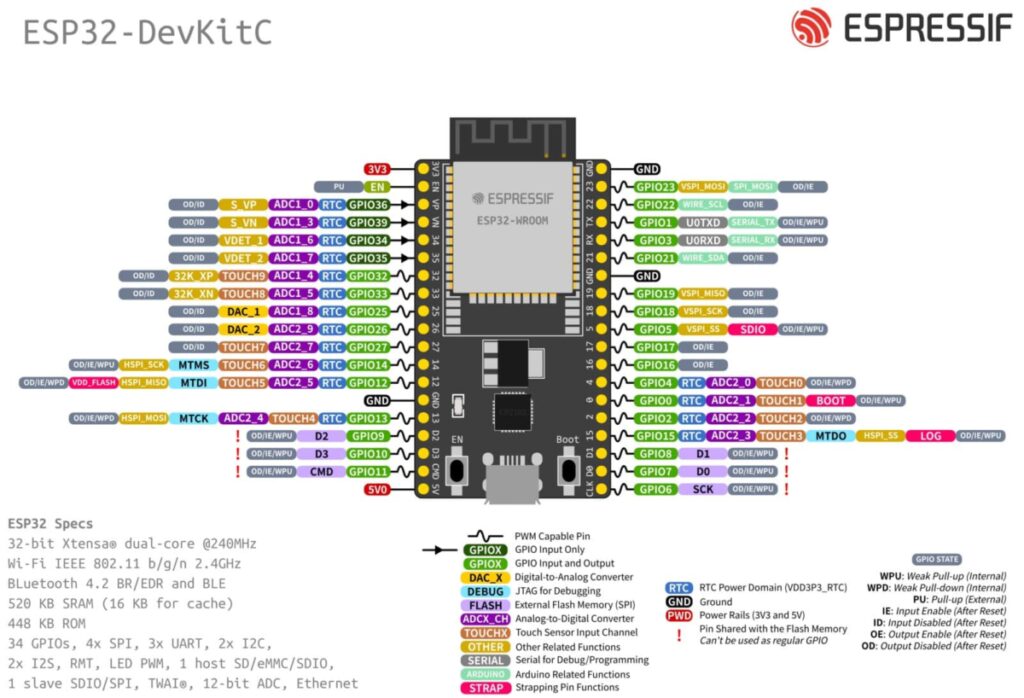
This image of the pinout is from the Espressif, maker of the ESP32 board.
There are two headers on the ESP32 kit. This table shows the pins on header 1.
| No. | Nombre de la clavija | Tipo de clavija | Función |
| 1 | 3V3 | P | 3.3 V power supply |
| 2 | ES | I | CHIP_PU, Reset |
| 3 | VP | I | GPIO36, ADC1_CH0, S_VP |
| 4 | VN | I | GPIO39, ADC1_CH3, S_VN |
| 5 | IO34 | I | GPIO34, ADC1_CH6, VDET_1 |
| 6 | IO35 | I | GPIO35, ADC1_CH7, VDET_2 |
| 7 | IO32 | E/S | GPIO32, ADC1_CH4, TOUCH_CH9, XTAL_32K_P |
| 8 | IO33 | E/S | GPIO33, ADC1_CH5, TOUCH_CH8, XTAL_32K_N |
| 9 | IO25 | E/S | GPIO25, ADC1_CH8, DAC_1 |
| 10 | IO26 | E/S | GPIO26, ADC2_CH9, DAC_2 |
| 11 | IO27 | E/S | GPIO27, ADC2_CH7, TOUCH_CH7 |
| 12 | IO14 | E/S | GPIO14, ADC2_CH6, TOUCH_CH6, MTMS |
| 13 | IO12 | E/S | GPIO12, ADC2_CH5, TOUCH_CH5, MTDI |
| 14 | GND | G | Tierra |
| 15 | IO13 | E/S | GPIO13, ADC2_CH4, TOUCH_CH4, MTCK |
| 16 | D2 | E/S | GPIO9, D2 2 |
| 17 | D3 | E/S | GPIO10, D3 2 |
| 18 | CMD | E/S | GPIO11, CMD 2 |
| 19 | 5V | P | Alimentación de 5 V |
Here are the pins on header 2 of the ESP32 devkit.
| No. | Nombre de la clavija | Tipo de clavija | Función |
| 1 | GND | G | Tierra |
| 2 | IO23 | E/S | GPIO23 |
| 3 | IO22 | E/S | GPIO22 |
| 4 | TX | E/S | GPIO1, U0TXD |
| 5 | RX | E/S | GPIO3, U0RXD |
| 6 | IO21 | E/S | GPIO21 |
| 7 | GND | G | Tierra |
| 8 | IO19 | E/S | GPIO19 |
| 9 | IO18 | E/S | GPIO18 |
| 10 | IO5 | E/S | GPIO5 |
| 11 | IO17 | E/S | GPIO17 3 |
| 12 | IO16 | E/S | GPIO16 3 |
| 13 | IO4 | E/S | GPIO4, ADC2_CH0, TOUCH_CH0 |
| 14 | IO0 | E/S | GPIO0, ADC2_CH1, TOUCH_CH1, Boot |
| 16 | IO2 | E/S | GPIO2, ADC2_CH2, TOUCH_CH2 |
| 17 | IO15 | E/S | GPIO15, ADC2_CH3, TOUCH_CH3, MTDO |
| 17 | D1 | E/S | GPIO8, D1 2 |
| 18 | D0 | E/S | GPIO7, D0 2 |
| 19 | CLK | E/S | GPIO6, CLK 2 |
I will take you through the peripherals in the coming section.
Understanding the pinout image of ESP32.
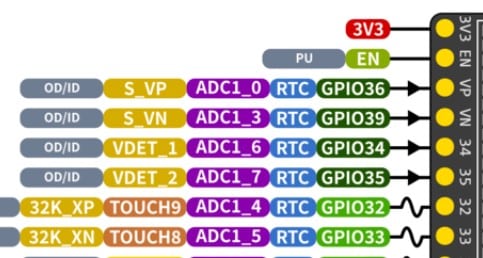
In the above image, you can see several pins of ESP32 and pin functions supported.
Some pins have fixed functions such as Power supply and GND.


Some pins have multiple functions supported. For example, consider the ESP32’s pin 34 functions below.

- GPIO34 → GPIO input and output. You can drive an LEd or plug in a push button to this pin when you configure the pin as general-purpose Output or Input.
- RTC → RTC power domain – You can enable or disable the pin features when powered via RTC Power (VDD3P3_RTC).
- ADC1_6 → Analog to digital converter – ADC module 1, channel 6.
- VDET_1 → Input pin in RTC domain
- OD/ID → This says that after reset state, the Output function will be disabled, and the Input function will be disabled as well.
Features of ESP32-S3 SoC
The ESP32 is a peripheral-rich controller. I have listed all the key features of an ESP32-S3 module.
Wi-Fi
- IEEE 802.11 b/g/n-compliant
- Supports 20 MHz, 40 MHz bandwidth in 2.4 GHz band
- 1T1R mode with a data rate of up to 150 Mbps
- Wi-Fi Multimedia (WMM)
- TX/RX A-MPDU, TX/RX A-MSDU
- Immediate Block ACK
- Fragmentation and defragmentation
- Automatic Beacon monitoring (hardware TSF)
- 4 × Virtual Wi-Fi interfaces
- Simultaneous support for Infrastructure BSS in Station, SoftAP, or Station + SoftAP modes Note that when ESP32-S3 scans in Station mode, the SoftAP channel will change along with the Station channel
- Antenna diversity
- 802.11mc FTM
Bluetooth
- Bluetooth LE: Bluetooth 5, Bluetooth mesh
- High power mode (20 dBm)
- Speed: 125 Kbps, 500 Kbps, 1 Mbps, 2 Mbps
- Advertising extensions
- Multiple advertisement sets
- Channel selection algorithm #2
- Internal coexistence mechanism between Wi-Fi and Bluetooth to share the same antenna
CPU and Memory
- Xtensa® dual-core 32-bit LX7 microprocessor, up to 240 MHz
- CoreMark® score:
- One core at 240 MHz: 613.86 CoreMark; 2.56 CoreMark/MHz
- Two cores at 240 MHz: 1181.60 CoreMark; 4.92 CoreMark/MHz
- 128-bit data bus and SIMD commands
- 384 KB ROM • 512 KB SRAM
- 16 KB SRAM in RTC
- SPI, Dual SPI, Quad SPI, Octal SPI, QPI and OPI interfaces that allow connection to multiple flash and external RAM
- Flash controller with cache is supported
- Flash In-Circuit Programming (ICP) is supported
Advanced Peripherals Interfaces
- 45 × programmable GPIOs
- Digital interfaces:
- 4 × SPI – 1 × LCD interface (8-bit ~16-bit parallel RGB, I8080 and MOTO6800), supporting conversion between RGB565, YUV422, YUV420 and YUV411
- 1 × DVP 8-bit ~16-bit camera interface – 3 × UART – 2 × I2C – 2 × I2S
- 1 × RMT (TX/RX)
- 1 × pulse counter
- LED PWM controller, up to 8 channels
- 1 × full-speed USB OTG
- 1 × USB Serial/JTAG controller
- 2 × MCPWM
- 1 × SDIO host controller with two slots
- General DMA controller (GDMA), with 5 transmit channels and five receive channels
- Analog interfaces
- 2 × 12-bit SAR ADCs, up to 20 channels
- 1 × temperature sensor
- 14 × touch sensing IOs
- Timers:
- 4 × 54-bit general-purpose timers
- One × 52-bit system timer
- 3 × Watchdog timers
Security
- Secure boot
- Flash encryption
- 4-Kbit OTP, up to 1792 bits for users
- Cryptographic hardware acceleration:
- AES-128/256 (FIPS PUB 197)
- Hash (FIPS PUB 180-4)
- RSA
- Random Number Generator (RNG)
- HMAC
- Digital signature
Applications of ESP32
With wireless and powerful processing capability combined with low-power features, ESP32 finds several applications across domains. I have listed a few examples in this section.
- Generic Low-power IoT Sensor Hubs: As a low-power yet powerful SoC, The ESP32 can act like a hub for several sensors. This will offload the wireless burden on the sensors. It enables the sensor to be produced at a lower cost and with better power consumption.
- Generic Low-power IoT Data Loggers – Wireless option enables you to create data loggers with built-in transmit options to the cloud. Examples are temperature monitoring for incubators, cold storage and logistics, etc.
- Cameras for Video Streaming – You can set up video streaming using ESP32 and a compatible camera. Examples: Panda parenting her baby, a match event, or even weather how it looks, can be broadcasted using ESP32 with a WiFi connection.
- Speech Recognition – You can connect a microphone, collect the voice samples, send them to the cloud for speech processing, and build voice recognition projects.
- Image Recognition – Essential image recognition can be implemented without cloud support, and advanced image recognition algorithms can be implemented with cloud support. Thanks to the wireless features of ESP32.
- Wi-Fi + Bluetooth Networking Card – A networking card enables you to reach all the nearby devices. It is helpful in stores and airport lounges where people can get exciting and valuable product offers via Bluetooth. It helps to locate interested parties and stores together without manual interference.
- Touch and Proximity Sensing – ESP32 supports touch functionality. Another extension of touch functionality is proximity detection. Imagine you have built a weather station or a news board display using ESP32. Instead of fetching the news or the data all the time, you can do it only when a user is nearby.
Using the proximity sensing feature of ESp32, you can detect the user approaching the display and then fetch the latest data. This will help save power and data usage as well as it wise.
- Smart Home – You can keep an eye on the health of your indoor plants, feed your aquarium fish, or observe your dog inside the house using the ESP32. Using its Wi-Fi feature, you can set motion detection, door or window movement, or vehicle movement alerts.
You can also monitor your tanks’ air quality and water level from anywhere worldwide, making the ESP32 the ideal choice for all these tasks.
- Industrial Automation and Health Care – ESP32 has been utilized in the production industry to transmit the status of machines, temperature, and loading conditions. The data is centrally monitored in an observation room.
In the healthcare industry, all essential patient data can be securely transmitted to mobile apps or servers using ESP32, providing doctors with easy access to vital patient information. Oxygen levels, air quality, patient temperature, and heart rate can be monitored in real-time, allowing for timely support when needed. When combined with WiFi, sensors can provide life-saving alerts to concerned parties.
- Consumer Electronics – Adding ESP32 into a consumer electronics product is easy since the price of esp32 is negligible compared to the value it adds. Consider a washing machine, for example.
Bringing an ESP32 feature addition will enable you to know the status of washing and helps you in scheduling the washing as well as service or sensor issues efficiently. What do you think?
- Smart Agriculture – ESP32 has applications in the agriculture industry as well. How? ESP32 can gather internet weather information and efficiently plan to water. ESP32 can also help create a mesh over the entire range of the land (in Hectares) and have one primary node communicating to the land owner about the soil condition and fertilizer distribution.
ESP32 helps in optimizing the usage of fertilizers, water and labour. Overall, it helps in protecting soil nature and improves yield.
- POS machines – ESP32 has security and encryption features built-in. You can create a low-cost POS machine using ESP32. ESP32 can handle a display and a keypad easily.
Its Wi-Fi feature lets you connect the POS to the internet, enabling data exchange, payment gateway setup and more. ESP32 can help you to plan the logistics to resupply the vending machines by sharing the status of inventory and usage statistics.
Programming ESP32
You have several ways to start with ESP32 programming.
- You can use Arduino IDE to program ESP32 to write the code in C/C++, just like you write for Arduino boards. Mostly recommended for beginners.
- You can use MicroPython
- Espressif has created the Espressif IoT Development Framework (ESP-IDF) to utilize all the features of ESP32 fully.
A Look At The ESP32 Datasheet Parameters
As always, a datasheet is your friend. Here is a link to the ESP32 datasheet from Espressive.
Imagine you are building an electronic gadget and have this little chip that will help make it work. It is best to know the details of the IC first before you use it in the design.
That’s where the datasheet comes in. The datasheet is the instruction manual for the chip, giving you all the details about how it works, what it needs to operate correctly, and what it can and can’t do.
By reading the datasheet, you can ensure you are using the chip correctly.
The datasheet also tells you how to hook up the chip to other parts of your gadget and how to make it communicate with them. And, if you are lucky, there will be some examples and tips to help you get started.
Power Supply Section
Understanding the power scheme will help you develop better power-efficient project solutions.
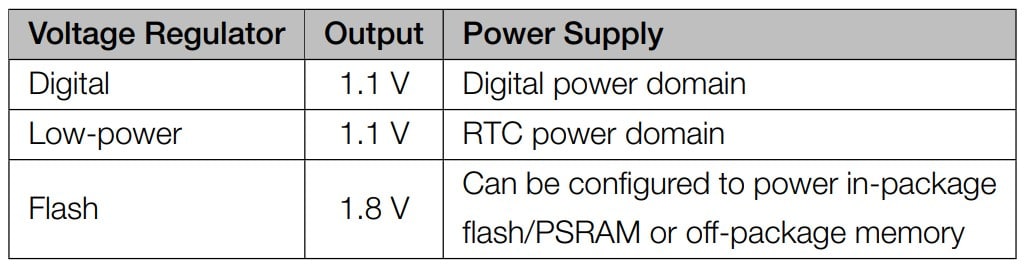
The sections also introduce you to power-up requirements, dependency on reset timing, power supply, and more.
Knowing those helps you debug a few problems, primarily when the ESP32 works fine once and not during the next power-on.
Analog Peripherals
ADC – Analog to Digital Converters
ESP32 has 12-bit SAR and supports measurements up to 20 channels. You can use ADC to measure voltages even in sleep mode. You can use threshold settings to wake up the ESP32 from sleep mode!
This information could have been missed if you hadn’t studied the datasheet.
Temperature Sensor
An onboard temperature sensor generates a voltage proportional to the temperature. The range for the temperature sensor is -20 °C to 110 °C.
You can refer to the datasheet for valuable information on all the peripherals. You can always go right when you refer to the official datasheet.
DC Characteristics
Here is a snapshot of the DC characteristics of the ESP32-S3

IOL refers to the current the chip can sink without damaging itself.
IOH is the maximum supply current the pin can supply (while driving the LED, for example).
You have heard a lot about internal pull-up and pull-down resistors. Here, you will find the actual values of the resistors.
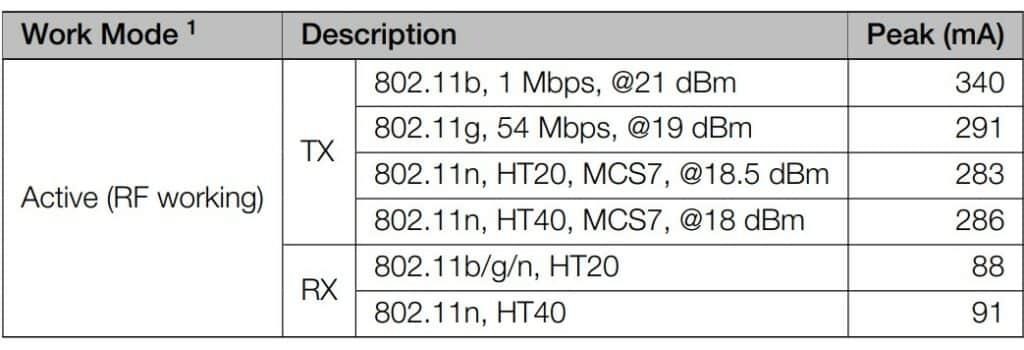
Current Consumption
The current consumption depends on the RF power level. You can use the information to estimate the battery backup time and thermal design considerations.
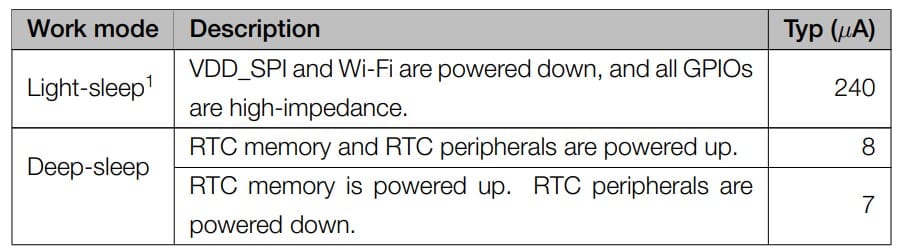
You will get information on the current consumption in low-power modes, such as RTC mode.
RF Specifications
- Bluetooth Low Energy Radio – Center frequency range 2402 and 2480 MHz
- WiFi Radio – Center Frequency range – 2412 MHz and 2484 MHz
I will be happy to help you if you have any questions regarding the specifications in the datasheet.
FAQs About The ESP32
I have included a list of the most frequently asked questions about projects built using the ESP32. If you have more questions, please post them in the comments section. I will be happy to answer them.
1. What is the power supply requirement for an ESP32 board?
The ESP32 board typically requires a power supply voltage of 3.3 V. Some boards may have onboard voltage regulators to accept a higher input voltage, but checking the board specifications before supplying power is essential. Recommended supply range is 3 V to 3.6 V.
2. What is the maximum current consumption of an ESP32 board?
The maximum current consumption of an ESP32 board depends on the specific board and the application it is being used for. Generally, the maximum current consumption can range from a few milliamps to several hundred milliamps. Please refer to the datasheet, connected peripherals, RF power and more to estimate the current consumption of the board.
3. What are the features of an ESP32 board?
Some of the features of an ESP32 board include
- Dual-core 32-bit CPU
- WiFi and Bluetooth connectivity
- Multiple communication interfaces such as SPI, I2C, UART, and more
- Analog-to-digital converters (ADCs) and digital-to-analog converters (DACs)
- GPIO pins for interfacing with external devices
- Onboard flash memory for storing code and data
4. Can an ESP32 board be programmed using the Arduino IDE?
The ESP32 board can be programmed using the Arduino IDE with the appropriate libraries and board definitions installed. Arduino IDE helps Arduino enthusiasts to easily start with ESP32 boards.
5. How can an ESP32 board be powered using a battery?
An ESP32 board can be powered using a battery by connecting the battery’s positive terminal to the VIN or 5V pin on the board and the negative terminal to the GND pin. Using a storm with the appropriate voltage and capacity for the application is essential.
It would help if you also considered using a battery management IC which can help protect the battery and the circuit during over-voltage, under-voltage and harsh conditions.
6. What are some typical applications of an ESP32 board?
Some typical applications of an ESP32 board include:
- IoT devices such as smart home appliances and sensors
- Wearables and fitness trackers
- Robotics and automation
- Data logging and monitoring systems
- Wireless communication devices
7. Is ESP32 better than an Arduino?
ESP32 is more powerful, has a rich set of peripherals and wireless features compared to a typical Arduino board. It depends on your final application.
Conclusión
In this article, I have taken you through all the essential hardware blocks of a typical ESP32 hardware development kit and the features of ESP32 SoC.
I have also walked you through the typical sections of the datasheet where you can find helpful information such as power consumption, pin configuration options and specifications of each peripheral.
I have also written an article to teach you all you need to know when it comes to programming ESP32 microcontrollers, so do go ahead and check this out as well.
I’d love to hear from you! Let us know if there’s anything else you’d like me to cover in future articles.
Please share the article with fellow ESP32 enthusiasts. Keep Learning!

I am Puneeth. I love tinkering with open-source projects, Arduino, ESP32, Pi and more. I have worked with many different Arduino boards and currently I am exploring, Arduino powered LoRa, Power line communication and IoT.
Bungy
Saturday 2nd of December 2023
Excellent article, very informative, thank you. Still at the novice stage, but articles like these are a great help.
Thanks again