
If you’re looking to build a gas detection system or a breathalyzer, then the MQ-3 sensor is a great option.
This tiny sensor can detect the presence of alcohol vapor with good accuracy and can be easily connected to an Arduino for use in a wide range of projects.
It is a low cost sensor and a favorite among hobbyists.
In this article, we’ll cover everything you need to know about the MQ-3 sensor, including its features, how to use it with an Arduino, and code examples.
I have provided a step by step guide to connect the MQ-3 sensor & Arduino UNO.
In the following section, you will also discover a compilation of the most commonly asked questions regarding the MQ-3 sensor.
Grab your Arduino board, and let’s begin!
Components Needed To Build Arduino And MQ-3 Module Sensor Project
Componentes de hardware
- Arduino Uno Rev3 x 1
- Arduino UNO MQ-3 Sensor x 1
- I2C – LCD Module x 1 (optional)
- Alambre Dupont x 1 juego
- Cable USB Arduino (para alimentar Arduino y programar) x 1
Software
Makerguides.com participa en el Programa de Asociados de Amazon Services LLC, un programa de publicidad de afiliados diseñado para proporcionar un medio para que los sitios ganen honorarios de publicidad mediante la publicidad y los enlaces a productos en Amazon.com.
Basics of The MQ-3 Alcohol detector Module
In this section, I’ll provide you all the details about the MQ-3 sensor, and it’s applications.
The MQ-3 sensor is a type of gas sensor that is designed to detect the presence of alcohol vapors in the air.
It is commonly used in breathalyzer devices, which are used to measure blood alcohol content (BAC) in individuals who are suspected of driving under the influence (DUI).
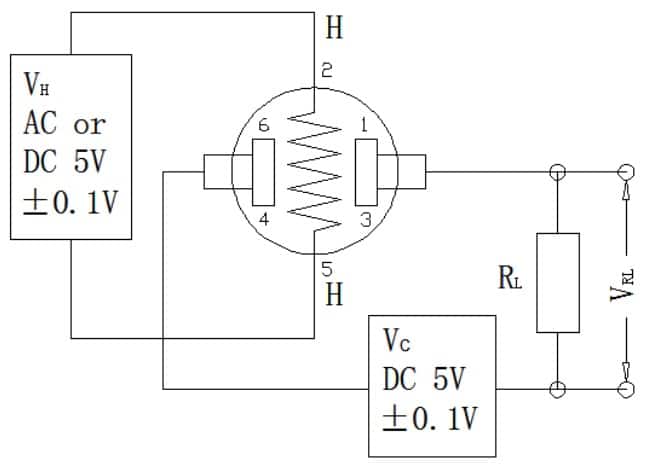
The circuit depicted in the above image is used to test the performance of the sensor.
The sensor comprises a tiny ceramic tube coated with a layer of Tin Dioxide (SnO2) that’s super sensitive, along with a measuring electrode and a heater.
These elements are packed into a crust made of plastic and stainless steel netting. The heater is essential as it sets the optimal conditions for the sensor to work.
The MQ-3 sensor has six pins – four for signal collection and two for the heating current.
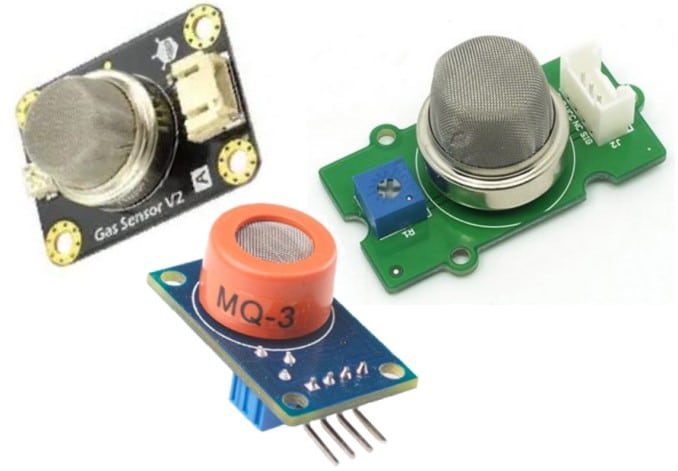
There are a variety of PCB modules available in the market that are designed for use with the MQ-3 sensor. However, this guide is intended to assist you in all such cases.
The MQ-3 sensor is also used in other applications, such as in gas leakage detection systems and in industrial settings where alcohol vapors may be present.
Basic Working Principle
The MQ-3 sensor operates based on the principle of gas detection through a chemical reaction.
The sensor contains a small heating element that heats up a metal oxide semiconductor (MOS) sensor.
When alcohol vapors are present in the air, they interact with the MOS sensor, causing a change in its electrical resistance.
The sensor then sends a signal to a microcontroller, which can be used to trigger an alarm or other action.
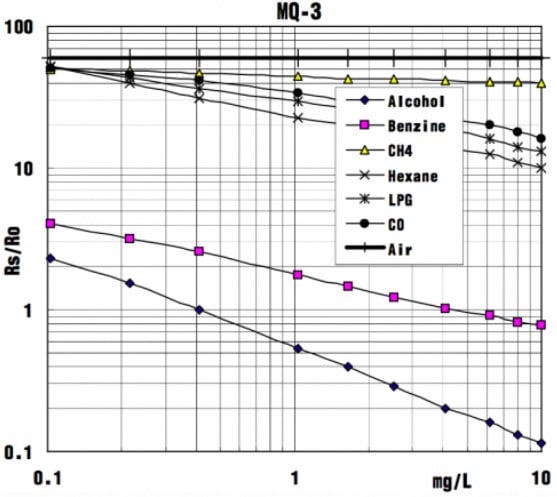
The above image shows the variation of the sensor output with respect to the concentration of the gas. As you can see, the sensor is most sensitive to Alcohol.
The MQ-3 sensor can detect alcohol vapors within a concentration range of 0.1 mg/L to 10 mg/L.
Due to the non-linear relationship between concentration and voltage changes, it is necessary to use a lookup table to obtain accurate readings across this wide range of alcohol concentrations.
One of the key advantages of the MQ-3 sensor is its sensitivity to alcohol vapors. It can detect alcohol vapors at very low concentrations, making it ideal for breathalyzer devices.
The MQ3 sensor can also be sensitive to other types of gases and vapors, which can result in false readings (see the plot above).
To reduce the risk of false readings, you can calibrate the sensor with a known amount of alcohol concentration in a test environment to correct offset errors.
The MQ-3 sensor is also relatively easy to use and inexpensive, which has made it popular among hobbyists and DIY enthusiasts.
Note that the sensor requires calibration to ensure accurate readings.
Calibration mechanism
Calibration involves exposing the sensor to a known concentration of alcohol vapors and adjusting the sensor’s output accordingly.
While the MQ-3 sensor is relatively easy to use and inexpensive, it requires calibration to ensure accurate readings.
It may be sensitive to other types of gases and vapors, which can result in false readings.
Features Of The MQ-3 Alcohol Detector module
Here are the features of the Arduino-compatible MQ-3 Sensor:
- It operates on a 5 V DC power supply and consumes very low power.
- The sensor has a high sensitivity and fast response time, allowing it to detect alcohol vapor quickly.
- It has a wide detection range, from 25 to 500 ppm of alcohol.
- The sensor output voltage can be read using an analog-to-digital converter (ADC) or a voltage comparator circuit.
- It has a small form factor and can be easily integrated into various systems or projects.
- It supports a wide operating temperature range: -10 ℃ to +50 ℃.
- Stable and long life
- Simple drive circuitry
Pin Details Of The MQ-3 Gas Sensor Module
Let’s look closer at the MQ-3 Gas Sensor Module.
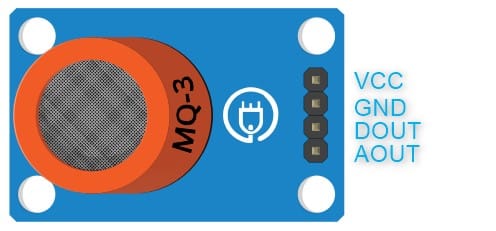
Here is the pin description of the pins of the MQ-3 sensor module.
| Pin | Función |
| DOUT | Salida digital |
| AOUT | Salida analógica |
| GND | Conexión a tierra |
| VCC | Fuente de alimentación |
- DOUT– This digital signal indicates whether or not the preset gas concentration limit has been reached.
- AOUT – An equivalent analog output is also available, which allows for precise measurement of the amount of gas detected by the sensor.
- GND – Ground connection
- VCC – Arduino 5 V
Step-By-Step Instructions To Connect The MQ-3 Gas Sensor Module With Arduino UNO
Let’s dive into building an alcohol detector project using an Arduino UNO and the MQ-3 gas sensor module.
This section is simple, since the connections are straightforward and won’t take much time to complete.
How To Connect The MQ-3 Gas Sensor Module To The Arduino UNO?
Below is the step-by-step connection guide to complete the Arduino and the MQ-3 gas sensor module.
Paso 1: Empezar con las conexiones GND
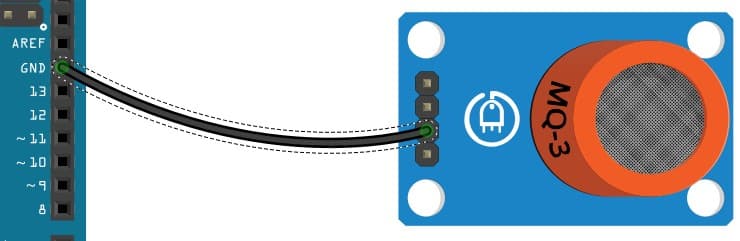
Connect the GND pin of the MQ-3 module to the GND of the Arduino.
Elige cualquier pin GND disponible en el Arduino para la conexión.
Es una excelente práctica comenzar con las conexiones GND.
Step 2: Connect the AOUT line
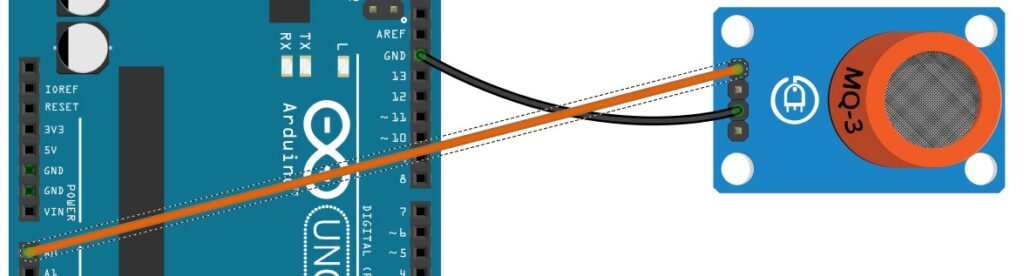
Connect the AOUT line of the MQ-3 sensor to the Analog pin of the UNO as shown in this diagram.
Step 3: Connect the LED Indicator
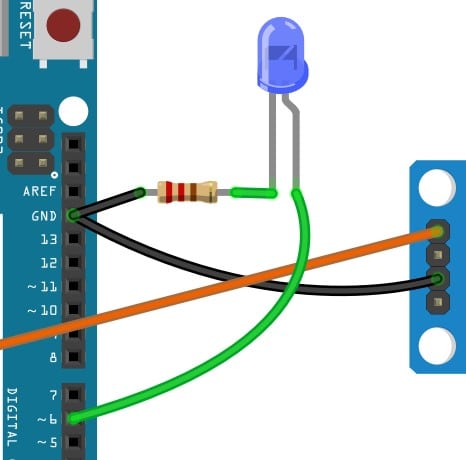
By monitoring the analog input, you can adjust the brightness of the LED to reflect the concentration of the alcohol detected by the sensor.
This allows for a visual representation of the level of alcohol present.
Paso 4: Conectar la línea de alimentación (cable rojo)
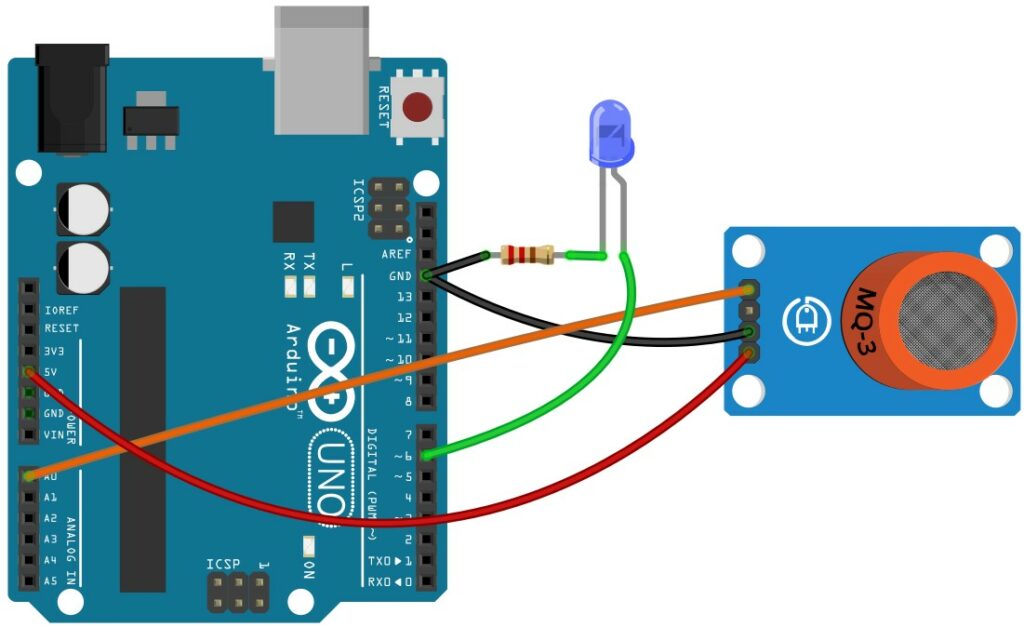
To test the gas sensor, simply connect the VCC pin on the MQ-3 sensor to the 5 V pin on the UNO.
That’s it! Congratulations, you have successfully completed the necessary connections. In the next section, we’ll delve into the Arduino code.
Arduino Code Example For The MQ-3 Gas Sensor Module Project
En esta sección, puedes encontrar el sketch completo de Arduino y la información sobre la instalación de las librerías necesarias.
The complete Arduino Code For The MQ-3 Arduino Project Example
#define Sober 200   // Define max value that we consider sober
#define Drunk 400   // Define min value that we consider drunk
#define MQ-3 0
#define ledPin 6

float sensorValue;  //variable to store sensor value

void setup() {
  Serial.begin(9600); // sets the serial port to 9600
  pinMode(ledPin, OUTPUT);
  digitalWrite(ledPin, LOW);
  Serial.println("MQ-3 Heating Up!");
  delay(20000); // allow the MQ-3 to warm up
}

void loop() {
  sensorValue = analogRead(MQ-3); // read analog input pin 0
  Serial.print("Sensor Value: ");
  Serial.print(sensorValue);
  // Return analog moisture value
  // Determine the status

  if (sensorValue < Sober) {
    Serial.println("  |  Status: Sober");
  } else if (sensorValue >= Sober && sensorValue < Drunk) {
    Serial.println("  |  Status: Drinking but within legal limits");
  } else {
    Serial.println("  |  Status: DRUNK");
  }

  unsigned int outputValue = map(sensorValue, 0, 1023, 0, 255);


  if (sensorValue > 700) {
    analogWrite(ledPin, outputValue); // generate PWM signal
  }
  else {
    digitalWrite(ledPin, LOW);
  }

  delay(2000); // wait 2s for next reading
}
In the example code above, the analog value from the MQ3 sensor is read. Arduino UNO’s analog input A0 is used in this example.
You can change to other analog channels but don’t also forget to update the code accordingly.
You can change the limits of variables `Sober` and `Drunk` to fine-tune your application. The code will read the sensor value.
It will compare with the predefined thresholds and report whether it has detected alcohol in the given range.
FAQs About The MQ-3 Sensor module And The Arduino UNO Projects
I have included a list of the most frequently asked questions about projects built using Arduino and the alcohol detector sensor module – MQ-3.
If you have more questions, please post them in the comments section. I will be glad to help.
1. What is an MQ-3 sensor?
The MQ-3 sensor is a gas sensor designed to detect alcohol vapors in the air. It does this by measuring the change in resistance of its internal sensing element when exposed to alcohol.
2. How does the MQ-3 sensor work with Arduino?
To use the MQ-3 sensor with Arduino, you need to connect its pins to the appropriate input/output pins on the Arduino board. Typically you need one analog input and digital input.
You can follow the sections above for the connection guide and the sample code.
3. What are some common applications for the MQ-3 sensor with Arduino?
The MQ-3 sensor can be used for various alcohol detection projects, including
- breathalyzers,
- drink-driving prevention systems,
- and gas leakage detectors.
It is a popular choice for hobbyists and professionals due to its accuracy and ease of use.
4. Can the MQ-3 sensor detect other types of gases besides alcohol?
No, the MQ-3 sensor is designed specifically for detecting alcohol vapors and may not be accurate for detecting other types of gases. You might have noticed this in the graph provided in the previous section of this article.
For other types of gases, you may need to use a different sensor or a multi-gas sensor that can detect multiple gases simultaneously.
5. How do I calibrate the MQ-3 sensor for my project?
Calibrating the MQ-3 sensor involves exposing it to a known concentration of alcohol vapors and measuring its output voltage.
You can then use this data to calculate the sensor’s sensitivity to alcohol and adjust your code accordingly.
It is important to note that calibration may need to be done periodically to ensure accuracy.
6. Can the MQ-3 sensor be used for industrial or commercial applications?
Yes, the MQ-3 sensor can be used in various industrial and commercial applications that require alcohol detection, such as in chemical plants, breweries, and distilleries.
It is important to ensure that the sensor is calibrated and tested regularly to maintain accuracy and reliability.
7. Are there any safety precautions I need to take when using the MQ-3 sensor?
Yes, as with any electronic component, you must follow safety guidelines when using the MQ-3 sensor.
This includes using appropriate voltage and current levels, ensuring proper grounding and insulation, and avoiding exposure to high temperatures or humidity.
Be sure to take care of yourself to prevent any potential health or safety risks.
Conclusión
In this article, I’ve covered all the details on how to connect and use the MQ-3 sensor with an Arduino UNO.
I have provided step-by-step instructions and working code examples to help you build your first alcohol detector project quickly.
The MQ-3 sensor’s ability to detect alcohol levels makes it an excellent choice for applications such as leakage detectors, drink, and drive detection sensors, etc.
I am hoping that this article has been helpful in learning about the MQ-3 sensor and its applications.
If you have questions or feedback, please don’t hesitate to ask. You can always leave your suggestions in the comments.
Please share the article with your friends and fellow Arduino enthusiasts.
What topic would you like to learn next?

I am Puneeth. I love tinkering with open-source projects, Arduino, ESP32, Pi and more. I have worked with many different Arduino boards and currently I am exploring, Arduino powered LoRa, Power line communication and IoT.