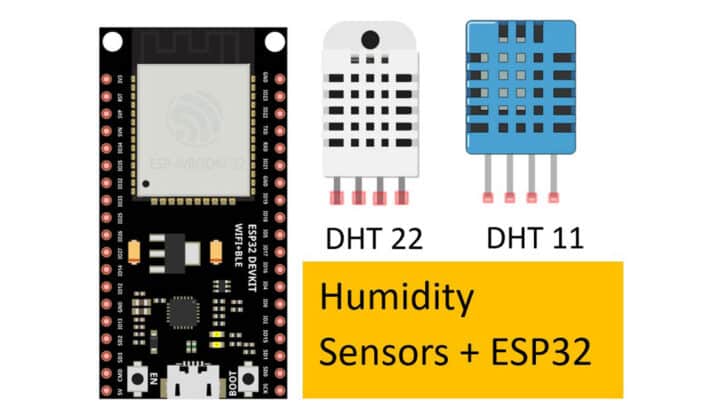
In this article, I will show you how to connect a DHT11 or a DHT22 sensor to an ESP32 microcontroller. The ESP32 with DHT11/ DHT22 sensors are easy to use and have affordable temperature and humidity sensors.
Humidity is the number one parameter to be monitored to protect buildings, storage equipment, and devices.
It is also essential to control the humidity and temperature for the best home comfort. You can do that using DHT11/DHT22 sensors.
I will teach you how to connect the two sensors to ESP32 and share some example codes you can use.
I will also show you all the valuable features of DHT 11 /DHT 22 sensors.
By the end of this article, you will understand how the ESP32 and DHT sensors work and the skills and knowledge to begin experimenting and building your own projects with them.
Whether you’re a beginner or an experienced maker, this article will provide a solid foundation to explore the world of humidity sensors.
Let’s get started!
Components Needed To Build ESP32 And DHTxx Sensor Project
Hardware Components
- Dupont wire x 1 set
- Micro USB Cable for ESP32 (for powering ESP32 and programming) x 1
Software
Guide
Makerguides.com is a participant in the Amazon Services LLC Associates Program, an affiliate advertising program designed to provide a means for sites to earn advertising fees by advertising and linking to products on Amazon.com.
Basics of The DHT11 / DHT 22 Sensors
Before we see how to connect a DHT sensor to the ESP32, let’s take a step back and understand what a DHT11/DHT22 sensor is.
DHT stands for → Digital Humidity and Temperature Sensor.
How does the DHT sensor work?
DHT sensors measure humidity by measuring the capacitance. When you change the dielectric of a capacitor, the capacitance changes.
In a capacitor, when you change the area of the plates or the dielectric, the capacitance changes.
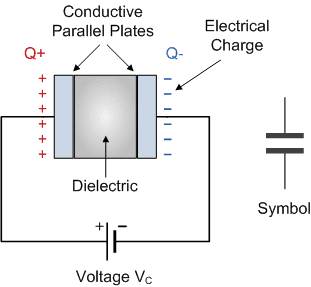
The humidity sensor has a sensitive dielectric whose value will change based on how much moisture it has absorbed or dried out.
By measuring the capacitance, you can tell how much water is in the air. This is how the DHT sensor can measure the humidity.
Let’s have a look at the DHT sensors in detail.
-> Read our guide about What You Can Build with Adruino.
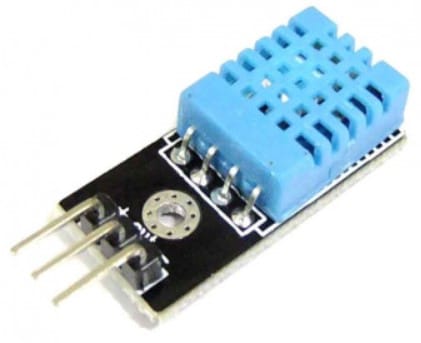
DHT11 Sensor Module: Essential Information
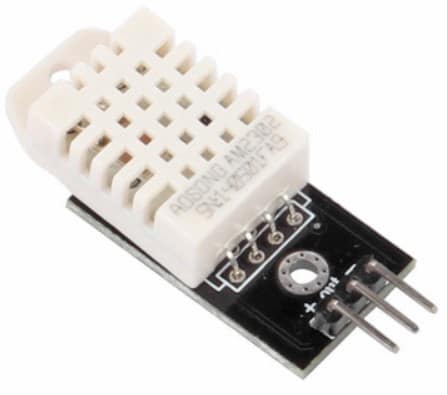
Here is a DHT11 sensor mounted on an easy-to-use PCB.
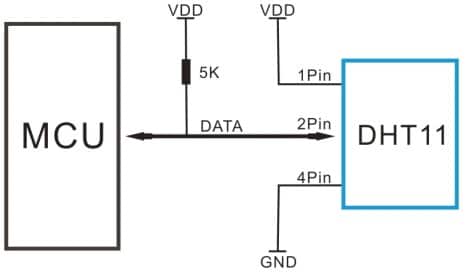
The DHT sensor has four pins, of which one pin has no function. A typical connection to an MCU looks like the image below.
Features of DHT11 Sensor Module
Here is a table with the features of the DHT11 sensor:
| Parameter | Range |
| Humidity Accuracy | ± 5% RH |
| Temperature Accuracy | ± 2 ℃ |
| Long term stability | ±1% RH/year |
| Temperature resolution | 1 ℃ |
| Temperature response time | 30 seconds |
| Power supply voltage | 3 to 5.5 V |
| Supply current | 2.5 mA max (during measurement) |
| Standby current | 150 uA |
| Sampling period | 1 second |
DHT22 Sensor Module: Essential Information
The DHT22 sensor module mounted on a PCB is shown below.
Features of the DHT22 Sensor Module
Here is a table with the features of the DHT22 sensor:
| Parameter | Limits / Range |
| Humidity Accuracy | ± 5% RH |
| Temperature Accuracy | ± 0.5 ℃ |
| Long term stability | ± 0.5 % RH/year |
| Temperature resolution | 0.1 ℃ |
| Temperature response time | 30 seconds |
| Power supply voltage | 3.3 to 6 V |
| Supply current | 8 mA (typical) (during measurement) |
| Standby current | 15 uA |
| Sampling period | 2 second |
How to choose between the DHT11 and the DHT22 sensors?
For my hobby projects, I would use either as they’re both great sensors.
But overall I prefer the DHT22 as it is more accurate than the DHT11 sensor. The measurement range is better with the DHT22 compared to DHT11.
The DHT22 sensor responds to changes in temperature faster than the DHT11 sensor. If you use the sensor for indoor garden sensing, the slightly less accurate DHT11 won’t hurt.
If lower speed response and the limited measuring range are okay for you, go for DHT11 sensors, and you will save more money.
If not, use DHT22 sensors for a more accurate and faster system.
DHT11/DHT22 Pin Details
Both DHT11 and DHT22 share similar pin details.

| 4 | GND | Ground Connection |
| 3 | NC | No connection |
| 2 | SDA | Serial data, bidirectional port |
| 1 | VDD | Power pin |
The VDD pin is for the power supply, and the GND pin is for the return connection. The SDA pin has unique features.
DHT11/DHT22 Data Protocol
The SDA pin is a bidirectional data pin. It is used to read data from the sensor and write data to it.
Let’s understand the communication protocol in detail. This will help you to debug your next DHT11 sensor project if you have any issues with the timing or the sequence.
The below diagram shows the data communication pattern between the DHT22 sensor and the host (ESP32, in our case).
The image below explains the DHT22 communication protocol in a graphical representation.
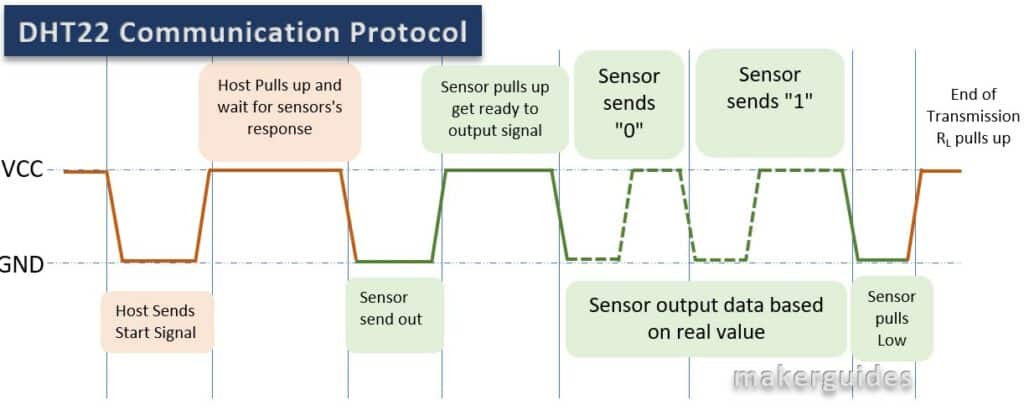
When the sensor sends the data to the MCU, every 0 and 1 bit follows the following pattern.
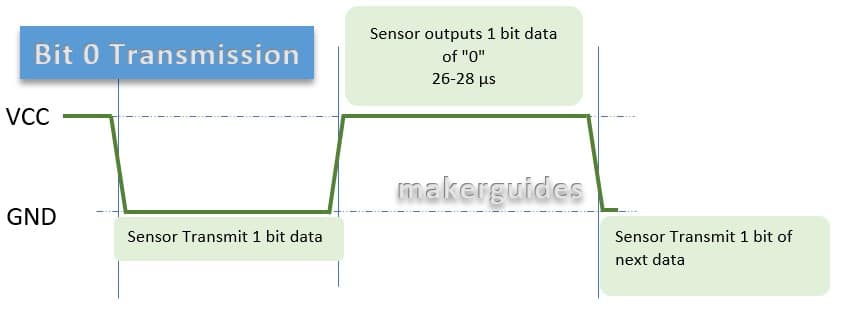
Bit 0 → Low period of 50 µs followed by high width of 26-28 µs
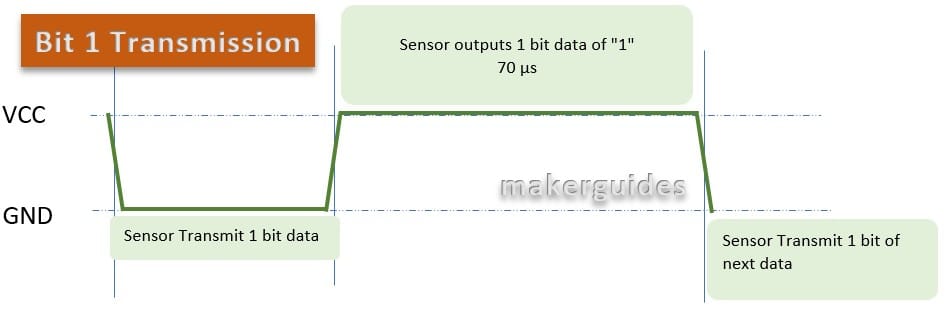
Bit 1 → Low period of 50 µs followed by high width of 70 µs
The images below will give you a clear idea of a bit 1 and bit 0 transmission.
Bit 0 Transmission:
Bit 1 Transmission:
The protocol used by DHT11/22 sensors differs from the standard 1-wire protocol defined by Dallas.
Every DHT sensor data is 40 bits wide. The data is split into the following sections
- 16 bits from humidity information,
- 16 bits from temperature information, and
- 8 bits for data integrity (checksum)

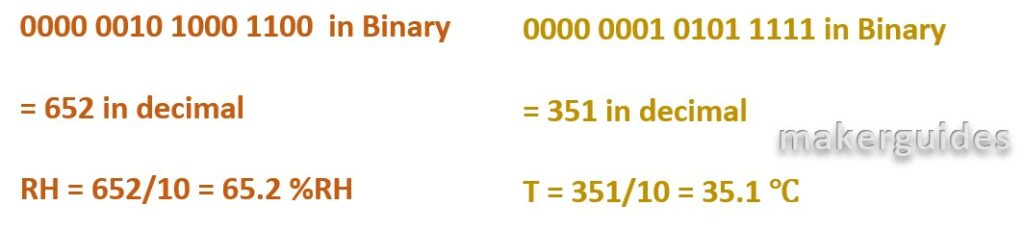
In the diagram below, you will see how easy it is to interest the received data to derive humidity and temperature value
In the below table, I have specified the communication protocol format in an easy-to-understand way.
| Name | Single-bus format definition |
| Start signal | ESP32 / MCU brings down SDA for at least 800 µs. It asks the sensor to prepare the data |
| Response signal | SDA is pulled down to 80 µs, followed by high 80 µs by the sensor |
| Data format | Sensor now sends the 40-bit data in the format defined in the earlier section |
| Humidity | Humidity resolution of 16-bit. Note that the humidity value is ten times the measured value. You should divide the read value by 10 in your code. |
| Temp. | Temperature resolution of 16-bit. Note that the temperature value is ten times the measured value. You should divide the read value by 10 in your code. |
| Parity bit (b its) | Parity bit = humidity high + humidity low + temperature high + temperature low |
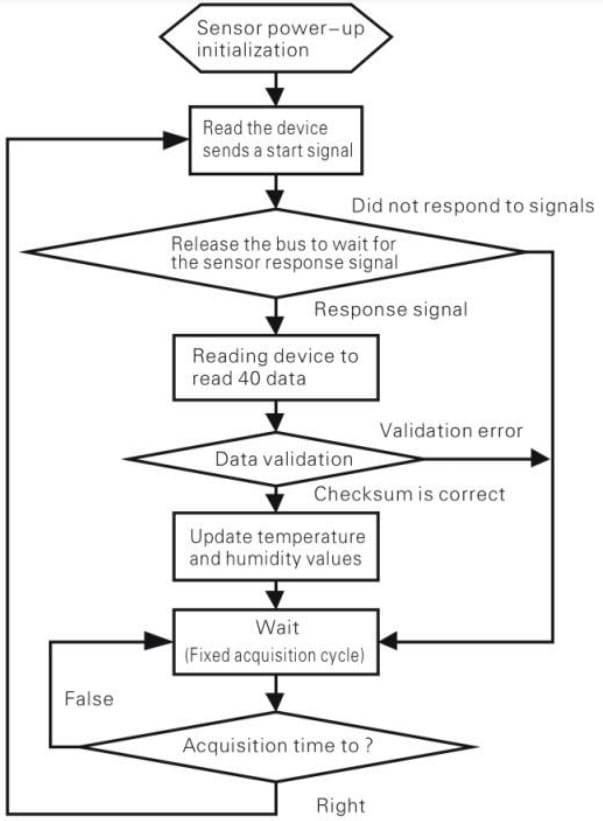
The overall process is presented in the flowchart below:
In the following sections, I will touch upon some important aspects to ensure you always read the correct values:
- Avoid using sensors in extreme conditions (condensation or dry)
- Ensure the sensor is not placed close to acidic or oxidizing gases
- For best results, operate in the safe region ( 10 – 40 ℃, 60% or less RH)
- Do not expose sensors to sunlight for the long term (prolonged UV radiation should be avoided)
- You should allow some days as cool-off days after assembling the sensors onto PCBs. You will read data with offsets if you don’t do it.
Let’s connect a DHT11/DHT22 humidity sensor to ESP32 in the next section.
Instructions To Connect The DHT11/22 Module with ESP32
I will show you how to build a project using ESP32 and the DHT11/22 sensor.
Let’s get started with the hardware connections.
Step 1: Complete the hardware connections
Start with the ground connections. If you have to use other pins, edit the code accordingly. Power the entire system only after completing all the connections.
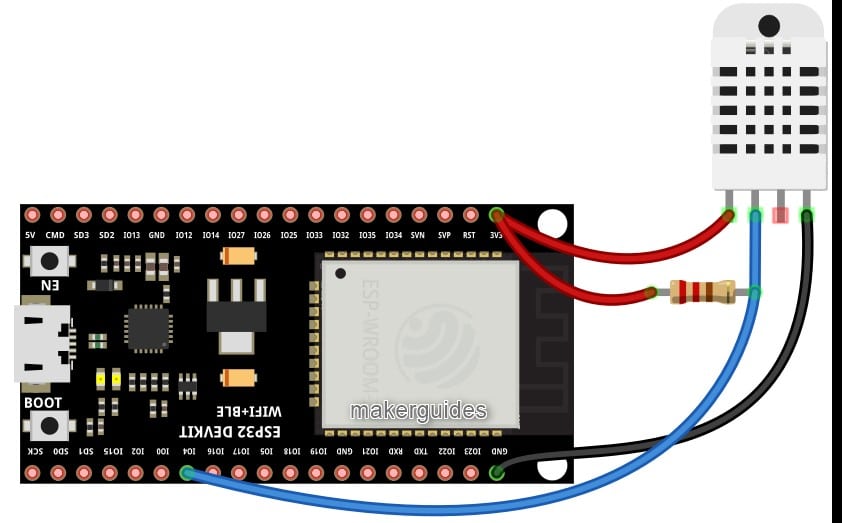
The connections between the ESP32 and the DHT sensor are given below.
- Connect the GND of the DHT pin to the ESP32 GND pin.
- Connect the sensor data pin to the GPIO32 GPIO4 pin.
- Connect the 3V3 Supply pin of ESP32 to the supply pin of the DHT sensor
- Connect a 10 kOhm pullup to the data pin.
Step 2: Program the ESP32 with the code below
Follow the next step to understand the code implementation. You can use the code below to test the ESP32 module and the connected DHT sensor.
Please follow our guide to install the ESP32 core on the Arduino IDE.
// Example testing sketch for various DHT humidity/temperature sensors written by ladyada
// REQUIRES the following Arduino libraries:
// - DHT Sensor Library: https://github.com/adafruit/DHT-sensor-library
// - Adafruit Unified Sensor Lib: https://github.com/adafruit/Adafruit_Sensor

#include "DHT.h"

#define DHTPIN 4     // Digital pin connected to the DHT sensor
// Feather HUZZAH ESP8266 note: use pins 3, 4, 5, 12, 13 or 14 --
// Pin 15 can work but DHT must be disconnected during program upload.

// Uncomment whatever type you're using!
//#define DHTTYPE DHT11   // DHT 11
#define DHTTYPE DHT22   // DHT 22  (AM2302), AM2321
//#define DHTTYPE DHT21   // DHT 21 (AM2301)

// Connect pin 1 (on the left) of the sensor to +5V
// NOTE: If using a board with 3.3V logic like an Arduino, Due connect pin 1
// to 3.3V instead of 5V!
// Connect pin 2 of the sensor to whatever your DHTPIN is
// Connect pin 4 (on the right) of the sensor to GROUND
// Connect a 10K resistor from pin 2 (data) to pin 1 (power) of the sensor

// Initialize the DHT sensor.
// Note that older versions of this library took an optional third parameter to
//Tweak the timings for faster processors.  This parameter is no longer needed
// as the current DHT reading algorithm adjusts to work on faster procs.
DHT dht(DHTPIN, DHTTYPE);

void setup() {
  Serial.begin(9600);
  Serial.println(F("DHTxx test!"));
  dht.begin();
}

void loop() {
  // Wait a few seconds between measurements.
  delay(2000);

  // Reading temperature or humidity takes about 250 milliseconds!
  // Sensor readings may also be up to 2 seconds 'old' (it's a very slow sensor)
  float h = dht.readHumidity();
  // Read temperature as Celsius (the default)
  float t = dht.readTemperature();
  // Read temperature as Fahrenheit (isFahrenheit = true)
  float f = dht.readTemperature(true);

  // Check if any reads failed and exit early (to try again).
  if (isnan(h) || isnan(t) || isnan(f)) {
    Serial.println(F("Failed to read from DHT sensor!"));
    return;
  }

  // Compute heat index in Fahrenheit (the default)
  float hif = dht.computeHeatIndex(f, h);
  // Compute heat index in Celsius (isFahreheit = false)
  float hic = dht.computeHeatIndex(t, h, false);

  Serial.print(F("Humidity: "));
  Serial.print(h);
  Serial.print(F("%  Temperature: "));
  Serial.print(t);
  Serial.print(F("°C "));
  Serial.print(f);
  Serial.print(F("°F  Heat index: "));
  Serial.print(hic);
  Serial.print(F("°C "));
  Serial.print(hif);
  Serial.println(F("°F"));
}
Step 3: Code Walkthrough
Code Explanation:
Let’s walk through the code. This example tests DHT sensors using the DHT sensor library and the Adafruit unified sensor library.
#include "DHT.h"
We start by including the necessary library. I have used GPIO4 on the ESP32 chip. You can use the pin you wish.
You must change the line of code here to reflect the actual data pin used.
#define DHTPIN 4
You should uncomment the line corresponding to the sensor you are using. In our case, we are using DHT22. Hence, the corresponding line is uncommented.
// Uncomment whatever type you're using!
//#define DHTTYPE DHT11   // DHT 11
#define DHTTYPE DHT22   // DHT 22  (AM2302), AM2321
//#define DHTTYPE DHT21   // DHT 21 (AM2301)
Next, create an object of type DHT.
DHT dht(DHTPIN, DHTTYPE);
The setup function initializes the serial communication and begins the DHT sensor.
void setup() {
  Serial.begin(9600);
  Serial.println(F("DHTxx test!"));
  dht.begin();
}
The loop function waits a few seconds before taking a reading from the DHT sensor. It then reads the humidity and temperature values in Celsius and Fahrenheit and computes the heat index in both units.
If any reads fail, the program prints an error message and exits early. Otherwise, it prints the humidity, temperature, and heat index values to the serial monitor.
I hope this explanation helps! Let me know if you have any other questions.
FAQs About The ESP32 And DHT11 / DHT 22 Sensors
I have included a list of the most frequently asked questions about projects built using the ESP32 and the DHTxx sensors.
What are DHT11 and DHT22?
DHT11 and DHT22 are low-cost digital temperature and humidity sensors. You can use these sensors to measure the temperature and humidity of the environment.
The main application areas include home automation, weather stations, and HVAC systems.
What is the difference between DHT11 and DHT22 sensors?
The main difference is that DHT22 has a higher temperature and humidity measurement accuracy than DHT11.
DHT22 has a more comprehensive operating voltage range (3.3V to 6V) than DHT11 (3V to 5.5V).
How do the sensors DHT11 and DHT22 work?
Both DHT11 and DHT22 use a capacitive humidity sensor and a thermistor to measure the relative humidity and temperature of the environment.
The capacitive humidity sensor measures the relative humidity by detecting the change in the capacitance of a polymer film.
As the film absorbs the moisture, the capacitance changes. YOu measure that change in the capacitance.
The thermistor measures the temperature by detecting the change in resistance as the
temperature changes. Please refer to the Basics section of this article to learn more.
How accurate are DHT11 and DHT22?
DHT22 is more accurate than DHT11 for both temperature and humidity measurements. DHT22 has a temperature accuracy of ±0.5 °C and a humidity accuracy of ±2% RH. In contrast, DHT11 has a temperature accuracy of ±2 °C and a humidity accuracy of ±5 % RH.
Conclusion
I have covered all the essential information about DHT sensors in this article. I have given you complete information on the working of DHT sensors and the differences between DHT11 and DHT22 sensors.
This will help you choose suitable sensors for your project and understand how they function.
I also provided a connection diagram and the example code with the explanation.
Did you find it easy to follow? If you have suggestions to improve the article, you are always welcome to share feedback.
If you have further questions about the sensors, please post them in the comments section.
Let us know if there’s anything else you’d like me to cover in future articles.

I am Puneeth. I love tinkering with open-source projects, Arduino, ESP32, Pi and more. I have worked with many different Arduino boards and currently I am exploring, Arduino powered LoRa, Power line communication and IoT.