This article will give you all the necessary information about the ESP32 and Arduino boards. I have included a detailed specification and a pin diagram of the ESP32 and Arduino Boards.
You will learn in detail about the speed and functionality difference between the ESP32 and Arduino Uno and Arduino Mega boards.
Supplies
Hardware components
| Arduino Uno Rev3 | Amazon |
| Arduino Mega ( Optional ) | Amazon |
| ESP32 | Amazon |
| ESP8266 ( Optional ) | Amazon |
| USB cable type A/B | Amazon |
| Micro-USB cable | Amazon |
Software
| Arduino IDE | Arduino IDE |
Makerguides.com is a participant in the Amazon Services LLC Associates Program, an affiliate advertising program designed to provide a means for sites to earn advertising fees by advertising and linking to products on Amazon.com.
Specification of ESP Board and Arduino Board
The following table compares the specifications and features of ESP32 and NodeMCU ESP8266 against the popular Arduino boards:
| Function | ESP32 | NodeMCU ESP8266 | Arduino UNO | Arduino Mega2560 |
| Microcontroller | Xtensa Dual Core 32-bit LX6 microprocessor | Tensilica 32-bit Xtensa LX106 | ATMega328P | ATMega2560 |
| Flash Memory | 4MB | 4 MB | 32KB | 256 KB |
| SRAM | 520MB | 128 KB | 2KB | 8KB |
| EEPROM | Not Available | Not Available512 bytes (Software) | 1KB | 4KB |
| CLOCK Speed | Upto 240 MHz | 80 or160 MHz | 16MHZ | 16 MHz |
| Operating Voltage | 3.3V DC | 3.3V DC | 5V DC | 5V DC |
| Input Voltage | 3.3V DC | 7-12 DC | 6V-20V DC | 7-12V |
| Current consumption | 80 mA – 90mA | 15 µA – 400 mA | 45 mA – 80 mA | 150 uA |
| DC Current per I/O Pin | 40 mA | 12 mA | 20 mA | 20 mA |
| DC Current For 3.3V Pin | 50 mA | 1A | 50 mA | 50 mA |
| Digital IO Pins | 36 | 17 | 14 | 54 |
| Analog Input Pins | Up to 18 | 1 | 6 | 16 |
| UARTs | 3 | 2 | 1 | 4 |
| SPI | 4 | 2 | 1 | 1 |
| I2C | 2 | 1 | 1 | 1 |
| CAN | Yes | No | No | No |
| PWM | 16 | 4 | 6 | 14 |
| Wi-Fi | Yes,802.11 b/g/n | Yes | No | No |
| Bluetooth | Yes, Bluetooth v4.2 BR/EDR and BLE specification | No | No | No |
Pin Comparison of ESP32 and Arduino UNO
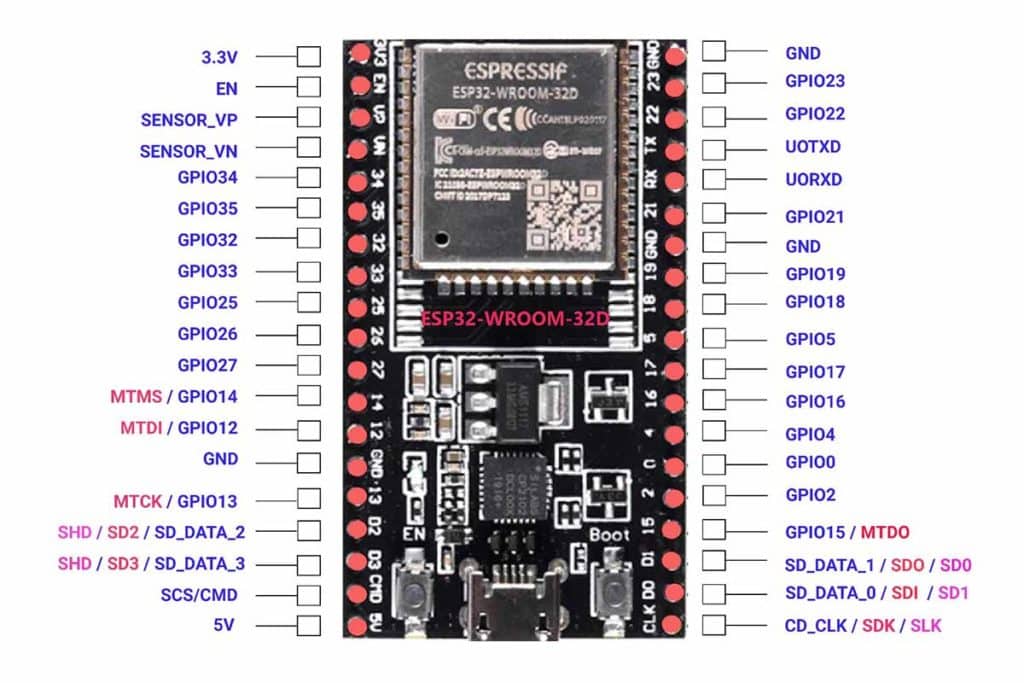
You can refer to the ESP32 Schematic diagram for more details about the components present on the ESP32 board. The pin diagram of ESP32 is depicted below.
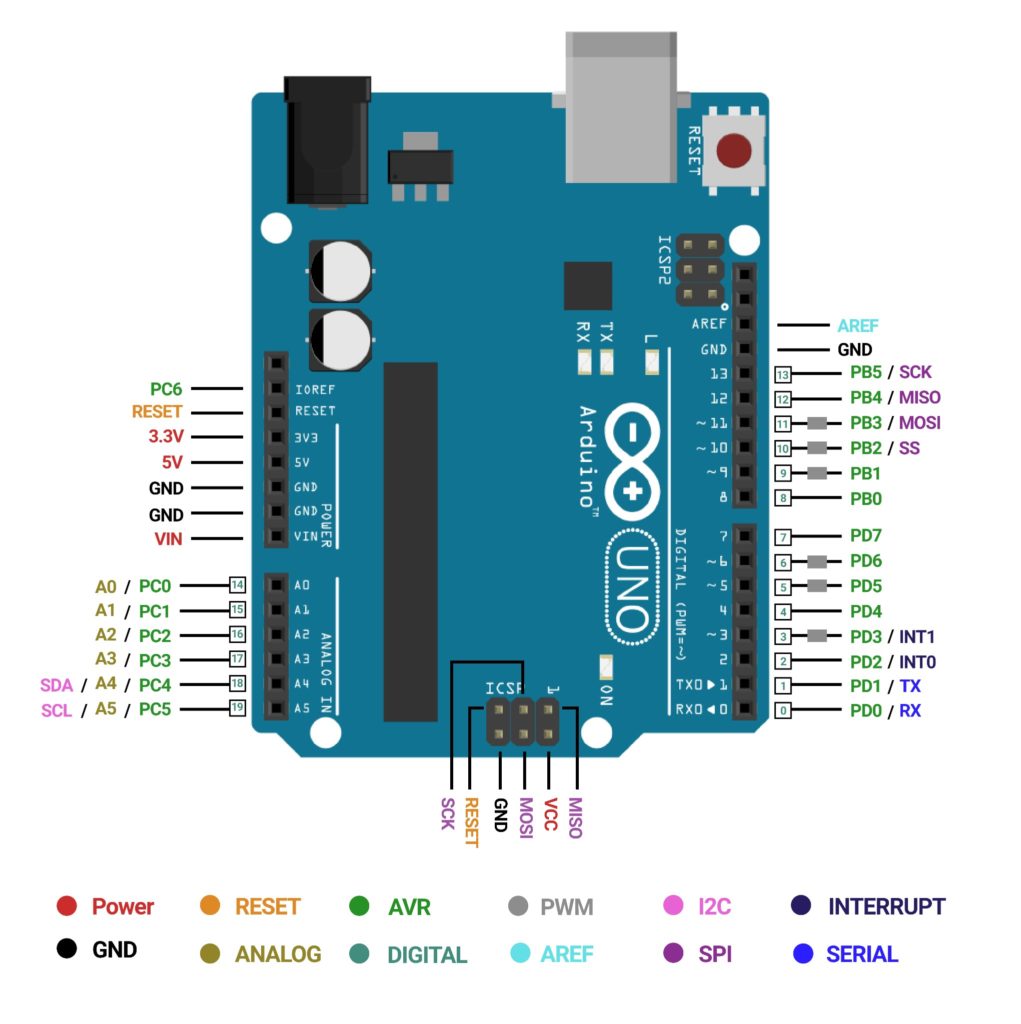
You can also refer to the Arduino Uno Schematic diagram for details of components present on the Arduino UNO board. The pin diagram of Arduino UNO is depicted below.
How Is ESP32 Different From Arduino Uno?
This section will provide information about the CPU, clock, and speed-wise difference between ESP32 and Arduino Uno.
1. CPU
ESP32 has 32-bit LX6 Xtensa® Dual-Core microprocessors, which run 600 DMIPS. The two cores are named Protocol CPU (PRO_CPU) and Application CPU (APP_CPU).
The PRO_CPU processor handles the Wi-Fi, Bluetooth, and other internal peripherals like SPI, I2C, ADC, etc. The APP_CPU is left out for the application code.
Arduino Uno is designed with an AVR microcontroller. It is based on the ATmega328P 8-bit microcontroller. It is a single-chip microcontroller.
It has a modified Harvard architecture 8-bit RISC processor single-core CPU.
So, as you can see here, ESP32 is a 32 bit MCU with dual cores, while Arduino Uno is an 8 bit MCU with a single core.
2. CLOCK
ESP32 can be used clocked internally or externally. The ESP32 microcontroller can use an external crystal oscillator.
An external crystal clock source is selected as the default CPU clock upon reset. ESP32 has an internal 8 MHz oscillator.
The application can select the clock source from the external crystal clock source. It has an external crystal of 40 MHz.
AVR microcontroller has a maximum clock, which defaults to using a 16MHz crystal. It takes 1 / 16 millionths of a second to perform a single operation.
It has three basic units: Clock Sources, Input and Clock Control, Clock Output.
It has multiple clock sources which get multiplexed to multiple peripherals via the AVR Clock Control Unit.
Why Would You Need To Change ESP32 CPU Clock?
CPU clock affects the power consumption, speed of operation, and performance of MCU. That’s why you need to set the speed of MCU as per your requirement.
If you want more details about the power consumption optimization, please refer to the ESP32 User manual.
How to change ESP32 CPU Speed (in Arduino IDE)
You can change the CPU speed from your code by using the below-mentioned command in the code.
bool setCpuFrequencyMhz(uint32_t cpu_freq_mhz);
The only preferable values entered are 240, 160, and 80, but you can also use lesser values, i.e., 40MHz, 20MHz, and 10MHz, in case you are not using Wi-Fi or Bluetooth.
| Frequency | Power consumption |
| 240 MHz | 66.8mA |
| 160 MHz | 45.9mA |
| 80 MHz | 33.2mA |
| 40 MHz | 19.88mA |
| 20 MHz | 15.43mA |
| 10 MHz | 13.19mA |
How To Configure ATmega328p Clock Source?
ATmega328P is an 8-bit microcontroller, and the default clock speed is 16 MHz. It has the following two clocking options only.
1) Calibrated Internal RC Oscillator
2) Low Power Crystal Oscillator.
ATmega328P is clocked by the Calibrated Internal RC Oscillator, which runs at 8MHz. This is By default settings.
The 8 MHz clock is divided by 8 due to the setting of the CKDIV8 bit in Fuse Low Byte.
So the effective clock rate available is 1 MHz.
Configuration of Fuse Low Byte
As you can see in the ATmega328P datasheet, table 27-7 show the Lower Fuse bits of this IC.
| Bit 7 | Bit 6 | Bit 5 | Bit 4 | Bit 3 | Bit 2 | Bit 1 | Bit 0 |
| CLKDIV8(2)4 | CKOUT | SUT1 | SUT0 | CKSEL3 | CKSEL2 | CKSEL1 | CKSEL0 |
ATmega328P Fuse Low Byte
This fuse low byte is responsible for setting up the clock source and some other parameters of the clock inside the AVR.
Now, The frequency is set based on the value of the Fuse Low Byte.
If the value changes, Frequency also changes.
High Fuse Byte: D9 Extended Fuse Byte: FF
Case 1: If Low fuse Byte value 0xCE to set frequency standard set 16MHz ceramic resonator fast start.
Case 2: If Low fuse Byte value 0xF7 to set frequency standard set crystal 16MHz, slow start + CLKO clock.
Case 3: If Low fuse Byte value 0xE2 to set frequency standard set Internal RC oscillator with Prescaler off. 8MHz system clock.
Case 4: If the High Fuse Byte: D1, Extended Fuse Byte: FF
Low fuse Byte value 0xFE to set frequency 8MHz crystal oscillator.
Case 5: If the High Fuse Byte: DE, Extended Fuse Byte: D5
Low fuse Byte value 0xFF to set frequency standard set 16MHz slow power starting.
ESP32 CPU Details
The following code will give you information about ESP32 CPU details.
uint32_t  CPU_Frequency;

void setup(){
  Serial.begin(9600);

  CPU_Frequency = getXtalFrequencyMhz();
  Serial.print("ESP32 Crystal Frequency is = ");
  Serial.print(CPU_Frequency);
  Serial.println(" MHz");
  setCpuFrequencyMhz(40);

  CPU_Frequency = getCpuFrequencyMhz();
  Serial.print("ESP32 CPU Frequency = ");
  Serial.print(CPU_Frequency);
  Serial.println(" MHz");

  CPU_Frequency = getApbFrequency();
  Serial.print("ESP32 APB Frequency = ");
  Serial.print(CPU_Frequency);
  Serial.println(" Hz");
}

void loop() {
}
Code Explanation
 CPU_Frequency = getXtalFrequencyMhz();
 Serial.print(CPU_Frequency);
Step 1: Declare a variable uint32_t CPU_Frequency; to store a return value.
Step 2: In setup() function initialize to Serial.begin(); function to set baudrate at 9600.
Step 3: You can get a lower CPU clock for power consumption optimization. You need to check the XTAL crystal frequency using this function.
setCpuFrequencyMhz(40); using this function, you can set the ESP32 CPU clock frequency and print it on the serial terminal.
Step 4: After changing the CPU clock frequency, you can cross-check the CPU clock rate value by reading the following function’s return value. CPU_Frequency = getApbFrequency(); and get it into the result on the serial terminal.
ESP32 and Arduino Board Speed Testing Using DSO
You can use the following code to test the different boards using Digital Storage Oscilloscope (DSO).
#define test_pin 5  //for ESP8266 use D5 instead of 5

void setup() {
  pinMode(test_pin, OUTPUT); //set pin as output
}

void loop() {
  digitalWrite(test_pin, HIGH); //make pin 5 high
  digitalWrite(test_pin, LOW);  //make pin 5 low
}
Code Description
This code is used to detect the execution of the same instruction in ESP32, ESP8266, Arduino Uno, and Arduino Mega boards.
I have used pin 5 as the output pin, and in void loop(), I have set it high and low without delay.
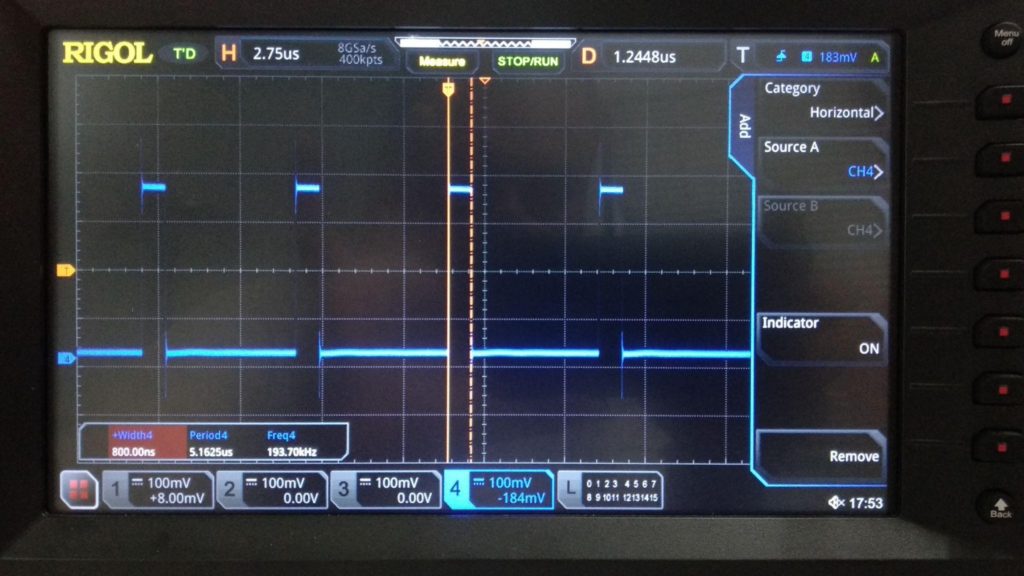
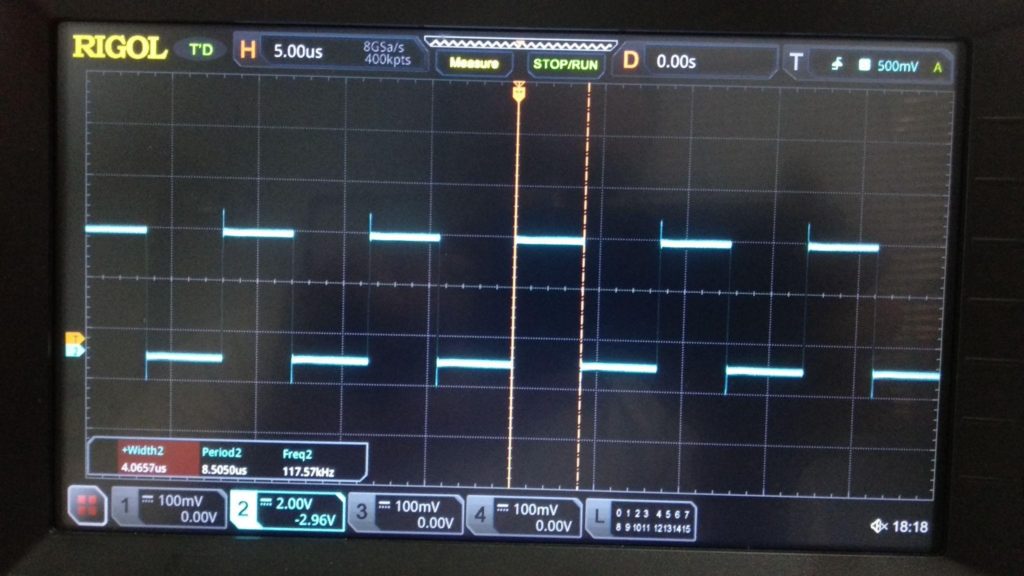
I have connected the Pin 5 of each board on the Digital Storage Oscilloscope (DSO). The following image shows the pulse duration for digitalWrite(test_pin, HIGH) and overall period in void loop().
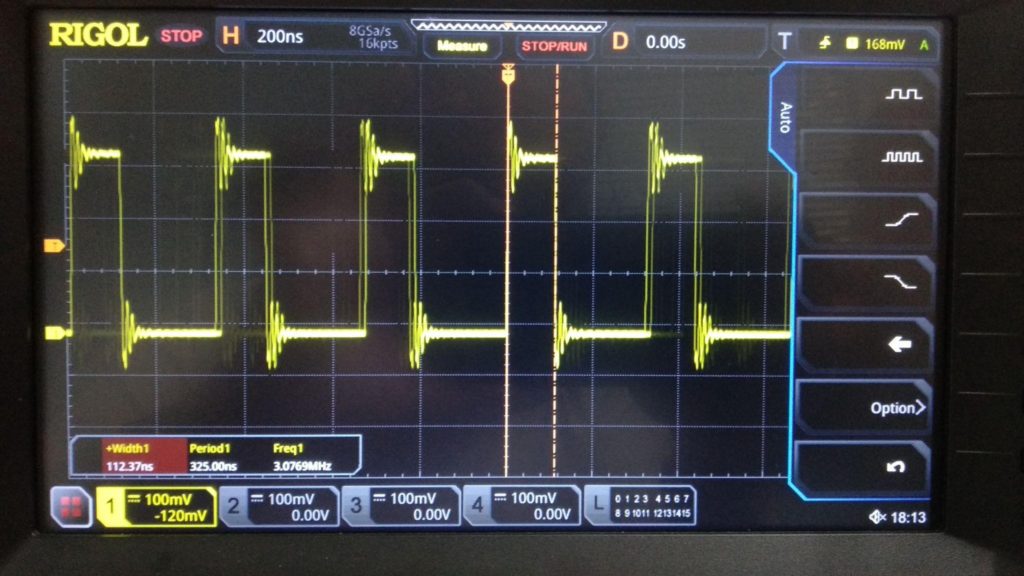

| Parameters | ESP32 | ESP8266 | Arduino Uno | Arduino Mega |
| digitalWrite Pulse width | 112.37 nS (0.1123 μS) | 800.00 nS(0.800 μS) | 4.0657 μS | 5.4367 μS |
| Void loop period | 325.00 nS(0.325 μS) | 5.1625 μS | 8.5050 μS | 11.248 μS |
How To Test ESP32 and Arduino Speed Using Code?
Now, I will show you how you can test the speed of ESP and Arduino Boards using code only, without using DSO.
unsigned long start, Total ;
#define test_pin 5 // for ESP8266 use D5 instead of 5
void setup() {
Serial.begin(9600);
pinMode(test_pin, OUTPUT);
}
void loop() {
start = millis();
for (int i = 0; i < 20000; i++) {
digitalWrite(test_pin, HIGH);
digitalWrite(test_pin, LOW);
}
Total = millis() - start ;
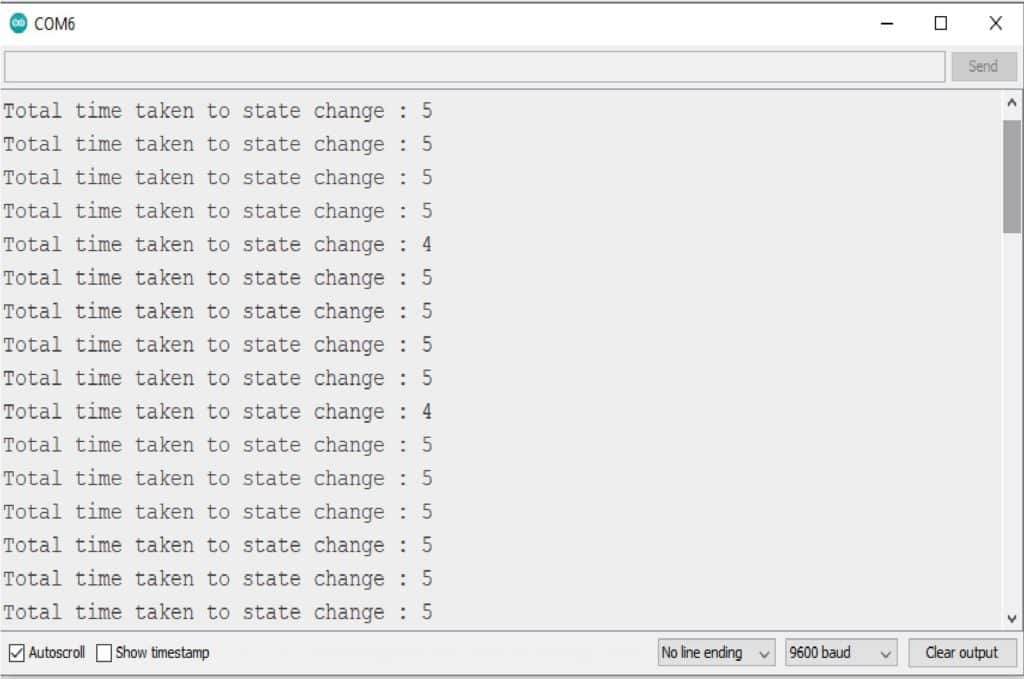
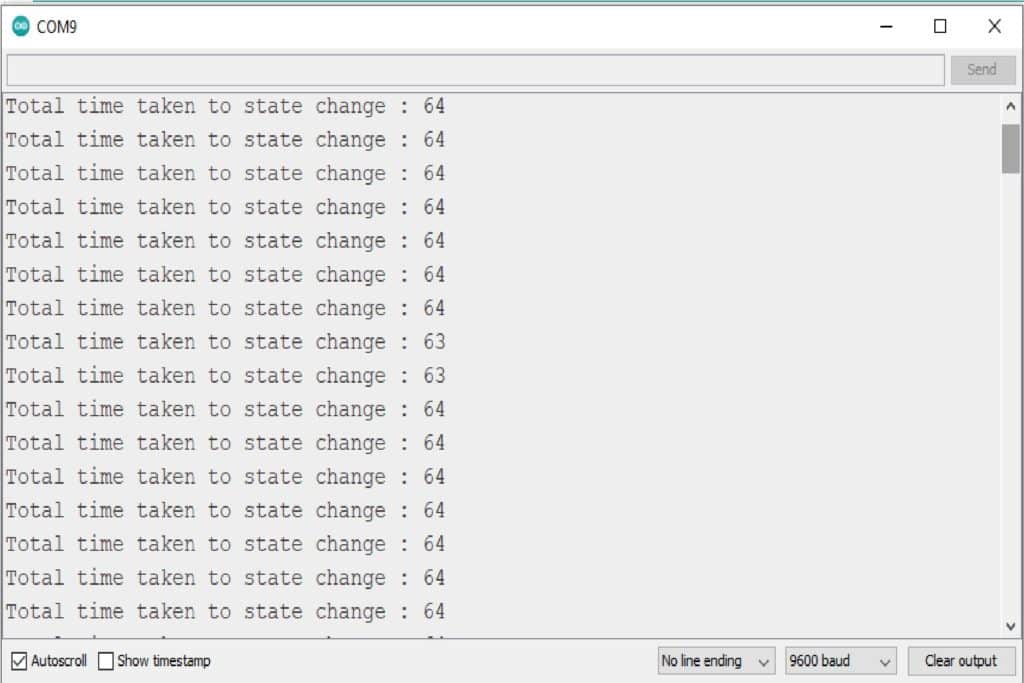
Serial.print("Total time taken to state change : ");
Serial.println(Total);
}
Code Explanation
Step 1: unsigned long start, Total ;
First, declare a variable to start and Total count in a millisecond.
Step 2: #define test_pin 5
Define a Pin used to Toggle the pin state.
Step 3: In void setup(), setup the baud rate at 9600-speed rate, and test pin mode select as an output mode.
Step 4: In millis() the function returns the number of milliseconds passed since the Arduino board started.
And return millis(); function return value to catch in start variable ,which before declare.
Step 5: for (int i = 0; i < 20000; i++)
digitalWrite(test_pin, HIGH);
 digitalWrite(test_pin, LOW);
This loop rotates 20,000 times and makes test_pin HIGH and LOW.
Step 6: Difference between Till now millisecond and before Received millisecond and result store into Total variable and print on the serial terminal.
Now, You can observe the output on the serial terminal.
Here are the results from the speed tests I ran comparing the speed of the ESP32 vs ESP8266 vs Arduino Mega2560 vs Arduino Uno boards.
Case 1: ESP32 Output
Case 2: ESP8266 Output
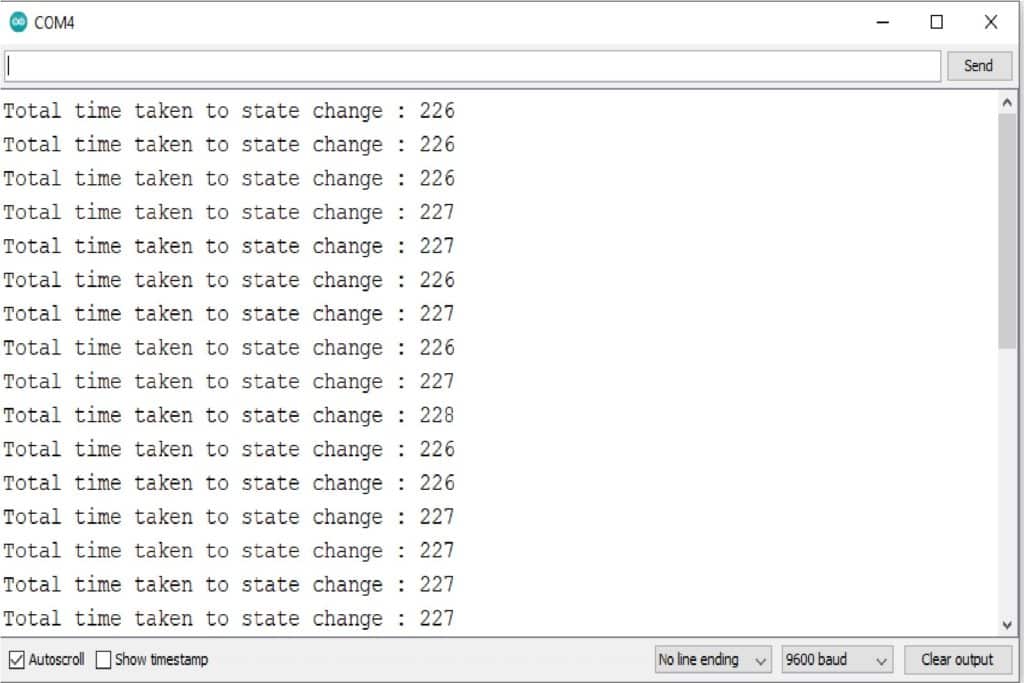
Case 3: Arduino Mega2560 Output
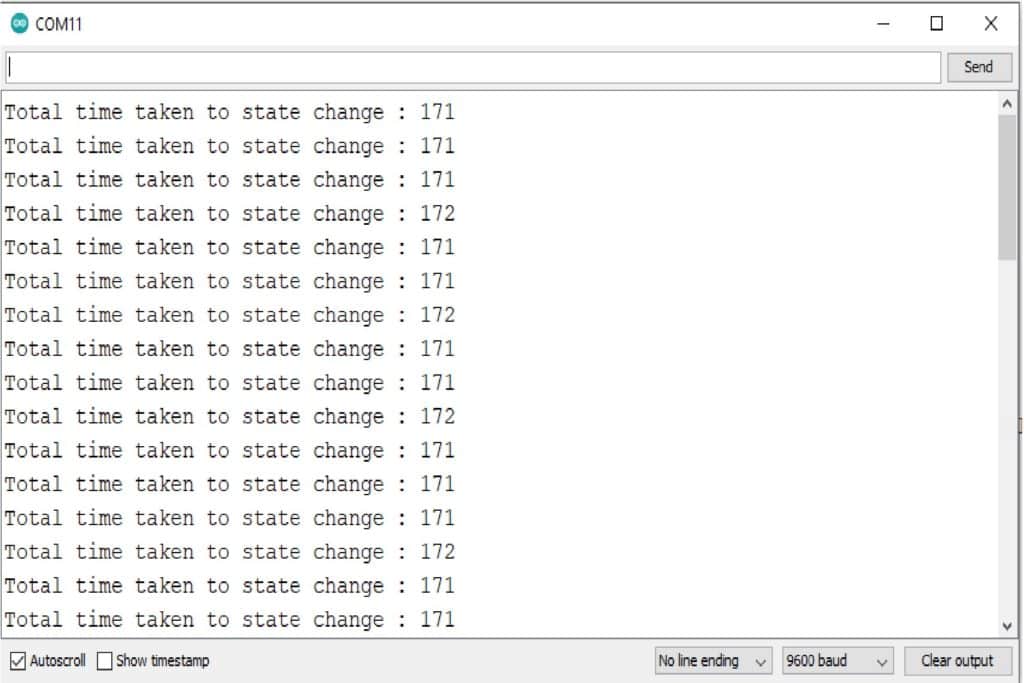
Case 4: Arduino Uno Output
This table summarizes the results from the speed tests that I ran comparing all 4 boards:
| ESP32 | ESP8266 | ArduinoMega2560 | Arduino Uno |
| 5 millisecond | 64 millisecond | 226 millisecond | 171 millisecond |
As you can see, the ESP32 board was by far the fastest, followed by the ESP8266, then the Arduino Uno, and the slowest was the Arduino Mega2560.
Is ESP32 Faster Than ESP8266?
Yes, ESP32 is faster than ESP8266. The ESP32 is the ESP8266 successor. It adds an extra CPU core, faster Wi-Fi, more GPIOs, and supports Bluetooth 4.2 and Bluetooth low energy.
Both chips have a 32-bit processor. The ESP32 is a dual-core 160MHz to 240MHz CPU, whereas the ESP8266 is a single-core processor that runs at 80MHz.
Also, the result shows that ESP32 is almost seven times faster than ESP8266 because for digitalWrite instruction ESP32 takes 112.37 nS while ESP8266 takes 800 nS.
Is ESP32 More Powerful Than Arduino?
Yes, the ESP32 is faster and more powerful than Arduino.
The ESP32 is a powerful 32-bit microcontroller with integrated Wi-Fi, a full TCP/IP stack for internet connection, and Bluetooth 4.2. It has 10 internal capacitive touch sensors.
Arduino Mega and Uno is an 8-bit microcontroller. The Arduino boards don’t have wireless connectivity, Bluetooth, and touch sensors.
Also, ESP32 is much faster than Arduino boards. So, ESP32 is more powerful than Arduino Board.
Can We Use ESP32 Instead of Arduino?
The ESP32 development board is actually cheaper than the Arduino board. As you already know, the ESP32 development board is a more powerful board for a lower price.
Although ESP32 has a different architecture than Arduino boards, it supports the Arduino IDE framework. So, the code looks similar for both boards.
Conclusion
In this article, I have shown you the specification of ESP Board and Arduino Board, and how ESP32 is faster than ESP8266 and Arduino boards.
I hope you found this article informative. I would love to know what project you plan on building or have already made with the Arduino or ESP32.
If you have any queries or suggestions, or if you think things are missing in this tutorial, please leave a comment below.
Note that comments are held for moderation to prevent spam.

Hiren is a professional Embedded Engineer with a Master’s Degree
in Electronics and Communication Engineering. He is proficient in C and
C++ and enjoys building DIY projects on Arduino, ESP32, PIC32, STM32 & Raspberry PI boards.
team antimaker`s
Friday 28th of July 2023
hola, estoy haciendo un robot sumo, quiero competir en una copa robotica, actualmente estoy usando un arduino mega, me conviene usar el esp32? habra un mejor desempeño de mi robot usando el esp32? reaccionara mas rapido al leer los sensores? especificaciones de mi sumo: dos driver: Puente H Driver Bts7960 43a tres sensores ir para ver al contrincante dos sensores de linea 2 motores dc de 300rpm a 6kgf