
An Arduino network shield enables you to bring your projects to the Internet.
With the surge in IoT (Internet of Things) applications, Arduino UNO with a Network shield (W5100) is a great choice to bring internet connectivity to your Arduino projects.
You can use the Arduino shield in automation projects, remote controller applications, and fancy displays showing messages from social media such as Twitter!
In this article, I will take you through a tour of everything you need to know about the ethernet shield W5100.
I will cover the features, capabilities, hacks, and connection diagram, including the example project library.
By the end of this tutorial, you will have all the necessary information to build your Arduino-based Internet of Thing project.
Let’s get started!
Components Needed To Build Arduino Ethernet Network Shield W5100
Hardware Components
- Arduino USB cable (for powering Arduino and programming) x 1
- Breadboard x 1
- Ethernet cable x 1
Software
Makerguides.com is a participant in the Amazon Services LLC Associates Program, an affiliate advertising program designed to provide a means for sites to earn advertising fees by advertising and linking to products on Amazon.com.
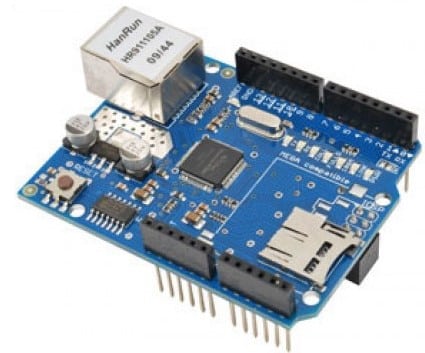
What Is The Ethernet Shield W5100?
The Arduino Ethernet shield W5100 is a shield designed to connect to an Arduino UNO quickly.
You can mount the W5100 shield directly onto the Arduino UNO without any cable or connector.
That is the best part of the shield.
You can find the W5100 schematics from this link. Make sure you match the version of the sample you have with the datasheet version.
A Brief Introduction To W5100 Chip
W5100 chip is designed for embedded applications. It has a built-in 10/100 ethernet controller. It has a fully hardwired TCP/IP stack and integrated Ethernet Mac and PHY.
Having a hardwired stack means you don’t need an operating system to manage TCP/IP on the MCU.
You can communicate with this IC via SPI or direct bus interface. Only socket-level API is needed to program the IC to enable internet connectivity to your projects.
Applications of W5100 shield based projects
Several examples of usages that can use the shield are listed below:
- Ethernet-controlled Serial LED displays
- Home network sensors (room temperature. Humidity levels etc. over ethernet)
- Remote control of appliances such as power supplies and medical devices where you can monitor the status over the internet from a remote place
- Factory automation
- Create your file server by connecting a USB stick to the project etc
Features Of W5100 Arduino Ethernet Shield
- W5100 shield supports the following hardware protocols: ICMP, TCP, UDP, IGMP, PPPoE, IPv4 ARP, Ethernet.
- The shield helps in auto-negotiation (for both half and full duplex operation).
- Auto MDI/MDIX is supported.
- It has 16 kbytes of memory for buffering, receiving and transmitting messages.
- LED indications for the status include Link, speed, collision, duplex, etc. The LEDs help you to quickly understand the issue or status just by looking at them.
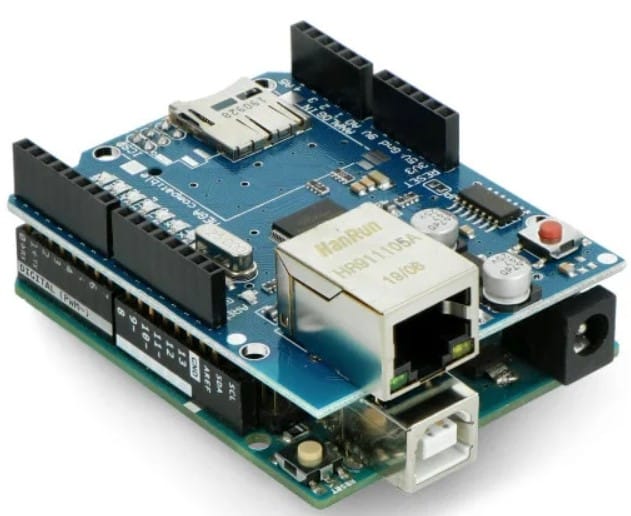
Board details of W5100 Arduino Ethernet Shield
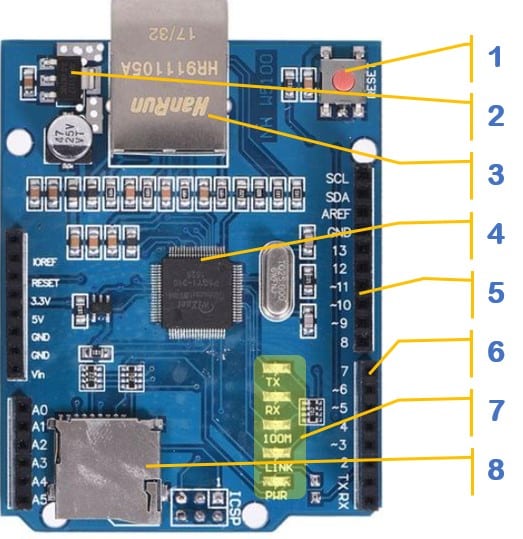
The description of the elements found on the board are listed in the labelled order below
- RESET button – You will short the reset Pin to the ground when you press the button. This will reset the W5100 controller. Pressing the reset button resets both Arduino UNO and the Ethernet shield.
- Voltage regulator – W5100 operates at 3.3 V. The IO lines are compatible with 5 V. So, you can connect both UNO and Arduino Mega to the W5100 shield without worrying about the compatibility of IO line voltage.
- Ethernet connector – You have to connect the RJ45 ethernet cable here
- W5100 chip
- Expansion header to access Arduino UNO GPIOs. Pin number 10 is used for Slave select
- SD_CS – chip select for the SD card is derived from this header. The remaining pins are free
- LEDs for indication of various status (Link speed, power, collision etc.)
- SD card connector. Insert the SD card here
Note: The analog pins A0 to A5 are not connected to the W5100 chip. You will have access to A0 to A5 pins of the Arduino UNO board on the shield when you mount the shield on the UNO board. The shield has all the pins labelled and it matches with the labelling of the Arduino UNO board.
How does Arduino UNO communicate with the W5100 ethernet shield?
The Arduino communicates with the Ethernet shield over the SPI interface. The SPI pins are available on the ICSP programming header.
Here is the screenshot of the ICSP programming header.
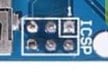
The ICSP programming header is a 6 pin connector with the following pins.
- 5 V
- GND
- SPI Clock line
- SPI MOSI line
- SPI MISO line
- Reset line
The W5100 also has onboard 3.3 V buffers which are 5 V IO tolerant These are used to convert the 5 V IO level from Arduino UNO to 3.3 V level. This is for the SD card access.
Purposes of the LEDs on the W5100 shield
There are 5 LEDs on the W5100 shield. You can see the functions associated with each LED below.
- LINK LED – The LINK LED indicates whether the link is established. The LED will always be on when the connection is Ok. It will blink once for every Rx and Tx operation.
- SPD LED – Speed LED is used to indicate the connection’s speed. It will always glow if the link speed is 100 Mbps
- FDX LED – The LED will always be on if the link is full duplex.
- COL LED – Collision LED will glow if there is a collision event
- PWR LED – Power LED will always glow if the 3.3 V is available on the board
Step-By-Step Instructions To Connect The Arduino Ethernet Shield W5100 To An Arduino UNO Board
The following section gives step-by-step details to connect the Ethernet Shield W5100 to your Arduino UNO board.
The connection is simple and easy to complete soon.
Let’s start!
1) Start with the Arduino
Disconnect the Arduino from PC and any other devices. You should connect the Arduino to PC only after all the connections to the Arduino UNO and the Arduino shield are done.
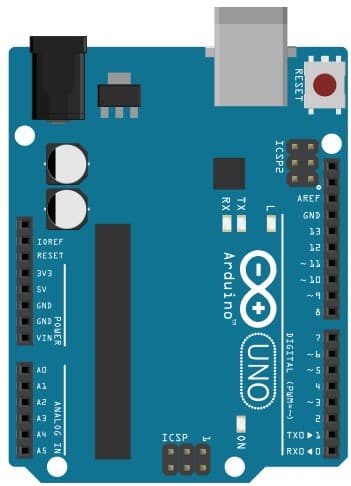
2) Mount the Arduino W5100 Ethernet shield on the Arduino UNO
The Arduino Ethernet shield is made to come in contact with the connectors on the Arduino. You can use the example image above for reference.
Gently press the shield once all the pins are oriented. Reverify the connection.
3) Now connect a USB cable between Arduino UNO and the PC
This is to prepare the setup for the next stage. USB cable provides both power and the option to program using a PC.
Arduino W5100 Ethernet Shield Library Installation And Code Examples
In this section, I will show how to install the W5100 shield library. Let’s begin!
1) Go To Manage Library options
Open the Arduino application on your PC. go to the Tools option in the Menu bar. In the drop-down menu you get, clock on “Manage Libraries.”
The image below should serve you as a guide to quickly locating the option.

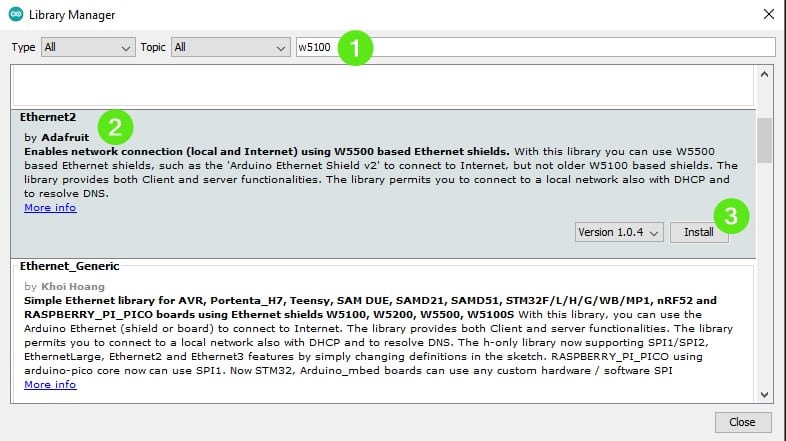
2) Install the Adafruit Ethernet2 library
Search for W5100 in the search window and hit enter. Locate the Ethernet 2 library in the options.
Click on the Install button, and this will download and install the library needed for the Arduino Ethernet.
The below image should help you to find the relevant result in the search window. Continue to the next step.
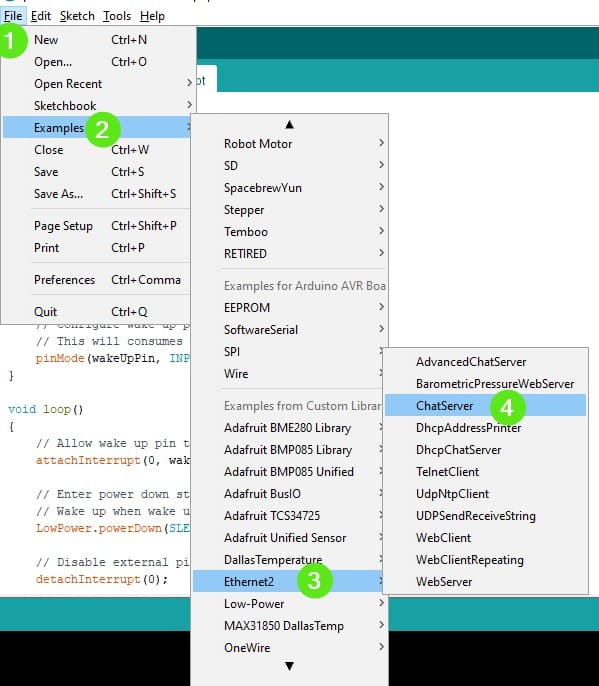
3) Open Chat Example code from the library
Follow the steps below to open Arduino sketch examples
- Click on “File”
- Select “Examples” in the drop-down menu
- Select the “Ethernet2” library under the Adafruit list of libraries.
- Select your favorite example. In this case, I have selected the chat server example code.
The example code below helps you to monitor the status of the connection via the serial terminal.
Once the clients are connected, any data received by the ethernet shield will be printed on the serial monitor.
There are several other examples you can go ahead and try out.
#include "SPI.h"
#include "Ethernet2.h"

// Enter a MAC address and IP address for your controller below.
// The IP address will be dependent on your local network.
// gateway and subnet are optional:
byte mac[] = {
  0xDE, 0xAD, 0xBE, 0xEF, 0xFE, 0xED
};
IPAddress ip(192, 168, 1, 177);
IPAddress gateway(192, 168, 1, 1);
IPAddress subnet(255, 255, 0, 0);


// telnet defaults to port 23
EthernetServer server(23);
boolean alreadyConnected = false; // whether or not the client was connected previously

void setup() {
  // initialize the ethernet device
  Ethernet.begin(mac, ip, gateway, subnet);
  // start listening for clients
  server.begin();
  // Open serial communications and wait for port to open:
  Serial.begin(9600);
  while (!Serial) {
    ; // wait for serial port to connect. Needed for Leonardo only
  }


  Serial.print("Chat server address:");
  Serial.println(Ethernet.localIP());
}

void loop() {
  // wait for a new client:
  EthernetClient client = server.available();

  // when the client sends the first byte, say hello:
  if (client) {
    if (!alreadyConnected) {
      // clead out the input buffer:
      client.flush();
      Serial.println("We have a new client");
      client.println("Hello, client!");
      alreadyConnected = true;
    }

    if (client.available() > 0) {
      // read the bytes incoming from the client:
      char thisChar = client.read();
      // echo the bytes back to the client:
      server.write(thisChar);
      // echo the bytes to the server as well:
      Serial.write(thisChar);
    }
  }
}
FAQ’s About The Arduino Ethernet W5100 Shield
In this section, I have compiled a collection of frequently asked questions about the Arduino ethernet shield based on W5100 controller.
If you have a question that is not answered here, please post it in the comments section.
1) How does the Arduino Ethernet shield gets the IP address?
The Arduino shield gets the IP address automatically via DHCP. DHCP stands for Dynamic Host Configuration Protocol.
It also provides configuration information such as the subnet mask and default gateway to the shield automatically.
You can also set the option manually if you want
2) How do I connect the SD card to the Ethernet shield?
You can connect the SD card to the shield easily. Make sure that the Arduino is not powered. Gently insert the SD card into the SD card slot (top side facing up). Push it gently inside.
Power the Arduino board by connecting the USB cable between UNO and the PC.
3) How do I use the Ethernet shield with Arduino?
Mount the shield carefully on your Arduino UNO. Once you have mounted the shield, you can power the Arduino UNO. This will automatically power the shield as well.
Upload the Arduino sketch to the Arduino from your computer. For programming, you can use a USB cable between the PC and the Arduino UNO.
After programming, you can use any external supply to power the Arduino UNO and the shield.
4) What is the difference between W5100 and W5300 ethernet modules?
Both W5100 and W5300 controllers are easy-to-use modules with Arduino. W5300 is superior in several parameters.
There are four sockets in the W5100, whereas the W5300 has eight sockets.
The combined Tx and Rx memory is 16 kbytes and 128 kbytes in W5100 and W5300, respectively.
You can find a complete comparison chart at this link.
Conclusion
I hope I have provided all the details you were looking for in the W5100 Arduino ethernet shield.
I have taken you through the features, board details, and details you need to complete the connection and program the Arduino sketch.
I will be curious to see what projects you do come up with the Arduino ethernet shield. I will be glad if you provide a link to the projects you build using the Arduino W5100 shield.
Please do share your projects in the comments section below.
If you are interested in any other Arduino or ESP32 project and would like to know more about it, please let me know in the comments.
I will be glad to create another helpful article on the topic.
Please don’t forget to share the article with your friends who are also Arduino enthusiasts and looking for an internet connection option!

I am Puneeth. I love tinkering with open-source projects, Arduino, ESP32, Pi and more. I have worked with many different Arduino boards and currently I am exploring, Arduino powered LoRa, Power line communication and IoT.