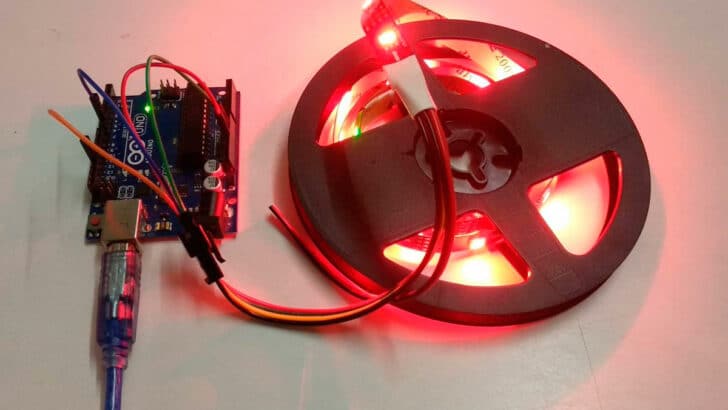
In this tutorial, you will learn the features and specifications of WS2812B LED strips and How to control WS2812B individually addressable LEDs using an Arduino board.
After this tutorial, you can control the color of each LED individually, which allows you to produce exceptional and complex effects simply.
Hardware components
| Arduino Uno Rev3 | x1 | Amazon |
| Arduino Mega (Optional) | x1 | Amazon |
| WS2812B LED strip | x1 | Amazon |
| 220Ω Resistor | x1 | Amazon |
| Breadboard | x1 | Amazon |
| Jumper wires | x10 | Amazon |
| USB cable type A/B | x1 | Amazon |
Software
| Arduino IDE | Arduino IDE |
Makerguides.com is a participant in the Amazon Services LLC Associates Program, an affiliate advertising program designed to provide a means for sites to earn advertising fees by advertising and linking to products on Amazon.com.
Introduction of WS2812B LED Strip
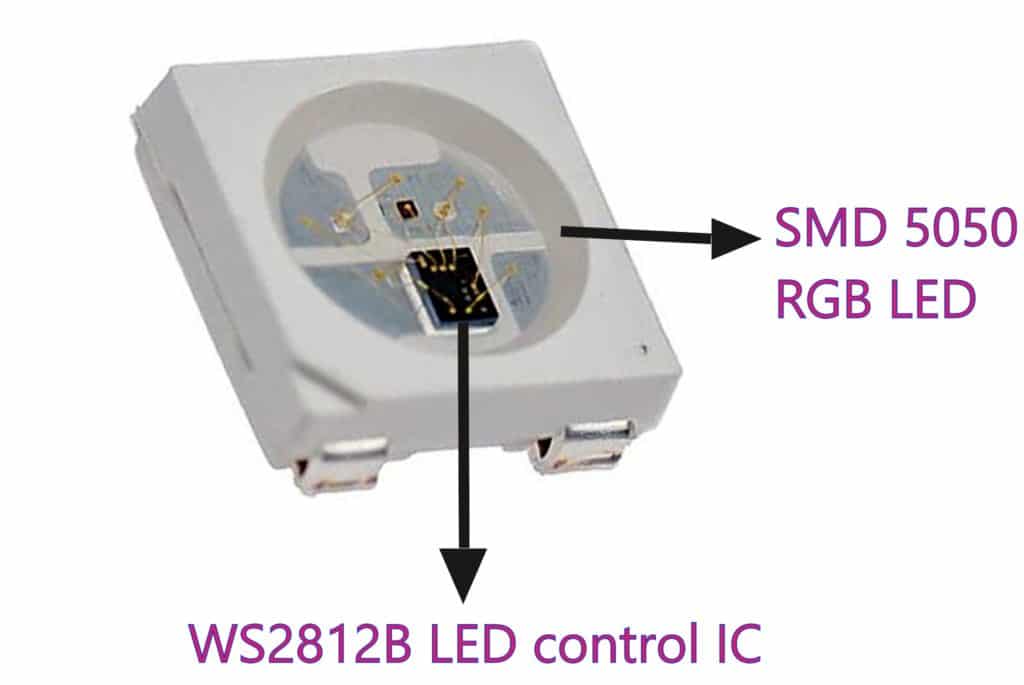
WS2812B is an intelligent control LED light source that the control circuit and RGB chip are integrated into a package of 5050 components.
Each addressable LED has its own driver IC, which allows you to control the color and brightness independently according to your usability.
WS2812B Addressable LED Pinout
Each unit has three LEDs (RED, GREEN, and BLUE) and a driver IC to control the color and the luminosity of the led. It consists of 4 pins.

The pin configuration details are listed below in the tabular form:
| Sr. No. | Pin Name | Function |
| 1 | VDD | Power Supply for LED |
| 2 | DOUT | Control Data Signal Output |
| 3 | VSS | Ground |
| 4 | DIN | Control Data Signal Input |
Features & Specifications of WS2812B LED Strip:
- Input voltage: 5V DC
- Input signal current: 1uA
- Supply Capacitance: 15 pF
- Operational Frequency: 400Hz
- Data transmission speed: 800Kbps
- 24-bit color control (8-bit PWM per channel); 16.8 million colors per pixel
- Power: 60LEDS/M – 18 watt/M
- Ingress Protection: IP30 Non-waterproof
- IP65: Waterproof in Silicon Coating
- Colors: Full-color RGB, dream color changing
- Length: The length of the Addressable LED Strip can be customized.
For more technical details, check the WS2812B datasheet.
WS2812B Addressable Serial Controller
The serial controller has a Serial In Serial Out (SISO) 24-bit register, divided into three parts of 8 bits such as B0-B7, R0-R7, and G0-G7.
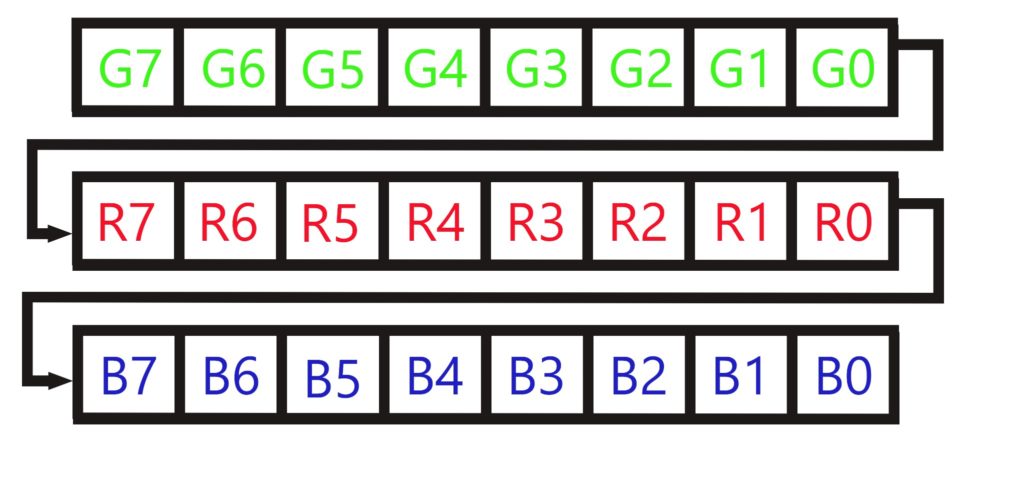
A 24-bit register takes data serially and stores data in the register. Using serial received data, the controller controls the brightness and colors of the RGB LED.
If you combine these 256 options of three colors, you will get around a million possibilities available. In this way, a variety of colors are displayed.
How do you wire a WS2812B LED strip?
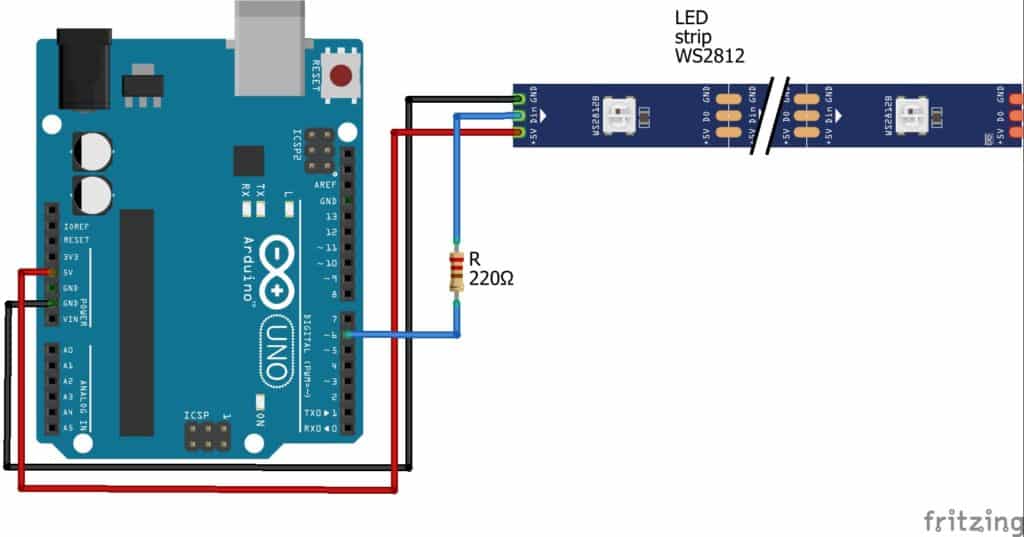
Follow the below-mentioned steps to interface the WS2812b LED strip with Arduino Uno.
Step 1: Connect Pin 6 of the Arduino Uno to the 220 Ω resistor to the W2812B LED Strip data pin.
Step 2: Now connect Arduino Uno 5V to the LED strip’s 5V and Arduino’s Ground to the led strip’s Ground. It is a complete diagram and uses it.
I’m using 10 LEDs WS2812B Strip, but If you use more than 10-12 WS2812B RGB LEDs, you need to connect an external power supply.
How do you control addressable LED strips with Arduino?
WS2812B RGB LED only needs a single data line to control all the LEDs connected in series.
To control the addressable LED strips using Arduino Uno, you need to install the WS2812B LED strip library in your Arduino IDE.
After that, I will provide you with the code to control the LED strip.
Installing the required Arduino libraries
To use WS2812B Addressable LEDs with Arduino IDE, you can use an already built library from FastLED.h.
Follow the below-mentioned steps to install the FastLED.h library in Arduino IDE.
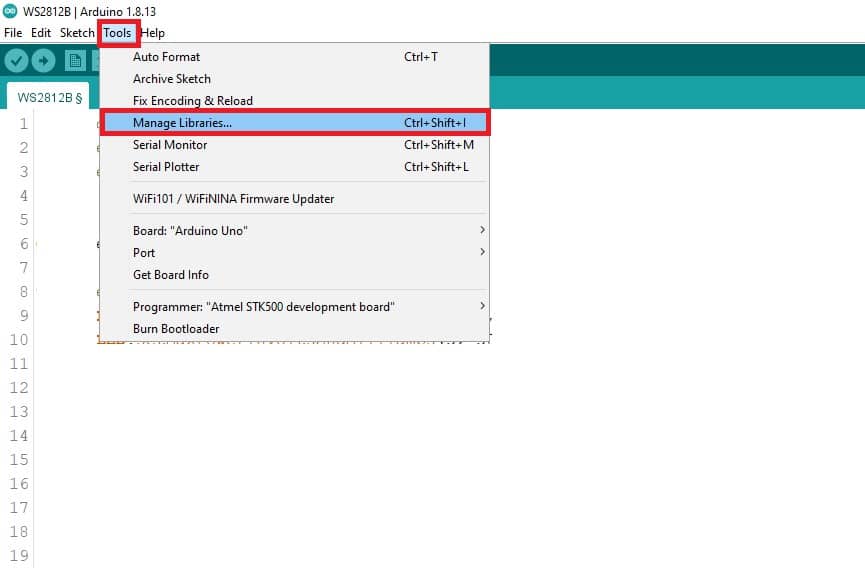
Step 1: Go to the Tools > Manage Libraries (Ctrl + Shift + I on Windows) to open the library manager in Arduino IDE.
Step 2: Now, in the search box, type “FastLED,” and you can see the different results for your search.
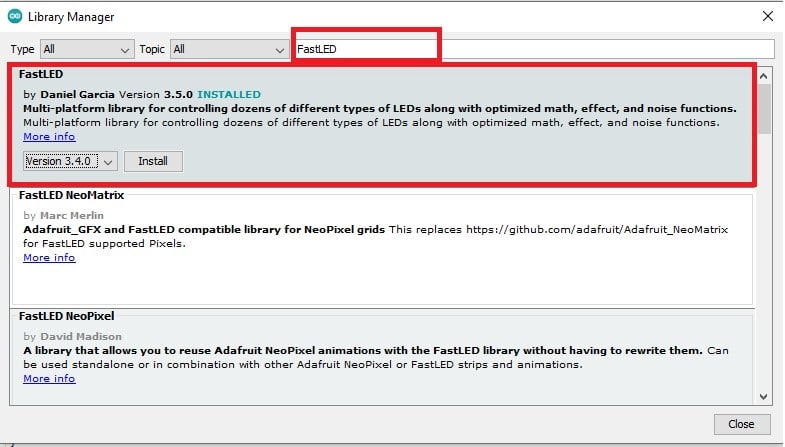
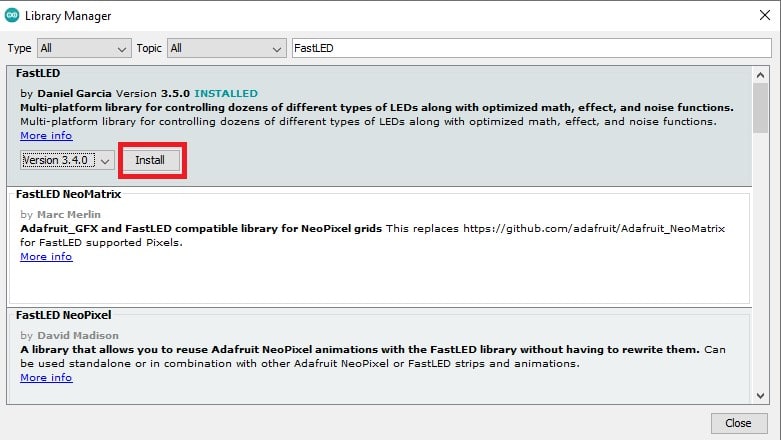
You need to click on Install and use it.
Arduino Code for WS2812B LEDs strip
The following code allows you to use a WS2812B LED strip to create various types of magic.
Using a serial monitor, you can try different types of LEDs operations.
#include "FastLED.h"
#define RGB_PIN 6 // LED DATA PIN
#define RGB_LED_NUM 10 // 10 LEDs [0...9]
#define BRIGHTNESS 200 // brightness range [0..255]
#define CHIP_SET WS2812B // types of RGB LEDs
#define COLOR_CODE GRB // sequence of colors in data stream
// Define the array of LEDs
CRGB LEDs[RGB_LED_NUM];
// define 3 byte for the random color
byte a, b, c;
#define UPDATES_PER_SECOND 100
char iByte = 0;
void setup() {
Serial.begin(9600);
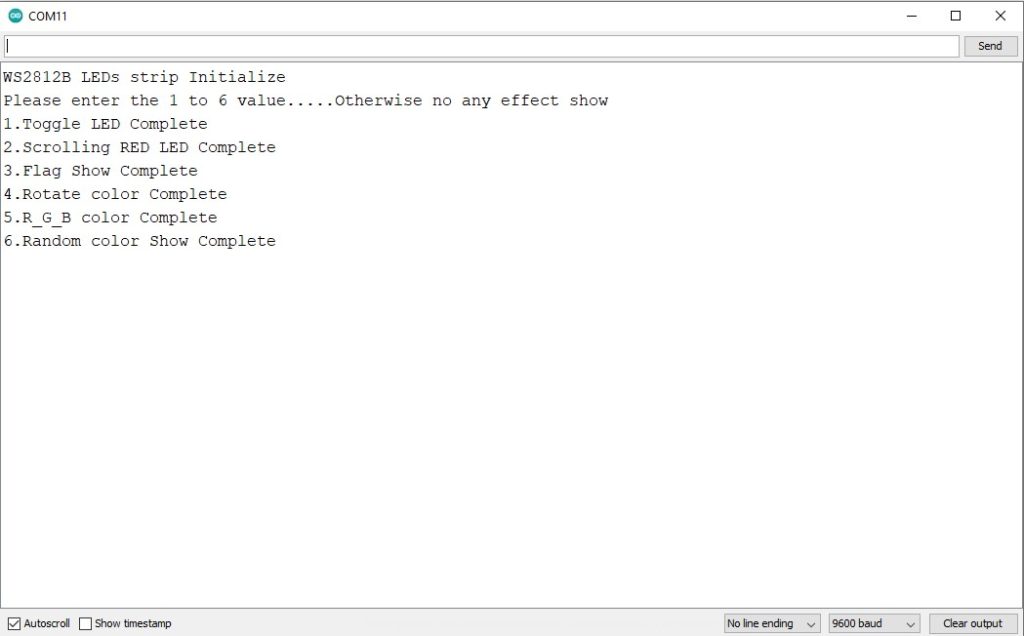
Serial.println("WS2812B LEDs strip Initialize");
Serial.println("Please enter the 1 to 6 value.....Otherwise no any effect show");
FastLED.addLeds<CHIP_SET, RGB_PIN, COLOR_CODE>(LEDs, RGB_LED_NUM);
randomSeed(analogRead(0));
FastLED.setBrightness(BRIGHTNESS);
FastLED.setMaxPowerInVoltsAndMilliamps(5, 500);
FastLED.clear();
FastLED.show();
}
void loop() {
if (Serial.available() > 0) {
// read the incoming byte:
iByte = Serial.read();
switch (iByte) {
case '1': Toggle_RED_LED();
Serial.println("1.Toggle LED Complete");
break;
case '2': Scrolling_RED_LED();
Serial.println("2.Scrolling RED LED Complete");
break;
case '3': O_W_G_scroll();
Serial.println("3.Flag Show Complete");
break;
case '4': Rotate_color();
Serial.println("4.Rotate color Complete");
break;
case '5': r_g_b();
Serial.println("5.R_G_B color Complete");
break;
case '6': random_color();
Serial.println("6.Random color Show Complete");
break;
}
}
}
// RED LED TOGGLE
void Toggle_RED_LED(void) {
// Red Green Blue
for (int i = 0; i < RGB_LED_NUM; i++)
LEDs[i] = CRGB(255, 0, 0 );
FastLED.show();
delay(1000);
for (int i = 0; i < RGB_LED_NUM; i++)
LEDs[i] = CRGB(0, 0, 0 );
FastLED.show();
delay(1000);
}
// Move the Red LED
void Scrolling_RED_LED(void)
{
for (int i = 0; i < RGB_LED_NUM; i++) {
LEDs[i] = CRGB::Red;
FastLED.show();
delay(500);
LEDs[i] = CRGB::Black;
FastLED.show();
delay(500);
}
}
// Orange/White/Green color green
void O_W_G_scroll() {
for (int i = 0; i < RGB_LED_NUM; i++) {
LEDs[i] = CRGB::Orange;
delay(50);
FastLED.show();
}
for (int i = 0; i < RGB_LED_NUM; i++) {
LEDs[i] = CRGB::Black;
delay(50);
FastLED.show();
}
for (int i = 0; i < RGB_LED_NUM; i++) {
LEDs[i] = CRGB::White;
delay(50);
FastLED.show();
}
for (int i = 0; i < RGB_LED_NUM; i++) {
LEDs[i] = CRGB::Black;
delay(50);
FastLED.show();
}
for (int i = 0; i < RGB_LED_NUM; i++) {
LEDs[i] = CRGB::Green;
delay(50);
FastLED.show();
}
for (int i = 0; i < RGB_LED_NUM; i++) {
LEDs[i] = CRGB::Black;
delay(50);
FastLED.show();
}
}
// Red/Green/Blue color Rotate
void Rotate_color(void) {
for (int clr = 0; clr < RGB_LED_NUM; clr++) {
LEDs[clr] = CRGB::Red;
LEDs[clr + 1] = CRGB::Green;
LEDs[clr + 2] = CRGB::Blue;
FastLED.show();
delay(100);
for (int clr = 0; clr < RGB_LED_NUM; clr++) {
LEDs[clr] = CRGB::Black;
delay(5);
}
}
}
// Blue, Green , Red
void r_g_b() {
for (int i = 0; i < RGB_LED_NUM; i++) {
LEDs[i] = CRGB ( 0, 0, 255);
FastLED.show();
delay(50);
}
for (int i = RGB_LED_NUM; i >= 0; i--) {
LEDs[i] = CRGB ( 0, 255, 0);
FastLED.show();
delay(50);
}
for (int i = 0; i < RGB_LED_NUM; i++) {
LEDs[i] = CRGB ( 255, 0, 0);
FastLED.show();
delay(50);
}
for (int i = RGB_LED_NUM; i >= 0; i--) {
LEDs[i] = CRGB ( 0, 0, 0);
FastLED.show();
delay(50);
}
}
// random color show
void random_color(void) {
// loop over the NUM_LEDS
for (int i = 0; i < RGB_LED_NUM; i++) {
// choose random value for the r/g/b
a = random(0, 255);
b = random(0, 255);
c = random(0, 255);
// Set the value to the led
LEDs[i] = CRGB (a, b, c);
// set the colors set into the physical LED
FastLED.show();
// delay 50 millis
FastLED.delay(200);
}
}
How The WS2812B LEDs Control Code Works
I have used an Arduino IDE to program an Arduino Uno board.
Step 1: First, you need to include the library for the WS2812B strip and define the output pin for RGB LED strip.
Then, mention the number of LEDs in the LED strip with RGB_LED_NUM.
Here, I am using 10 LEDs. Instead of 10 LEDs, you can set any number of LEDs that you have available.
#include "FastLED.h"
#define RGB_PIN        6
#define RGB_LED_NUM    10
#define BRIGHTNESS     200
BRIGHTNESS to control the brightness of LEDs. You can set any brightness level between 0 to 255.
#define CHIP_SET WS2812B
Here, I am using CHIP_SET model number WS2812B, but you can use any model that you have available.
You can set the type of LED driver.
#define COLOR_CODE GRB
COLOR_ORDER will set the color sequence of your LED driver.
CRGB LEDs[RGB_LED_NUM];
I will use a LEDs array that can hold the RGB data for the number of LEDs you want.
Step 2: In the setup section, I will set the LED strip.
First, Initialize the serial monitor and set the baud rate at 9600 speed.
FastLED.addLeds<CHIP_SET, RGB_PIN, COLOR_CODE>(LEDs, RGB_LED_NUM);
I used the library function using a WS2812B LED strip connected to Arduino PIN 6, and the driver has a G-R-B led order. And the strip has 10 nos WS2812B RGB LEDs.
FastLED.setBrightness(BRIGHTNESS);
Using this library function, you can set the brightness.
FastLED.setMaxPowerInVoltsAndMilliamps(5, 500);
Set the maximum power in volts and milliamps to make a safe Arduino Board using this function.
FastLED.clear();
Using this function, you can clear the LEDs whenever you upload a new code.
FastLED.show();
FastLED.show() is used to update the Arduino about the status of the CRGB function.
Step 3: In the void loop(), I have used 6 different cases for LEDs to create some magic. In CRGB(0, 0, 0 ) function, 1st argument is red, the second is green, and the third is blue.
Also significant is that this color value is 0 to 255.
for (int i = 0; i < RGB_LED_NUM; i++)
In this function, the loop will rotate up to 10 times what you declared at starting.
Case 1:
void Toggle_RED_LED(void) {
  // Red Green Blue
  for (int i = 0; i < RGB_LED_NUM; i++)
    LEDs[i] = CRGB(255, 0, 0 );
  FastLED.show();
  delay(1000);
  for (int i = 0; i < RGB_LED_NUM; i++)
    LEDs[i] = CRGB(0, 0, 0 );
  FastLED.show();
  delay(1000);
}
In first for loop, CRGB(255, 0, 0 ) will turn ON red LED and in second for loop CRGB(0, 0, 0 ) will turned OFF red LED.
Thus, 10 red LEDs will glow for 1 second and then turn OFF for 1 second.

Case 2:
void Scrolling_RED_LED(void) {
  for (int i = 0; i < RGB_LED_NUM; i++) {
    LEDs[i] = CRGB::Red;
    FastLED.show();
    delay(500);
    LEDs[i] = CRGB::Black;
    FastLED.show();
    delay(500);
  }
}
10 red LEDs will glow one by one in sequence.
Case 3:
void O_W_G_scroll() {
  for (int i = 0; i < RGB_LED_NUM; i++) {
    LEDs[i] = CRGB::Orange;
    delay(50);
    FastLED.show();
  }
  for (int i = 0; i < RGB_LED_NUM; i++) {
    LEDs[i] = CRGB::Black;
    delay(50);
    FastLED.show();
  }
  for (int i = 0; i < RGB_LED_NUM; i++) {
    LEDs[i] = CRGB::White;
    delay(50);
    FastLED.show();
  }
  for (int i = 0; i < RGB_LED_NUM; i++) {
    LEDs[i] = CRGB::Black;
    delay(50);
    FastLED.show();
  }
  for (int i = 0; i < RGB_LED_NUM; i++) {
    LEDs[i] = CRGB::Green;
    delay(50);
    FastLED.show();
  }
  for (int i = 0; i < RGB_LED_NUM; i++) {
    LEDs[i] = CRGB::Black;
    delay(50);
    FastLED.show();
  }
}
In each for loop, all 10 LEDs will glow one by one, and then they turn OFF one by one.
The first for loop turned ON orange light, and the second for loop turned OFF all lights.
The third for loop turned ON white light, and the fourth for loop turned OFF all lights.
The fifth for loop turned ON the green light, and the sixth for loop turned OFF all lights.
Case 4:
void Rotate_color(void) {
  for (int clr = 0; clr < RGB_LED_NUM; clr++) {
    LEDs[clr]     =   CRGB::Red;
    LEDs[clr + 1] = CRGB::Green;
    LEDs[clr + 2] = CRGB::Blue;
    FastLED.show();
    delay(100);
    for (int clr = 0; clr < RGB_LED_NUM; clr++) {
      LEDs[clr] = CRGB::Black;
      delay(5);
    }
  }
}
In the code, sequence red, green, and blue will glow and rotate, like 3 LEDs: red, green, and blue LED rotate.
Case 5:
void r_g_b() {
  for (int i = 0; i < RGB_LED_NUM; i++) {
    LEDs[i] = CRGB(0, 0, 255);
    FastLED.show();
    delay(50);
  }
  for (int i = RGB_LED_NUM; i >= 0; i--) {
    LEDs[i] = CRGB(0, 255, 0);
    FastLED.show();
    delay(50);
  }
  for (int i = 0; i < RGB_LED_NUM; i++) {
    LEDs[i] = CRGB(255, 0, 0);
    FastLED.show();
    delay(50);
  }
  for (int i = RGB_LED_NUM; i >= 0; i--) {
    LEDs[i] = CRGB(0, 0, 0);
    FastLED.show();
    delay(50);
  }
}
The first loop glows all 10 LEDs in blue color.
The following loop lights up again all 10 LEDs, but this time in green color and reverse order. After the loop lights up all 10 LEDs, this time, the color is red after stopping it.

Case 6:
void random_color(void) {
  // loop over the NUM_LEDS
  for (int i = 0; i < RGB_LED_NUM; i++) {
    // choose random value for the r/g/b
    a = random(0, 255);
    b = random(0, 255);
    c = random(0, 255);

    //set the value to the led
    LEDs[i] = CRGB (a, b, c);
    // set the colors set into the physical LED
    FastLED.show();

    // delay 50 millis
    FastLED.delay(200);
  }
}
In this pattern code, LEDs will glow a random color.
Output Of The WS2812B LED strip on Serial Terminal
How do you control individually addressable LEDs?
To control Indifvual addressable LED, you need to update CRGB(0,0,0) function to select the color and leds[value] to select the led number.
In the void loop(), you can use:
  leds[2] = CRGB(0, 255, 0);
  FastLED.show();
  delay(500);
Here, leds[2] means 3rd LED will be controlled, and CRGB(0, 255, 0) means the green LED will glow.
How many addressable LEDs can an Arduino control?
Each LED strip needs one Arduino Uno pin, and an Arduino Uno has 13 digital pins. So, you can individually control 13 individually addressable LEDs strips.
Conclusion
After this tutorial, you have learned how to connect a WS2812B RGB LED strip with an Arduino and control them in different ways.
I hope you found this tutorial informative. If you did, please share it with a friend who likes electronics and making things!
I would love to know what project you plan on building or have already made with the Arduino.
If you have any questions or suggestions or think things are missing in this tutorial, please comment below.
Note that comments are held for moderation to prevent spam.

Hiren is a professional Embedded Engineer with a Master’s Degree
in Electronics and Communication Engineering. He is proficient in C and
C++ and enjoys building DIY projects on Arduino, ESP32, PIC32, STM32 & Raspberry PI boards.
Geoff Cremasco
Thursday 9th of November 2023
Thak you for this post. I am in no way technically minded and using Arduino to control lights is very new to me. I am currently teaching myself so I can create a Christmas light show at my house with music here in Sydney. Now I've taken one step closer to controlling strings of addressable LEDs then next step to is to add music and effects!