In this tutorial, you will learn how to use the BME280 sensor with Arduino to measure and display environmental data.
The BME280 sensor is a versatile and popular sensor that can measure pressure, temperature, and humidity. It is commonly used in weather stations, indoor climate control systems, and other projects that require environmental monitoring.
By the end of this tutorial, you will have a clear understanding of how to connect the BME280 sensor to an Arduino board, install the necessary libraries, and write code to read and display the sensor data. We will also explore how to add an OLED display to visualize the sensor readings in real-time.
If you are new to Arduino or sensors, don’t worry! This tutorial is designed for beginners and will guide you through each step with detailed explanations and code examples. So let’s get started by gathering the required parts for this project.
Required Parts
Below you will find the parts required for this project.

Arduino Uno

Dupont Wire Set

Breadboard

USB Cable for Arduino UNO
OLED Display
BME280 Sensor
Makerguides.com is a participant in the Amazon Services LLC Associates Program, an affiliate advertising program designed to provide a means for sites to earn advertising fees by advertising and linking to products on Amazon.com. As an Amazon Associate we earn from qualifying purchases.
Overview of the BME280 Sensor
The BME280 sensor is a sensor that combines pressure, temperature, and humidity measurements into a single module. In this section, we will delve into how the BME280 sensor works and explore its main features.
How the BME280 Sensor Works
The BME280 sensor utilizes advanced MEMS (Micro-Electro-Mechanical Systems) technology to accurately measure pressure, temperature, and humidity. It consists of a pressure sensor, a temperature sensor, and a humidity sensor, all integrated into a single chip.
Pressure Measurement
The pressure sensor in the BME280 measures atmospheric pressure by detecting the changes in air pressure. It uses a piezoresistive element that changes its resistance based on the applied pressure. By converting this resistance into a digital value, the sensor can provide accurate pressure readings.
Temperature Measurement
The temperature sensor in the BME280 measures ambient temperature using a built-in thermistor. It detects changes in temperature by measuring the resistance of the thermistor. This information is then converted into a digital value.
Humidity Measurement
The humidity sensor in the BME280 measures relative humidity by detecting changes in capacitance. It uses a thin-film polymer capacitor that absorbs or releases moisture based on the surrounding humidity. By measuring the capacitance changes, the sensor can provide accurate humidity readings.
Main Features of the BME280 Sensor
One of the key features of the BME280 sensor is its high accuracy and stability. It offers pressure measurements with an accuracy of ±1 hPa, temperature measurements with an accuracy of ±1°C, and humidity measurements with an accuracy of ±3%. This level of precision makes it suitable for applications that require reliable and consistent environmental data.
Another notable feature of the BME280 sensor is its wide operating range. It can measure pressure from 300 hPa to 1100 hPa, temperature from -40°C to +85°C, and humidity from 0% to 100%. The following list summarizes the main technical details of the BME280:
- Operating Voltage: 1.71V to 3.6V
- Operating Temperature Range: -40°C to +85°C
- Pressure Measurement Range: 300 hPa to 1100 hPa
- Pressure Measurement Accuracy: ±1 hPa
- Temperature Measurement Range: -40°C to +85°C
- Temperature Measurement Accuracy: ±1°C
- Humidity Measurement Range: 0% to 100%
- Humidity Measurement Accuracy: ±3%
For more details have a look at the datasheet of the BME280.
Using the BME280 with an Arduino or other microcontrollers is very simple, since it supports the I2C (and SPI) interface. Additionally, the sensor operates at low power, consuming only 3.6 μA in normal mode and 0.1 μA in sleep mode, making it suitable for battery-powered applications.
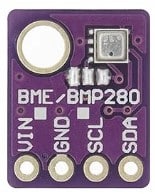
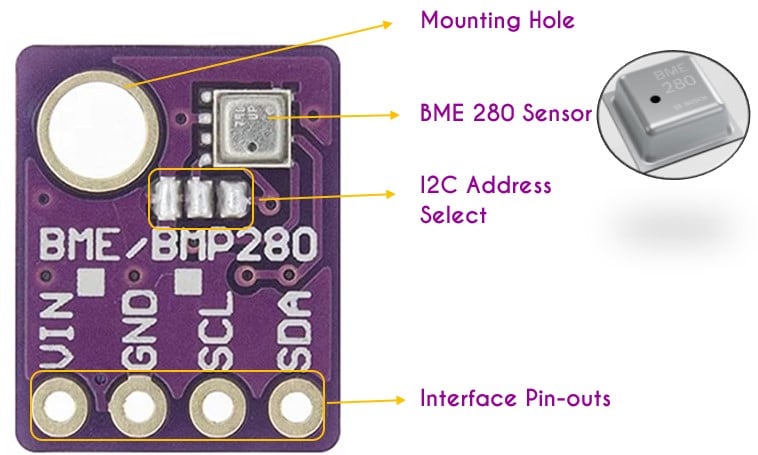
Breakout board for BME280
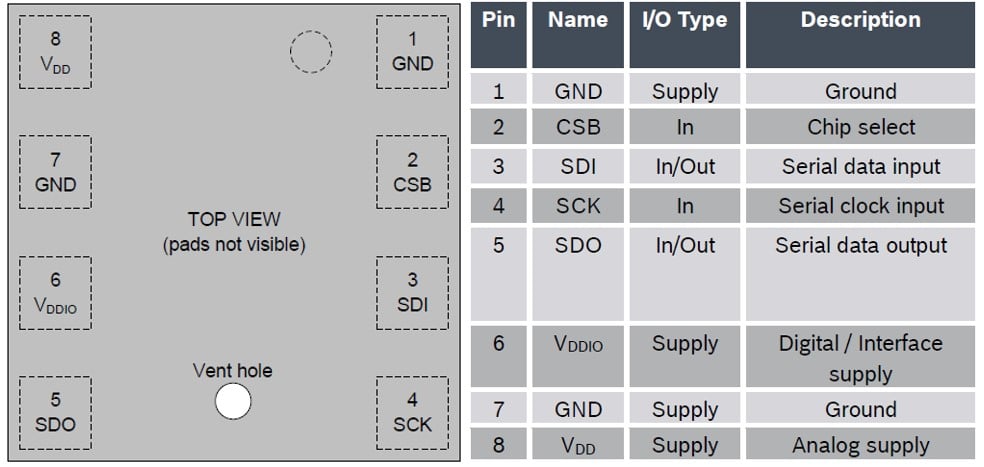
The BME280 is an 8 Pin IC in a tiny package. The picture below shows the pinout of the IC.
Since the BME280 IC is so small, you typically want to use a breakout board to make it easier to connect to an Arduino. This also allows to mount the BME280 on a breadboard, if you want to. Just solder the Bergstik connector to the breadboard., which comes with the breakout board.
The image below shows the breakout board for the BME280 Sensor listed in the required parts. As you can see it is very simple, with just for interface pins and the tiny sensor itself.
Schematics of BME280
The board can easily be connected via the I2C interface (SCL, SDA) and the necessary pullups for the SCL and SDA lines are already present on the Arduino Board. See the schematics below with the two 10K pullup resistors marked (red boxes).
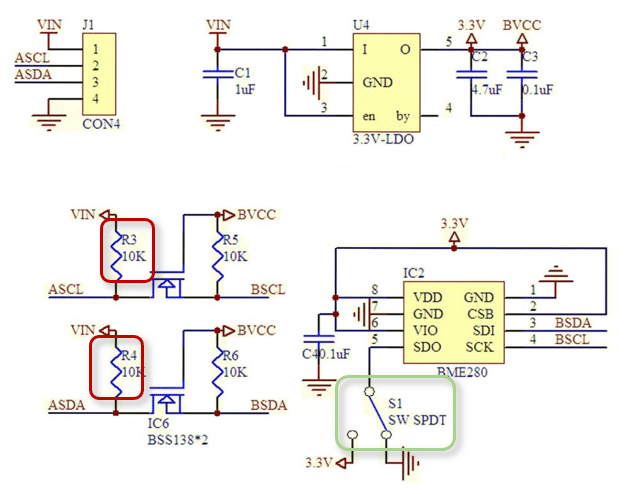
In the schema, you can also see the switch S1 SW SPDT (green box) connected to the SDO line, which allows you to switch between the I2C addresses 0x76 and 0x77 of the sensor. The last bit of the address is controlled by the SDO pin (high or low).
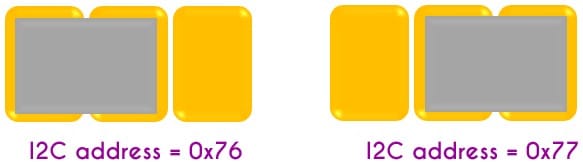
I2C address switch
On the breakout board this address switch is realized as three pads. You can choose an I2C address by shorting the first two or the last two pads, as shown in the image below. Use a solder blob or a zero ohm resistor to do this.
Finally, the breakout board has a GND pin for ground and a VIN pin for power. Note that there are two versions of BME280 breakout boards available, running either on 3.3V or 5V. Here we use the 3.3V version and you can see the 3.3V Voltage regulator (3.3V-LDO) in the schematics above.
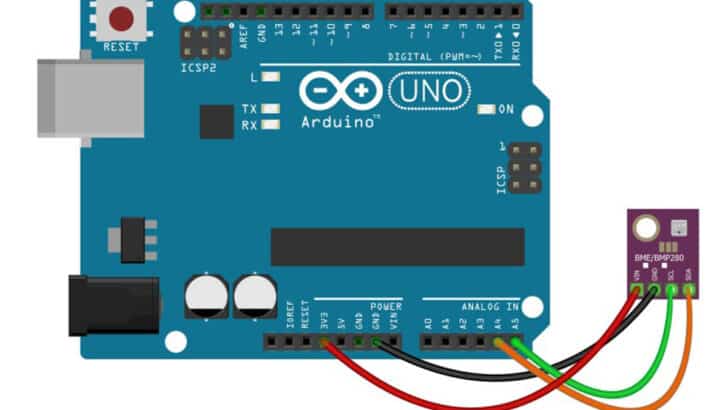
Connecting the BME280 Sensor to Arduino
Connecting the BME280 Sensor to an Arduino is very simple. Just connect SCL of the Sensor to A5 and SDA to A4 of the Arduino. Then connect ground the GND pins and the 3.3V pin of Arduino to VIN of the BME280 Sensor. See the wiring diagram below.
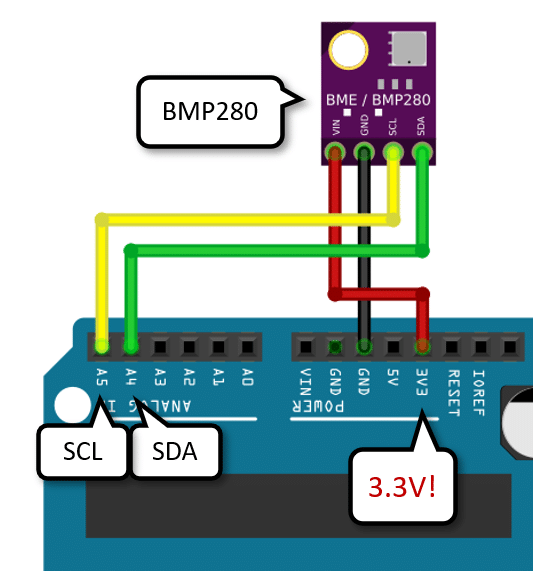
Make sure that your BME280 runs on 3.3V and that you use 3.3V output of the Arduino! If the following code cannot detect your BME280 Sensor, verify that the SCL and SDA lines are connected correctly.
Code to Read BME280 Sensor Data
The following code shows you how to read pressure, temperature, humidity and altitude data from the BME280 sensor. Have a quick look at the complete code first before we look at its details.
#include "Adafruit_BME280.h"

#define SEALEVELPRESSURE_HPA 1013.25
#define BME280_ADDRESS 0x76

Adafruit_BME280 bme;

void setup() {
  Serial.begin(9600);
  while(!Serial);

  if (!bme.begin(BME280_ADDRESS )) {
    Serial.println("Can't find BME280!");
    while(1) delay(10);
  }
}

void loop() {
  Serial.print("Temperature in degC = ");
  Serial.println(bme.readTemperature());

  Serial.print("Pressure in hPa     = ");
  Serial.println(bme.readPressure() / 100.0F);

  Serial.print("Altitude in m       = ");
  Serial.println(bme.readAltitude(SEALEVELPRESSURE_HPA));

  Serial.print("Humidity in %RH     = ");
  Serial.println(bme.readHumidity());

  Serial.println();
  delay(5000);
}
Include Libraries
To communicate with the BME280 sensor, we need to install and include the “Adafruit_BME280” library. This library provides functions to read data from the sensor via I2C communication.
#include "Adafruit_BME280.h"
To install the library follow these steps:
- Open the Arduino IDE software on your computer.
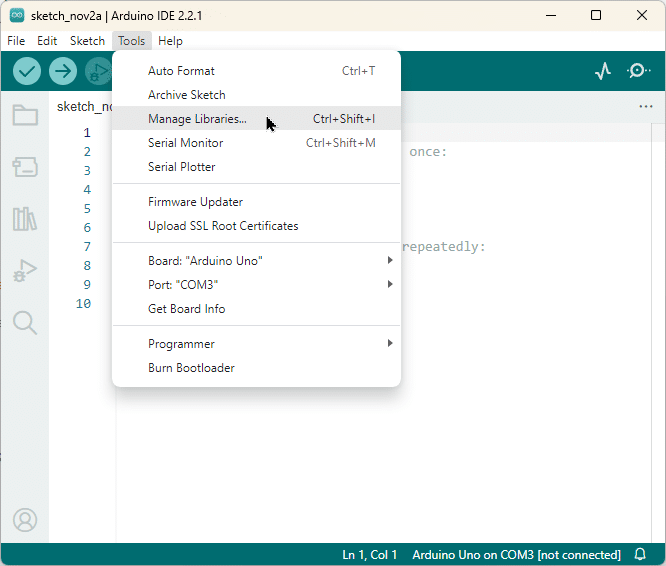
- Go to the “Sketch” menu and select “Include Library” and then “Manage Libraries”.
- In the Library Manager, type “Adafruit BME280” in the search bar.
- Look for the “Adafruit BME280” library in the search results and click on it.
- Click the “Install” button to install the library.
- Wait for the installation process to complete.
- Once the installation is finished, you can close the Library Manager.
If you need more help installing libraries have a look at the Arduino documentation.
Constants and Variables
After including the “Adafruit BME280” library, we define two constants. The first constant, “SEALEVELPRESSURE_HPA”, represents the average sea-level pressure in hPa at your location. It is used to convert a measured air pressure into an estimate for altitude. The second constant, “BME280_ADDRESS”, specifies the I2C address of the BME280 sensor.
#define SEALEVELPRESSURE_HPA 1013.25
#define BME280_ADDRESS 0x76
Next we create an instance of the “Adafruit_BME280” class called “bme”. This instance will be used to access the functions provided by the library.
Adafruit_BME280 bme;
Setup Function
In the “setup()” function, we initialize the serial communication at a baud rate of 9600. We also wait for the serial connection to be established before proceeding.
After that we try to initiate communication with the BME280 sensor by calling “bme.begin()” with its I2C address. If you run the code and get the error message that the BME280 sensor cannot be found, then this might be due to the wrong I2C address used here. Double check and if it still doesn’t work you can install and run the I2CScanner library to find the I2C address programmatically.
void setup() {
  Serial.begin(9600);
  while(!Serial);

  if (!bme.begin(BME280_ADDRESS)) {
    Serial.println("Can't find BME280!");
    while(1) delay(10);
  }
}
Loop Function
In the “loop()” function, we continuously read data from the BME280 sensor and print it to the serial monitor. We first print the temperature in degrees Celsius, followed by the pressure in hPa, altitude in meters, and humidity in percentage.
The “delay(5000)” function is used to pause the execution for 5 seconds before repeating the loop.
void loop() {
  Serial.print("Temperature in degC = ");
  Serial.println(bme.readTemperature());

  Serial.print("Pressure in hPa     = ");
  Serial.println(bme.readPressure() / 100.0);

  Serial.print("Altitude in m       = ");
  Serial.println(bme.readAltitude(SEALEVELPRESSURE_HPA));

  Serial.print("Humidity in %RH     = ");
  Serial.println(bme.readHumidity());

  Serial.println();
  delay(5000);
}
If you want the temperature in Fahrenheit instead of Celsius, you can use the equation
°F = °C * 1.8000 + 32.00.
Note that the reported altitude is derived from the measured air pressure relative to the provided air pressure at sea level. The altitude measurements will be off, if you don’t provide the air pressure at sea level at your location.
Finally, also note that the measured humidity is relative humidity. Relative humidity is the amount of moisture in the air compared to the maximum amount the air could hold at that temperature. Absolute humidity, on the other hand, is the actual amount of moisture present in the air.
And that’s it! With this code, you can read temperature, pressure, altitude, and humidity data from the BME280 sensor using Arduino. In the next section, I show you how to display this data on an OLED.
Adding an OLED to Display Sensor Data
In this section we add an OLED to display the sensor data read from the BME280. Alternatively, you could also use an LCD display. Have a look at our tutorial: Character I2C LCD with Arduino Tutorial (8 Examples), if you prefer this.
Connecting the OLED to the Arduino
The following image shows the wiring of the BM280 and the OLED with the Arduino. We use a breadboard here, since we need a few more connections, but the wiring is straightforward.
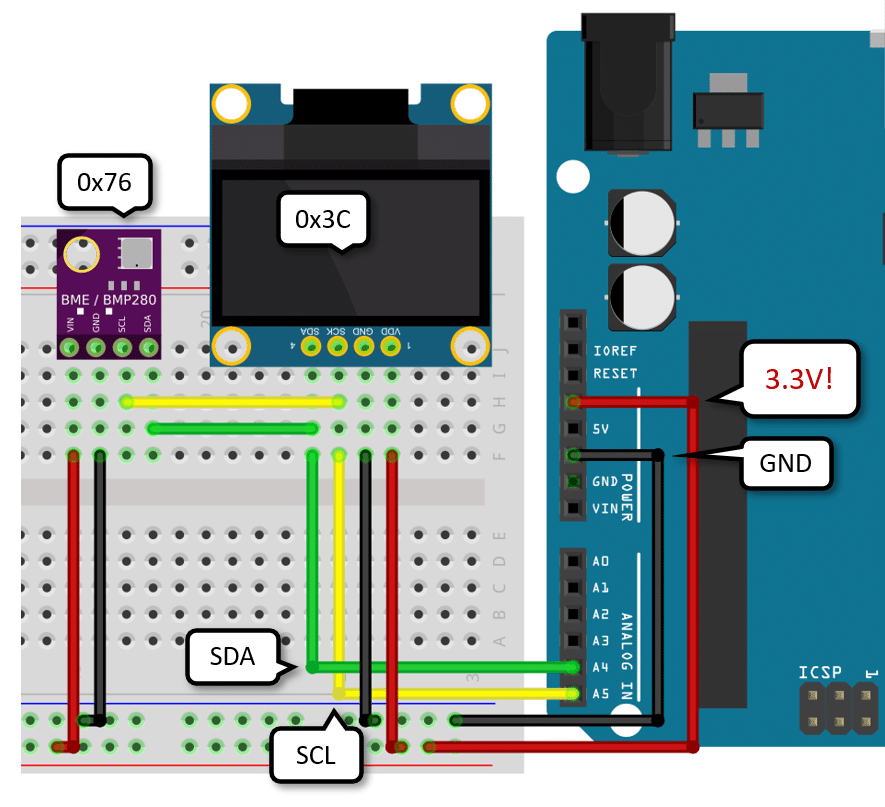
First connect 3.3V and GND from the Arduino to the power rails of the breadboard. From there provide power to the BME280 and OLED. The red wires connecting 3.3V to VIN and VDD and the black wires connecting GND. Again make sure to use the 3.3V power output of the Arduino!
The BME280 and the OLED are connected to the I2C bus and using the same wires. Connect SDA via the green wires to A4 of the Arduino and SCL to A5 (yellow wire). Note that the BME280 and the OLED can use the same wires (SCL, SDA), since they have different I2C addresses (0x76, 0x3C). Should both devices use the same I2C address, you will have a conflict and have to change the address of the BME280.
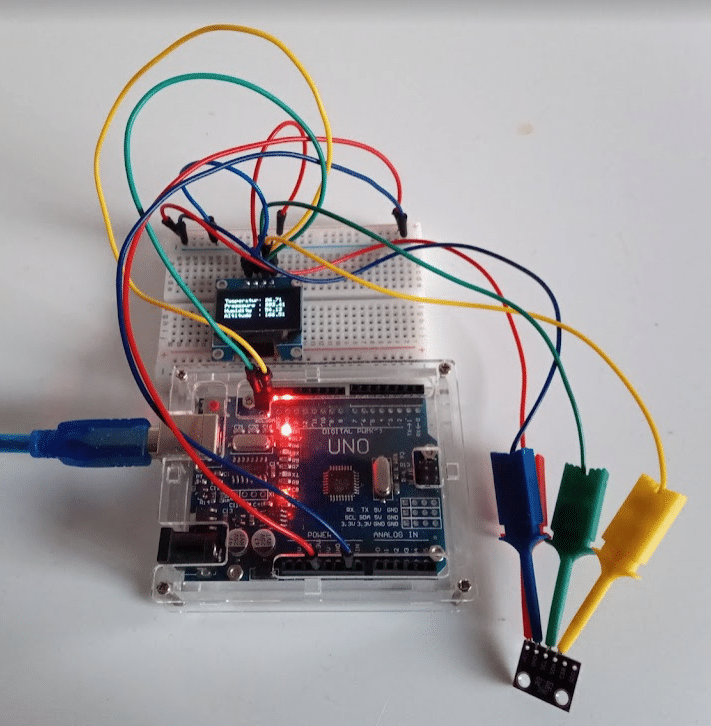
Below you can see a picture of the complete wiring on a real breadboard. I did not solder pins to my BME280 and instead connected it via wired clips, which by the way are very handy to have.
In the following section we write the code to display the sensor data of the BME280 on the OLED.
Code to Display Sensor Data on the OLED
Have a quick look at the complete code first, before we dive in its details.
// Display BME280 data on OLED

#include "Wire.h"
#include "Adafruit_GFX.h"
#include "Adafruit_SSD1306.h"
#include "Adafruit_BME280.h"

#define SEALEVELPRESSURE_HPA 1013.25
#define BME280_ADDRESS 0x76
#define SCREEN_WIDTH 128
#define SCREEN_HEIGHT 64
#define SCREEN_ADDRESS 0x3C

Adafruit_SSD1306 display(SCREEN_WIDTH, SCREEN_HEIGHT, &Wire, -1);
Adafruit_BME280 bme;

void setup() {
  Serial.begin(115200);

  if (!display.begin(SSD1306_SWITCHCAPVCC, SCREEN_ADDRESS)) {
    Serial.println("Can't find display!");
    while (1) delay(10);
  }

  if (!bme.begin(BME280_ADDRESS)) {
    Serial.println("Can't find BME280!");
    while (1) delay(10);
  }

  delay(100);
  display.setTextSize(1);
  display.setTextColor(WHITE);
}

void show(int y, char *text, float val) {
  display.setCursor(5, y);
  display.print(text);
  display.println(val);
}

void loop() {
  float temp = bme.readTemperature();
  float pres = bme.readPressure() / 100.0;
  float hum = bme.readHumidity();
  float alt = bme.readAltitude(SEALEVELPRESSURE_HPA);

  display.clearDisplay();
  show(10, "Temperatur: ", temp);
  show(20, "Presssure : ", pres);
  show(30, "Humidity  : ", hum);
  show(40, "Altitude  : ", alt);
  display.display();

  delay(1000);
}
Libraries
We start by including the necessary libraries for this project. First we include the Wire library for I2C communication. Then we include the Adafruit_GFX library for graphics, followed by the Adafruit_SSD1306 library for the OLED display, and finally the Adafruit_BME280 library for the BME280 sensor. The order doesn’t matter though.
#include "Wire.h"
#include "Adafruit_GFX.h"
#include "Adafruit_SSD1306.h"
#include "Adafruit_BME280.h"
If you need help installing those libraries have a look at the Arduino documentation. The essential steps are as follows:
- Open the Arduino IDE software on your computer.
- Go to the “Sketch” menu and select “Include Library” and then “Manage Libraries”.
- In the Library Manager, type the name of the library in the search bar.
- Look for a matching library in the search results and click on it.
- Click the “Install” button to install the library.
Constants
Once we have the required libraries, we define constants for the BME280 address, screen dimensions, and screen address of the OLED.
#define SEALEVELPRESSURE_HPA 1013.25
#define BME280_ADDRESS 0x76
#define SCREEN_WIDTH 128
#define SCREEN_HEIGHT 64
#define SCREEN_ADDRESS 0x3C
Initializing the Display and Sensor
In the setup() function, we begin the serial communication and initialize the OLED display and BME280 sensor. If the display or sensor is not found, we print an error message and enter an infinite loop.
void setup() {
  Serial.begin(115200);

  if (!display.begin(SSD1306_SWITCHCAPVCC, SCREEN_ADDRESS)) {
    Serial.println("Can't find display!");
    while (1) delay(10);
  }

  if (!bme.begin(BME280_ADDRESS)) {
    Serial.println("Can't find BME280!");
    while (1) delay(10);
  }

  delay(100);
  display.setTextSize(1);
  display.setTextColor(WHITE);
}
After that we wait a tiny bit (100ms) before setting the text size and color for the OLED. You can play a bit with the text size if you want bigger text. What colors you can use will depend on your OLED display.
Displaying Sensor Data
To simplify the display of the sensor data we define a show() function. It takes the vertical position, text and sensor value to display as input and shows in on the OLED. The display.print() and display.println() functions are functions provided by the OLED library.
void show(int y, char *text, float val) {
  display.setCursor(5, y);
  display.print(text);
  display.println(val);
}
In the loop() function, we read the temperature, pressure, humidity, and altitude values from the BME280 sensor. We then clear the display, show the sensor data using the show() function, and update the display.
void loop() {
  float temp = bme.readTemperature();
  float pres = bme.readPressure() / 100.0;
  float hum = bme.readHumidity();
  float alt = bme.readAltitude(SEALEVELPRESSURE_HPA);

  display.clearDisplay();
  show(10, "Temperature: ", temp);
  show(20, "Pressure   : ", pres);
  show(30, "Humidity   : ", hum);
  show(40, "Altitude   : ", alt);
  display.display();

  delay(1000);
}
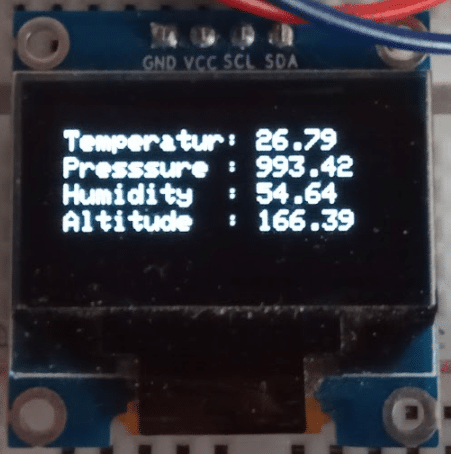
And there you go! Now you have a cute, little, almost complete weather station that displays environmental data on an OLED. It should look like this:
Conclusion
In this tutorial, we have learned how to use the BME280 pressure, temperature, and humidity sensor with Arduino. The BME280 sensor is a versatile and accurate sensor that can be used in various projects, such as weather monitoring systems, indoor climate control, and environmental monitoring. Its small size and low power consumption make it ideal for portable applications as well.
We started by introducing the BME280 sensor and its capabilities. We then discussed the required parts for this project, including the Arduino board and the BME280 sensor itself.
Next, we provided a detailed overview of how to connect the BME280 sensor to the Arduino board. We explained the necessary wiring connections and provided clear diagrams to help you understand the process.
Once the sensor was successfully connected, we moved on to the code implementation. We shared a complete code example that demonstrates how to read data from the BME280 sensor using the Arduino IDE. We explained each line of code and highlighted the important parts.
To take our project a step further, we showed you how to add an OLED display to your Arduino setup. This allows you to visualize the sensor data in real-time. We provided the necessary code and wiring instructions to connect the OLED display to the Arduino.
In conclusion, we have covered all the essential aspects of using the BME280 sensor with Arduino. You should now have a good understanding of how to connect the sensor, read data from it, and display the results on an OLED display.
Feel free to experiment with the code and adapt it to your specific project requirements. The BME280 sensor opens up a world of possibilities for environmental monitoring and climate control projects. Have fun exploring and creating with this powerful sensor!
Frequently Asked Questions
Here are some frequently asked questions about using the BME280 pressure, temperature, and humidity sensor with Arduino.
Q: What is the BME280 sensor?
A: The BME280 sensor is a versatile environmental sensor that can measure pressure, temperature, and humidity. It is commonly used in weather stations, indoor climate control systems, and other projects that require environmental monitoring.
Q: What is the difference between the BME280 and the BMP280 sensor?
A: BMP280 is a pressure sensor only. The BME280 has a temperature, humidity as well as a pressure sensor
Q: How do I connect the BME280 sensor to Arduino?
A: To connect the BME280 sensor to Arduino, you will need to make the following connections:
- VCC to 3.3V or 5V (depending on the sensor version)
- GND to GND
- SDA to A4
- SCL to A5
Make sure to refer to the datasheet or pinout diagram of your specific BME280 sensor for accurate pin connections.
Q: Which library should I use to interface with the BME280 sensor?
A: There are several libraries available for the BME280 sensor, but one popular choice is the Adafruit BME280 library. This library provides easy-to-use functions to read sensor data and supports various Arduino boards.
Q: How can I read sensor data from the BME280 sensor?
A: Once you have connected the BME280 sensor and installed the appropriate library, you can use the library’s functions to read sensor data. Typically, you would initialize the sensor, read the sensor data, and then access the individual pressure, temperature, and humidity values.
Here’s an example code snippet to read sensor data using the Adafruit BME280 library:
#include "Wire.h"
#include "Adafruit_Sensor.h"
#include "Adafruit_BME280.h"

Adafruit_BME280 bme;

void setup() {
  Serial.begin(9600);
  if (!bme.begin(0x76)) {
    Serial.println("Could not find BME280 sensor!");
    while (1);
  }
}

void loop() {
  float temperature = bme.readTemperature();
  float humidity = bme.readHumidity();
  float pressure = bme.readPressure() / 100.0F;

  Serial.println(temperature);
  Serial.println(humidity);
  Serial.println(pressure);

  delay(2000);
}
Q: What is the accuracy of the BME280 sensor?
A: The typical accuracy values are ±1 hPa for pressure, ±1°C for temperature, and ±3% for humidity.
Q: Can I change the I2C address of the BME280 sensor?
A: Yes, it is possible to change the I2C address of the BME280 sensor. The sensor has two possible addresses: 0x76 and 0x77. By default, the address is set to 0x76, but you can change it to 0x77 by connecting the SDO pin of the sensor to the VCC pin. Some breakout boards have soldering pads for that.
Q: Can I power the BME280 sensor with 5V?
A: The BME280 sensor can be powered with either 3.3V or 5V, depending on the sensor version. Make sure to refer to the datasheet or pinout diagram of your specific BME280 sensor to determine the correct voltage.
Q: Can I use the BME280 sensor outdoors?
A: Yes, the BME280 sensor can be used outdoors. However, you need to protect the sensor from direct exposure to rain or extreme weather conditions.
Q: What are the technical specifications of the BME280 sensor?
A: The technical specifications of the BME280 sensor are as follows:
- Operating Voltage: 1.71V to 3.6V
- Operating Temperature Range: -40°C to +85°C
- Pressure Measurement Range: 300 hPa to 1100 hPa
- Pressure Measurement Accuracy: ±1 hPa
- Temperature Measurement Range: -40°C to +85°C
- Temperature Measurement Accuracy: ±1°C
- Humidity Measurement Range: 0% to 100%
- Humidity Measurement Accuracy: ±3%
Q: Can I use the BME280 sensor with other microcontrollers?
A: Yes, the BME280 sensor can be used with other microcontrollers that support I2C communication. As long as you can establish an I2C connection and have a compatible library, you can interface the BME280 sensor with other microcontrollers.
Q: How often can I read data from the BME280 sensor?
A: The BME280 sensor can provide accurate readings at a maximum data output rate of 25 Hz for pressure and temperature, and 1 Hz for humidity. However, it is recommended to read data at a slower rate to minimize power consumption and ensure stable measurements.
Q: Can I calibrate the BME280 sensor for improved accuracy?
A: The BME280 sensor comes pre-calibrated from the factory, and its accuracy is already quite high. However, if you require even greater accuracy, you can perform additional calibration. This involves comparing the sensor readings with a known reference and adjusting the readings accordingly.
Q: Can I use multiple BME280 sensors in the same project?
A: Yes, you can use multiple BME280 sensors in the same project. Each sensor will require its own set of connections to the microcontroller and can be addressed individually using different I2C addresses. By using different addresses, you can communicate with and read data from multiple sensors on the same I2C bus.
Q: Can I use the BME280 sensor for altitude measurement?
A: Yes, the BME280 sensor can be used for altitude measurement. By utilizing the pressure readings from the sensor, you can calculate the altitude using the barometric formula. Keep in mind that altitude calculations can be affected by factors such as temperature and local weather conditions.
Q: What is the power consumption of the BME280 sensor?
A: The power consumption of the BME280 sensor depends on various factors such as the operating mode and sampling rates. In normal mode, the sensor consumes around 0.1 mA (100 µA) during active measurements. However, it also has sleep modes that reduce power consumption to as low as 0.1 µA.
Q: Can I use the BME280 sensor in a battery-powered project?
A: Yes, the BME280 sensor can be used in battery-powered projects. Its low power consumption makes it suitable for applications where power efficiency is crucial. By utilizing sleep modes and optimizing the sampling rates, you can minimize the sensor’s power consumption and extend the battery life of your project.
Q: Can I use the BME280 sensor for indoor air quality monitoring?
A: The BME280 sensor primarily measures pressure, temperature, and humidity, and it is not specifically designed for indoor air quality monitoring. For comprehensive indoor air quality monitoring, you may need additional sensors that specifically measure parameters such as volatile organic compounds (VOCs), carbon dioxide (CO2), or particulate matter (PM). However, the BME280 sensor can still provide valuable environmental data that can be used as part of a broader indoor air quality monitoring system.

I am Puneeth. I love tinkering with open-source projects, Arduino, ESP32, Pi and more. I have worked with many different Arduino boards and currently I am exploring, Arduino powered LoRa, Power line communication and IoT.
digiton
Wednesday 10th of January 2024
Code is not complete and error:'SEALEVELPRESSURE_HPA' was not declared in this scope
Stefan Maetschke
Wednesday 10th of January 2024
Thanks for finding this! Much appreciated! The code has been corrected.