This tutorial contains everything you need to know about how to use the I2C OLED graphic display with an Arduino board.
I have included a wiring diagram and example codes for the I2C graphic display.
After this tutorial, you’ll be able to display text, shapes, images, and various data on an I2C graphic display with Arduino boards.
Let’s get started.
Hardware components
| Arduino Uno Rev3 | x1 | Amazon |
| Arduino Mega (Optional) | x1 | Amazon |
| OLED Display | x1 | Amazon |
| Breadboard | x1 | Amazon |
| Jumper wires | x15 | Amazon |
| 10K Potentiometer | x1 | Amazon |
| USB cable type A/B | x1 | Amazon |
Software
| Arduino IDE | Arduino IDE |
Makerguides.com is a participant in the Amazon Services LLC Associates Program, an affiliate advertising program designed to provide a means for sites to earn advertising fees by advertising and linking to products on Amazon.com.
Introduction to SSD1306 I2C OLED Display
This tutorial will teach you about 0.96 SSD1306 I2C OLED displays with Arduino Board. It is a simple dot-matrix graphics display with 128 columns and 64 rows, so it displays a total of 8192 pixels.
As the display works on the I2C protocol, it requires only two pins of the MCU.
I2C OLED Display Module Pinout
There are four pins on this display. OLED I2C display Pinout, you can see below.
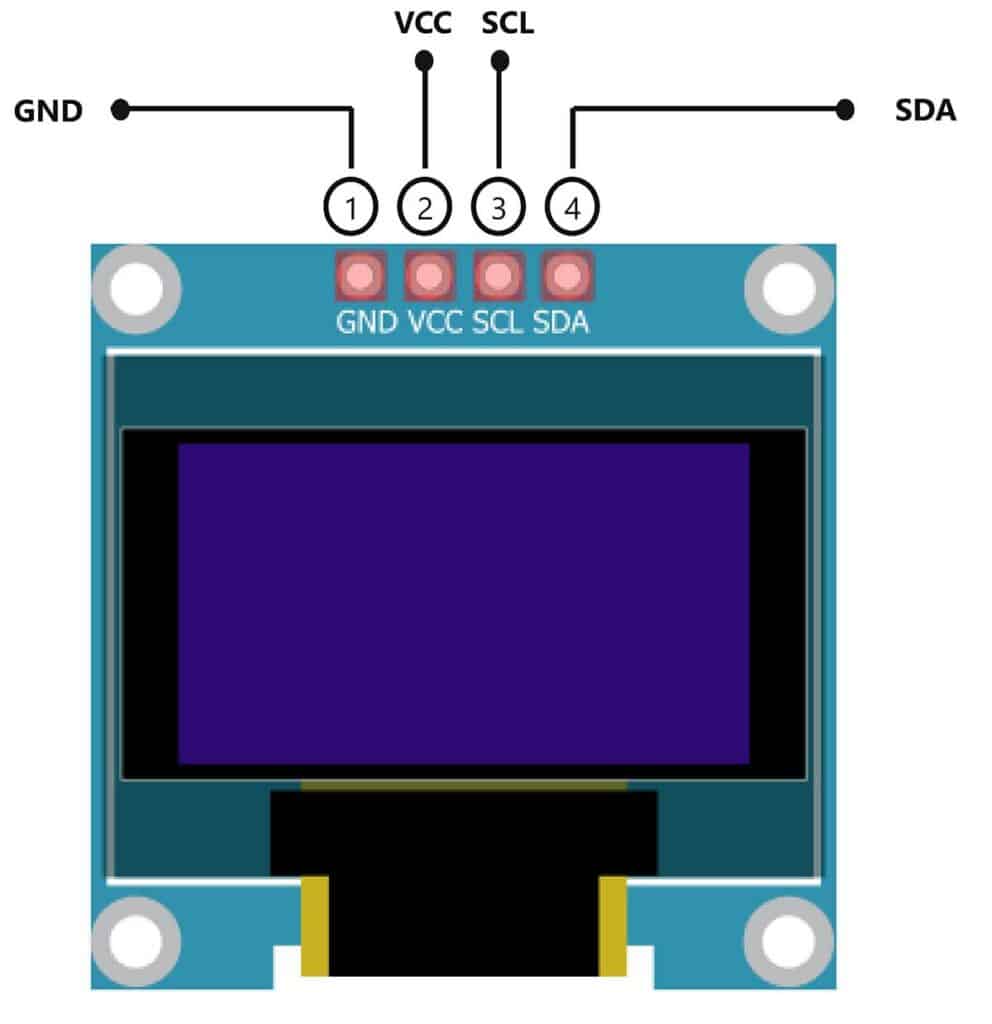
| 1 | GND | Connect the ground of the supply to this pin. |
| 2 | VCC | There is a power supply pin here. A supply of 3.3V or 5V can be provided to this pin to power the display. |
| 3 | SCL (Serial Clock line) | It is a clock signal. Data is sent to other devices as clock ticks occur. Only the master generates the SCL. |
| 4 | SDA (Serial Data line) | Using SDA, slaves and masters can exchange data and acknowledgment. |
Note that in a few of the display that has both SPI and I2C pins, in that case, you may need to use the reset pin too.
I2C Address of OLED display
Every I2C device has its slave address or device address. The OLED display has a slave address format, as shown below image.
| 7 | 6 | 5 | 4 | 3 | 2 | 1 | 0 |
| 0 | 1 | 1 | 1 | 1 | 0 | SA0 bit | R/W bit |
SA0 (Slave Address) bit: This bit provides two slave address options to choose from.
R/W (Read/Write) bit: This bit is used to determine the mode of operation.
I2C write mode of operation – 0
I2C read mode of operation – 1
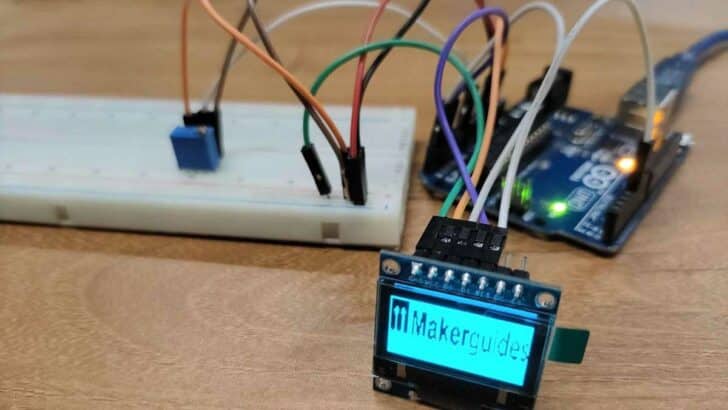
How do I connect an Arduino to an OLED display?
Here, you will learn about the step-by-step connection of the I2C OLED display with the Arduino Uno board.
Step 1: Connect Arduino I2C pins to OLED display pins as mentioned in the below table. Then connect Vcc and ground pins.
| Arduino Uno PIN | OLED Display Pin |
| GND | GND |
| VCC | 3.3 V |
| Analog Pin A4 | SDA |
| Analog Pin A5 | SCL |
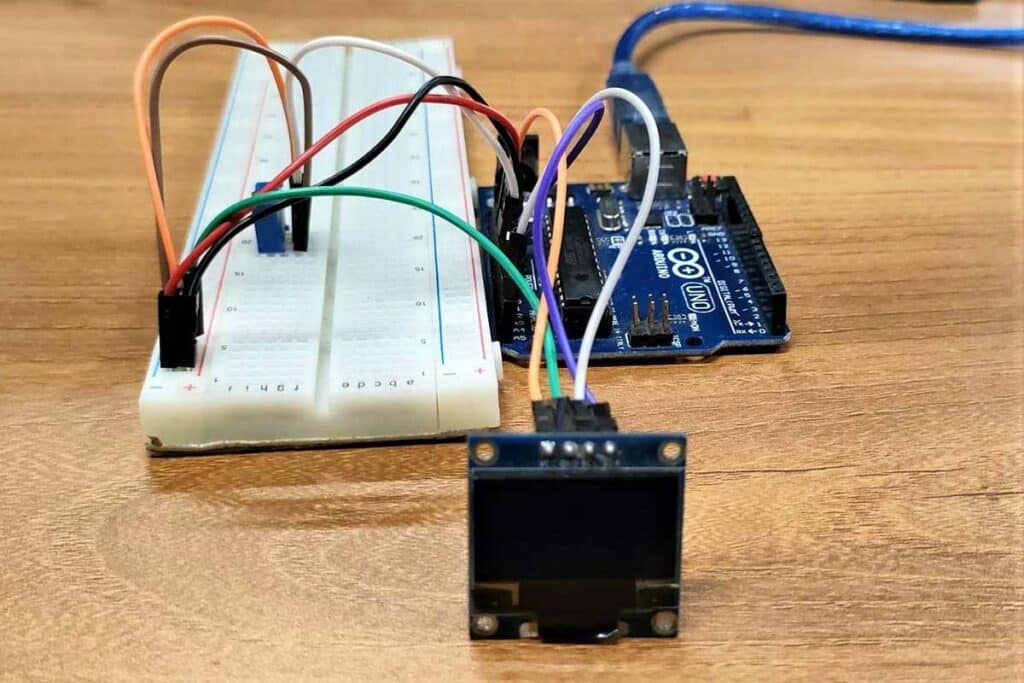
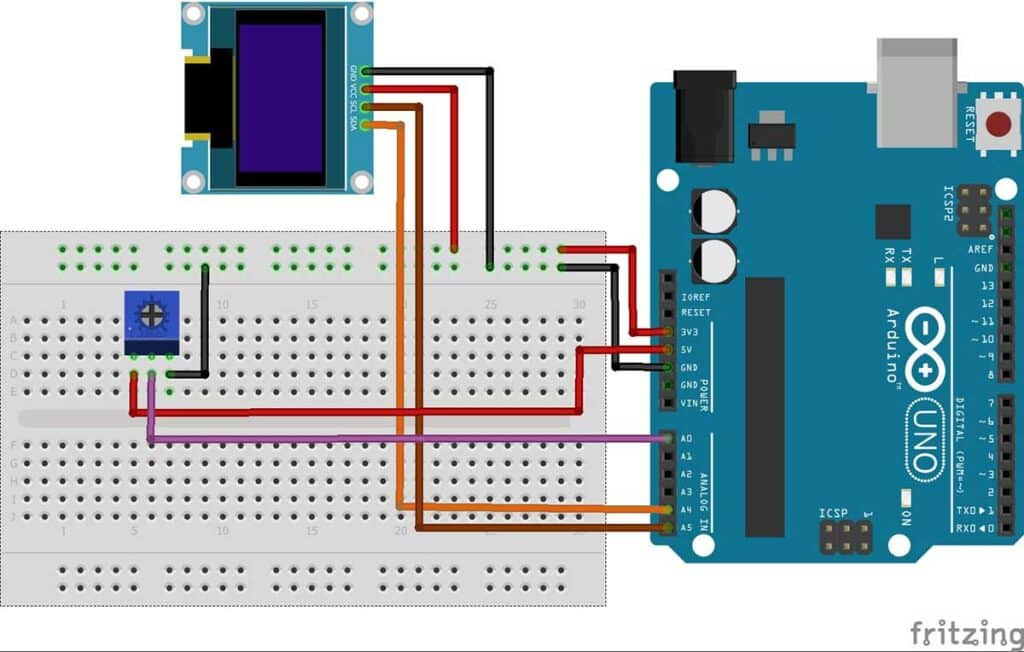
Step 2: Interface the potentiometer pin to the A0 pin of Arduino Uno, connect Vcc to +5V, and make common ground.
That’s it, and you have completed the interfacing process.
Installing the required Arduino libraries
You can use an already built library for OLED displays with Arduino IDE.
Follow the below-mentioned steps to install the library in Arduino IDE.
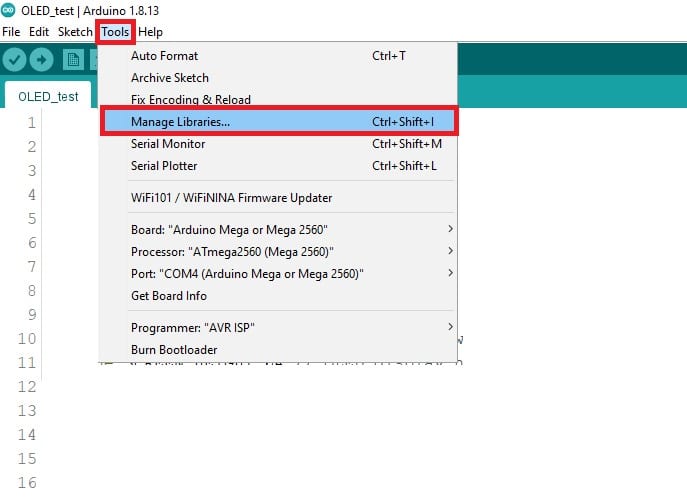
Step 1: Go to the Tools > Manage Libraries (Ctrl + Shift + I on Windows) to open the library manager in Arduino IDE.
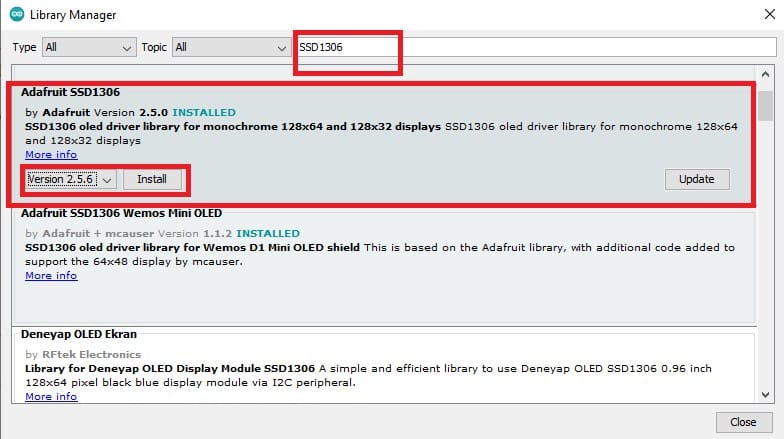
Step 2: Now, in the search box, type “GFX,” and you can see the different results for your search.
You need to click on the latest version, Install and use it.
Same as searching “SSD1306” and installing the latest version.

Arduino Code For Interfacing with Arduino Uno & I2C OLED Display
#include "Wire.h"
#include "Adafruit_GFX.h"
#include "Adafruit_SSD1306.h"

int Pot_Value = 0;
int Data = 0;
const int analog_Pin = A0;

//#define OLED_RESET 4
//Adafruit_SSD1306 display(OLED_RESET);

Adafruit_SSD1306 display(-1);

#define DIS_WIDTH 128 // OLED display width, in pixels
#define DIS_HEIGHT 64 // OLED display height, in pixels

#define IMG_HEIGHT   128
#define IMG_WIDTH    64

static const uint8_t  PROGMEM makerguides [] PROGMEM = {
  0xff, 0xff, 0xff, 0xff, 0xff, 0xff, 0xff, 0xff, 0xff, 0xff, 0xff, 0xff, 0xff, 0xff, 0xff, 0xff,
  0x80, 0x00, 0x3f, 0xff, 0xff, 0xff, 0xff, 0xff, 0xff, 0xff, 0xff, 0xff, 0xff, 0xff, 0xff, 0xff,
  0x80, 0x00, 0x3f, 0xff, 0xff, 0xff, 0xff, 0xff, 0xff, 0xff, 0xff, 0xff, 0xff, 0xff, 0xff, 0xff,
  0x80, 0x00, 0x3f, 0xff, 0xff, 0xff, 0xff, 0xff, 0xff, 0xff, 0xff, 0xff, 0xff, 0xff, 0xff, 0xff,
  0x80, 0x00, 0x3f, 0xff, 0xff, 0xff, 0xff, 0xff, 0xff, 0xff, 0xff, 0xff, 0xff, 0xff, 0xff, 0xff,
  0x82, 0x08, 0x3c, 0x3c, 0x1f, 0xff, 0x3f, 0xff, 0xff, 0xff, 0xff, 0xff, 0xff, 0xf3, 0xff, 0xff,
  0x87, 0x1c, 0x3c, 0x3c, 0x1f, 0xff, 0x1f, 0xff, 0xff, 0xff, 0xff, 0xff, 0xdf, 0xf3, 0xff, 0xff,
  0x8f, 0x1e, 0x3c, 0x3c, 0x1f, 0xff, 0x1f, 0xff, 0xff, 0xff, 0xff, 0xff, 0xdf, 0xf3, 0xff, 0xff,
  0x87, 0x1c, 0x3c, 0x1c, 0x1f, 0x1f, 0x1f, 0xfd, 0xff, 0xbf, 0xff, 0xff, 0xff, 0xf3, 0xff, 0xff,
0x86, 0x0c, 0x3c, 0x98, 0x1c, 0x07, 0x18, 0xf0, 0x78, 0x1e, 0x6f, 0xfd, 0xdf, 0x13, 0xe3, 0xf1, 0x82, 0x0c, 0x3c, 0x98, 0x18, 0x47, 0x11, 0xe2, 0x38, 0x18, 0x8e, 0x79, 0xde, 0x43, 0x99, 0xcd, 0x82, 0x0c, 0x3c, 0x99, 0x1c, 0xe7, 0x03, 0xc7, 0x18, 0xf3, 0xce, 0x79, 0xdc, 0xf3, 0xbc, 0xcf, 0x82, 0x0c, 0x3c, 0x89, 0x1f, 0xc7, 0x03, 0xc7, 0x18, 0xf3, 0xee, 0x79, 0xdd, 0xf3, 0x3c, 0xcf, 0x82, 0x0c, 0x3c, 0xc1, 0x1c, 0x07, 0x03, 0xc0, 0x18, 0xf3, 0xee, 0x79, 0xd9, 0xf3, 0x00, 0xe3, 0x82, 0x0c, 0x3c, 0xc3, 0x18, 0xe7, 0x01, 0xc7, 0xf8, 0xf3, 0xee, 0x79, 0xd9, 0xf3, 0x3f, 0xf9, 0x82, 0x0c, 0x3c, 0xc3, 0x18, 0xe7, 0x19, 0xc7, 0xf8, 0xf3, 0xee, 0x79, 0xdd, 0xf3, 0x3f, 0xfc, 0x82, 0x0c, 0x3c, 0xc3, 0x18, 0xc7, 0x18, 0xc3, 0x18, 0xf9, 0xce, 0x79, 0xdc, 0xf3, 0xbf, 0xfc, 0x82, 0x0c, 0x3c, 0xe3, 0x18, 0x03, 0x1c, 0xe0, 0x38, 0xf8, 0x0f, 0x01, 0xde, 0x03, 0x80, 0xc1, 0xc7, 0x1c, 0x3c, 0xe7, 0xbc, 0x37, 0x3e, 0xf8, 0x7d, 0xff, 0xef, 0x8d, 0xdf, 0x1b, 0xe1, 0xe3, 0xff, 0xff, 0xff, 0xff, 0xff, 0xff, 0xff, 0xff, 0xff, 0xff, 0xef, 0xff, 0xff, 0xff, 0xff, 0xff, 0xff, 0xff, 0xff, 0xff, 0xff, 0xff, 0xff, 0xff, 0xff, 0xff, 0xcf, 0xff, 0xff, 0xff, 0xff, 0xff, 0xff, 0xff, 0xff, 0xff, 0xff, 0xff, 0xff, 0xff, 0xff, 0xf8, 0x1f, 0xff, 0xff, 0xff, 0xff, 0xff, 0xff, 0xff, 0xff, 0xff, 0xff, 0xff, 0xff, 0xff, 0xff, 0xfe, 0xff, 0xff, 0xff, 0xff, 0xff, 0xff, 0xff, 0xff, 0xff, 0xff, 0xff, 0xff, 0xff, 0xff, 0xff, 0xff, 0xff, 0xff, 0xff, 0xff, 0xff, 0xff, 0xff, 0xff, 0xff, 0xff, 0xff, 0xff, 0xff, 0xff, 0xff, 0xff, 0xff, 0xff, 0xff, 0xff, 0xff, 0xff, 0xff, 0xff, 0xff, 0xff, 0xff, 0xff, 0xff, 0xff, 0xff, 0xff, 0xff, 0xff, 0xff, 0xff, 0xff, 0xff, 0xff, 0xff, 0xff, 0xff, 0xff, 0xff, 0xff, 0xff, 0xff, 0xff, 0xff, 0xff, 0xff, 0xff, 0xff, 0xff, 0xff, 0xff, 0xff, 0xff, 0xff, 0xff, 0xff, 0xff, 0xff, 0xff, 0xff, 0xff, 0xff, 0xff, 0xff, 0xff, 0xff, 0xff, 0xff, 0xff, 0xff, 0xff, 0xff, 0xff, 0xff, 0xff, 0xff, 0xff, 0xff, 0xff, 0xff, 0xff, 0xff, 0xff, 0xff, 0xff, 0xff, 0xff, 0xff, 0xff, 0xff, 0xff, 0xff, 0xff, 0xff, 0xff, 0xff, 0xff, 0xff, 0xff, 0xff, 0xff, 0xff, 0xff, 0xff, 0xff, 0xff, 0xff, 0xff, 0xff, 0xff, 0xff, 0xff, 0xff, 0xff, 0xff, 0xff, 0xff, 0xff, 0xff, 0xff, 0xff, 0xff, 0xff, 0xff, 0xff, 0xff, 0xff, 0xff, 0xff,
0xff, 0xff, 0xff, 0xff, 0xff, 0xff, 0xff, 0xff, 0xff, 0xff, 0xff, 0xff, 0xff, 0xff, 0xff, 0xff, 0xff, 0xff, 0xff, 0xff, 0xff, 0xff, 0xff, 0xff, 0xff, 0xff, 0xff, 0xff, 0xff, 0xff, 0xff, 0xff, 0xff, 0xff, 0xff, 0xff, 0xff, 0xff, 0xff, 0xff, 0xff, 0xff, 0xff, 0xff, 0xff, 0xff, 0xff, 0xff, 0xff, 0xff, 0xff, 0xff, 0xff, 0xff, 0xff, 0xff, 0xff, 0xff, 0xff, 0xff, 0xff, 0xff, 0xff, 0xff, 0xff, 0xff, 0xff, 0xff, 0xff, 0xff, 0xff, 0xff, 0xff, 0xff, 0xff, 0xff, 0xff, 0xff, 0xff, 0xff, 0xff, 0xff, 0xff, 0xff, 0xff, 0xff, 0xff, 0xff, 0xff, 0xff, 0xff, 0xff, 0xff, 0xff, 0xff, 0xff, 0xff, 0xff, 0xff, 0xff, 0xff, 0xff, 0xff, 0xff, 0xff, 0xff, 0xff, 0xff, 0xff, 0xff, 0xff, 0xff, 0xff, 0xff, 0xff, 0xff, 0xff, 0xff, 0xff, 0xff, 0xff, 0xff, 0xff, 0xff, 0xff, 0xff, 0xff, 0xff, 0xff, 0xff, 0xff, 0xff, 0xff, 0xff, 0xff, 0xff, 0xff, 0xff, 0xff, 0xff, 0xff, 0xff, 0xff, 0xff,
  0xff, 0xff, 0xff, 0xff, 0xff, 0xff, 0xff, 0xff, 0xff, 0xff, 0xff, 0xff, 0xff, 0xff, 0xff, 0xff,
  0xff, 0xff, 0xff, 0xff, 0xff, 0xff, 0xff, 0xff, 0xff, 0xff, 0xff, 0xff, 0xff, 0xff, 0xff, 0xff,
  0xff, 0xff, 0xff, 0xff, 0xff, 0xff, 0xff, 0xff, 0xff, 0xff, 0xff, 0xff, 0xff, 0xff, 0xff, 0xff,
  0xff, 0xff, 0xff, 0xff, 0xff, 0xff, 0xff, 0xff, 0xff, 0xff, 0xff, 0xff, 0xff, 0xff, 0xff, 0xff,
  0xff, 0xff, 0xff, 0xff, 0xff, 0xff, 0xff, 0xff, 0xff, 0xff, 0xff, 0xff, 0xff, 0xff, 0xff, 0xff,
  0xff, 0xff, 0xff, 0xff, 0xff, 0xff, 0xff, 0xff, 0xff, 0xff, 0xff, 0xff, 0xff, 0xff, 0xff, 0xff,
  0xff, 0xff, 0xff, 0xff, 0xff, 0xff, 0xff, 0xff, 0xff, 0xff, 0xff, 0xff, 0xff, 0xff, 0xff, 0xff,
  0xff, 0xff, 0xff, 0xff, 0xff, 0xff, 0xff, 0xff, 0xff, 0xff, 0xff, 0xff, 0xff, 0xff, 0xff, 0xff,
  0xff, 0xff, 0xff, 0xff, 0xff, 0xff, 0xff, 0xff, 0xff, 0xff, 0xff, 0xff, 0xff, 0xff, 0xff, 0xff,
  0xff, 0xff, 0xff, 0xff, 0xff, 0xff, 0xff, 0xff, 0xff, 0xff, 0xff, 0xff, 0xff, 0xff, 0xff, 0xff,
  0xff, 0xff, 0xff, 0xff, 0xff, 0xff, 0xff, 0xff, 0xff, 0xff, 0xff, 0xff, 0xff, 0xff, 0xff, 0xff,
  0xff, 0xff, 0xff, 0xff, 0xff, 0xff, 0xff, 0xff, 0xff, 0xff, 0xff, 0xff, 0xff, 0xff, 0xff, 0xff,
  0xff, 0xff, 0xff, 0xff, 0xff, 0xff, 0xff, 0xff, 0xff, 0xff, 0xff, 0xff, 0xff, 0xff, 0xff, 0xff,
  0xff, 0xff, 0xff, 0xff, 0xff, 0xff, 0xff, 0xff, 0xff, 0xff, 0xff, 0xff, 0xff, 0xff, 0xff, 0xff,
  0xff, 0xff, 0xff, 0xff, 0xff, 0xff, 0xff, 0xff, 0xff, 0xff, 0xff, 0xff, 0xff, 0xff, 0xff, 0xff,
  0xff, 0xff, 0xff, 0xff, 0xff, 0xff, 0xff, 0xff, 0xff, 0xff, 0xff, 0xff, 0xff, 0xff, 0xff, 0xff,
  0xff, 0xff, 0xff, 0xff, 0xff, 0xff, 0xff, 0xff, 0xff, 0xff, 0xff, 0xff, 0xff, 0xff, 0xff, 0xff,
  0xff, 0xff, 0xff, 0xff, 0xff, 0xff, 0xff, 0xff, 0xff, 0xff, 0xff, 0xff, 0xff, 0xff, 0xff, 0xff,
  0xff, 0xff, 0xff, 0xff, 0xff, 0xff, 0xff, 0xff, 0xff, 0xff, 0xff, 0xff, 0xff, 0xff, 0xff, 0xff,
  0xff, 0xff, 0xff, 0xff, 0xff, 0xff, 0xff, 0xff, 0xff, 0xff, 0xff, 0xff, 0xff, 0xff, 0xff, 0xff,
  0xff, 0xff, 0xff, 0xff, 0xff, 0xff, 0xff, 0xff, 0xff, 0xff, 0xff, 0xff, 0xff, 0xff, 0xff, 0xff,
  0xff, 0xff, 0xff, 0xff, 0xff, 0xff, 0xff, 0xff, 0xff, 0xff, 0xff, 0xff, 0xff, 0xff, 0xff, 0xff,
  0xff, 0xff, 0xff, 0xff, 0xff, 0xff, 0xff, 0xff, 0xff, 0xff, 0xff, 0xff, 0xff, 0xff, 0xff, 0xff
};

void setup(){
  Serial.begin(9600);
  //Initialize display by providing the display type and its I2C address.
  if (!display.begin(SSD1306_SWITCHCAPVCC, 0x3C)) {
    Serial.println(F("SSD1306 allocation failed"));
    for (;;); // Don't proceed, loop forever
  }
  delay(2000); // Pause for 2 seconds

  display.clearDisplay();

  Serial.println("Display Bitmap Image");
  show_Bitmap();
  Serial.println("Display Print Message");
  Print_msg();
  Serial.println("Display Print Message Scroll");
  Print_msg_scroll();
  Serial.println("Display Rectangle");
  Rect_Blank_filled();

}
void loop()
{
  display.clearDisplay();
  display.setTextSize(1);
  display.setTextColor(WHITE);
  display.setCursor(40, 5);
  display.println("POT VALUE");
  Serial.print("POT VALUE :");
  Pot_Value = analogRead(analog_Pin);
  Data = map(Pot_Value, 0, 1023, 0, 500);
  display.setCursor(60, 15);
  display.print(Data);
  Serial.println(Data);
  delay(1000);
  display.display();
}
// Shows fn bitmap
void show_Bitmap(void) {
  display.clearDisplay();
  display.drawBitmap(0, 0, makerguides, IMG_HEIGHT, IMG_WIDTH, WHITE);
  display.display();
  delay(1000);
}
// Shows fn print string
void Print_msg() {
  display.clearDisplay();
  display.setTextSize(1);             // The fontsize
  display.setTextColor(WHITE);    // Draw white text
  display.setCursor(5, 10);           // Start at top-left corner
  display.print("Makerguides.com");
  display.display();
  delay(3000);
}
//shows fn msg scroll
void Print_msg_scroll() {
  display.clearDisplay();
  display.setTextSize(1);             // The fontsize
  display.setTextColor(WHITE);        // Draw white text
  display.setCursor(0, 5);           // Start at top-left corner
  display.print("Hello");
  display.display();
  delay(3000);

  display.startscrollleft(0x00, 0x0F);
  delay(2000);
  display.stopscroll();
  delay(1000);
  display.startscrollright(0x00, 0x0F);
  delay(2000);
  display.stopscroll();
  delay(1000);
  display.startscrolldiagright(0x00, 0x07);
  delay(2000);
  display.startscrolldiagleft(0x00, 0x07);
  delay(2000);
  display.stopscroll();
  delay(3000);
}

// Shows fn Rectangle display
void Rect_Blank_filled() {
  display.clearDisplay();
  display.setTextSize(1);
  display.setTextColor(WHITE);
  display.setCursor(0, 0);
  display.drawRect(30, 5, 60, 25, WHITE);
  display.display();
  delay(2000);

  display.clearDisplay();
  display.setTextSize(1);
  display.setTextColor(WHITE);
  display.setCursor(0, 0);
  display.fillRect(30, 5, 60, 25, WHITE);
  display.display();
  delay(2000);
}
How The Arduino Uno & I2C OLED Display Code Works
I have used an Arduino IDE to program an Arduino Uno board.
Step 1: First, I have included the necessary header file for the OLED display.
#include "Wire.h"
#include "Adafruit_GFX.h"
#include "Adafruit_SSD1306.h"
Step 2:
If you have SPI and I2C combined Display, you can use GPIO pin 4 to use a RESET pin.
// #define OLED_RESET 4
// Adafruit_SSD1306 display(OLED_RESET);
If you have only an I2C OLED display, there is no need to connect the reset pin.
Adafruit_SSD1306 display(-1);
The (-1) parameter means your OLED display doesn’t have a RESET pin.
Step 3:
#define DIS_WIDTH 128
#define DIS_HEIGHT 64
I define your OLED width and height. In this example, I’m using a 128×64 OLED display. If you’re using other sizes, you can change that in the DIS_WIDTH and DIS_HEIGHT 64 variables.
Step 4: Displaying Bitmap Images.
static const uint8_t PROGMEM makerguides [] PROGMEM = { 0xff, ......
To display any images, first to be converted to a monochrome bitmap. Convert the images to Hex code, and then you can display the images.
Important Arduino function for I2C OLED Display:
display.clearDisplay() : All pixels are off.
display.setTextSize() : To set the font size. Passing arguments start from 1.
display.setTextColor() : To set text color. Passing arguments WHITE: for the dark background and BLACK: for a bright background.
display.setCursor(X,Y) : To display set cursor position. Passing arguments should be x,y. horizontal (X) and vertical (Y) coordinates.
display.print(): Print the message on display like print data on a serial monitor.
display.display() : To display the data.
display.drawBitmap(): To show a bitmap image on display. I pass the 1st and 2nd arguments corresponding to X and Y coordinates. The following argument is the byte array of the monochrome bitmap, the width of the bitmap in pixels, the height of the bitmap in pixels, and the Color.
display.startscrollleft() & startscrollright(): To scroll the display horizontally.
startscrolldiagright() & startscrolldiagleft(): To scroll the display diagonally. In this function, pass arguments start page and stop page. The display has eight pages from 0 to 7, So you can scroll the entire screen by passing parameters 0x00 and 0x07.
display.stopscroll(): To stop the scrolling.
display.drawRect(): To draw a rectangle on display. This function draws a hollow rectangle with a 1-pixel border.
display.fillRect() : To draw a filled rectangle.
Both functions, Passing argument X and Y coordinate, Width, Height, and color.
Step 5:
void setup(){
  Serial.begin(9600);

  if (!display.begin(SSD1306_SWITCHCAPVCC, 0x3C)) {
    Serial.println(F("SSD1306 allocation failed"));
    for (;;); // Don't proceed, loop forever
  }
In the setup function, Initialize the serial monitor and set the baud rate at 9600 speed.
display.begin(SSD1306_SWITCHCAPVCC, 0x3C) : Initialize with the I2C addr 0x3C
OLED display. It’s fixed and cannot be changed.
Here, I’m Implementing some extra functions. Using this function, you can see on the display messages, scrolling the text, bitmap images, and rectangles.
Before executing this function using a serial terminal, print the message for a specific task.
show_Bitmap(): To help this function show the bitmap images.
Print_msg() : To help this function print the messages.
Print_msg_scroll() : To help this function scrolling the print message.
Rect_Blank_filled() : To help this function Draw a rectangle and fill.
How do I display data on an OLED display?
Step 6: In the void loop(), display a potentiometer value.
void loop()
{
  display.clearDisplay();
  display.setTextSize(1);
  display.setTextColor(WHITE);
  display.setCursor(40, 5);
  display.println("POT VALUE");
  Serial.print("POT VALUE :");
  Pot_Value = analogRead(analog_Pin);
  Data = map(Pot_Value, 0, 1023, 0, 500);
  display.setCursor(60, 15);
  display.print(Data);
  Serial.println(Data);
  delay(1000);
  display.display();
}
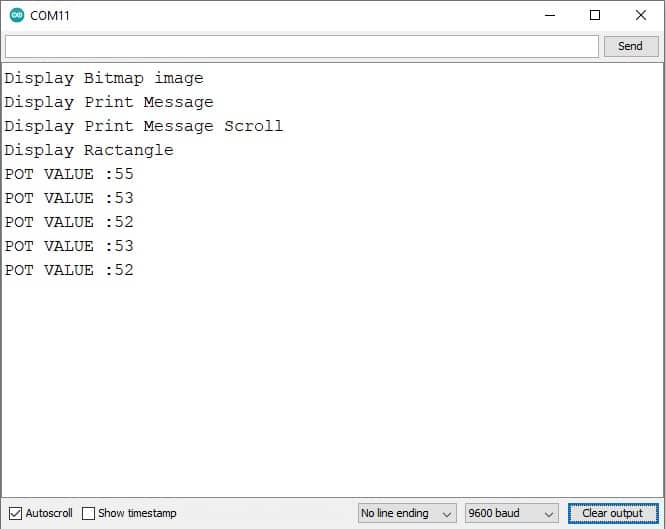
The output of The OLED display on the Serial Terminal
Conclusion
After this tutorial, you learned how to interface an OLED display with an Arduino board, and you can display various shades, images, and strings.
I hope you found this tutorial informative. If you did, please share it with a friend who likes electronics and making things!
I would love to know what project you plan on building or have already made with the Arduino.
Please comment below if you have any questions or suggestions or think things are missing in this tutorial.
Note that comments are held for moderation to prevent spam.

Hiren is a professional Embedded Engineer with a Master’s Degree
in Electronics and Communication Engineering. He is proficient in C and
C++ and enjoys building DIY projects on Arduino, ESP32, PIC32, STM32 & Raspberry PI boards.