The Serial Monitor is a powerful tool that allows you to communicate with your Arduino board and print the data being sent and received. It provides the most common and important method to debug your Arduino projects by displaying information in real-time.
It is based on the Serial communication protocol and requires you to connect your Arduino via a USB cable to your computer.
In this step-by-step guide, we will walk you through the process of printing to the Serial Monitor and formatting the data to make it more readable and user-friendly. Whether you are a beginner or an experienced Arduino user, mastering the Serial Monitor is a must.
So, let’s get started!
Required Parts
For this project you only need an Arduino or another MCU that supports serial connections via USB, and a USB cable.

Arduino Uno

USB Cable for Arduino UNO
Makerguides.com is a participant in the Amazon Services LLC Associates Program, an affiliate advertising program designed to provide a means for sites to earn advertising fees by advertising and linking to products on Amazon.com. As an Amazon Associate we earn from qualifying purchases.
How to open the Serial Monitor?
If you start the Arduino IDE you can press on the circular icon in the right upper corner to open the Serial Monitor. This will add a tab named “Serial Monitor” at the bottom of the IDE. See the picture below.
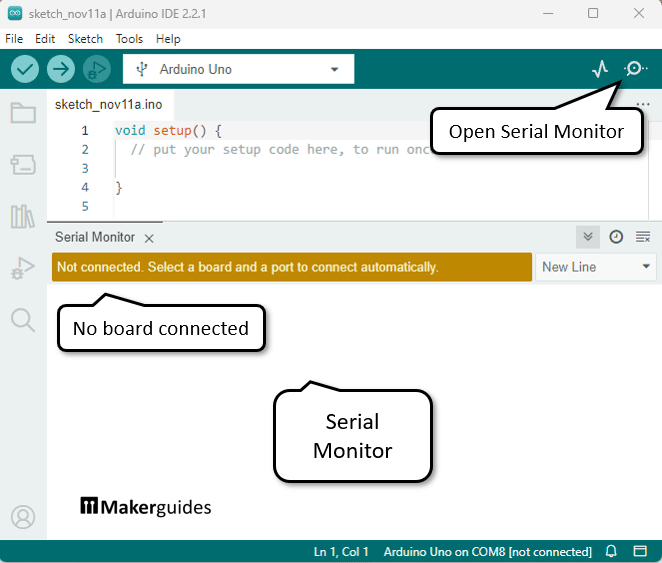
If no Arduino is connected you will see an alert message saying “Not connected. Select a board and port to connect automatically“. This means you have to connect your Arduino via the USB cable to your computer.
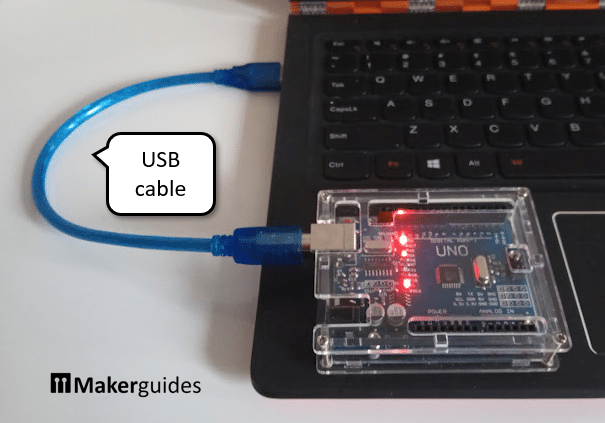
You should see the red power LED for the Arduino coming on. If not, then something is wrong with your cable, your Arduino or the computer is not switched on.
Also make sure you have the correct board, e.g. Arduino UNO selected under Tools -> Board:.
Select the Port
To actually communicate with the Arduino we need to do one more thing: we need to set the correct Port. Go to Tools -> Port: "COM3" -> COM3 and select the available Serial Port. In the example below this is “COM3” but in your case this is likely to be a different Port.
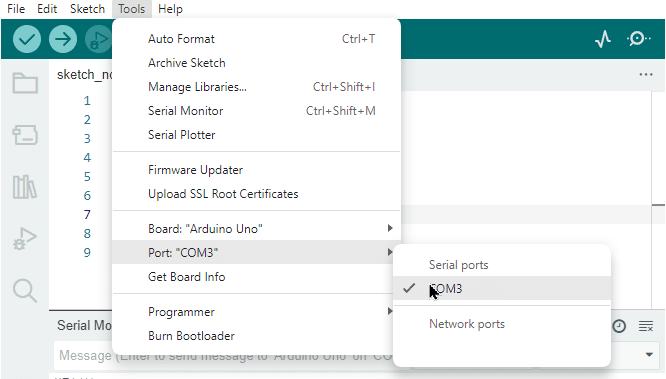
If there are multiple choices don’t despair. We will use a little program to test the communication and that allows you to try out different ports until we find the correct one. If you don’t see any ports, then something is wrong with the USB cable or your computer is not running.
Test the Communication
Here is a very short an simple program to test the serial communication with your Arduino:
void setup() {
  Serial.begin(9600);
}

void loop() {
  Serial.println("Hello");
  delay(1000);
}
In the setup() function, we initialize the Serial communication with a baud rate of 9600. This sets up the communication between the Arduino and the computer, allowing us to send and receive data through the Serial Monitor.
In the loop() function, we use the Serial.println() function to print the string “Hello” to the Serial Monitor and then wait for a second. On the Serial Monitor you now should see “Hello” being printed every second.
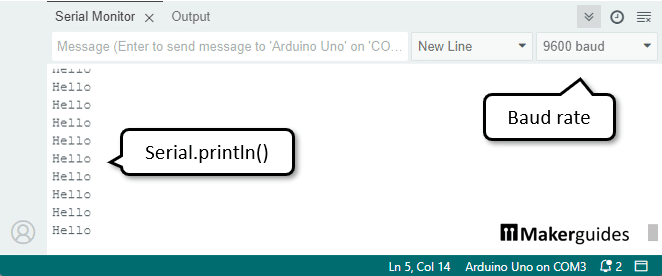
If not, make sure the baud rate that is shown in the Serial Monitor is 9600 baud. You can try higher baud rates for faster communication. The maximum will depend on the specific Arduino you are using. Just make sure the baud rate in Serial.begin and the one that is selected in the Serial monitor are the same.
Garbled characters
If you see garbled characters that is typically a sign that correct communication could not be established due to mismatch in baud rates. However, a few garbled characters after plugging in a board or uploading a new sketch are normal.
You can avoid this to some degree by using the following code in the setup() function, which ensures that the Serial communication port is ready before trying to print anything.
void setup() {
  Serial.begin(9600);
  while (!Serial);  // Wait for serial port to connect
}

void loop() {}
Print once in setup
In the code example above we printed the text "Hello" within the loop() function. This means the text will be printed repeatedly, as long as the loop() function runs.
If you want to print only once, for instance to print out certain values of settings, you should move the print statement into the setup() function. Here an example:
void setup() {
  Serial.begin(9600);
  Serial.println("Serial com started!");
}

void loop() {}
Make sure that you call Serial.begin() before your print statement. The loop() function can be empty ,as you see above.
User Interface of the Serial Monitor
In this section you will learn about the buttons and functions the Serial Monitor offers. Have a look at the picture below with the enumerate elements of the user interface.
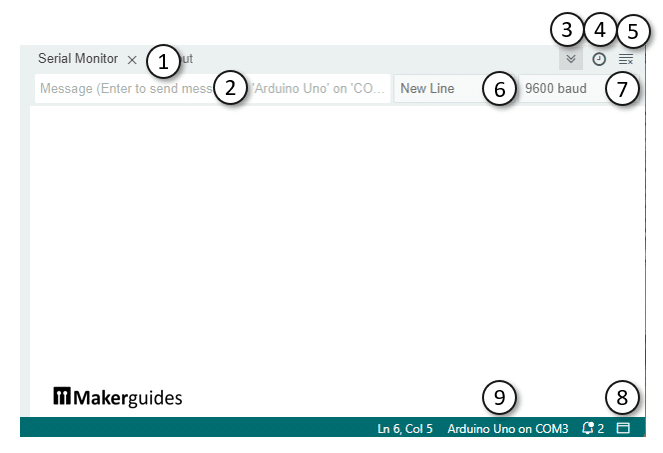
- The tab of the Serial Monitor. Click on the ‘x’ to close it. You can reopen the Serial Monitor with
CTRL+SHIFT+M(on Windows) - Message field. A text field where you can type text data you want to send to the Arduino
- Toggle Auto scroll. If you enable Auto scroll, the text will automatically scroll up so that you can always see the latest message you have printed on the terminal.
- Toggle Timestamps. If enabled each output is prefixed with at timestamp that tells you when the text was printed.
- Clear Output. Deletes all text printed so far.
- Line Ending. Here you can specify how a new line is encoded. Usually you don’t have to worry about it apart from when using the Message field.
- Baud rate. This is important. The baud rate set here and the one specified via
Serial.begin()in thesetup()function have to match. - Toggle Bottom Panel. Click this if you want to temporarily hide or show the output panel for the Serial monitor. This does not stop the serial communication and messages are still printed. You just can’t see them, while the panel is closed.
- The bottom bar tells you which port the Serial Monitor is using and which board is connected. Furthermore it shows you which line and column are currently printed.
With this you know everything you need to use the interface of the Serial Monitor. In the next section we quickly discuss the difference between the two main methods for printing to the Serial Monitor.
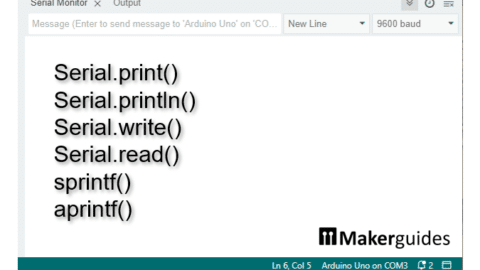
Serial.print() vs Serial.println()
When printing data to the Serial Monitor on Arduino, you have two options: Serial.print() and Serial.println(). Both functions are used to send data to the Serial Monitor, the only difference is how the line ending is handled.
Serial.print()
The Serial.print() function is used to print data without adding a new line character at the end. This means that if you use Serial.print() multiple times, the output will be displayed on the same line. Let’s take a look at an example:
Serial.print("1");
Serial.print("2");
Serial.print("3");
The output on the Serial Monitor will be
123
Note that all three numbers are printed next to each other without any space in between and on the same line.
Serial.println()
On the other hand, if you use Serial.println() to print the same data as follows
Serial.println("1");
Serial.println("2");
Serial.println("3");
You will see this output on the Serial Monitor:1
2
3
So, println() in contrast to print(), adds a new line at the end of each message and therefore each number is printed on a new line. Obviously, you can combine println() and print() to print data a specific format. A common pattern is to print a label or description followed by a sensor reading, for instance.
Serial.print("Sensor Value = ");
Serial.println(sensorValue);
Note that you can print only a single value with Serial.print() or Serial.println(). While the printf() function in C or the print() statement in Python can print multiple values at once, the Serial.print() functions are very limited. In short, the following code does NOT work!
Serial.println("Sensor Value = ", sensorValue); # doesn't work
However, there is a workaround, which I will present later. For now let’s learn in more detail how to print text and variables and how to format the output to make it easier to read.
Printing Text and Numbers
In this section you will learn how to print single characters, texts with multiple characters and numbers.
Print a Single Character
To print a single character, you will have to use single quotes around the character. Here an example that prints the character ‘x’:
Serial.println('x');
Print a Text
Text with multiple characters, on the other hand, needs to be enclosed in double quotes:
Serial.println("Some text");
It is a common mistake to use single quotes here as well, especially when coming from Python, where this is valid. If you do this with Serial.print() or Serial.println() you will see garbled characters in the output!
By the way, you can use the new line character (‘\n’) within the text to print multiple lines with one statement. For instance, the following code
Serial.print("Hello\nMy\nArduino");
will print
Hello
My
Arduino
Print a Number
You can print numbers without any extras and they can be integer or floating point numbers.
Serial.println(1);
Serial.println(3.14);
Printing Variables
One of the most useful features of the Serial Monitor is the ability to print variables. This allows you to monitor the values of your variables in real-time and debug your code.
Printing of variable values works the same as the printing of static characters, text or numbers we have seen above. Here is a typical example that does both. It prints text and a variable value:
int sensorValue = 42;
Serial.print("Sensor value: ");
Serial.println(sensorValue);
In the above example, we have declared an integer variable sensorValue and assigned it a value of 42. We then use Serial.print() to print the text “Sensor value: ” followed by the value of sensorValue using Serial.println(). The println() function adds a newline character at the end, which moves the cursor to the next line in the Serial Monitor.
It’s important to note that the Serial.print() function can print variables of different data types, including integers, floats, characters, and strings. Arduino’s Serial Monitor is intelligent enough to interpret the data correctly.
In the next section, you will learn how to format outputs of datatypes to make them easier to read.
Formatting Output
Here you will learn how to print numbers in different base systems, to specify the output format for floating point numbers and how to align text.
Formatting the Number Base
When writing software for embedded systems like Arduinos you often have to deal with number in various formats such as decimal, binary, hexadecimal or octal. The Arduino languages supports this by allowing you to add a numerical format or base descriptor to a print statement . The following code shows how to use it:
void setup() {
  Serial.begin(9600);
  Serial.print("Printing 36 in Hexadecimal: ");
  Serial.println(36, HEX);
  Serial.print("Printing 36 in Binary     : ");
  Serial.println(36, BIN);
  Serial.print("Printing 36 in Octal      : ");
  Serial.println(36, OCT);
  Serial.print("Printing 36 in Decimal    : ");
  Serial.println(36, DEC);
}

void loop() {}
It will print the number 36 in different base systems and you should see the following text on the Serial Monitor when running this code:
Printing 36 in Hexadecimal: 24
Printing 36 in Binary     : 100100
Printing 36 in Octal      : 44
Printing 36 in Decimal    : 36
Formatting Floating Point Numbers
When printing floating point numbers you often want to limit the number of digits shown after the decimal point. You can control this by specifying the number of digits, after the number you want to print. Here a code example that prints a floating point number with zero, two and three digits after the decimal point.
void setup() {
  Serial.begin(9600);
  Serial.println(1.23456, 0);
  Serial.println(1.23456, 2);
  Serial.println(1.23456, 3);
}
void loop() {}
If you run this code you should see the following output
1
1.23
1.235
Formatting Text
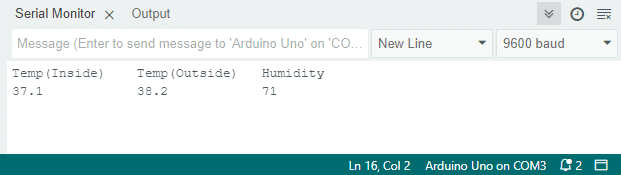
Lastly, sometimes we want to align outputs nicely, in a tabular format to make them easier to read. You can use the tab character (‘\t’) for that. Here a code example:
void setup() {
  Serial.begin(9600);
  float temp_in = 37.1;
  float time_out = 38.2;
  float hum = 71;
  Serial.print("Temp(Inside)\tTemp(Outside)\tHumidity\n");
  Serial.print(temp_in, 1);
  Serial.print("\t\t");
  Serial.print(time_out, 1);
  Serial.print("\t\t");
  Serial.print(hum, 0);
  Serial.print("\n");
}
void loop() {}
and here is what you should see on Serial Monitor:
Using sprintf() for Formatting
As you can see above, formatting outputs with Serial.print is possible but rather cumbersome. It takes many print statements to output a table, for instance. Unfortunately the Serial library for the Arduino does not provide the classic printf() function, which is much more powerful.
As a workaround you can use the sprintf() function from <stdio.h>. This function essentially works like printf() with all its formatting options but writes to a character buffer, which then can be printed via Serial.print(). Have a look at the example below:
#include "stdio.h"

void setup() {
  Serial.begin(9600);

  float temp = 37.1;
  int dist = 42;

  char buffer[128];

  sprintf(buffer, "Distance = %d\n", dist);
  Serial.print(buffer);

  sprintf(buffer, "Temperature = %.1f\n", temp);
  Serial.print(buffer);
}

void loop() {}
If you run this code you would expect the to see the following output on the Serial Monitor:
Distance = 42
Temperature = 37.1
However, due to performance reasons %f is not included in the Arduino’s implementation of sprintf(), vsprintf() or vnsprintf(). While this code will work on ESP32 and ESP8266 for most Arduino boards your are likely to get a question mark (‘?’) instead of the floating point number printed.
Distance = 42
Temperature = ?
Compiler Flags for printf()
The good news is, you can fix this by adding a file named “platform.local.txt” to the hardware folder of the Arduino board you are using. For an Arduino Uno under Windows this would be a path like the following:
C:\Users\<user>\AppData\Local\Arduino15\packages\arduino\hardware\avr\1.8.6\
In the file “platform.local.txt” insert the following two lines to set the relevant compiler options and restart your Arduino IDE.
compiler.c.extra_flags=
compiler.c.elf.extra_flags=-Wl,-u,vfprintf -lprintf_flt -lm
After that, you should be able to format and print floating point numbers with sprintf(). However, make sure that your string is not longer than the buffer (128 characters in the example above). Otherwise, your Arduino is likely to crash and the output will be garbled.
Implement your Own printf Function
While the workaround with sprintf() helps it is still cumbersome to use. We need to create the buffer, write to it, print it out and watch out for the string length.
We can improve this by reimplementing the printf() function ourselves. It is not hard as you will see. The following code defines a function aprintf() (arduino printf) that works just like printf().
#include "stdio.h"
#include "stdarg.h"

#define MAX_ASTR 128

void aprintf(const char* format, ...) {
  char buf[MAX_ASTR];
  va_list args;
  va_start(args, format);
  vsnprintf(buf, MAX_ASTR, format, args);
  Serial.print(buf);
}
The aprintf() function takes a format string and a variable number of arguments (...) and prints the formatted output to the Serial Monitor.
The va_start() macro initializes the args variable argument list, and the vsnprintf() function formats the data according to the format string and stores it in the character buffer buf. The maximum length of the formatted string is limited by the MAX_ASTR constant. Any string longer than MAX_ASTR will be cut off but will not crash the Arduino.
Finally, the formatted data is printed to the Serial Monitor using the Serial.print() function. You can copy and paste this function in any Arduino sketch and then can use aprintf(). Here is an example how to use it
void setup() {
  Serial.begin(9600);
  aprintf("%10s\n", "test");
  aprintf("counter: %03d\n", 1);
  aprintf("pi = %.2f\n", 3.145);
}
In the first aprintf() statement, we print the string “test” with a field width of 10 characters. The output will be right-aligned and padded with spaces if necessary. The second aprintf() prints the integer 1 with a field width of 3 characters. The output will be zero-padded if necessary. And finally, the third aprintf() prints the floating-point number 3.145 with a precision of 2 decimal places.
      test
counter: 001
pi = 3.14
As before, if you see a question mark (‘?’) instead of the the floating point number you need to add platform.local.txt with the relevant compiler settings to your hardware folder.
If you don’t want to implement it yourself, I also create a aprintf library. Just download the zip file and install it as usual. For all the formatting options printf() and therefore aprintf() offer, consult the documentation for printf().
Use PrintEx library for Formatting
If you don’t want to reimplement printf() yourself, there is an available library called PrintEx, which also offers the printf functionality. Here is a code example:
#include "PrintEx.h"

StreamEx mySerial = Serial;

void setup(){
  Serial.begin(9600);
  mySerial.printf("%.2f\n", 3.145);
}

void loop() {}
However, it is a bit more complex to use and will consume more memory.
Writing and Reading Serial Data
So far we have used the Serial Monitor just to print data. However, serial communication is actually a two-way street and we can not only write but also read data. The Serial library has the functions Serial.write() and Serial.read() to do this.
Apart from allowing Arduino boards to talk to each other, another common application is to control things with text commands. The following example shows how to switch off and on the built-in LED on an Arduino board by sending ‘y’ or ‘n’ messages.
const int ledPin = LED_BUILTIN;

void setup() {
  Serial.begin(9600);
  pinMode(ledPin, OUTPUT);
}

void loop() {
  if (Serial.available()) {
    char input = Serial.read();

    if (input == 'y') {
      digitalWrite(ledPin, HIGH);
      Serial.write("LED is ON\n");
    } else if (input == 'n') {
      digitalWrite(ledPin, LOW);
      Serial.write("LED is OFF\n");
    }
  }
}
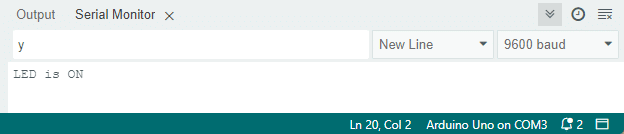
Just type ‘y’ or ‘n’ in the message box of the Serial Monitor and hit the Enter key to send the text command.
Let’s break down the code step-by-step to understand how it works.
Constants and Variables
The code starts by defining the constant ledPin which represents the pin number of the built-in LED on the Arduino board.
const int ledPin = LED_BUILTIN;
Setup function
In the setup() function, we initialize the Serial communication with a baud rate of 9600 using the Serial.begin() function. We also set the ledPin as an output pin using the pinMode() function.
void setup() {
  Serial.begin(9600);
  pinMode(ledPin, OUTPUT);
}
Loop function
The loop() function is where the main logic of the code resides. It continuously checks if there is any data available in the Serial Monitor using the Serial.available() function.
  if (Serial.available()) {
    char input = Serial.read();
If there is data available, it reads a single character from the Serial Monitor and stores it in the variable input. The code then checks the value of input to determine the action to be taken.
    if (input == 'y') {
      digitalWrite(ledPin, HIGH);
      Serial.write("LED is ON\n");
    } else if (input == 'n') {
      digitalWrite(ledPin, LOW);
      Serial.write("LED is OFF\n");
    }
If the value of input is ‘y’, it turns on the LED by setting the ledPin to HIGH using the digitalWrite() function. It also prints the message “LED is ON” to the Serial Monitor using the Serial.write() function.
On the other hand, if the value of input is ‘n’, it turns off the LED by setting the ledPin to LOW and prints the message “LED is OFF”.
This process repeats continuously, allowing the user to control the LED by entering ‘y’ to turn it on or ‘n’ to turn it off in the Serial Monitor.
Conclusion
In this tutorial, we have learned how to print to the Serial Monitor on Arduino and format the data to make it more readable and user-friendly.
The Serial Monitor is an essential tool for Arduino development. It allows us to monitor and debug our code by providing real-time feedback.
We also looked at ways to improve the formatting capabilities of the print function and implemented our own printf. This makes nicely formatted output much easier to create.
Finally, we used the Serial library to communicate with an Arduino to control the built-in LED.
By know, you should have all the knowledge needed to use the Serial Monitor effectively.
Frequently Asked Questions
Here are some frequently asked questions about printing to the Serial Monitor on Arduino:
Q: How do I open the Serial Monitor?
A: To open the Serial Monitor, go to the Arduino IDE and click on the magnifying glass icon located on the top right corner of the window. Alternatively, you can use the shortcut Ctrl + Shift + M.
Q: Why do I see garbled characters when printing to the Serial Monitor?
If you see garbled characters that is typically a sign that correct communication could not be established due to mismatch in baud rates. Make sure the baud rate in Serial.begin() matches the one selected in the Serial monitor. The most common baud rate is 9600.
Also make sure you are using double quotes (“) and not single quotes (‘) when printing text strings.
Q: How can I change the baud rate of the Serial Monitor?
A: By default, the baud rate of the Serial Monitor is set to 9600. To change it, you can use the Serial.begin() function in your Arduino code. For example, if you want to set the baud rate to 115200, you can use Serial.begin(115200). Remember to set the correct baud rate in both the Arduino code and the Serial Monitor.
Q: What is the difference between Serial.print() and Serial.println()?
A: The Serial.print() function is used to print data to the Serial Monitor without adding a new line character at the end. On the other hand, the Serial.println() function adds a new line character after printing the data, which moves the cursor to the next line.
Q: How can I print variables to the Serial Monitor?
A: To print variables to the Serial Monitor, you can use the Serial.print() or Serial.println() functions along with the variable name. For example, if you have an integer variable called sensorValue, you can print its value using Serial.print(sensorValue).
Q: Can I format the data for better readability on the Serial Monitor?
A: Yes, you can format the data before printing it to the Serial Monitor. You can use formatting options such as specifying the number of decimal places for floating-point numbers or adding leading zeros to integers. This can be done using the Serial.print() or Serial.println() functions with appropriate formatting syntax.
Q: Why is sprintf() with %f not working for floating point numbers?
A: Most Arduino board use a limited version of the stdio.h library, which does not support the formatted printing of floating point numbers. However, you can change this by setting the appropriate compiler flags.
Add a file named “platform.local.txt” to the hardware folder for the Arduino board and set the following two flags.
compiler.c.extra_flags=
compiler.c.elf.extra_flags=-Wl,-u,vfprintf -lprintf_flt -lm
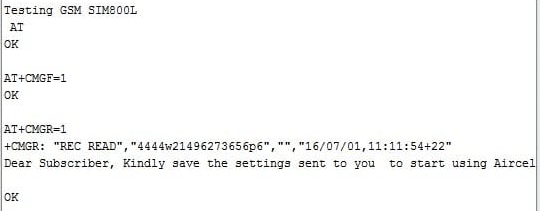
Q: What are AT commands?
AT commands are attention commands used to interact with a co-processor. By connecting serial pins of Arduino with the other devices, you can establish a communication channel and interact with them using AT commands. Below is an example of AT commands sent to a GSM module:
That’s it for the frequently asked questions about printing to the Serial Monitor on Arduino. If you have any more questions, feel free to ask in the comments section below.

I am Puneeth. I love tinkering with open-source projects, Arduino, ESP32, Pi and more. I have worked with many different Arduino boards and currently I am exploring, Arduino powered LoRa, Power line communication and IoT.