Have you ever wondered how to create several beautiful projects with a simple buzzer? This tutorial will show you how to interface a buzzer with Arduino.
You will learn how to connect a buzzer to Arduino, along with the basic working principle of the buzzer.
I will give a step-by-step guide to connect and drive the buzzer.
You can play songs on it like on a normal speaker, use the buzzer for warning or audible feedback in games, and more.
In the first part of the article, I will take you through the basic working principle and the most common types of buzzer sed in Arduino projects.
You will find a step-by-step guide to connect a buzzer to an Arduino, a sample program to test the circuit.
Later in the article, you will find several projects with connections diagrams and Arduino code.
Let us get started!
Components Needed To Use Arduino Serial Plotter
Hardware Components
- Arduino Uno Rev3 x 1
- Buzzer x 1
- Dupont wire x 2
- Arduino USB cable (for powering and programming) x 1
- Breadboard x 1
- Pushbutton x 8 ( for the Arduino mini-piano project)
Software
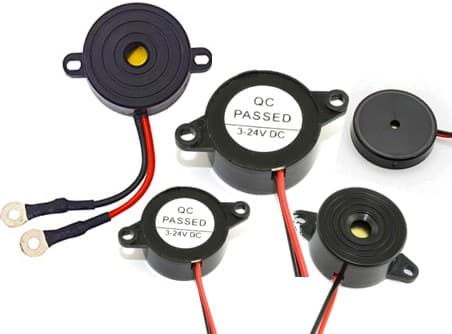
Quick Tip: Buy the Buzzers, which are compatible with Arduino UNO. The above buzzer can work from 3V to 24 V; hence this is a good choice.
Makerguides.com is a participant in the Amazon Services LLC Associates Program, an affiliate advertising program designed to provide a means for sites to earn advertising fees by advertising and linking to products on Amazon.com. As an Amazon Associate we earn from qualifying purchases.
What Is A Buzzer?
As the name suggests, the buzzer creates an audible tone when you apply electrical energy to it.
The most common buzzers you find are Piezo buzzers which are easy to use.
The main element in a buzzer is a piezo (a Greek word meaning to squeeze), which oscillates and creates a tone when you apply DC power to it.
Piezo buzzers are very reliable and come in various form factors. You can see applications of piezo buzzers in toys, microwave ovens, washing machines, other appliances, etc.
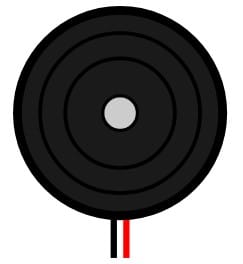
The piezo buzzer has two pins. Positive (Red) and negative (black) wire.
You will connect the negative wire to the GND pin and the positive wire to a PWM pin of the Arduino.
In the next section, I will take you through the most critical parameters of a piezoelectric buzzer.
The parameters help you choose the correct buzzer for your next Arduino Piezo buzzer project.
Rated Voltage – This is the voltage at which all other specifications (sound, current consumption, etc.) mentioned in the datasheet are measured.
Operating Voltage range – Safe operating voltage range, which you can use to work with the buzzer. For example, if you work with the Arduino UNO, the voltage applied to the buzzer will be 5 V. It is still acceptable if 5V is in the operating voltage range.
Operating Temperature Range: Temperature range beyond which the buzzer performance will not be reliable or permanently fail.
Frequency: Most Piezo buzzers have ratings from 2 to 4 kHz. The frequency range will be in the audible range (20 Hz to 20 kHz).
A common type of buzzers you see around in a picture.
The basic working principle is illustrated in the image below.
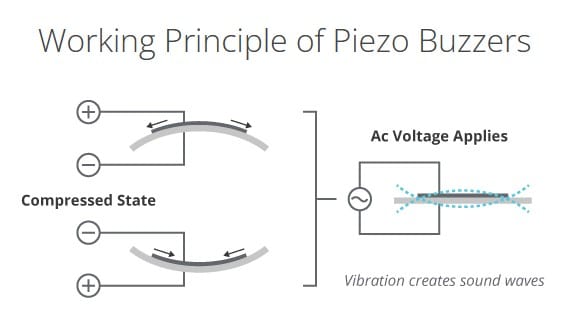
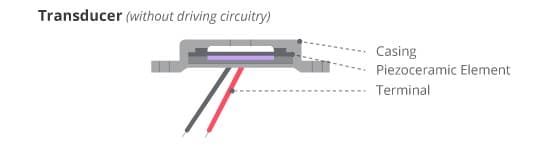
When you send a square wave, you will squeeze the element at a particular frequency.
The frequency at which you drive the square wave will be the frequency at which the Piezo vibrates.
You will find all the information needed to connect and drive the buzzer at the desired frequency (tone) in the buzzer Arduino project examples in the following sections.
Step-By-Step Instructions To Connect A Piezo Buzzer To Arduino
The following sections will show you how to connect the piezo buzzer with an Arduino and build several interesting buzzer projects.
Project 1: A Simple Melody Tone On Arduino Using A Buzzer
In this project, you will connect a buzzer to an Arduino and build a project which will play the tunes.
This project will give basic blocks required to build the buzzer project on Arduino UNO.
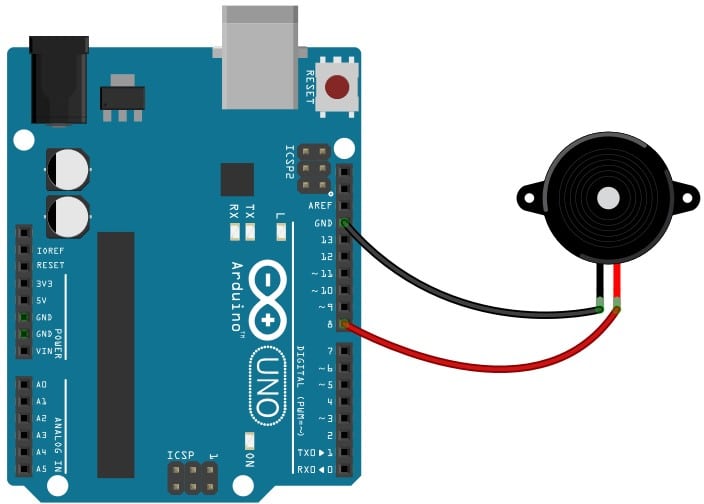
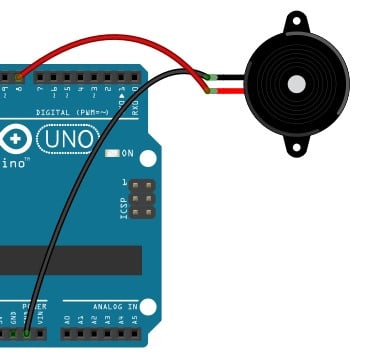
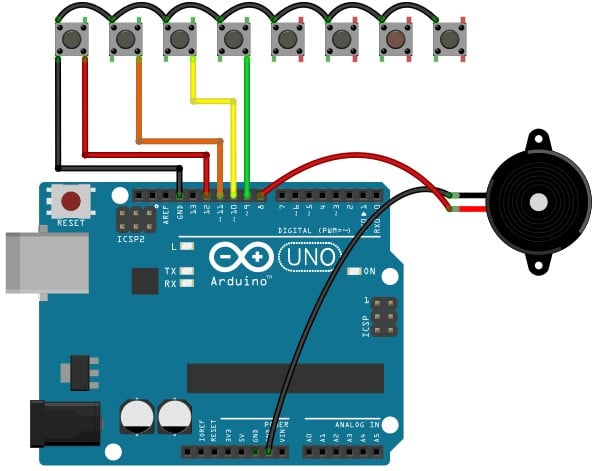
1) Start with the Arduino and a buzzer
The same steps applies to Arduino UNO, Arduino Mega, and other Arduino boards. I am using PIN 8 of the Arduino for this example project.
You can always use other pins based on the pin availability in your next project.
Make sure you update the new PIN in the new code.

You don’t need any current limiting resistors for a buzzer. You can connect it directly to the Arduino UNO.
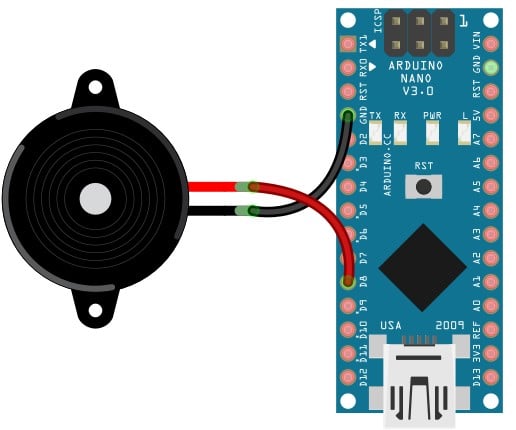
2) Connect the Buzzer black wire to the Arduino GND pin
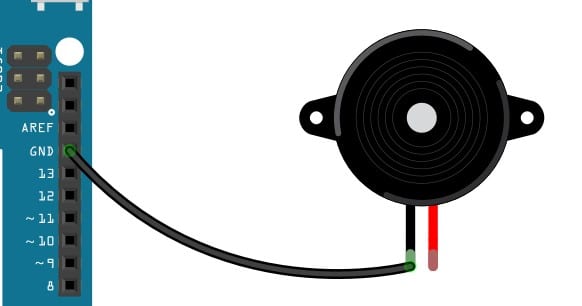
Connect the black wire of the buzzer to Arduino’s GND pin. There are three GND pins on the Arduino UNO. You can choose any of the three GND pins.
3) Connect the red buzzer wire to Arduino PIN8
Connect the red wire of the buzzer to Arduino’s PIN 8. This completes all the essential connections.
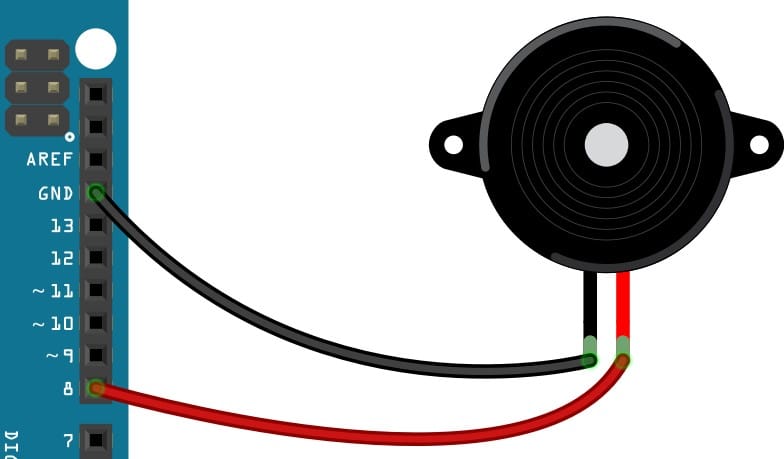
In the next section, you will program the Arduino with the example code given.
4) Arduino Program to create a simple Melody using Piezo buzzer
You can use the code below to test the circuit and also complete the first project.
/*
  Melody
  Plays a melody
  circuit:
  - 8 ohm speaker on digital pin 8
  created 21 Jan 2010
  modified 30 Aug 2011
  by Tom Igoe
  This example code is in the public domain.
  http://www.arduino.cc/en/Tutorial/Tone
*/

#include "pitches.h"

// notes in the melody:
int melody[] = {

  NOTE_C4, NOTE_G3, NOTE_G3, NOTE_A3, NOTE_G3, 0, NOTE_B3, NOTE_C4
};

// note durations: 4 = quarter note, 8 = eighth note, etc.:
int noteDurations[] = {
  4, 8, 8, 4, 4, 4, 4, 4
};

void setup() {
  // iterate over the notes of the melody:
  for (int thisNote = 0; thisNote < 8; thisNote++) {

    // to calculate the note duration, take one second divided by the note type.
    //e.g. quarter note = 1000 / 4, eighth note = 1000/8, etc.
    int noteDuration = 1000 / noteDurations[thisNote];
    tone(8, melody[thisNote], noteDuration);

    // to distinguish the notes, set a minimum time between them.
    // the note's duration + 30% seems to work well:
    int pauseBetweenNotes = noteDuration * 1.30;
    delay(pauseBetweenNotes);

    // stop the tone playing:
    noTone(8);
  }
}

void loop() {
  // no need to repeat the melody.
}
The file pitches.h consists of the list of notes defined as constants. You can create a new file with the name pitches.h and paste the below contents in it.
/**************************************************
   This file defines constants with the frequency
   of different musical notes.
 *************************************************/

#define NOTE_B0  31
#define NOTE_C1  33
#define NOTE_CS1 35
#define NOTE_D1  37
#define NOTE_DS1 39
#define NOTE_E1  41
#define NOTE_F1  44
#define NOTE_FS1 46
#define NOTE_G1  49
#define NOTE_GS1 52
#define NOTE_A1  55
#define NOTE_AS1 58
#define NOTE_B1  62
#define NOTE_C2  65
#define NOTE_CS2 69
#define NOTE_D2  73
#define NOTE_DS2 78
#define NOTE_E2  82
#define NOTE_F2  87
#define NOTE_FS2 93
#define NOTE_G2  98
#define NOTE_GS2 104
#define NOTE_A2  110
#define NOTE_AS2 117
#define NOTE_B2  123
#define NOTE_C3  131
#define NOTE_CS3 139
#define NOTE_D3  147
#define NOTE_DS3 156
#define NOTE_E3  165
#define NOTE_F3  175
#define NOTE_FS3 185
#define NOTE_G3  196
#define NOTE_GS3 208
#define NOTE_A3  220
#define NOTE_AS3 233
#define NOTE_B3  247
#define NOTE_C4  262
#define NOTE_CS4 277
#define NOTE_D4  294
#define NOTE_DS4 311
#define NOTE_E4  330
#define NOTE_F4  349
#define NOTE_FS4 370
#define NOTE_G4  392
#define NOTE_GS4 415
#define NOTE_A4  440
#define NOTE_AS4 466
#define NOTE_B4  494
#define NOTE_C5  523
#define NOTE_CS5 554
#define NOTE_D5  587
#define NOTE_DS5 622
#define NOTE_E5  659
#define NOTE_F5  698
#define NOTE_FS5 740
#define NOTE_G5  784
#define NOTE_GS5 831
#define NOTE_A5  880
#define NOTE_AS5 932
#define NOTE_B5  988
#define NOTE_C6  1047
#define NOTE_CS6 1109
#define NOTE_D6  1175
#define NOTE_DS6 1245
#define NOTE_E6  1319
#define NOTE_F6  1397
#define NOTE_FS6 1480
#define NOTE_G6  1568
#define NOTE_GS6 1661
#define NOTE_A6  1760
#define NOTE_AS6 1865
#define NOTE_B6  1976
#define NOTE_C7  2093
#define NOTE_CS7 2217
#define NOTE_D7  2349
#define NOTE_DS7 2489
#define NOTE_E7  2637
#define NOTE_F7  2794
#define NOTE_FS7 2960
#define NOTE_G7  3136
#define NOTE_GS7 3322
#define NOTE_A7  3520
#define NOTE_AS7 3729
#define NOTE_B7  3951
#define NOTE_C8  4186
#define NOTE_CS8 4435
#define NOTE_D8  4699
#define NOTE_DS8 4978
The table helps you quickly refer to the notes for any of the projects. The table maps each tone to a particular frequency.
In the next section, you will define two arrays. Melody[ ] and noteDuration[ ]
The melody[ ] consists of a list of notes, and noteDuration[ ] array contains the duration for which the Arduino should play the corresponding note.
// notes in the melody:
int melody[] = {
  NOTE_C4, NOTE_G3, NOTE_G3, NOTE_A3, NOTE_G3, 0, NOTE_B3, NOTE_C4
};

// note durations: 4 = quarter note, 8 = eighth note, etc.:
int noteDurations[] = {
  4, 8, 8, 4, 4, 4, 4, 4
};
You will derive the actual note duration using the noteDuration[ ] array values.
To convert the noteDuration[ ] array values into the exact duration of the note, you have to divide 1000 by the value from the noteDuration[ ] array.
For example, the quarter note (in our array, represented by the digit 8 in the noteDuration[ ] array) is 1000/8 in seconds. A half note is 1000/4 and so on.
The tone() is the heart of the code. The tone() function creates a square wave on the Arduino UNO pin (PIN 8 in this example) using a built-in internal hardware timer.
What arguments do you need to send to the tone() function?
tone() function can accept either 2 or 3 arguments.
1. tone(pin, frequency)
- PIN – The PIN number of the Arduino on which a square wave has to be generated
- Frequency – The frequency of the square wave
2. tone(pin, frequency, duration)
- PIN – The PIN number of the Arduino on which a square wave has to be generated
- Frequency – The frequency of the square wave
- Duration – The duration for which the tone has to be generated
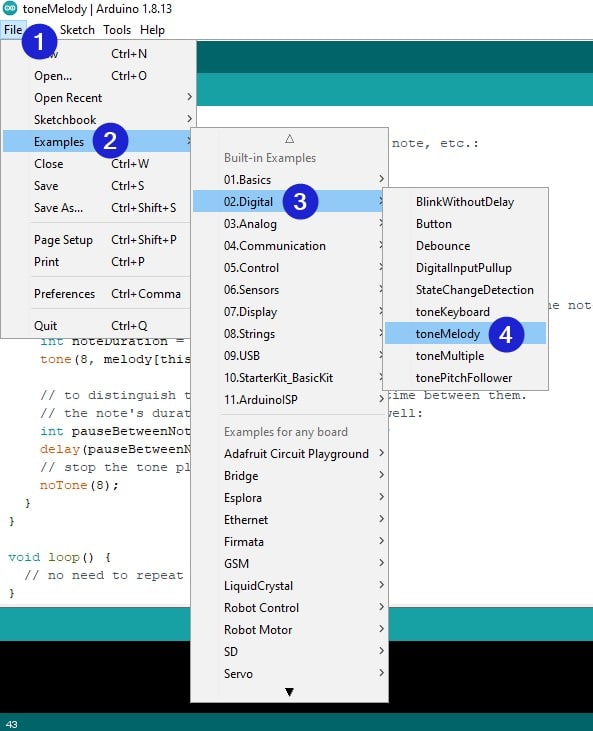
You can easily find the tone() example project in the Arduino IDE.
Congratulations! That completes the first example of a piezo buzzer and an Arduino project.
If you are having trouble, recheck the connections and the code.
If you are in doubt, feel free to drop a comment, I will be glad to answer all your queries and support.
Project 2: How To Make A Piano Project Using Buzzer And Arduino
In this project you will find one of the simplest ways to build your own musical instrument. You will reuse the components discussed in Project 1 to build a mini Piano.
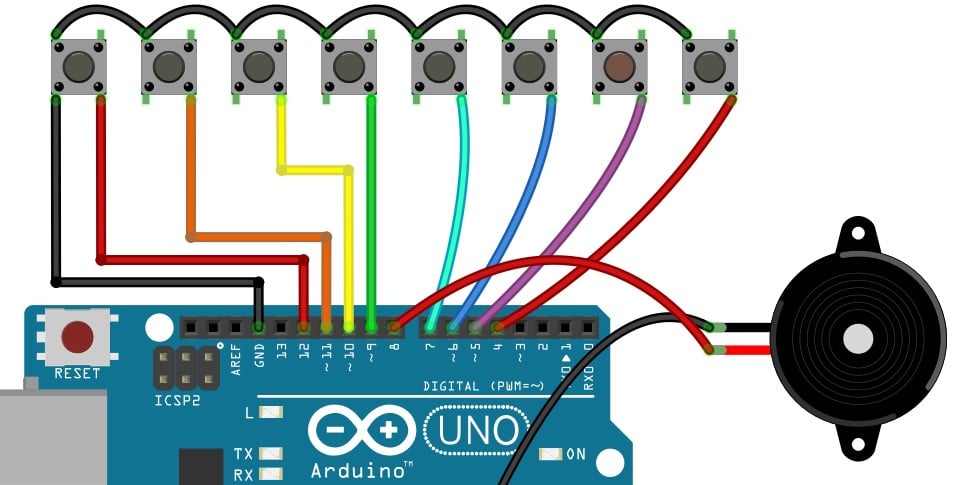
To complete this project, you will need eight pushbuttons, a buzzer, and an Arduino UNO.
You can see the connection diagram to complete the project with a switch in an active-high configuration below.
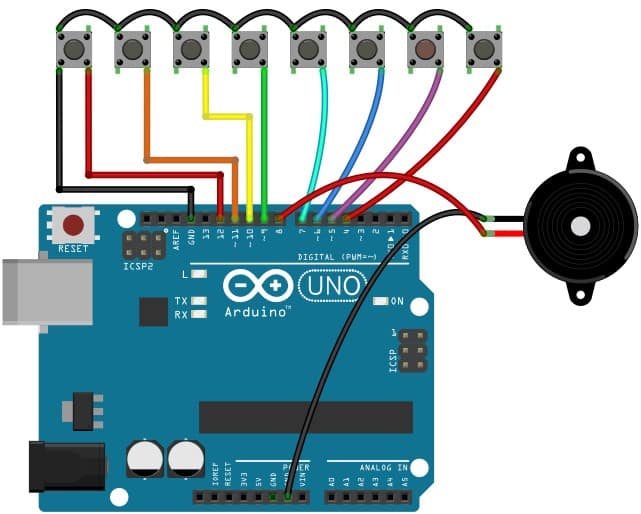
1) Make the Ground Connections between switches and Arduino
Start with the ground connections. GND pins of all the pushbuttons are tied together to Arduino’s GND pin. Keep all the wires as short as possible.
2) Connect the Buzzer to Arduino
You can connect the buzzer to any free Arduino Pin. To keep the examples uniform, I will connect the red wire of the buzzer to Arduino PIN 8 and black wire the GND pin of the Arduino.
3) Connect the pushbuttons to Arduino digital pins
You have to configure 8 Arduino pins as inputs. You will use these input pins to detect the press on the pushbuttons and play the corresponding tunes.
Here is the table for an overview of Arduino Pins used and connections made.
| Arduino Pins | Purpose |
| PIN 8 | Digital Output – Buzzer |
| PIN 12-9, 7-4 | Digital Input – Push Buttons |
Don’t leave the Arduino input pins floating. When you are not pressing the button, the corresponding input pin will float.
Floating inputs can cause erratic behavior.
You can use internal pull-up options for all the input pins to keep the input pins in a stable state.
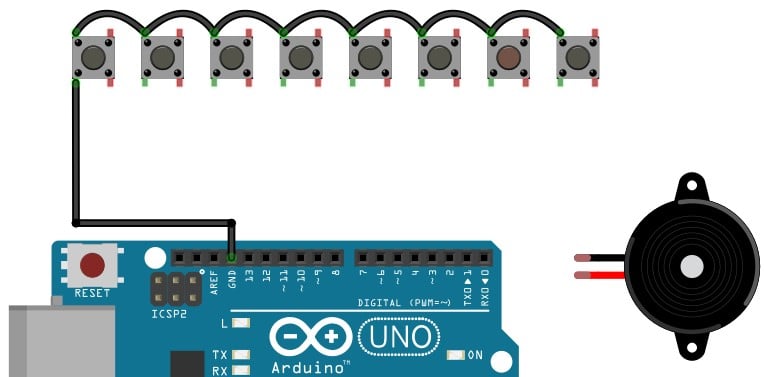
The image shows the first four connections between Arduino and the pushbuttons.
You can now complete all the connections necessary to complete the project.
If you have followed all the steps, your connections are now complete. You will program the Arduino UNO with the mini-piano code in the next steps.
4) Program the Arduino UNO with mini-piano code
The mini-Piano code present below is all you need. You have to follow three simple steps to program the Arduino:
- Open an empty sketch
- Copy paste the below code onto the editor
- Program the Arduino UNO
/**
   Mini piano for Arduino.

   You can control the colorful buttons with your keyboard:
   After starting the simulation, click anywhere in the diagram to focus it.
   Then press any key between 1 and 8 to play the piano (1 is the lowest note,
   8 is the highest).

   Copyright (C) 2021, Uri Shaked. Released under the MIT License.
*/

#include "pitches.h"

#define SPEAKER_PIN 8

const uint8_t buttonPins[] = { 12, 11, 10, 9, 7, 6, 5, 4 };
const int buttonTones[] = {
  NOTE_C4, NOTE_D4, NOTE_E4, NOTE_F4,
  NOTE_G4, NOTE_A4, NOTE_B4, NOTE_C5
};
const int numTones = sizeof(buttonPins) / sizeof(buttonPins[0]);

void setup() {
  for (uint8_t i = 0; i < numTones; i++) {
    pinMode(buttonPins[i], INPUT_PULLUP);
  }
  pinMode(SPEAKER_PIN, OUTPUT);
}

void loop() {
  int pitch = 0;
  for (uint8_t i = 0; i < numTones; i++) {
    if (digitalRead(buttonPins[i]) == LOW) {
      pitch = buttonTones[i];
    }
  }
  if (pitch) {
    tone(SPEAKER_PIN, pitch);
  } else {
    noTone(SPEAKER_PIN);
  }
}
When you have to define properties for multiple Arduino pins, you can do it easier using for loops.
To set all the eight pins as inputs and enable the internal pull-ups, you only need these three lines of code.
for (uint8_t i = 0; i < numTones; i++) {
    pinMode(buttonPins[i], INPUT_PULLUP);
}
You can also have a look at the simulation here.
Project 3: How To Play Tones On Multiple Arduino Pins Sequentially?
As you have learnt, tone() function uses internal timer of Arduino to create a square wave to drive the buzzer.
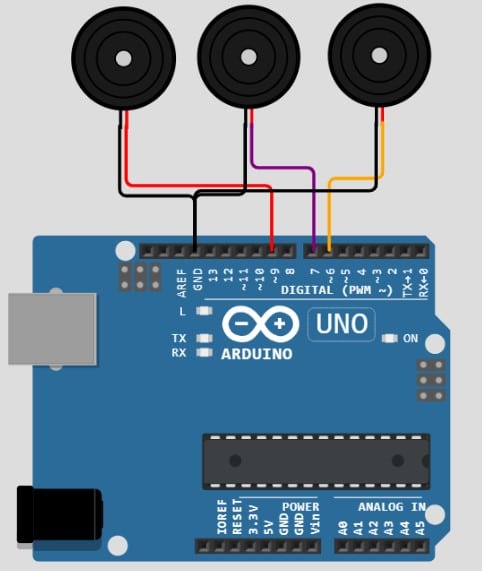
You can connect multiple buzzers to the Arduino play them sequentially.
1) Connect three buzzers to Arduino UNO
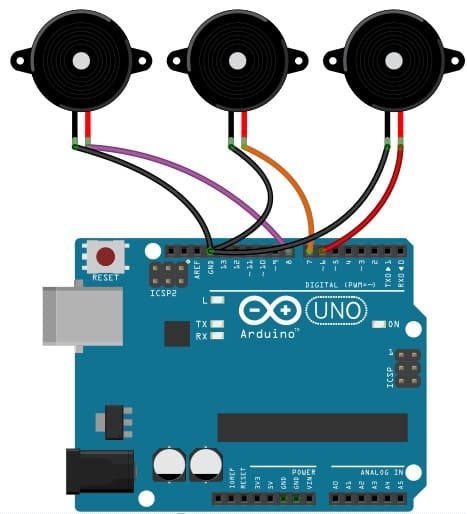
You can use any other pins as well. I am using Pins 6, 7, and 8.
2) Program to drive three buzzers using Arduino
/*
  Multiple tone player
  Plays multiple tones on multiple pins in sequence
  circuit:
  - three 8 ohm speakers on digital pins 6, 7, and 8
  created 8 Mar 2010
  by Tom Igoe
  based on a snippet from Greg Borenstein
  This example code is in the public domain.
  http://www.arduino.cc/en/Tutorial/Tone4
*/

void setup() {
}

void loop() {
  // turn off tone function for pin 8:
  noTone(8);
  // play a note on pin 6 for 200 ms:
  tone(6, 440, 200);
  delay(200);
  // turn off tone function for pin 6:
  noTone(6);
  // play a note on pin 7 for 500 ms:
  tone(7, 494, 500);
  delay(500);
  // turn off tone function for pin 7:
  noTone(7);
  // play a note on pin 8 for 300 ms:
  tone(8, 523, 300);
  delay(300);
}
The above code plays a tone sequentially on the three buzzers connected.
Note that the delay given matches with the tone duration in the previous line.
3) Arduino Simulation of three buzzer example
You can use this link to have a look at the simulation created on Wokwi Arduino Simulator.
Faqs On Arduino-Buzzer Projects
This section will answer the most frequent questions about buzzers and Arduino.
Feel free to post the questions in the comments if they are not covered.
What is an Arduino Buzzer?
A buzzer is a two-pin device that generates a tone based on the Arduino code. You can use the tone() function to generate a tone on any Arduino digital pin.
How do you turn on the buzzer in Arduino?
Use tone() function to generate the tone. There are two options for you.
- 2 Arguments – tone(Arduino-pin, Frequency) – THis function will generate the tone on the particular Arduino PIN mentioned in the arguments. The tone will continue to play until you stop it.
- 3 Arguments – tone(Arduino-pin, Frequency, note-duration) – This will generate the tone for a particular duration
How do you turn off the buzzer in Arduino?
To stop the buzzer, you can use the noTone() function. The function will stop the running tone if there is any active tone function.
If not, there will be no effect of using the noTone() function.
How do you connect the buzzer to Arduino Mega?
You can reuse the project examples for your Arduino Mega and buzzer projects. The connection diagram will be similar for Arduino UNO, Arduino Mega, and Arduino Nano as well.

What is the purpose of noTone() function?
The noTone() function stops the current running tone. If no tones are being played, this function has no effect.
Conclusion
This article showed you how to connect a buzzer to an Arduino. I have demonstrated the essential connections and the Arduino code you will need.
I hope you agree that the buzzers are beneficial components in a project.
You can now confidently add the buzzer feature to other projects. I have used the push buttons to control fan speed and light patterns in recent projects.
I would love to hear your feedback. Did you find this article on the Arduino-buzzer project beneficial? Do you have any feedback to make this article more helpful?
Please share your feedback in the comments section. I will be glad to respond to all your comments.
Feel free to share the projects and ask for feedback.
I am sure buzzers will now be an integral part of your future Arduino projects. I will be glad to know more about it.
Now it is your turn to suggest a topic you would like to learn about next!
Don’t forget to share the article with your friends!

I am Puneeth. I love tinkering with open-source projects, Arduino, ESP32, Pi and more. I have worked with many different Arduino boards and currently I am exploring, Arduino powered LoRa, Power line communication and IoT.
Beau
Tuesday 3rd of January 2023
Good tutorial. Showed me how to deal with stepping through dual arrays with a for loop, had me create my first .h file and use it, and play with the piezo with a melody instead of random tones. If I have one thing to add, its that I find these notes to be more pleasing for the melody over the ones you've provided, but just a personal choice!
int melody[] = { NOTE_G4, NOTE_D4, NOTE_D4, NOTE_E4, NOTE_D4, 0, NOTE_FS4, NOTE_G4 };