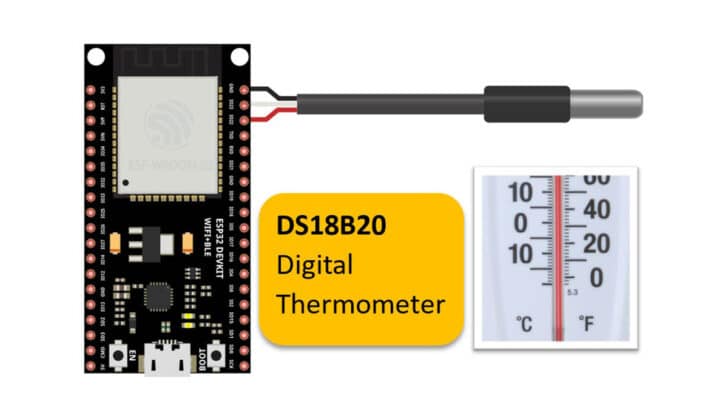
In this article, I will show you how to use the 1-wire DS18B20 temperature sensor with an ESP32 microcontroller.
The DS18B20 stands out among the temperature sensors because you can connect many of them to just one microcontroller pin.
Temperature information is critical for any system, be it a laptop, a battery charger, food storage, home automation, gardening, automotive, HVAC, hospitals, etc.
Temperature sensors are needed for safety, quality maintenance, and human comfort, and because of this, they are used very widely.
I will teach you how to connect a DS18B20 temperature sensor to ESP32 and share some example codes you can use.
I will also show you all the essential features of the 1-wire thermometer DS18B20.
By the end of this article, you will understand how the ESP32 and DS18B20 work together, and you will have the skills and knowledge to begin experimenting and using them in your projects.
Let’s get started!
Components Needed To Build ESP32 And DS18B20 Sensor Project
Hardware Components
- Dupont wire x 1 set
- Micro USB Cable for ESP32 (for powering ESP32 and programming) x 1
Software
Guide
Makerguides.com is a participant in the Amazon Services LLC Associates Program, an affiliate advertising program designed to provide a means for sites to earn advertising fees by advertising and linking to products on Amazon.com.
Fundamentals Of The DS18B20 Sensors
Before we connect a DS18B20 sensor to the ESP32, let’s first understand what a DS18B20 sensor is.
In this section, I will teach you everything about the DS18B20 sensor.
The DS18B20 comes in both a three pin package and SMD small outline package.
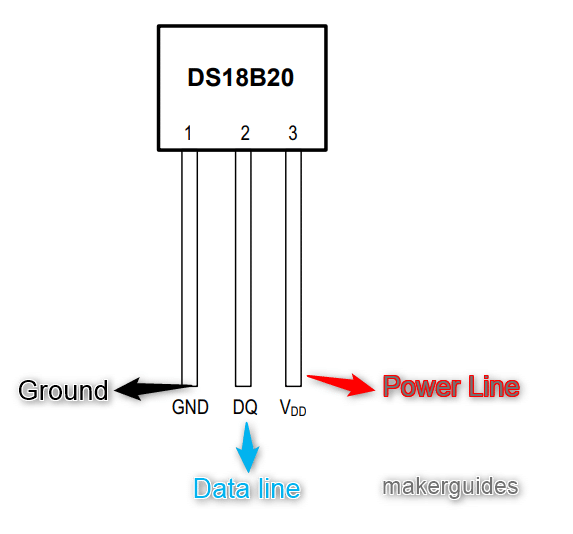
DS18B20 uses a unique 1-wire interface. Hence only one GPIO pin is needed.
The DS18B20 is a digital thermometer. It can give temperatures in Celsius. You can set the resolution from 9 bits to 12 bits.
You can program lower and upper threshold values for the sensor. The sensor can generate an alarm signal for you if the condition is met.
It helps save power and develop a very power-efficient design.
The threshold values are written in internal EEPROM. Hence, the settings won’t be lost even if you remove power.
Did you know?
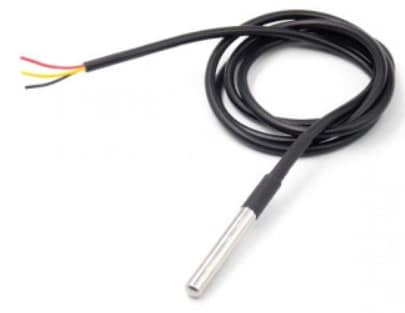
You don’t have to connect the power line to the DS18B20 sensor module. It can derive power from the data line itself!

A typical module you can buy is shown below:
Can you connect multiple sensors to one board?
Yes. Each sensor has a unique 64-bit serial code. The unique code allows you to connect multiple sensors on the same wire!
In the 1-Wire bus system, a single bus master controls one or more slave devices, with the DS18B20 continuously operating as a slave.
When there is only one slave on the bus, it is known as a “single-drop” system, while multiple slaves on the bus constitute a “multidrop” system.
Note: All data and commands transmitted over the 1-Wire bus follow a least significant bit first format.
Features of the DS18B20 Sensor
Here are the key features of the DS18B20 sensor summarized in a table:
| Parameter | Range |
| Operating temperature range | -55 ℃ to 125 ℃ |
| Temperature Accuracy | ± 0.5 ℃ |
| Supply voltage | 3 V to 5.5 V |
| Temperature resolution | 1 ℃ |
| Resolution | Programmable ( 9 bits to 12 bits) |
| Power supply voltage | 3 to 5.5 V |
| Supply current | 1 mA (during measurement) |
| Standby current | 5 uA |
| Drift | ± 0.2 ℃ |
| Temperature conversion time | 93.75 ms for 9-bit 187.5 ms for 10-bit375 ms for 11-bit750 ms for 12-bit resolution |
Pin Definition of DS18B20
There are three available pins in DS18B20. They are described in the table below.
| VDD | Optional Power Supply. If you want to use power from the data pin itself, you must ground the VDD pin |
| DQ | Data input / Output – Open drain 1-wire interface |
| GND | Ground pin |
Resolution Settings of DS18B20
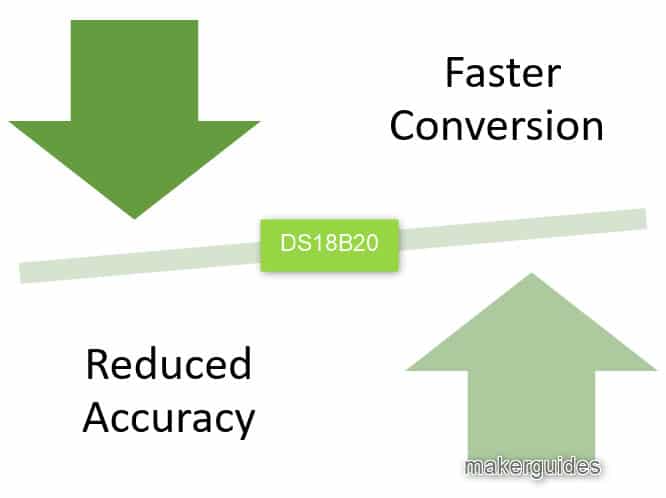
You can choose the resolution of 9 bits to 12 bits in DS18B20. When you increase the resolution, the precision of the temperature sensed increases along with the temperature conversion time.
If you need a faster scanning time, choose a higher resolution. If you need speed, set a lower resolution.
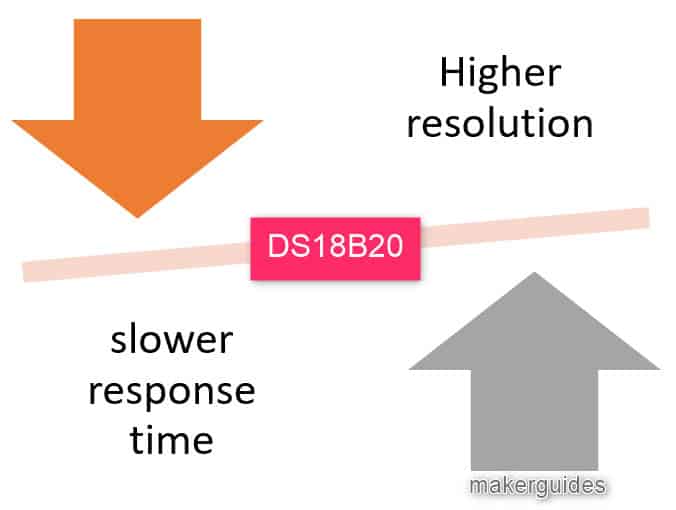
I have summarised the resolution settings and their implications for DS18B20.
| Resolution setting | Conversion time | Temperature resolution |
| 9-bits | 93.75 ms | 0.5 ℃ |
| 10-bits | 187.5 ms | 0.25 ℃ |
| 11-bits | 375 ms | 0.125 ℃ |
| 12-bits | 750 ms | 0.0625 ℃ |
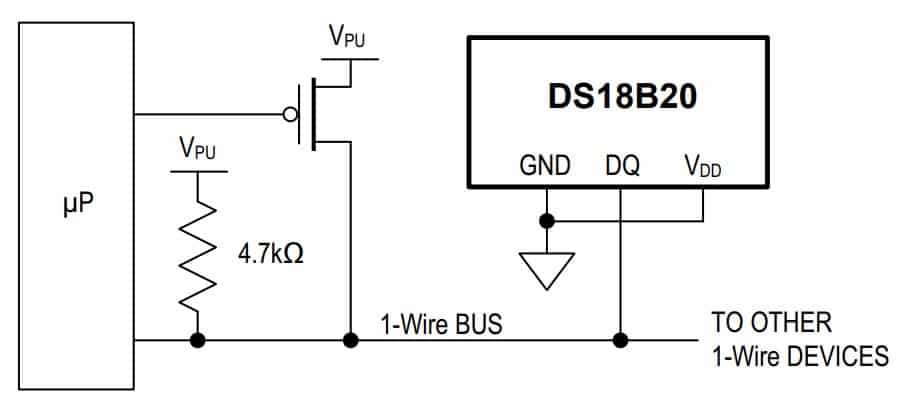
Powering the DS18B20 sensor
You can power the DS18B20 sensor by an external power supply. You can also use its parasite power mode.
It allows the DS18B20 to function without a local external power supply. This is helpful in space contrast applications.
Here is how to connect the DS18B20 sensor in parasite power mode.
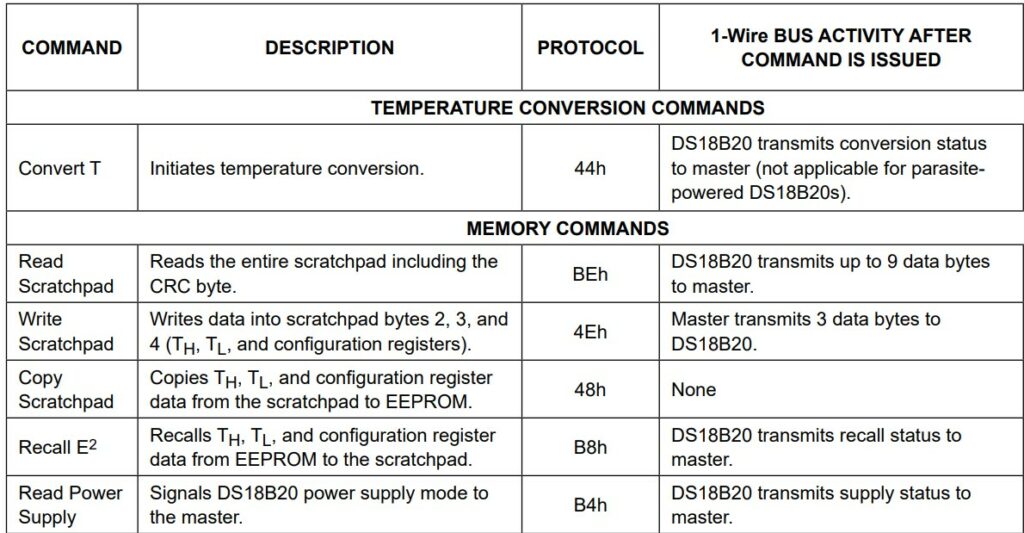
Here is the command set for D18B20.
Let’s connect a DS18B20 temperature sensor to ESP32 in the next section.
Instructions To Connect The DS18B20 Sensor Module with ESP32
I will show you how to build a project using ESP32 and the DS18B20 sensor.
Let’s get started with the hardware connections.
Step 1: Complete the hardware connections
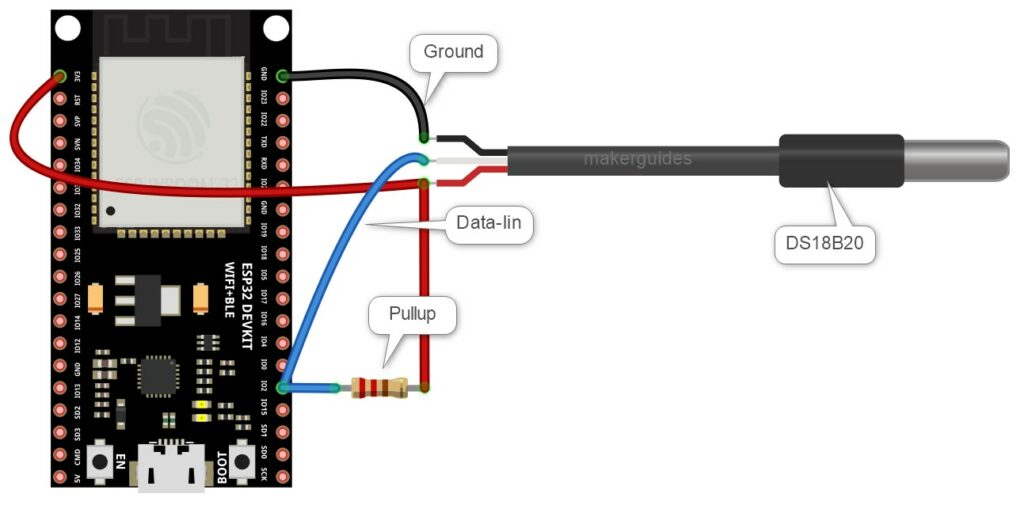
Start with the ground connections. If you have to use other pins, edit the code accordingly. Power the entire system only after completing all the connections.
- Connect the GND pin of the DS18B20 sensor to the GND pin of the ESP32.
- Connect the Data pin of the sensor to the ESP32 GPIO2 pin.
- Connect the red cable of the sensor to the 3V3 pin of the ESP32.
Step 2: Program the ESP32 with the code below
Follow the next step to understand the code implementation. You can use the code below to test the ESP32 module and the connected DS18B20 sensor.
Please follow our guide to install the ESP32 core on the Arduino IDE.
#include "OneWire.h"
#include "DallasTemperature.h"

#define ONE_WIRE_BUS 2

OneWire oneWire(ONE_WIRE_BUS);
DallasTemperature sensors(&oneWire);

void setup(void)
{
  Serial.begin(9600);
  Serial.println("Dallas Temperature IC Control Library Demo");
  sensors.begin();
}


/*
   Main function, get and show the temperature
*/
void loop(void)
{
  Serial.print("Requesting temperatures...");
  sensors.requestTemperatures(); // Send the command to get temperatures
  Serial.println("DONE");
  float tempC = sensors.getTempCByIndex(0);

  if (tempC != DEVICE_DISCONNECTED_C)
  {
    Serial.print("Temperature for the device 1 (index 0) is: ");
    Serial.println(tempC);
  }
  else
  {
    Serial.println("Error: Could not read temperature data");
  }
}
Step 3: Code Walkthrough
Code Explanation:
Let’s walk through the code. This example tests DS18B20 sensors.
#include "OneWire.h"
#include "DallasTemperature.h"
These lines include the OneWire and DallasTemperature libraries that are needed for communicating with the temperature sensor.
#define ONE_WIRE_BUS 2
This line defines a constant variable called ONE_WIRE_BUS and assigns it the value of 2.
This is the pin on the Arduino board that is connected to the DS18B20 temperature sensor.
OneWire oneWire(ONE_WIRE_BUS);
This line creates an instance of the OneWire class and assigns it to the variable oneWire.
It passes the ONE_WIRE_BUS constant to the OneWire constructor, telling it which pin to use for communication with the sensor.
In this case, it is pin 2.
DallasTemperature sensors(&oneWire);
The below line creates an instance of the DallasTemperature class and assigns it to the variable sensors. It passes the oneWire object to the DallasTemperature constructor, telling it to use this object for communication with the temperature sensor.
In the setup() function, you begin serial communication at a baud rate of 9600 and print a message to the serial monitor to indicate that the program has started.
You also initialize the sensors object by calling the begin() function.
In the loop() function, we send a message to the serial monitor to indicate that we request the temperature.
Then, we call the requestTemperatures() function of the sensor object to request temperature data from the sensor.
It prints a message to the serial monitor to indicate that the data has been requested.
Next, we use the getTempCByIndex() function to get Celsius’s temperature reading and store it in the tempC variable.
If the temperature reading is valid, we print it on the serial monitor. If the reading is invalid, it prints an error message.
FAQs About The DS18B20 Sensors
I have included a list of the most frequently asked questions about projects built using the ESP32 and the DS18B20 sensors.
What is the DS18B20 sensor?
The DS18B20 is a digital temperature sensor that can measure temperatures ranging from -55°C to +125°C with an accuracy of ±0.5°C.
You can use just one GPIO pin to read and write to the sensor, making it the best solution when the GPIO pins are scarce.
How does the DS18B20 sensor work?
The DS18B20 temperature sensor uses a one-wire interface to communicate with microcontrollers. It converts temperature readings into digital signals that microcontrollers can easily read.
In this article, we connect a sensor to ESP32 using only one GPIO pin. You will read the temperature.
What is the resolution of the DS18B20 temperature sensor?
The DS18B20 temperature sensor has a programmable resolution of 9 to 12 bits, which can provide temperature readings with a resolution of 0.5 °C to 0.0625 °C. Please refer to the resolution topic in the basics section for more information.
You can see that the resolution is programmable. Higher the resolution, the more time it would take for the temperature conversion.
You can select the tradeoff between power, accuracy, and speed depending on your application.
Can the DS18B20 sensor be used to measure outdoor temperature?
Yes, the DS18B20 temperature sensor can be used for outdoor temperature measurement.
Still, it requires a weatherproof enclosure to protect the sensor from the elements.
Make sure you provide a shield from UV rays and also from rain.
What is the maximum cable length for the DS18B20 sensor?
The maximum cable length for the DS18B20 temperature sensor depends on the cable type and the environmental conditions.
Generally, a cable length of up to 100 meters can be achieved, provided you have received proper cable selection and shielding.
Can multiple DS18B20 temperature sensors be connected to the same microcontroller?
Multiple DS18B20 temperature sensors can be connected to the same microcontroller using different OneWire bus addresses for each sensor.
This is the most crucial selling point of the sensor. You don’t have to spend too many GPIOs when you have many sensors to interface with.
What are the applications of the DS18B20 temperature sensor?
The DS18B20 temperature sensor is commonly used in applications such as HVAC systems, industrial process control, temperature monitoring of food and beverage products, and weather monitoring.
You can find more listed in the article above.
Conclusion
This article has covered all the essential information about the DS18B20 sensors.
I have given you complete information on the working of the DS18B20 sensors and the advantages of using the sensor in your following thermal sensing projects.
The connection diagram and example code will help you test your connections and build the project faster.
If you have further questions about the sensors, please post them in the comments section.
Was the connection diagram and the example code easy to follow?
If you have suggestions to improve the article, you are always welcome to share feedback.
Let us know if there’s anything else you’d like me to cover in future articles.
Keep learning!

I am Puneeth. I love tinkering with open-source projects, Arduino, ESP32, Pi and more. I have worked with many different Arduino boards and currently I am exploring, Arduino powered LoRa, Power line communication and IoT.