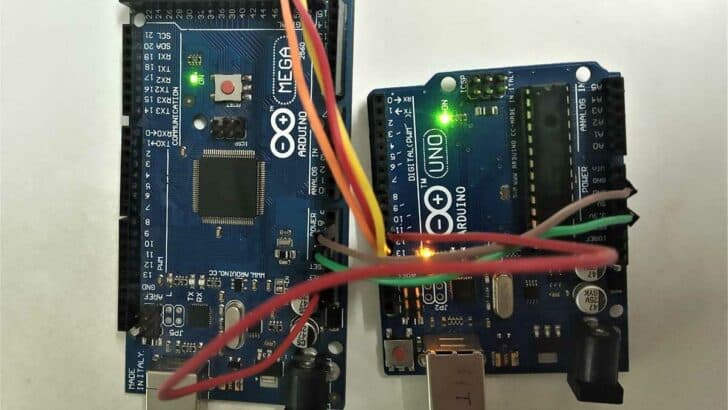
This article will give you all the necessary information about the Bootloader in the Arduino AVR board. After this article, you will learn about what Bootloader is and what the burn bootloader does in Arduino IDE.
As an ISP programmer, how does Arduino Uno upload Bootloader in Arduino Uno and Arduino Mega board?
Supplies
Hardware components
Software
| Arduino IDE | Arduino IDE |
Makerguides.com is a participant in the Amazon Services LLC Associates Program, an affiliate advertising program designed to provide a means for sites to earn advertising fees by advertising and linking to products on Amazon.com.
What is Bootloader?
The bootloader is a piece of code stored in the bootloader flash section memory of the microcontroller.
When you power up your MCU, it will first jump to the bootloader flash section and check for the new update code for the application flash section.
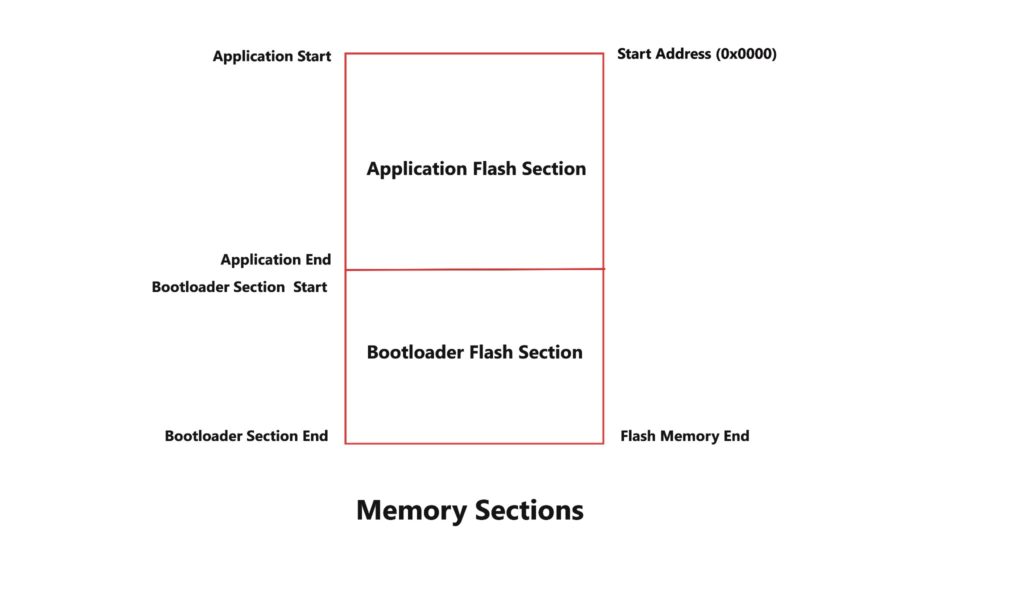
In other words, the bootloader is a firmware that allows the installation of new firmware in the microcontroller via different communication interfaces like SPI or UART.
Is it necessary to use Bootloader?
No, It is not necessary to use a bootloader for the microcontroller. If you want to use the full program flash memory of the chip or avoid the bootloader delay at start-up, you can burn your code using an external programmer.
Most of the time, bootloaders in microcontrollers simplify the uploading of programs to the microcontrollers.
They can also be used for initializing Input/Output devices connected to the microcontrollers before they begin the main application program.
Bootloader In Arduino Uno
Arduino Uno board comes with an AVR ATmega328P microcontroller for their platforms with program memory sections.
The bootloader program is written in the bootloader section, and the application program is written in the application section.
All AVR microcontrollers can be programmed using different methods such as In-System Programming (ISP), Atmel-ICE for AVR and ARM, Parallel programming, and Bootloader.
The advantage of the bootloader is that you don’t need any external hardware to load the hex file on the microcontroller.
Arduino family bootloaders mostly use simple serial communication (UART) to download the hex or bin file and write it in the application section.
How Does The Arduino Bootloader work?
The Arduino bootloader supports programming or re-programming the Flash memory over serial communication.
Without it, you would need a dedicated hardware programmer to change the code in the ATmega328P or ATmega2560.
The ATmega328P or ATmega2560 dedicates a section of its Flash memory for bootloader code.
In the case of the Arduino Uno and Arduino Mega, the Arduino bootloader waits during the time while watching the serial communication (UART) pins.
Suppose the bootloader does not receive a particular sequence of bytes over the serial port.
In that case, the processor jumps to the “user” program section to load whatever is already in the program memory. This jump loads your program.
If the predefined sequence is received, then it executes the bootloader code. At this point, avrdude will begin sending your program’s binary data with a protocol over the virtual serial port.
The ATmega328P or other AVR MCU program memory stores the incoming byte stream. Once completed, the microcontroller resets and starts the new code.
Does the Arduino Uno have a bootloader?
By default, Arduino Uno comes with a bootloader in it. However, if you have replaced the microcontroller with a new microcontroller, then you need to install a bootloader in a new microcontroller.
Arduino Board as an ISP and Burn Bootloader Procedure
If the Bootloader in your Arduino Uno or Arduino Mega board is corrupted, or if you replace the old microcontroller with a new microcontroller, this section will help you install the Bootloader in your Arduino Board.
If your board does not have a bootloader, it will show a timeout error, as shown in the below image.
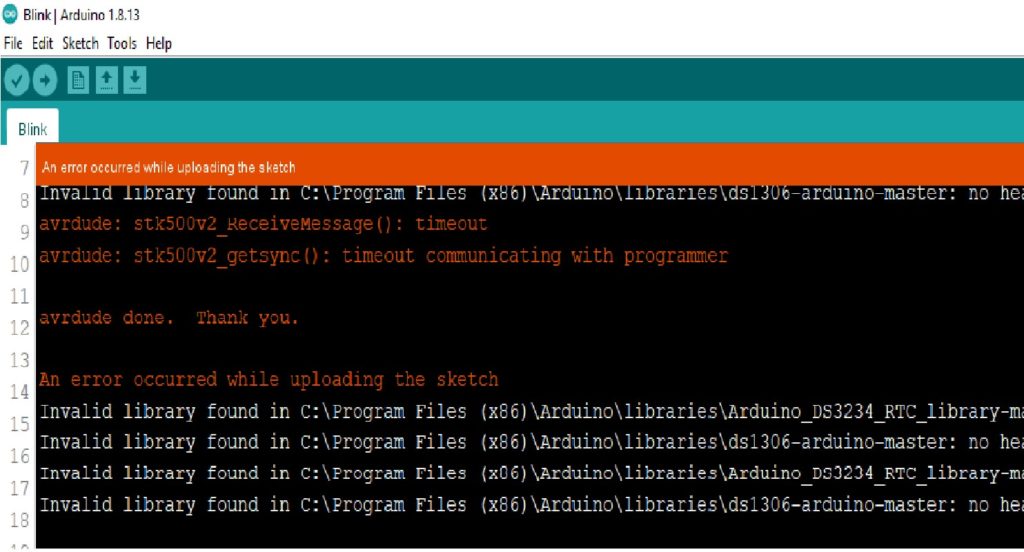
This problem can be solved by using Arduino Uno or Arduino Mega as an ISP. You can upload the application code and Bootloader to the target MCU with your Arduino board.
This section will discuss four different cases with Arduino Uno and Arduino Mega Board:
- Arduino Uno as ISP and Arduino Mega as Target MCU
- Arduino Uno as ISP and Arduino Uno as Target MCU
- Arduino Mega as ISP and Arduino Uno as Target MCU
- Arduino Mega as ISP and Arduino Mega as Target MCU
1) Arduino Uno as ISP and Arduino Mega as Target MCU
Interfacing of Arduino Uno as an ISP to Arduino Mega as Target MCU
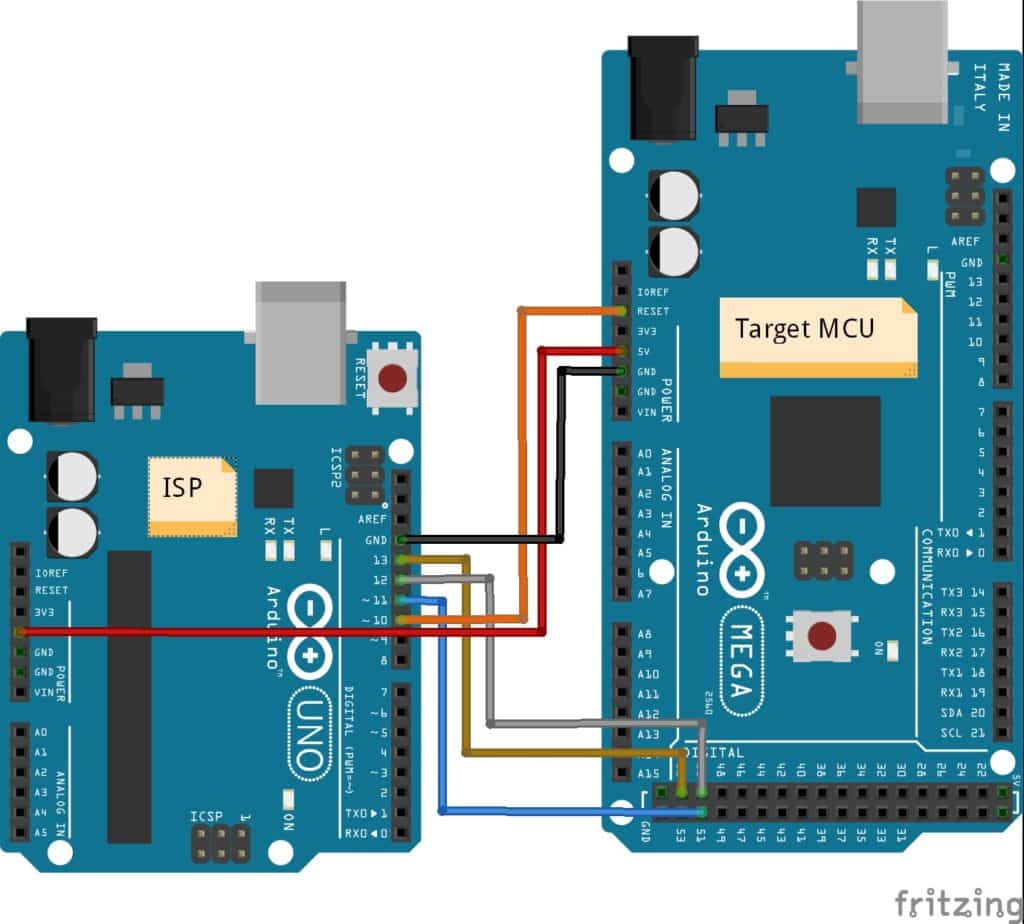
The following table shows the interfacing of Arduino Uno to Arduino Mega via SPI pins. Make sure that ground is common.
| Arduino Board | MOSI | MISO | SCK | CS |
| Uno ISP | 11 or ICSP-4 | 12 or ICSP-1 | 13 or ICSP-3 | 10 |
| Mega2560 Target | 51 or ICSP-4 | 50 or ICSP-1 | 52 or ICSP-3 | RESET |
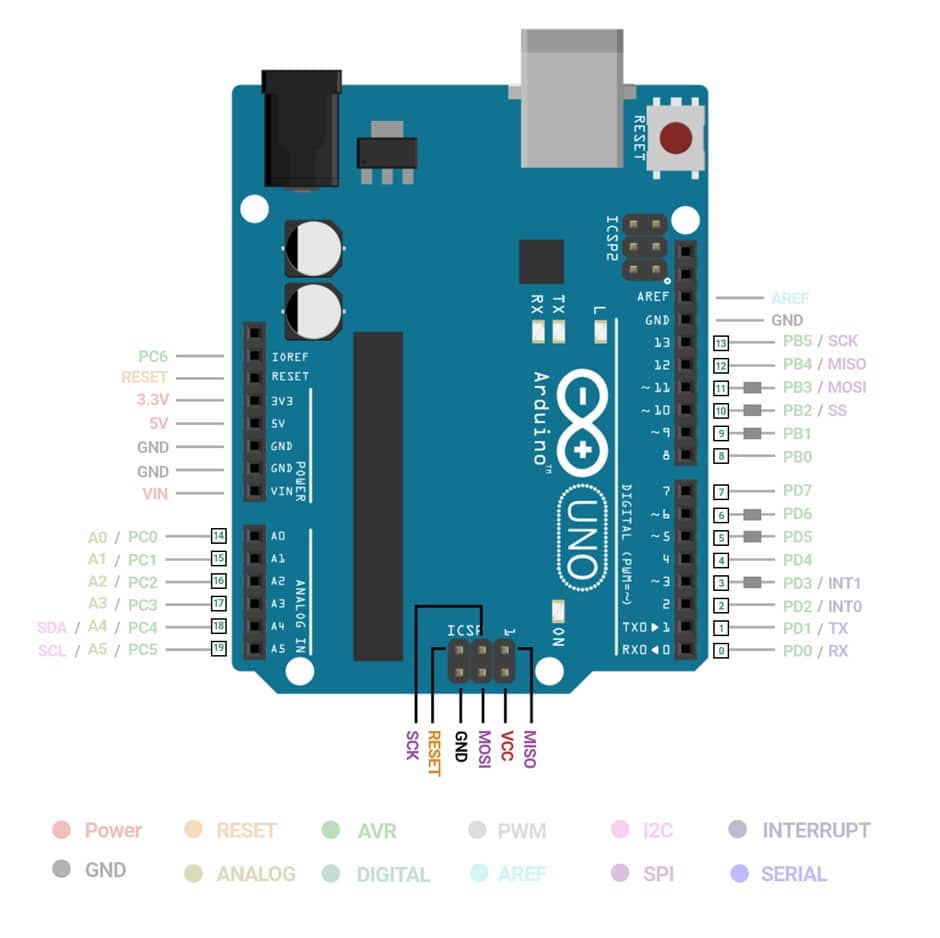
This SPI interface: MISO, MOSI, and SCK pins are available in a consistent physical location on the ICSP header.
This connector is also used by shields with the SPI interface, allowing shields that work on every board.
How to setup Arduino Uno as an ISP?
The following steps give you information about setting up Arduino Uno as an ISP with Arduino IDE.
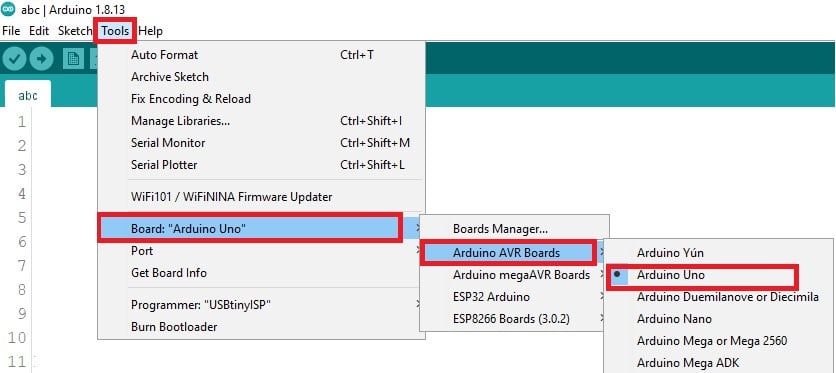
Step 1: Open the Arduino IDE and go to Tools > Board > Arduino AVR Boards > Arduino Uno. As shown in the below image.
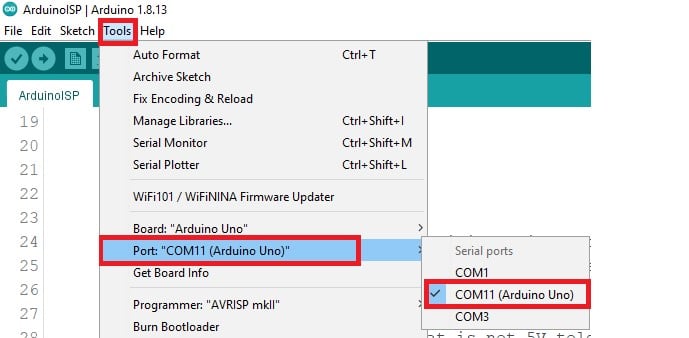
Step 2: Select the corresponding COM port for Arduino Uno in Tools > Port.
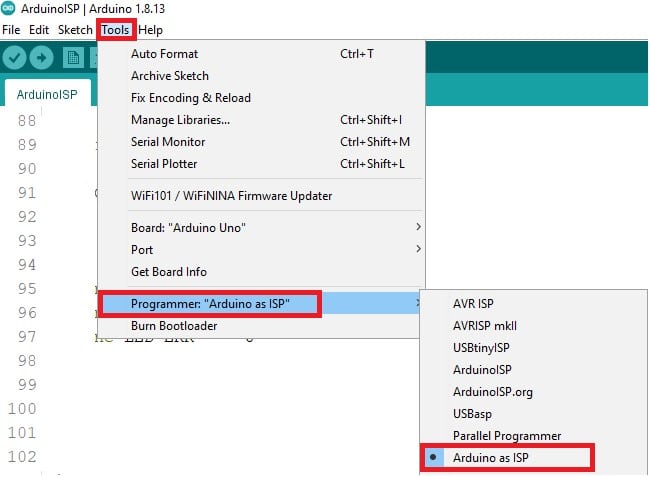
Step 3: After that select Tools > Programmer > Arduino as ISP.
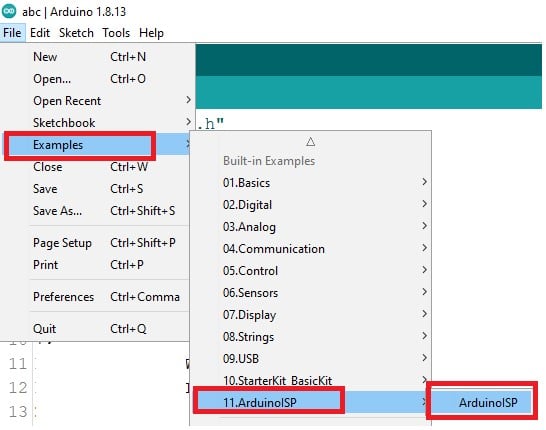
Step 4: Go to File > Examples > ArduinoISP > ArduinoISP.
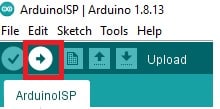
Step 5: Click the Upload button to upload the sketch to the board.
After all these five steps, Arduino Uno will work as an ISP now.
Case 1: Uploading Application Code From Arduino Uno as ISP To Arduino Mega
After completing all five steps mentioned for Arduino Uno as an ISP, you upload a sketch code (application code) from Arduino IDE to Arduino Mega via Arduino Uno as an ISP.
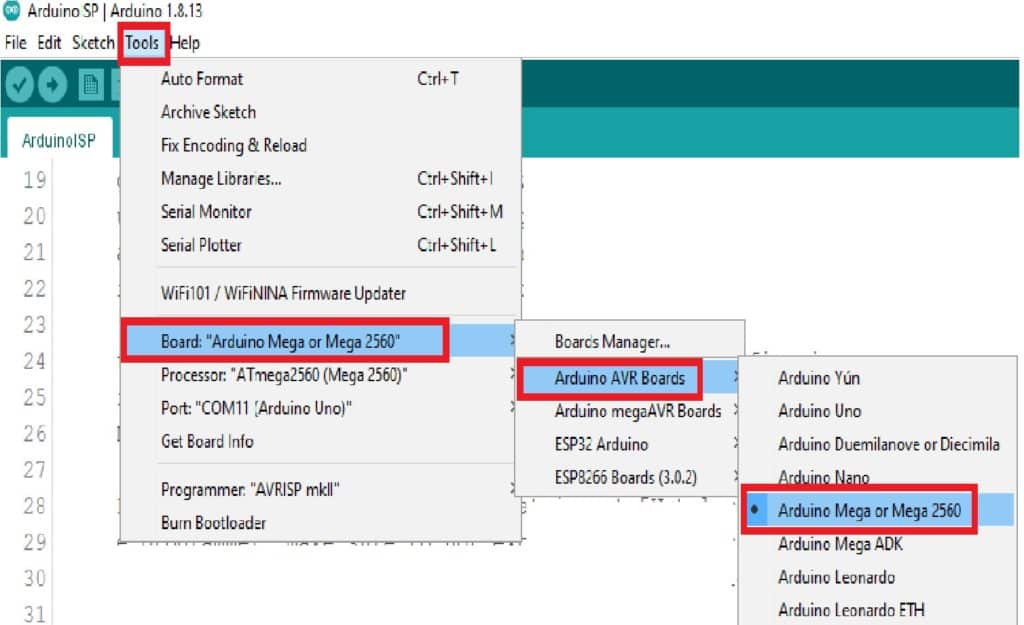
Step 6: Select Tools > Board > Arduino AVR Boards > Arduino Mega or Mega 2560.
Step 7: Open the code in Arduino IDE that you want to upload in Arduino Mega. In Arduino IDE, go to Sketch > Upload Using Programmer.
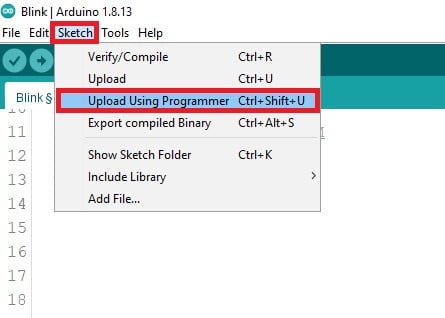
After all these steps, you have successfully uploaded the sketch code to Arduino Mega from Arduino Uno as an ISP.
Case 2: Uploading Bootloader From Arduino Uno as ISP To Arduino Mega
If you have not set your Arduino Uno as an ISP, follow Steps 1 to 5 mentioned in “How to setup Arduino Uno as an ISP?” that will make your Arduino Uno ready as an ISP programmer.
Now, I will show you how to upload the Bootloader in the Arduino Mega from Arduino Uno as an ISP with burn bootloader.
Step 6: Select Tools > Board > Arduino AVR Boards > Arduino Mega or Mega 2560.

Step 7: Then Select Tools > Burn Bootloader.
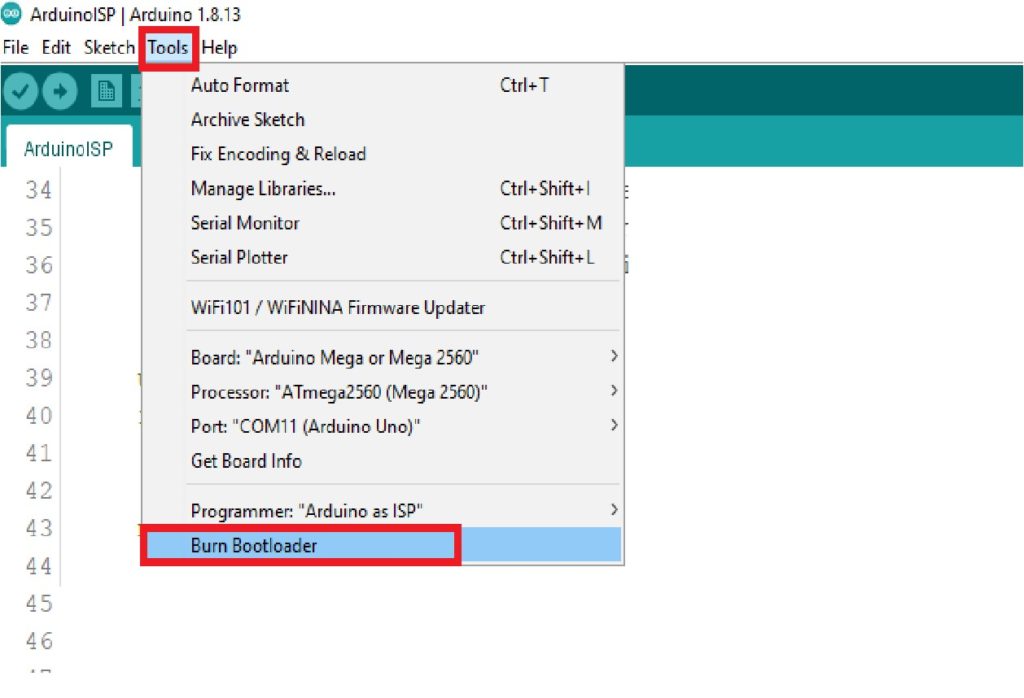
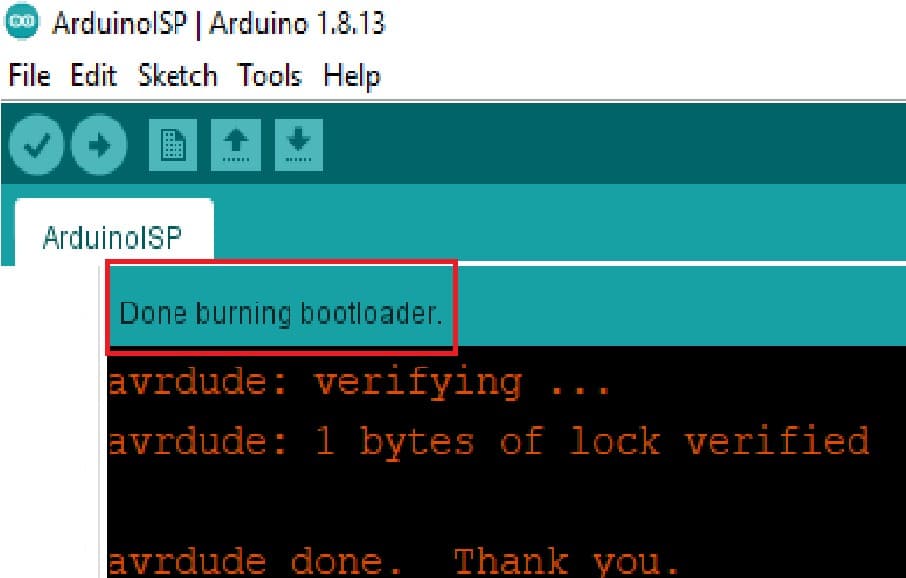
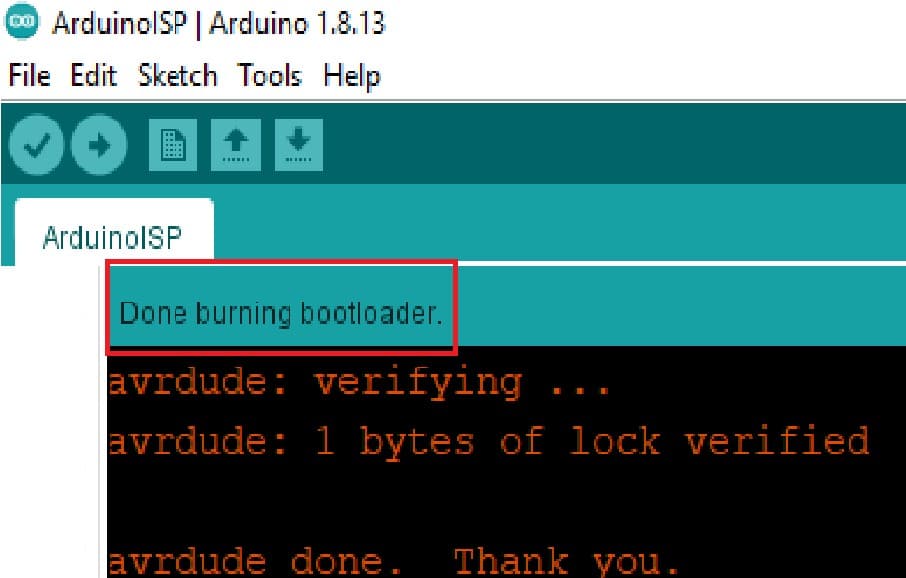
If successful, the following confirmation message will show at the bottom of Arduino IDE.
2) Arduino Uno as ISP and Arduino Uno as Target MCU
Interfacing of Arduino Uno as an ISP to Arduino Uno as Target MCU
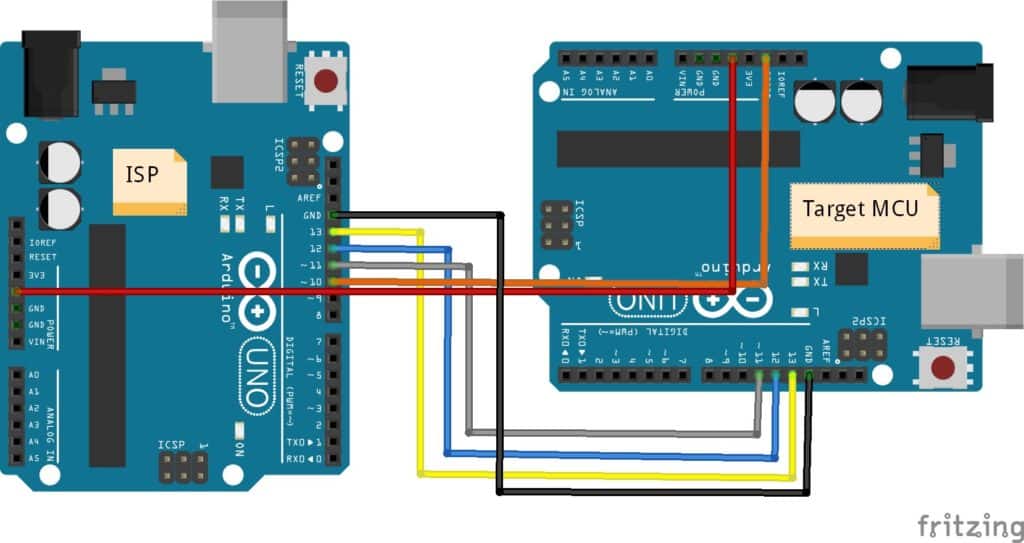
The following table shows the interfacing of Arduino Uno to Arduino Uno via SPI pins. Make sure that ground is common.
| Arduino Board | MOSI | MISO | SCK | CS |
| Uno ISP | 11 or ICSP-4 | 12 or ICSP-1 | 13 or ICSP-3 | 10 |
| Uno Target | 11 or ICSP-4 | 12 or ICSP-1 | 13 or ICSP-3 | RESET |
Case 1: Uploading Application Code From Arduino Uno as ISP To Arduino Uno Target
The following steps give you information about uploading a sketch code (application code) from Arduino IDE to Arduino Uno from Arduino Uno as an ISP.
First, you need to set Arduino Uno as an ISP as mentioned in How to setup Arduino Uno as an ISP?
After completing all 1 to 5 steps, you need to follow step 6 as mentioned below.
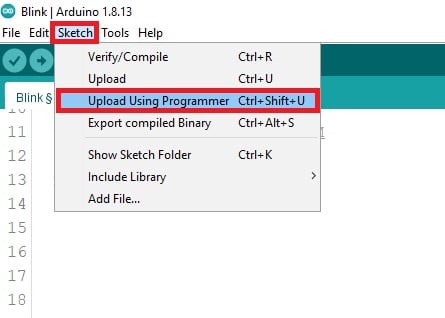
Step 6: Open the code in Arduino IDE that you want to upload in Arduino Uno. In Arduino IDE, go to Sketch > Upload Using Programmer.
Case 2: Uploading Bootloader From Arduino Uno as ISP To Arduino Uno
If you have not set your Arduino Uno as an ISP, follow Steps 1 to 5 mentioned in “How to setup Arduino Uno as an ISP?” that will make your Arduino Uno ready as an ISP programmer.
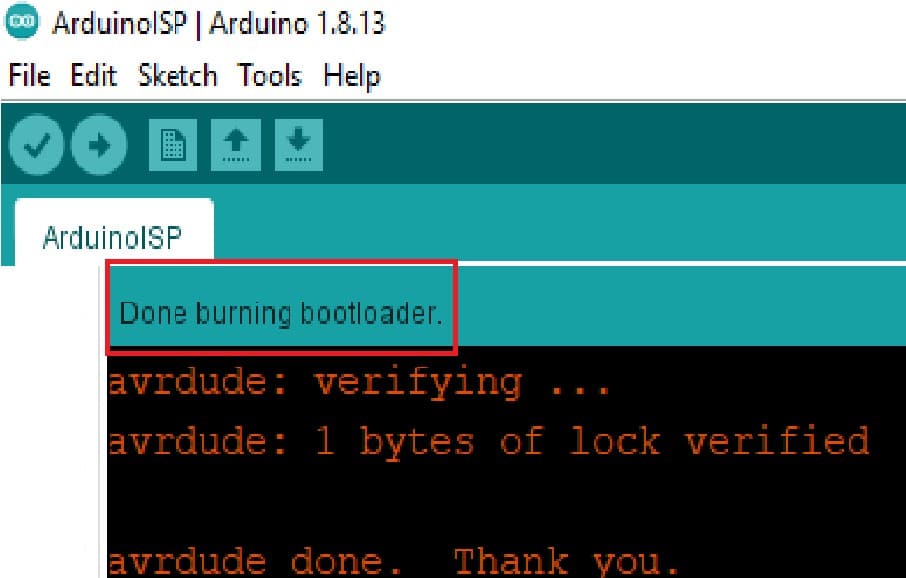
Step 6: Then Select Tools > Burn Bootloader.

After step 6, you have successfully uploaded the bootloader in the Arduino Mega2560.
3) Arduino Mega as ISP and Arduino Uno as Target MCU
Interfacing of Arduino Mega as an ISP to Arduino Uno as Target MCU
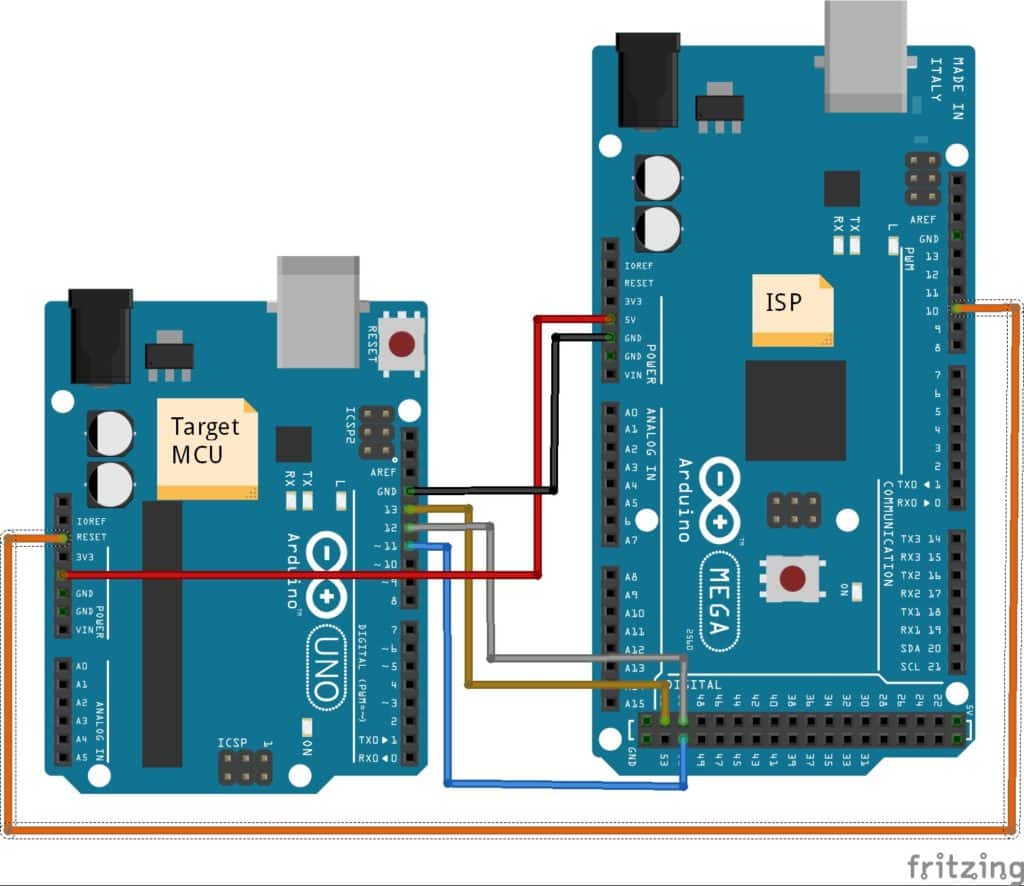
The following table shows the interfacing of Arduino Mega to Arduino Uno via SPI pins. Make sure that ground is common.
| Arduino Board | MOSI | MISO | SCK | CS |
| Mega ISP | 51 or ICSP-4 | 50 or ICSP-1 | 52 or ICSP-3 | 10 |
| Uno Target | 11 or ICSP-4 | 12 or ICSP-1 | 13 or ICSP-3 | RESET |
How to setup Arduino Mega2560 as an ISP?
The following steps give you information about setting up Arduino Mega2560 as an ISP with Arduino IDE.
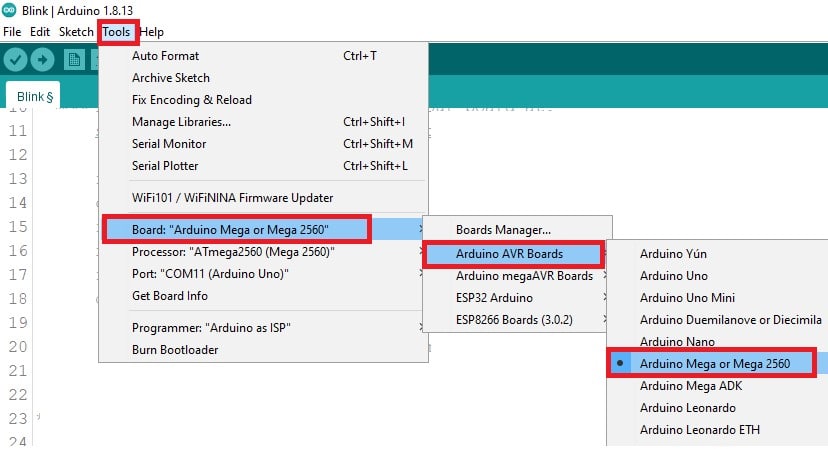
Step 1: Open the Arduino IDE and go to Tools > Board > Arduino AVR Boards > Arduino Mega or Mega 2560, as shown below.
Step 2: Select your corresponding COM Port in Tools > Port. Where the Arduino Mega board is connected.
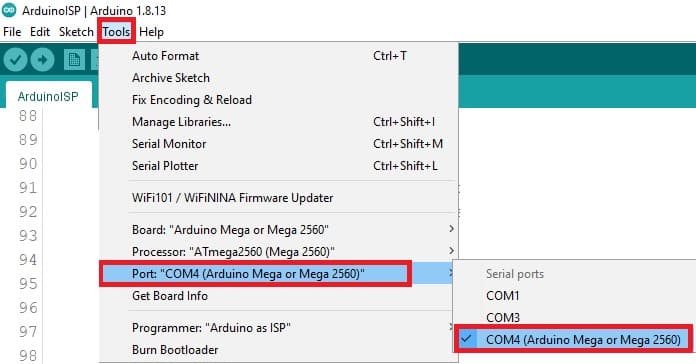
Step 3: After that select Tools > Programmer > Arduino as ISP.
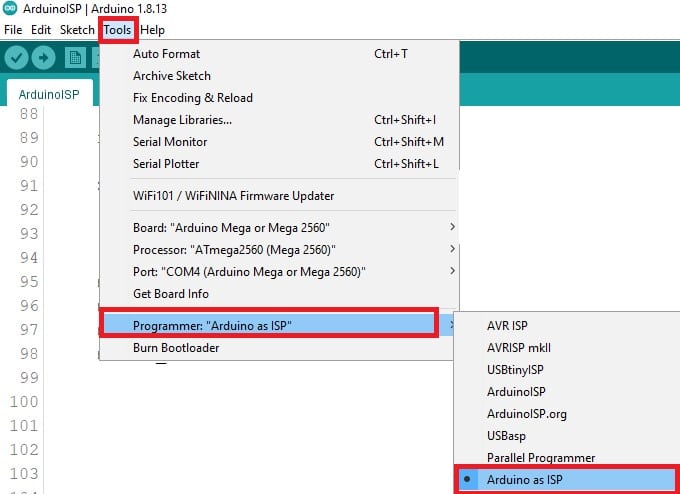
Step 4: Go to File > Examples > ArduinoISP > ArduinoISP.

Step 5: Click the Upload button to upload the sketch to the board.

Case 1: Uploading Application Code From Arduino Mega as ISP To Arduino Uno
The following steps give you information about uploading a sketch code (application code) in Arduino IDE from Arduino Mega as an ISP to Arduino Uno as the target MCU.
First, you need to set Arduino Mega as an ISP as mentioned in How to setup Arduino Mega2560 as an ISP?
After completing all 1 to 5 steps, you need to follow step 6 as mentioned below.
Step 6: Open the Arduino IDE and go to Tools > Board > Arduino AVR Boards > Arduino Uno.
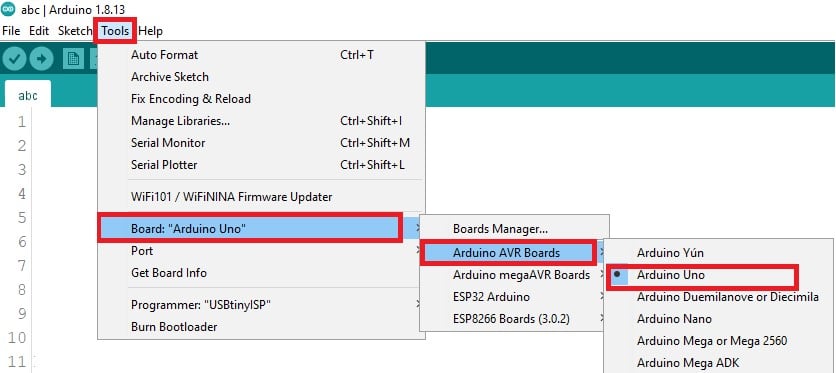
Step 7: Open the code in Arduino IDE that you want to upload in Arduino Uno. In Arduino IDE, go to Sketch > Upload Using Programmer.

Case 2: Uploading Bootloader From Arduino Mega as ISP To Arduino Uno
If you have not set your Arduino Uno as an ISP, follow Steps 1 to 5 mentioned in “How to setup Arduino Mega2560 as an ISP?” that will make your Arduino Mega2560 ready as an ISP programmer.
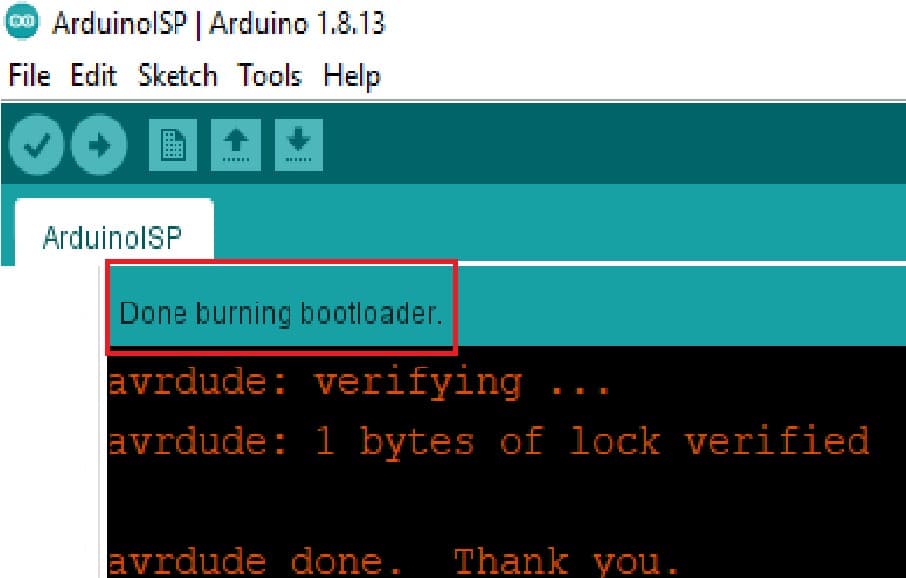
Step 6: Then Select Tools > Burn Bootloader.

In the end, you will get a Done burning Bootloader message.
4) Arduino Mega as ISP and Arduino Mega as Target MCU
Interfacing of Arduino Mega as an ISP to Arduino Mega as Target MCU
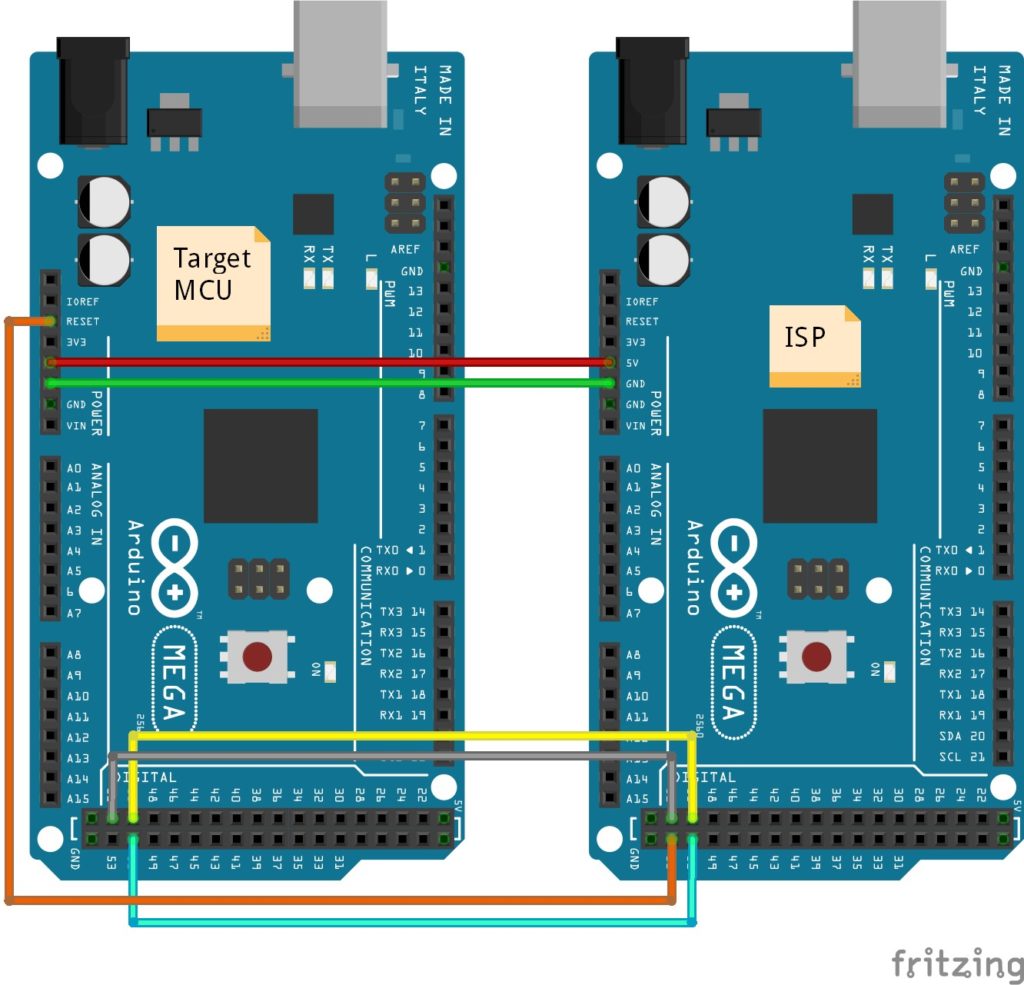
The following table shows the interfacing of Arduino Mega to Arduino Mega via SPI pins. Make sure that ground is common.
| Arduino Board | MOSI | MISO | SCK | CS |
| Mega ISP | 51 or ICSP-4 | 50 or ICSP-1 | 52 or ICSP-3 | 10 |
| Mega Target | 51 or ICSP-4 | 50 or ICSP-1 | 52 or ICSP-3 | RESET |
Case 1: Uploading Application Code From Arduino Mega as ISP To Arduino Mega
The following steps give you information about uploading a sketch code (application code) from Arduino IDE to Arduino Mega from Arduino Mega as an ISP.
First, you need to set Arduino Mega2560 as an ISP as mentioned in How to setup Arduino Mega2560 as an ISP?
After completing all 1 to 5 steps, you need to follow step 6 as mentioned below.
Step 6: Then Select Tools > Board > Arduino AVR Boards > Arduino Mega or Mega 2560.

Step 7: Open the code in Arduino IDE that you want to upload in Arduino Mega. In Arduino IDE, go to Sketch > Upload Using Programmer.

Case 2: Uploading Bootloader From Arduino Mega as ISP To Arduino Mega
If you have not set your Arduino Uno as an ISP, follow Steps 1 to 5 mentioned in “How to setup Arduino Mega2560 as an ISP?” that will make your Arduino Mega ready as an ISP programmer.
Step 6: Then Select Tools > Burn Bootloader.

Finally, after clicking on Burn Bootloader, you will see a Done burning bootloader.
Conclusion
In this article, I have shown you How the Arduino Bootloader works, Arduino Uno, and Arduino Mega as an ISP works.
After this, you can use a burn bootloader to upload the bootloader to your AVR microcontroller.
I hope you found this article informative if you find information, please share it and like.
I would love to know what project you plan on building or have already made with the Arduino.
If you have any queries or suggestions, or if you think things are missing in this tutorial, please leave a comment below.
Note that comments are held for moderation to prevent spam.

Hiren is a professional Embedded Engineer with a Master’s Degree
in Electronics and Communication Engineering. He is proficient in C and
C++ and enjoys building DIY projects on Arduino, ESP32, PIC32, STM32 & Raspberry PI boards.

