Welcome to my in-depth guide, where I will teach you how to program ESP32 microcontrollers.
The ESP32 is the number one solution for connectivity and IoT projects. You can use it for home automation, security, or remote sensing projects.
In this article, I will discuss programming language options and libraries and walk you through how to set up your first ESP32 project.
I will also take you through a few critical programming modes and how to set them up. This will enable you to choose and control the ESP32 programming options easily.
I have also written an article in this series that covers all you need to know about the hardware fundamentals of the ESP32 (board, pins, connections, power, applications, etc.).
By the end of this article, you will be confident to take up your ESP32 and start programming on your favorite platform.
Let’s get programming!
Components Used
Componentes de hardware
- ESP32 Wroom 2.4 GHz with integrated Antenna x 1
- Micro USB Cable for ESP32 (for powering ESP32 and programming) x 1
Makerguides.com participa en el Programa de Asociados de Amazon Services LLC, un programa de publicidad de afiliados diseñado para proporcionar un medio para que los sitios ganen honorarios de publicidad mediante la publicidad y los enlaces a productos en Amazon.com.
ESP32 Programming Options
Programming ESP32: An Overview
You have several ways to start with ESP32 programming:

- ESP32 can be programmed using Arduino IDE, which allows you to write C/C++ code similarly to programming Arduino boards. This option is particularly recommended for you if you have prior experience with Arduino programming.
- Alternatively, you can use MicroPython (see more info on this below).
- To take full advantage of all the features of ESP32, Espressif has developed the Espressif IoT Development Framework (ESP-IDF). I will get into the details of all these options.
First, let us look at a few features of ESP32 which are relevant to ESP32 programming.
I would like to begin by explaining the USB Serial / JTAG Controller present in ESP32.
In the following sections, I will take you through the steps needed to kick off your programming journey with ESP32.
1) Programming ESP32 via Arduino IDE
I have taught how to install the ESP32 core on an Arduino IDE in another article here.
Programming ESP32 on the Arduino IDE has some fantastic advantages. I am listing a few for you here:
- Firstly, if you know your way around the Arduino IDE and programming language, working with ESP32 on the same platform is a piece of cake. Why? The Arduino IDE is user-friendly and straightforward, making it easy to start.
- Secondly, the Arduino community is massive, so you can find many resources online to help you. There are tutorials, code examples, and forums where you can ask questions and get assistance.
- Another benefit of using Arduino IDE is accessing many libraries, making programming the ESP32 easier. These libraries provide functions for everyday tasks such as Wi-Fi connection and device communication.
- Arduino IDE is cross-platform. You can use it on Windows, Mac, or Linux, which makes it super convenient.
Even if you’re new to programming, it’s a great place to start. The user interface is intuitive, and there are tons of resources available online to help you learn.
Hence, starting with the Arduino IDE is highly recommended for beginners.
2) Programming ESP32 via MicroPython
What is Micropython?
Micropython is a programming language. It allows you to run Python code on ESP32 and microcontrollers. It is a lightweight implementation of Python-3 to run code on MCUs with limited memory and processing power.

MicroPython is written in C99, and the entire MicroPython core is available for general use under the very liberal MIT license.
Most libraries and extension modules (some of which are from a third party) are also available under MIT or similar licenses.
You can freely use and adapt MicroPython for personal use, education, and commercial products.
MicroPython is developed in the open on GitHub, and the source code is available on the GitHub page and the download page. Everyone is welcome to contribute to the project.
In the next section, I will show you the setup needed to start programming in MicroPython.
How to begin using MicroPython on the ESP32
Once you have got your ESP32 chip in your hands, you must first download the latest MicroPython firmware. It is a .bin file. Load the file onto the ESP32 chip.
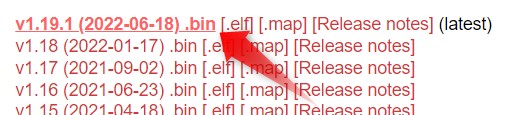
Please visit the link to download the MicroPython firmware. The page looks like the one below.
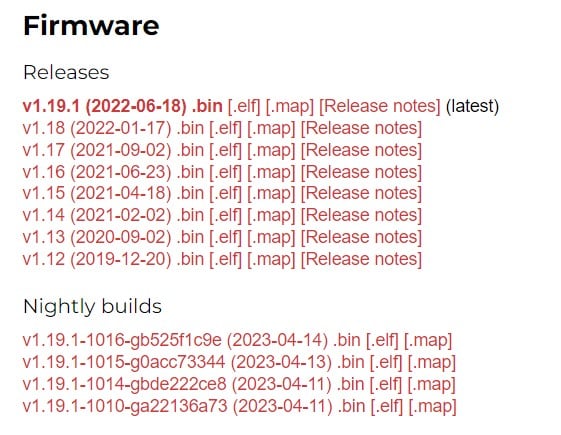
I suggest going for stable releases. If you are an advanced user, you can also select the Nightly builds, where you can closely follow every update to the firmware.
So select the bin file and download it onto your computer.
Now, you have two steps further to load the bin file onto the ESP32 chip.
- Put the ESP32 in bootloader mode
- Copy the firmware onto ESP32
Erase the entire flash before copying the new MicroPython firmware.
Install the esptool, which supports copying the firmware from the PC using the Python application onto the ESP23 device.
What is esptool?
esptool.py interacts with ESP8266 and ESP32 series chips. esptool.py can be used for various tasks, including
- flashing firmware,
- reading and
- writing the flash memory,
- erasing flash, and
- resetting the chip.
It supports multiple firmware formats, including binaries, ELF, and hex files. It can communicate with the chip using various interfaces, including serial, SPI, and USB.
You can install esptool using pip.
pip install esptool
Now follow the command below to erase the ESP32 device’s flash memory using esptool.py
esptool.py --port /dev/ttyUSB0 erase_flash
Now you are just one step away from deploying the downloaded bin file.
esptool.py --chip esp32 --port /dev/ttyUSB0 write_flash -z 0x1000 esp32-20220618-v1.19.1.bin
Here are some Tips if you have trouble copying the file:
- You can change the baud rate to a lower one ( use –9600 ) in the command
- Check the USB cable and power supply
- Make sure the downloaded file is not corrupted
- Ensure the file name you downloaded matches the name you mentioned in the command.

What is REPL?
REPL stands for Read Evaluate Print Loop. This is an interactive MicroPython prompt you can access on the ESP32 device.
It is the easiest way to test out the code and run commands.
Since ESP32 already has a USB-to-serial converter, you can access the REPL directly from your PC.
Try the following: print (‘hello Makerguides’) at the prompt to test the ESP32 code and hit enter.
>>> print (‘hello Makerguides’)
hello Makerguides
You can now try some basic commands.
>>> 10 + 20
30
>>> 10 / 20
0.5
>>> 10 / 20
0.5
???? Congratulations, your ESP32 device setup to work with MiroPython is now complete.
3) Programming ESP32 via ESPRESSIF
ESPRESSIF is the official manufacturer of ESP32. They provide you with hardware and software resources to bring your projects and ideas using ESP32 series hardware.
They also provide a software development framework that can be used to develop an application for IoT, Wi-Fi, Bluetooth, power management, and more.
¡Comencemos!
You need three hardware items to start with
- ESP32 Board
- Ordenador
- USB cable (Micro USB or a C-type USB, depending on the board you have)
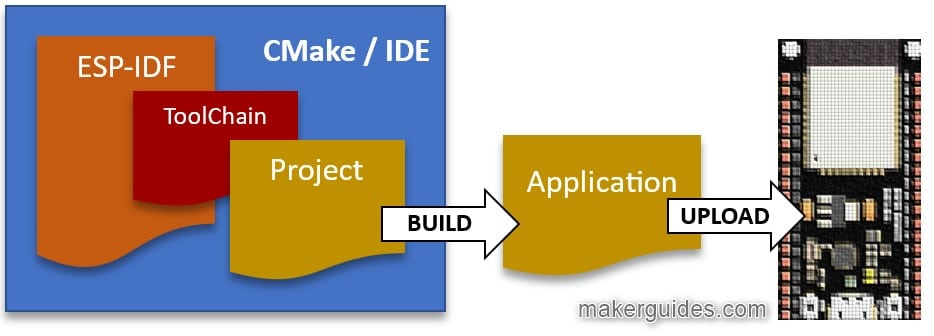
You also need three software items.
- Toolchain to compile code for ESP32
- Build tools – CMake and Ninja to build your application for ESP32
- ESP-IDF – It contains all essential APIs for ESP32 and scripts to operate the toolchain
You can continue using the same IDE if you are a VSCode or Eclipse user. You just have to download the corresponding extension from the link below.
You can also install the required software manually (Windows, Linux, and Mac)
You can start with the available examples to get a quick hands-on and verify both hardware and software setup.
Note:
- Do not disconnect the device when you are programming ESP32 or erasing it
- Some ESP32 development boards come with BSPs (Board support package). It speeds up prototyping.
Famous ESP32 libraries
Here is a list of 10 ESP32 libraries widely used for several applications.
| Library | What is it about? |
| WiFi | This library provides APIs for connecting to a WiFi network and configuring the ESP32 as a soft access point. |
| Bluetooth | This library allows the ESP32 to act as a Bluetooth device and communicate with others. |
| AsyncTCP | This library provides asynchronous TCP support for the ESP32, which helps create fast and responsive networking applications. |
| SPIFFS | This library allows the ESP32 to access files stored on the SPIFFS file system, a lightweight and flexible file system designed for small devices. |
| Adafruit GFX and Adafruit SSD1306 | These libraries support OLED displays and are widely used in ESP32 projects. |
| PubSubClient | This library supports the MQTT protocol, a lightweight messaging protocol for IoT applications. |
| ArduinoJson | This library allows the ESP32 to parse and generate JSON data, commonly used for data exchange in web and mobile applications. |
| FastLED | This library provides advanced control of LED strips and matrices and is often used in creative lighting projects. |
| Blynk | This library supports the Blynk IoT platform, which allows you to control and monitor your ESP32 projects from a smartphone or tablet. |
| WebSockets | This library supports the WebSockets protocol, which is used for real-time communication between clients and servers. |
Useful links:
- ESPRESSIF Github page – https://github.com/espressif
- ESPRESSIF Arduino Code – https://github.com/espressif/arduino-esp32
- ESP32 hardware guide – https://docs.espressif.com/projects/esp-idf/en/latest/esp32/hw-reference/index.html
Debugging Code Issues With USB Serial / JTAG Controller
The USB Serial / JTAG Controller programs the ESP32 flash memory.
While running, you can also read the program output and attach a debugger to the code. All you need is one PC (host).
The conventional programming method uses a serial port to push the program over the serial port (over UART, which takes only two pins). You can later use the same two pins to read the program output to ensure the code runs as expected.
But, if there is an issue in the code, you cannot read the program output over UART. That is where you grab a JTAG debugger.
JTAG uses a set of pins on a device that can be accessed through a JTAG header or connector. With JTAG, it is possible to perform various operations on the pins, including reading and writing data, checking the state of a pin, and controlling the operation of a device.
JTAG can be a valuable tool for learning about hardware and software development. It allows you to test and debug the testing, which can be beneficial when working with microcontrollers or other programmable devices.
With JTAG, one can better understand how hardware and software interact and how to optimize performance and identify issues.
You can see a typical JTAG pinout connector below.
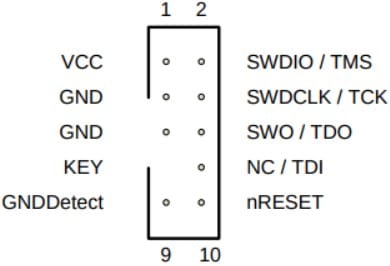
Hence, when working with ESP32, you may need at least six pins to achieve JTAG debugging if the serial port programming is insufficient.
If your chip already has fewer pins, keeping six pins aside for JTAG debugging will hurt. You will not be able to use those for other functions comfortably.
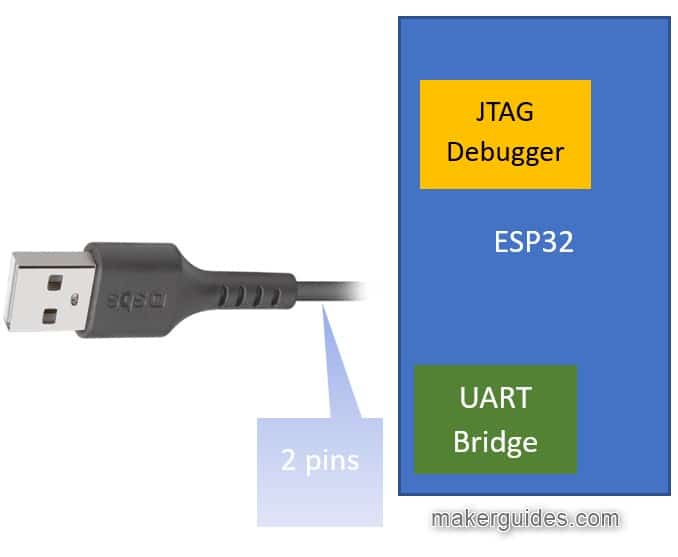
The image shows a microcontroller that supports both serial and JTAG debugging.
To use JTAG debugging, you need to use external adapters and dedicate at least six pins to JTAG, which can be problematic because those six pins cannot be used for other purposes.

This may limit the functionality of the microcontroller and make it more challenging to work with, depending on your specific project requirements.
So, What ESP32 chip manufacturers have done is this:
That’s great news! The ESP32 now has a built-in JTAG debugger and USB-to-serial bridge, eliminating the need to search for external adapters or dedicated devices.
This improvement makes it much easier and more convenient to work with the ESP32, as developers can now use the onboard JTAG debugger and USB-to-serial bridge without worrying about additional hardware.
This feature can also free up pins on the microcontroller for other uses, making the ESP32 an even more versatile and robust option for various applications.
Summary
“ Debugging the ESP32-S3 only requires two pins to be dedicated to this functionality. ”
Here is the snapshot from the ESP32 S3 module reference manual. You can see the built-in USB Serial / JTAG Logic block added.
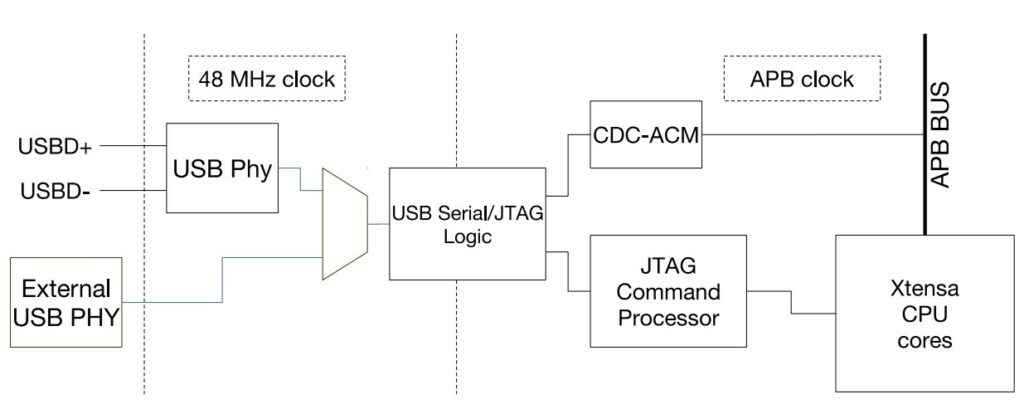
In the table below, you can see the pins needed for debug operation. Make sure you don’t use these two pins for other functions so that the debugging is not disturbed.
| ESP32-S3 Pin | USB Signal |
| GPIO19 | D- |
| GPIO20 | D+ |
| 5V | V_BUS |
| GND | Tierra |
FAQs About Programming The ESP32
I have included a list of the most frequently asked questions about programming ESP32. If you have more questions, please post them in the comments section. I will be happy to answer them.
What programming languages can be used to program ESP32?
You can program ESP32 using various programming languages, including C, C++, Python, and MicroPython. The Arduino IDE uses a C++ based programming language.
What are some popular development environments for programming ESP32?
Some popular development environments for programming ESP32 include the Arduino IDE, Visual Studio Code with the PlatformIO extension, and Espressif’s official development environment, ESP-IDF. My personal favorite is PlatformIO.
How many times can I program ESP32?
The ESP32 microcontroller chip has a rated endurance of 100,000 write cycles per sector on its internal flash memory. You can write and erase the memory 100,000 times before it wears out.
Note that each write cycle can cause wear on the memory. Please avoid frequent reprogramming of the ESP32 chip. There is an inverse relationship between the memory-retaining capacity of the ESP32 and the number of times we can program ESP32.
Can I use the ESP32 with the Arduino IDE?
The ESP32 can be programmed using the Arduino IDE, which provides a familiar interface for beginners and experienced programmers. People from Arduino backgrounds will find the IDE100% friendly and helps in easy migration to the ESP32 platform.
How do I connect the ESP32 to Wi-Fi or Bluetooth?
The ESP32 has built-in Wi-Fi and Bluetooth capabilities, and you can use libraries or code examples to connect it to Wi-Fi or Bluetooth networks. The specific steps will depend on the development environment and libraries you are using
What are some resources for learning ESP32 programming?
Many resources are available online for learning ESP32 programming, including official documentation, online forums, and tutorial websites like Instructables and maker-guides. There are also many books and video courses available that cover ESP32 programming.
What connector options are there to program ESP32?
USB: Many ESP32 development boards have a built-in USB port that can be used for programming and debugging. You can connect the board to your computer using a standard USB cable.
Serial: Some ESP32 boards have a serial interface that can be used for programming. You’ll need a serial-to-USB adapter to connect the board to your computer.
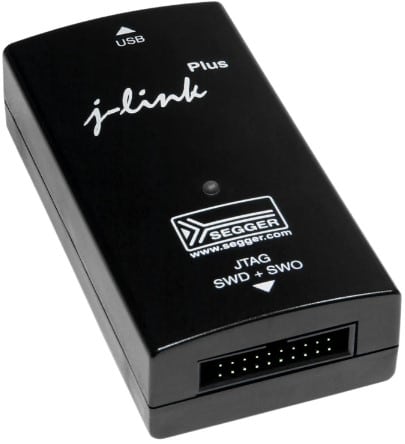
JTAG: JTAG (Joint Test Action Group) is a standard for on-chip debugging that can be used with some ESP32 development boards. You can use Jlink from Segger, for example.
SWD: SWD (Serial Wire Debug) is another debugging interface that can be used with some ESP32 boards. You can use Jlink from Segger, for example.
Most ESP32 development boards can be programmed using a standard USB cable, which is often the easiest option.
Conclusión
I have taken you through all the programming options available to program the ESP32 chip in this article. This in-depth information will enable you to decide on the right programming environment for your needs and level of experience.
I have shared the 3 main programming modes and how to set them up in detail in the article. The information will also help you to debug ESP32 in your next project if you have issues with programming.
I also recommend you look at my ESP32 hardware beginners guide, where I teach all the fundamental hardware aspects of the ESP32 module.
I’d love to hear from you! Let us know if there’s anything else you’d like me to cover in future articles.
Please share the article with fellow ESP32 enthusiasts. Keep Learning!

I am Puneeth. I love tinkering with open-source projects, Arduino, ESP32, Pi and more. I have worked with many different Arduino boards and currently I am exploring, Arduino powered LoRa, Power line communication and IoT.