In this blog post, we’ll provide a comprehensive overview of the most common motors and actuators used for Motion control and Actuation in Arduino projects. Whether it’s the simplicity of a DC motor, the precision of a stepper motor, or the specific angular movement of a servo, we’ve got you covered.
Beyond just naming them, we’ll delve into their workings, typical applications, and tips for choosing the right one for your next project. If you’re looking to add motion to your Arduino creation or simply curious about the motors buzzing in your gadgets, this guide will light the way. Let’s dive in and set your projects in motion!
Makerguides.com is a participant in the Amazon Services LLC Associates Program, an affiliate advertising program designed to provide a means for sites to earn advertising fees by advertising and linking to products on Amazon.com. As an Amazon Associate we earn from qualifying purchases.
Motion control and Actuation
DC Motors
DC motors are perhaps the most straightforward and ubiquitous motors in the realm of electronics. They rely on the principle of converting direct current (DC) electrical energy into mechanical energy, producing a continuous rotation. The central difference between a DC motor and others lies in its brushes, which provide current to the rotor. DC motors are easy to use and come in various sizes, from tiny coin-cell powered types to powerful ones used in electric vehicles.
DC motors find their applications in numerous DIY projects, toys, fans, and even some home appliances. Their continuous rotation makes them particularly suited for anything that needs to spin or rotate, such as wheels on a robot or a fan blade. Below is the picture of a small DV motor often used in Arduino projects:
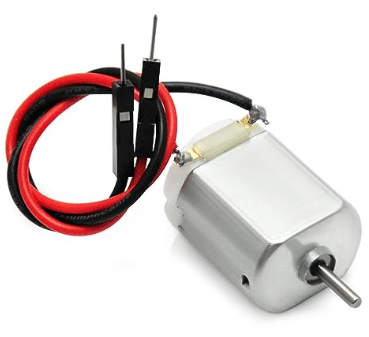
Gikfun 1.5V-6V Type 130 Miniature DC Motors
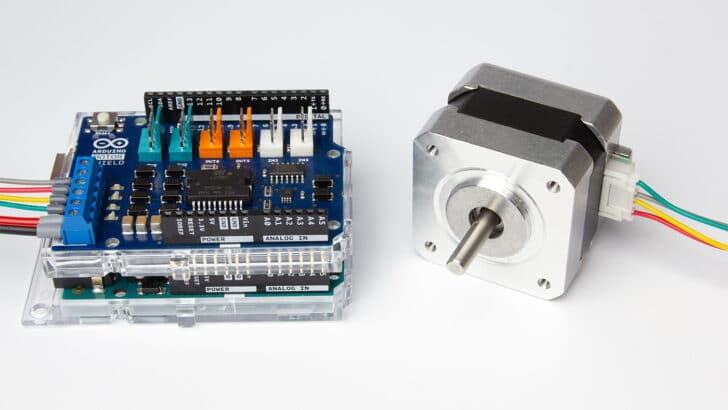
You usually cannot drive a DC motor directly from an Arduino output pin. You will need a motor shield to provide the necessary current. Common choices are the L298N or L293D motor shields. Below a picture and link for the L298N:
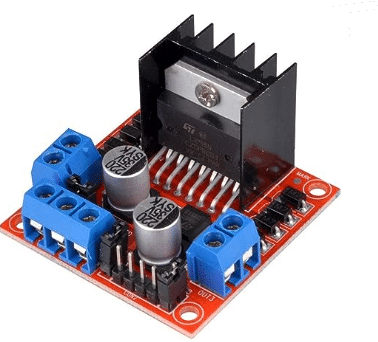
HiLetgo 4pcs L298N Motor Driver Controller Board Module Stepper Motor DC Dual H-Bridge
See our tutorial on how to control a DC motor with an Arduino for more details.
Key considerations
DC motors can draw a lot of power, especially when starting or if they get stuck. This can strain your Arduino’s power supply or even damage it. Always check the motor’s power needs and make sure your Arduino can handle it. If the motor needs more power than the Arduino can give, use an external power source.
Note that DC motors can create electrical noise that might interfere with other parts of your project. It’s a good idea to add a diode or capacitor to help with this.
Brushless DC Motors (BLDC)
Unlike DC motors, BLDC motors eliminate the brushes, reducing friction, wear and tear, and maintenance requirements. Instead, they employ a controller to switch current direction in the motor windings, producing rotation. This feature gives higher efficiency and longer lifespan to BLDCs, making them a better choice for applications that demand reliability and efficiency, however at a higher cost.
Commonly found in drones, high-performance tools, and computer cooling fans, BLDCs are preferred for their smooth operation, energy efficiency, and high torque. Drones, in particular, benefit from BLDCs due to their light weight and high responsiveness, which are crucial for stability and manoeuvrability.
You will need a Electronic speed controller (ESC) to drive an control a Brushless DC Motor. Below a picture of a typical kit for drones, containing the control and the BLDC:

BGNing A2212 1400kv Brushless Outrunner Motor 10t+ 30a Speed Controller ESC,Rc Aircraft
Key considerations
BLDCs require complex control mechanisms and/or an Electronic Speed Controllers (ESC). They can also draw significant current, leading to potential power supply issues and heat generation.
Electrical noise from BLDCs might interfere with other components in your project, so proper grounding and shielding is needed. Always check the motor’s voltage and current ratings to avoid damage, and consider the torque requirements, especially at start-up.
Stepper Motors
Stepper motors, as their name implies, move in distinct steps. Each rotation is divided into a large number of steps, and the motor can be directed to move any number of these at a time. This makes them exceptionally precise, with the ability to control the exact angle of rotation. Unlike continuous DC motors, steppers can move to and hold a specific position, making them indispensable in CNC machines and 3D printers.
Below is a picture of the very common NEMA 17 stepper motor:
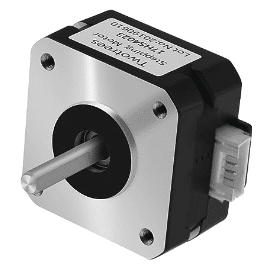
Twotrees Nema17 Stepper Motor 17HS 4023 Stepper motor Bipolar 42 Motor 4-Lead Wire with 1m Cable 23mm 42BYGH 1.5A Motor
In general, you do not control or drive a stepper motor directly from an MCU but use a driver shield. Common drivers are the A4988 or DRV8825 chips. Here a picture of a A4988 stepper driver module with an heat sink:
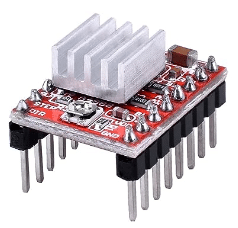
WWZMDiB A4988 Stepper Motor Drive modules with Heat Sink
We have many tutorial on how to control stepper motors with various drivers. Have a look.
Key considerations
Stepper motors can draw a lot of current, and if powered directly from the Arduino, it can lead to damage. Always use an external power supply and a motor driver.
Be aware that if a stepper motor is pushed too hard or too fast, it might miss steps, leading to inaccurate positioning.
Lastly, stepper motors can get hot during extended use. Ensure there’s adequate ventilation around the motor, and consider adding a heat sink if it runs hot.
Servo Motors
Servo motors are unique in that they provide controlled angular movement, typically ranging from 0° to 180°. Inside, a feedback mechanism, often a potentiometer, continually adjusts to maintain the desired angle. This makes servos incredibly precise for angle-based tasks but limits their rotation range.
This restricted yet precise movement makes them especially suited for tasks like adjusting the flaps of a toy airplane, moving a camera to a desired angle, or positioning the limbs of a robot.
The picture below shows the very common SG90 micro servo motor:
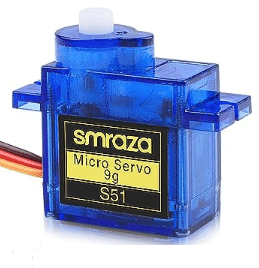
Hanaive SG90 9G Micro Servo
We have multiple tutorials on how to control servo motors of different types using different drivers.
Key considerations
Servos can draw more current than the Arduino can supply, especially larger ones. Don’t power them directly from the Arduino.
Servos need specific pulse-width signals to set their position. While the Arduino can generate these signals, always double-check your code to ensure you’re sending the correct commands. Incorrect signals can make the servo jitter or move unpredictably. Also, remember that most servos have a limited rotation range. Don’t force them beyond their limits, or they might get damaged.
Lastly, always check the servo’s specifications. Different servos have different torque, speed, and voltage requirements. Using the wrong type can lead to poor performance or even damage.
Solenoids
Solenoids operate on a simple principle: when electricity flows through their coil, a magnetic field is generated, pulling a metal slug or pin into the coil’s center. This action can produce a pushing or pulling force. When power is removed, the slug typically returns to its original position, either by a spring mechanism or another external force.
This linear motion finds its use in many applications. From the simple doorbell’s ding-dong mechanism to complex pinball machines flippers and even automotive starters, solenoids can be found.
The picture below shows a typical solenoid:
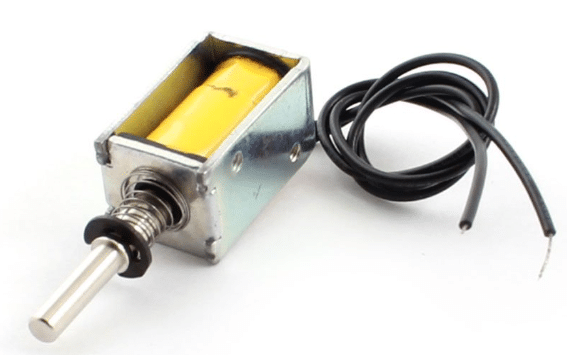
uxcell a14092600ux0438 Open Frame Actuator Linear Mini Push Pull Solenoid Electromagnet, DC 4.5V, 40 g/2 mm
Key considerations
When using solenoids in Arduino projects, remember they draw a lot of current, especially when activated. Don’t power them directly from the Arduino, as this can damage the board. Instead, use an external power source and a transistor or relay to control the solenoid safely.
Solenoids create a magnetic field when powered, which can cause interference with nearby electronics. Place them away from sensitive components, and consider adding a diode to manage any voltage spikes.
Lastly, solenoids can get hot if they’re kept activated for long periods. It’s essential to give them breaks or use them in short bursts.
Relays
Relays act as switches, but they’re electrically operated. This means that a small voltage and current, like from an Arduino, can be used to control much higher voltages and currents. Inside the relay, an electromagnet (essentially solenoid) pulls a set of switch contacts closed (or open, depending on the type) when activated.
Their primary advantage is isolation. High-voltage appliances or circuits can be safely controlled without exposing the delicate low-voltage components (like an Arduino) to the higher voltage. You’ll find relays in numerous applications, from home automation systems to industrial equipment, anywhere that control over power is needed without direct interaction.
There are pre-made relay modules tailored for Arduino use, preferably with optocouplers for added safety, as the one shown below:
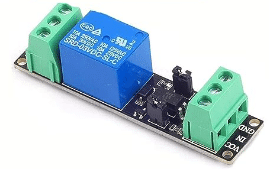
3v Relay Board Relay Module 1 Channel Opto-Isolate High Level Trigger for IOT
See our tutorial on how to use a relay module with an Arduino.
Key considerations
When using relays in Arduino projects, always remember they’re handling high voltages. Never touch a relay’s terminals when it’s powered, and ensure your setup is safe from accidental touches or short circuits.
Relays can create electrical noise when switching, which might disturb other parts of your project. Place them away from sensitive components and consider adding a snubber circuit or diode to manage potential voltage spikes.
Lastly, always check the relay’s specifications. Ensure it can handle the voltage and current of the device you’re controlling.
Buzzers
Buzzers, in their essence, are transducers that convert electrical energy into sound. The underlying mechanism typically involves a piezoelectric element, which vibrates when voltage is applied, producing sound. Buzzers can be categorized into active (which produce a tone when powered) and passive (which require an oscillating input signal to produce a sound).
Buzzers are found in many applications. Whether it’s the beep of a microwave oven, the alert tone of a wristwatch, or the warning beep of a reversing vehicle.
The picture below shows a typical active buzzer:

Cylewet 5V Active Buzzer Electronic Alarm Magnetic Long Continuous Beep CYT1036
Have a look at our tutorial on how to use a piezo buzzer with an Arduino.
Key considerations
When using buzzers in Arduino projects, first check their voltage requirements. Some buzzers might need more voltage than the Arduino can provide. If you connect a high-voltage buzzer directly to the Arduino, it might not work or sound very faint.
Buzzers can produce noise, not just the sound you want but electrical noise too. This can interfere with other parts of your project. To reduce this, add a capacitor across the buzzer’s terminals.
Lastly, be aware of the type of buzzer you’re using. Active buzzers will beep when powered, while passive buzzers need a specific signal from the Arduino to produce sound. Make sure you’re sending the right commands from your Arduino to the buzzer.
Summary
In this article, we’ve explored a range of actuators and their uses. We started with DC Motors, which are great for turning things like toy cars and fans. Then there’s the Brushless DC Motors, which are often used for flying gadgets like drones. We have seen Stepper Motors, which move step by step and are typically found in 3D printers. Servo Motors are like tiny robots themselves, making precise turns for tasks like moving a toy’s arm. Solenoids are all about push and pull, and they power things like doorbells. We also touched on Relays which let our small projects safely control bigger things, like lamps. And, of course, Buzzers, which make beeps and tunes to get our attention. Each of these actuators has its special job, and understanding them can make our Arduino projects come alive in all sorts of cool ways!
Stefan is a professional software developer and researcher. He has worked in robotics, bioinformatics, image/audio processing and education at Siemens, IBM and Google. He specializes in AI and machine learning and has a keen interest in DIY projects involving Arduino and 3D printing.