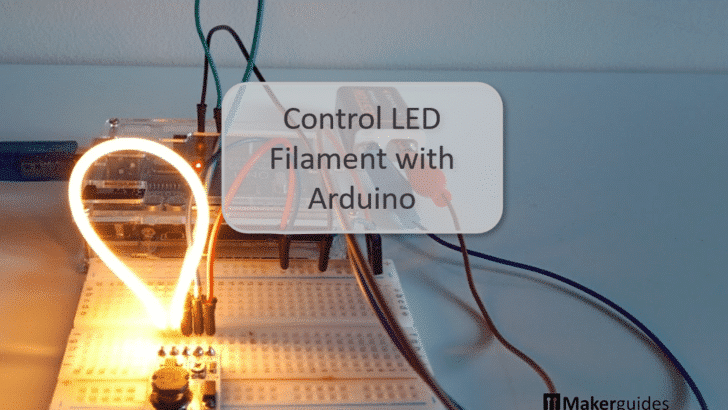
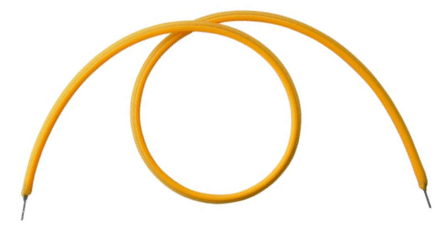
In this tutorial you will learn how to control a COB LED filament with Arduino using an LED driver board. COB LED Filaments are high density LED arrangements that come in many different shapes, sizes, colors and wattages. The picture below shows a flexible LED filament, which will use in this tutorial.

They are commonly used in retro light bulbs but are great for many other lighting applications, specifically illumination for miniatures. Since they run on 3V and use only 100mA, they are safe and fun to play with.
Comencemos.
Required Parts
Below the list of required parts. I used an Arduino Uno for this project but any other Arduino board, or ESP8266/ESP32 board will work just as well.
The link for the LED filament is for a flexible filament with a warm, yellow color, which is my favorite. But you can get other colors and different color temperatures (e.g. warm white vs cool white) as well.
Also, I selected the LD24AJTA_MINI LED driver, since I had it at hand. But any other LED driver that can deliver up 100mA will be fine.

Arduino Uno

USB Cable for Arduino UNO

Dupont Wire Set

Tablero de pruebas
LD24AJTA_MINI LED Driver
Flexible Cob LED Filament
Makerguides.com is a participant in the Amazon Services LLC Associates Program, an affiliate advertising program designed to provide a means for sites to earn advertising fees by advertising and linking to products on Amazon.com. As an Amazon Associate we earn from qualifying purchases.
What are COB LED Filaments
COB LED Filaments, or Chip-on-Board LED Filaments, are a type of LED technology where multiple LED chips are mounted directly onto a substrate to form a single module.
This design allows for a higher density of LEDs in a compact space, resulting in a brighter and more uniform light output. The COB technology also provides better thermal management, ensuring the LEDs operate efficiently and have a longer lifespan.
Flexible and Rigid Filaments
In addition to the common flat, rectangular arrangements, COB LEDs are also produced in the shape of rigid or flexible filaments. The picture below shows some rigid COB LED filament stripes in different colors.

Note that while they are rigid they are also brittle and break easily. You have to handle them with care and can’t put any mechanical load on them.
When mounted on a flexible substrate LED filaments become flexible, wire-like lighting elements. The following picture shows a flexible COB LED filament stripe.
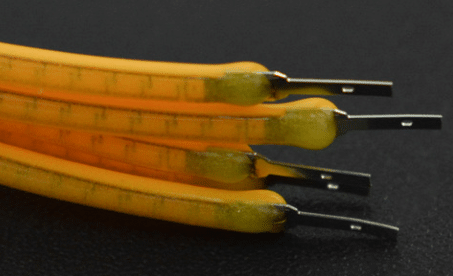
If you look closely then you can see the individual LEDs within a COB LED filament. See picture below
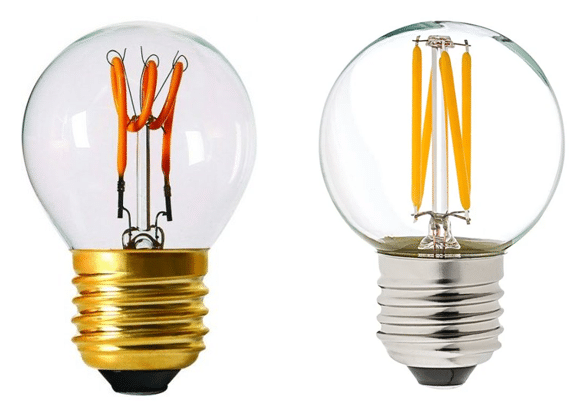
COB LED filaments are now often used in retro light bulbs, since they appear similar to the tungsten wire filament of traditional light bulbs. The example below shows two lightbulbs using flexible and rigid COB LED filaments.
In the socket of the light bulb is a small circuit that transforms the 110V/220V of the mains power supply voltage to the much lower voltage that the COB LED Filament consumes. The circuit also controls the current flow. More about that later.
Specification
The COB LED Filament, I am using in this project is 130mm long, runs on 2.7-3.3V of DC and the maximum current is 100mA. For higher currents and voltages the LEDs will quickly burn out.
Note that LED Filament have polarity! To identify the plus pole, have a close look at both pins. The pin with a small hole in it, is the plus pole. See the picture below.

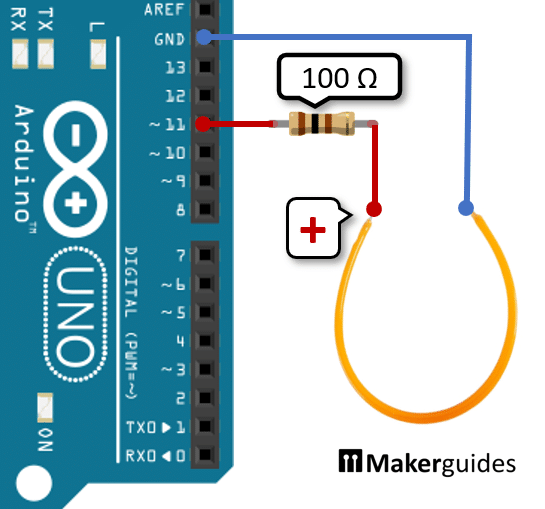
You can easily try out the LED filament by connecting it to a DC power source with the suitable current limiting resistor. For instance, you can use the 5V output of your Arduino and a 100Ω resistor. See the wiring diagram below.
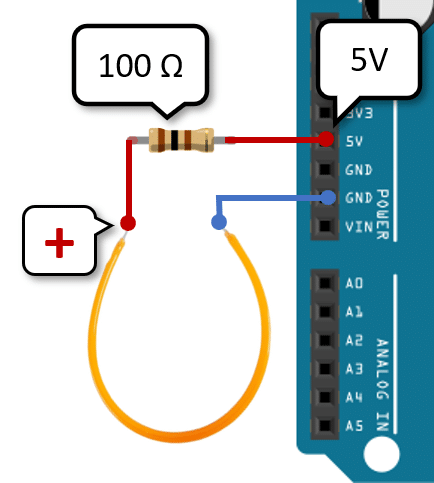
The COB LED Filament has a voltage drop of roughly 3V and with a 5V power supply and a 100Ω resistor we get a current of (5V-3V)/100Ω = 20mA. The COB LED Filament will light up but it won’t be very bright, since we are not providing the full 100mA.
Control LED Filament with Arduino
As you might guess, you could connect and control an LED Filament like any other LED from a GPIO pin of an Arduino as well. A GPIO pin provides 5V and can safely deliver up 20mA (40mA max).
We can therefore use the same circuit as shown above but connect the plus pole of the LED Filament to a GPIO pin (~11), instead of 5V. The minus pole of the LED Filament remains connected to ground (GND). See the connection diagram below.
Now you can control the LED Filament, like any other LED, for instance with the simple Blink example:
const byte ledDriverPin = 11;

void setup() {
  pinMode(ledDriverPin, OUTPUT);
}

void loop() {
  digitalWrite(ledDriverPin, LOW);
  delay(1000);
  digitalWrite(ledDriverPin, HIGH);
  delay(1000);
}
Note that the current limiting resistor is only 100Ω, compared to the 220Ω you usually would choose to drive a normal LED. That is because the voltage drop the LED Filament is about twice as high (≈2.6V) as that as of a standard LED (≈1.3V).
While the circuit above works fine the LED Filament is not very bright due to the low current. However, we cannot safely deliver more than 20mA directly from a GPIO pin. In the next section we therefore use an LED Driver to provide more current to the LED Filament.
Wiring of the LED Filament with Arduino and LED Driver
LED drivers provide power and regulate the current flowing to an LED. They ensure that LEDs receive the right amount of power to operate efficiently and prevent damage from voltage fluctuations. With an LED Driver we can provide enough current to run our LED Filament at full brightness.
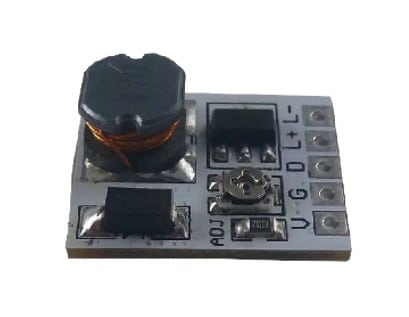
LD24AJTA_MINI LED Driver
I am going to use the LD24AJTA_MINI LED driver board here. It runs on 6-25V and can deliver up to 910mA of output current. For more information have a look at our tutorial on how to Dim High-Power LED with Arduino and LD24AJTA_MINI.
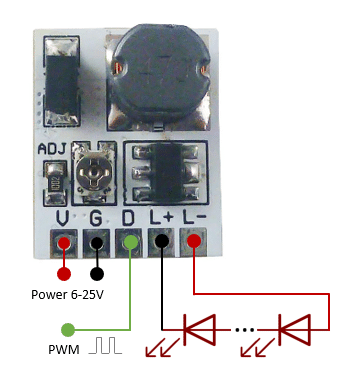
The following picture shows the basic wiring of the LD24AJTA_MINI. As you can see it is very simple. The input power goes to the V and G pins, the LEDs are connected to L+ and L- and the output current can be control via a PWM signal on the D pin.
Since the LD24AJTA_MINI needs at least 6V of input voltage we cannot run it from the 5V pin of the Arduino. In the following, I am therefore using a 9V battery but any other power supply in the 6-25V range that can deliver a current of 100mA would work as well.
Connecting the LED Driver to the Arduino
The following picture shows how to connect the LED Driver to the Arduino and the LED Filament to the Driver.
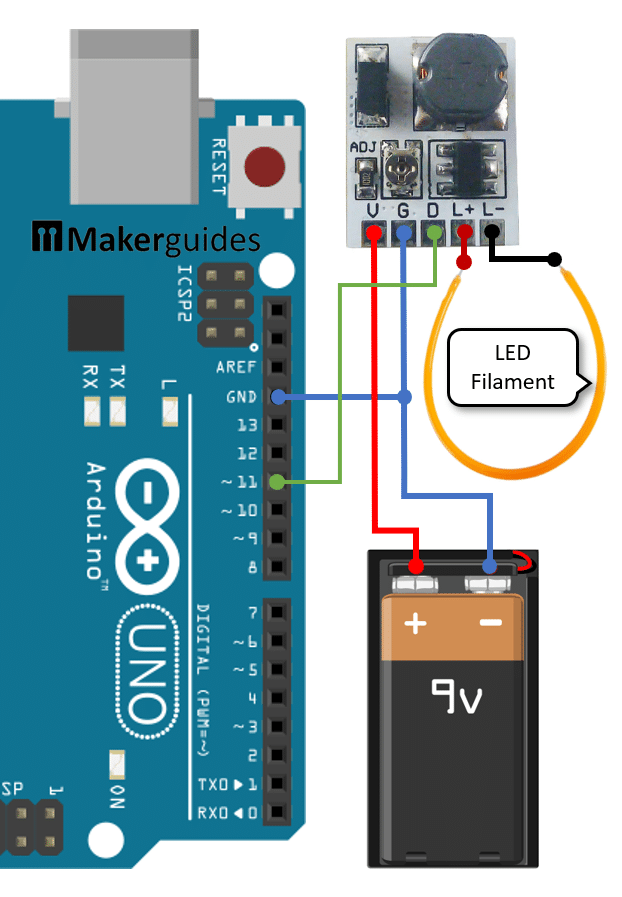
First, we connect the battery to the LED driver. The positive pole (+) needs to be connected to the V pin (red wire) and the negative pole (-) of the 9V battery must be connected to the G pin (blue wire) of the LED driver.
Now, we connect the negative pole of the 9V battery also to the GND pin of the Arduino. This is important! Arduino and LED driver must share the same ground.
Since, we want to control the brightness of the LED Filament we need to use the PWM pin (D) of the LED driver. Connect it to pin ~11 of the Arduino (green wire). Any other PWM output pin would work as well.
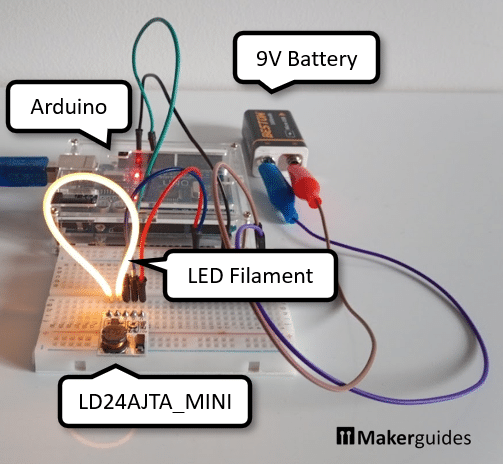
Next, we connect the COB LED Filament to the L+ and L- pins of the LED driver (red and black wire). Watch out for matching polarity here! The picture below show how that circuit looks on a breadboard.
And that’s it. With this circuit we can drive the LED Filament at its maximum current. Even better, you can connect multiple LED filaments in series and the LED Driver will take care of the correct supply voltage.
In the next section we have a look at the code needed to control the LED Filament.
Code to Control the LED Filament
We are going to use a PWM signal on GPIO pin ~11 to control the brightness of the LED Filament. However, we have to be a bit careful here. The LD24AJTA_MINI can deliver up to 910mA of output current, which is much higher than the 100mA maximum current of the LED Filament.
Which means we cannot fully switch on the GPIO pin. I slowly increased the PWM value and for a value of 60 (analogWrite(pin, 60)), I measure an output current of 86mA and a voltage of 2.4V at the LED Driver output. This current is below the 100mA maximum current of the LED Filament. Which means we can write a PWM value of up to 60 but not beyond that.
The following code example shows the typical Blink program. Instead of digitalWrite, I am using analogWrite and I limit the maximum value to 60 but everything else remains the same.
// Blink for LED filament and
// D24AJTA_MINI LED Driver
const byte ledDriverPin = 11;

void setup() {
  pinMode(ledDriverPin, OUTPUT);
}

void loop() {
  analogWrite(ledDriverPin, 60); # 60 max!
  delay(1000);
  analogWrite(ledDriverPin, 0);
  delay(1000);
}
This code will switch on the LED Filament on for a second (1000msec), then off for another second, and then the cycle repeats. As mentioned above, make sure not to go beyond a value of 60 for analogWrite, otherwise the output current will be too high and you will damage/burn the LED filament.
Dimming the LED Filament is easily done as well. The following code example slowly increases the brightness from zero to maximum (60), with a delay of 100msec between each increment. When the maximum is reached, the LED Filament is switched off for one second (1000msec).
// Dimming for LED filament and
// D24AJTA_MINI LED Driver
const byte ledDriverPin = 11;

void setup() {
  pinMode(ledDriverPin, OUTPUT);
}

void loop() {
  for(int b=0; b<60; b++) {
    analogWrite(ledDriverPin, b);  # 60 max!
    delay(100);
  }
  analogWrite(ledDriverPin, 0);
  delay(1000);
}
And there you go! Now you know how to control flexible COB LED Filaments with Arduino using an LD24AJTA_MINI LED driver.
Enjoy ; )
Conclusions
In this blog post, we learned how to control a flexible COB LED Filament using an Arduino and an LED driver (LD24AJTA). By understanding the wiring connections and utilizing the provided code examples, you can easily integrate this LED filament into your projects.
By following the steps outlined in this guide, you can create dynamic lighting effects and enhance the visual appeal of your projects. Experiment with different brightness levels and patterns to customize the LED filament to suit your specific needs.
Frequently Asked Questions
Q: Can I use a different LED driver with the COB LED Filament and Arduino setup?
A: Yes, you can use a different LED driver as long as it is compatible with the specifications of the COB LED Filament and can be controlled by the Arduino.
Q: How do I know if the wiring is correct?
To ensure the wiring is correct, double-check the connections between the COB LED Filament, LED driver, and Arduino against the provided circuit diagram. Test the setup with a simple code to verify that the LED responds as expected.
Q: Can I adjust the brightness of the COB LED Filament using the Arduino?
Yes, you can adjust the brightness of the COB LED Filament by modifying the PWM signal in the Arduino code. By changing the duty cycle of the PWM signal, you can control the brightness of the LED.
Q: Can I power the COB LED Filament directly from a GPIO pin?
A: The LED Filament used here draws 100mA at full brightness. That is too much for a GPIO pin, with a recommended maximum current of 20mA. You can use a current limiting resistor of 100Ω, but the LED Filament will not be a full brightness.
Q: Can I power multiple COB LED Filament?
A: Yes, you can power multiple LED Filaments if you use the LED driver. Just connect them in series and the LED Driver will take care of the right current and voltage. If you want to control multiple LED Filaments individually, you will need multiple LED drivers connected to different GPIO pins.
Q: Can I power longer COB LED Filament?
A: The longer the LED Filament the higher the current it need for full brightness. The LED driver will take care of that but you have to make sure to adjust the PWM value accordingly and check whether the LED driver can deliver sufficient current.
Stefan is a professional software developer and researcher. He has worked in robotics, bioinformatics, image/audio processing and education at Siemens, IBM and Google. He specializes in AI and machine learning and has a keen interest in DIY projects involving Arduino and 3D printing.