
There are several ways to put an Arduino to sleep. Knowing how to wake up the Arduino enables you to program exceedingly power-efficient and user-friendly projects!
This tutorial will show you several ways to put Arduino to sleep and how to wake up the Arduino once it is put into sleep mode.
You will see the various sources of wakeup events, how to configure the wakeup events, and what the differences are between them.
Knowing wakeup sources can come a long way in creating power-efficient projects. This enables you to develop projects which can be responsive yet battery friendly.
Let’s get started!
Components Needed To Put Arduino Into Sleep Mode
Hardware Components
- Arduino Uno Rev3 x 1
- Pushbutton x 1
- Dupont wire x 2
- Arduino USB cable (for powering and programming) x 1
- LED x 1
Software
Makerguides.com is a participant in the Amazon Services LLC Associates Program, an affiliate advertising program designed to provide a means for sites to earn advertising fees by advertising and linking to products on Amazon.com. As an Amazon Associate we earn from qualifying purchases.
What Are Sleep Modes?
You can use the sleep modes to put the Arduino into low power modes, where only essential blocks of the MCU will be active while the rest of the peripherals are off.
Practical application of low power modes helps you save on the current consumption.
Once you reduce the power consumption, you can use smaller batteries, or the batteries will come for a long time.
Either way, you save on costs and make your product smaller.
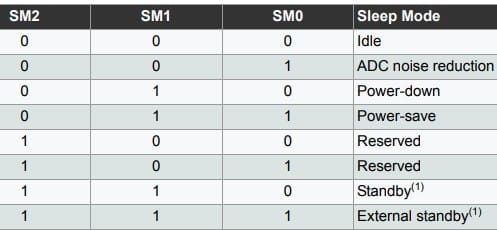
There are six different sleep modes (low power modes). They are
- Idle mode
- ADC noise reduction mode
- Power Down Mode
- Power Save Mode
- Standby Mode
- Extended Standby Mode
I will give you critical insights into the low power modes in the coming sections, which will help you make the right decision about the sleep modes and get maximum juice from your batteries.
Key Points About Low Power Modes In Arduino
This section will share key points about all the sleeping modes. Following the key points are the wake-up methods available for each low power mode.
Note that all modes are not available in all the MCUs. You can refer to the MCU datasheet to see the methods present in the particular MCU.
The details will be in the power management and sleep modes chapters.
To set the Arduino into one of the power modes, you can use SM[2:0] in the SMCR (sleep mode control) register.
How to wake up Arduino from Idle Mode?
1) Idle Mode Key Points
- CPUCLK and FLASHCLK will be halted
- Other clocks (ADC, UART, etc.) will be running
- If the ADC is enabled, a conversion starts automatically after entering Idle mode
- You can disable ADC manually to reduce the power consumption further
- SM[2:0] = 000
2) Wakeup sources when Arduino is in Idle Mode
- External Trigger Interrupts
- Internal interrupts such as timer overflow, UART transmission complete, etc.
- Analog comparator
How to wake up Arduino from ADC Noise Reduction Mode?
1) ADC Noise reduction Mode Key Points
- CPUCLK , I/OCLK , and FLASHCLK will be halted
- Helps in reducing the noise in the ADC section
- You can get better ADC resolution due to reduced noise
- SM[2:0] = 001
2) Wakeup sources when Arduino is in ADC Noise reduction Mode
- ADC conversion complete event
- External Reset
- Watchdog system reset
- Watchdog interrupt
- Brownout reset
- 2 wire address match
- Pin change interrupt
- External level interrupt (INT0 / INT1)
How to wake up Arduino from Power-down Mode?
1) Power-down Mode Key Points
- MCU enters power-down mode
- The external oscillator is stopped
- Halts all generated clocks
- There will be a delay between the wakeup event and resuming normal mode (to allow the clock to settle)
- SM[2:0] = 010
2) Wakeup sources when Arduino is in Power-down Mode
- External Reset
- Watchdog System Reset
- Watchdog interrupt
- Brownout reset
- Pin change interrupt
- External level interrupt (INT0 / INT1)
How to wake up Arduino from Power-save Mode?
1) Power-save Mode Key Points
- All features are common to power-down mode except the Timer/counter2 is enabled; it will continue running.
- If the timer feature is not used, use Power-down mode itself
- SM[2:0] = 011
2) Wakeup sources when Arduino is in Power-save Mode
- Same as power-down mode
- Timer/counter2 overflow interrupt /compare output interrupt
How to wake up Arduino from Standby Mode?
1) Standby Mode Key Points
- Standby mode is the same as power-down mode, except that the external oscillator will be running
- Wakeup time will be less ( 6 clock cycles)
- SM[2:0] = 110
2) Wakeup sources when Arduino is in Standby Mode
- Similar to Power-down mode
The following section gives you the step-by-step procedure to install the low-power Arduino library.
Using the “LowPower” library, you can quickly put Arduino into sleep after configuring the wake-up options accordingly.
Step-By-Step Procedure To Install Low-power Arduino Library
You can install the LowPower library in Arduino using the steps below.
Arduino sketch allows you to easily add the downloaded library.
I will show you how to add the libraries in the Arduino.
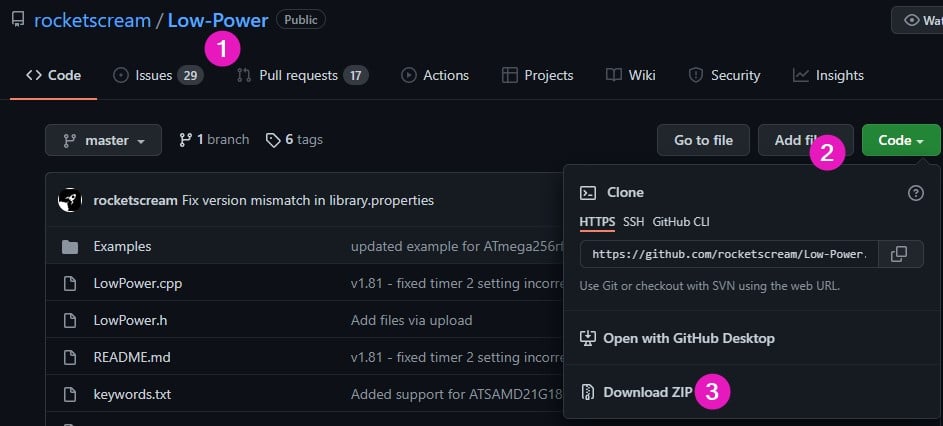
Download the LowPower Library
The Low Power library is on GitHub, follow the easy steps below to download the zip file
Visit the GitHub link.
You will find the option to download the zip file option under the Code button.
The image below gives you an easy way to locate the download zip option.
Install the low power Library
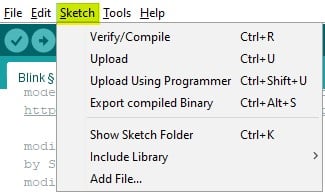
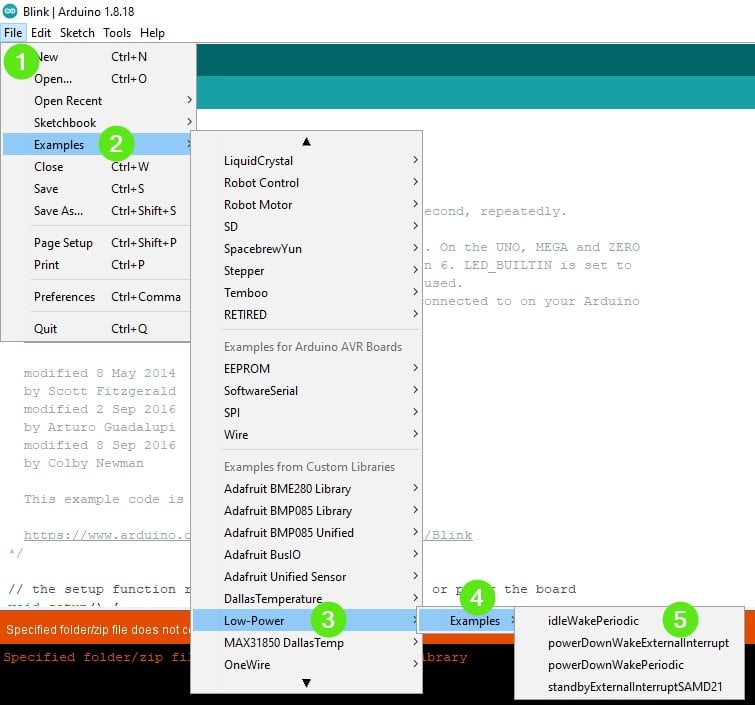
1) Open the Arduino application and click on the Sketch option in the Menu bar
2) Select the option (to install the library as a zip file) using the steps as shown in the image below
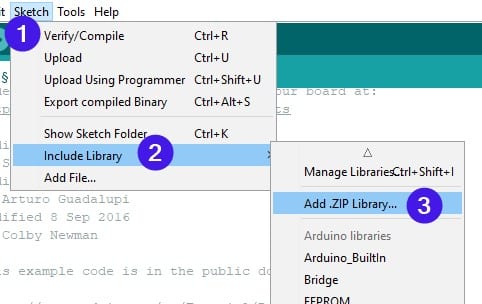
3) Browse the download file and select it

Congratulations, now you have successfully installed the low power library. In the next step, I will show you how to add the library to your project.
4) Add the library to your project
To add the library to the project, Goto Sketch → Include Library → Low-Power (under contributed library section)
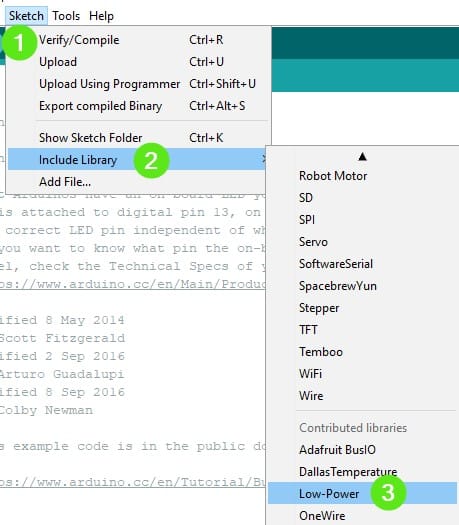
5) Verify that the library is added
If the addition is succely, you can see the below line in your code.
#include "LowPower.h"
In the below image, you can see that the library is “included” in the code.
Now you are ready to use the library.

I will show you how to configure various wake-up sources in the following sections.
Example Project 1 – Waking Up From Powerdown Mode
In this project, the Arduino will go to sleep for 2 seconds. This enables you to test two things. Firstly, the sleep timer of 2 seconds. Secondly, you can measure the sleep current as well.
In this project, you will blink the onboard LED on the Arduino UNO every 2 seconds. The LED is connected to PIN 13 on the Arduino.
The conventional way of blinking the LED is to turn on the LED, followed by 2 seconds of delay, then turn off the LED, and finally 2 seconds of delay further.
This conventional method wastes power in the delay function.
In this project, you will put the Arduino to sleep for 2 seconds.
By doing this, you are saving battery life significantly.
Arduino Code
#include "LowPower.h"

void setup()
{
  pinMode(13,OUTPUT);
}

void loop()
{
  digitalWrite(13,HIGH);
  delay(2000);
  digitalWrite(13,LOW);
  LowPower.powerDown(SLEEP_2S, ADC_OFF, BOD_OFF);
}
How are you saving the battery life?
Here is how. The active current of the MCU ATMEGA328P present on the Arduino UNO is about 14 mA at 5 V and 16 MHz. The sleep current is about 6 uA.
Since we use sleep mode 50 % of the time in our code, the average current consumption is about 7 mA.
If you hadn’t used the sleep mode, then the current consumption of the MCU will always be 14 mA.
If you see, there is about a 50% reduction in the average current in the low power mode.
Hence, the battery life is almost doubled!
Let us examine the function closely.
LowPower.powerDown(SLEEP_2S, ADC_OFF, BOD_OFF);
In this function, we send the first parameter as the time. In this example, the parameter is set to 2 seconds. The DC is turned off.
This will further help to reduce the power, as we saw in the earlier section.
In this case, the Arduino will be woken up by the timer interrupt internally.
Waking up with the Timer function is a valuable way to plan the wake-up event in your project.
Using the timer function is a synchronous wake-up event since you plan when to wake up the Arduino before you put it to sleep.
Example Project 2 – Waking Up From Power-down Mode
In this example project, I will show you how to wake up Arduino from sleep using an external wake-up event.
Unlike the previous example, this is an asynchronous event. We don’t know when the event will occur.
When the event occurs, you will perform a particular job and put back the Arduino to sleep again.
Arduino Code
#include "LowPower.h"

// Use pin 2 as wake up pin
const int wakeUpPin = 2;

void wakeUp()
{
    // Just a handler for the pin interrupt.
}

void setup()
{
    // Configure wake up pin as input.
    // This will consumes few uA of current.
    pinMode(wakeUpPin, INPUT);
}

void loop()
{
    // Allow wake up pin to trigger interrupt on low.
    attachInterrupt(0, wakeUp, LOW);

    // Enter power down state with ADC and BOD module disabled.
    // Wake up when wake up pin is low.
    LowPower.powerDown(SLEEP_FOREVER, ADC_OFF, BOD_OFF);

    // Disable external pin interrupt on wake up pin.
    detachInterrupt(0);

    // Do something here
    // Example: Read sensor, data logging, data transmission.
}
In this example, the below line.
LowPower.powerDown(SLEEP_FOREVER, ADC_OFF, BOD_OFF);
You put the Arduino into sleep forever. It means, unless there is an external event, we don’t wake up the Arduino.
This is useful when you want to perform an action only when there is a desired external event.
This is very helpful for you in projects such as
- a timed RTC module that will give an interrupt to the Arduino. Arduino can then, do some predefined tasks (example: sending the temperature data, or measuring the moisture in the soil)
- Turning on the powerful Pi computer when there is a motion detected using the motion sensor
The below part of the code doesn’t have any purpose other than a placeholder.
If you want, you can execute a few instructions in the function.
void wakeUp()
{
    // Just a handler for the pin interrupt.
}
The instruction below disables the interrupt so that the Arduino doesn’t call the wakeUp() function continuously.
Once the planned tasks are done, you again enable the external interrupt in the loop function.
  // Disable external pin interrupt on wake up pin.
    detachInterrupt(0);
You can find more projects in the examples section of the library. You can find them here.
FAQs On Waking Up Arduino From Sleep Mode
Here are the most frequently asked questions about sleep modes and wakeup methods for an Arduino
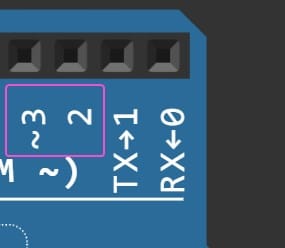
What are the possible pins one can use to trigger the external wake-up events with Arduino?
For the external interrupt option, Arduino UNO supports wake-up events on two pins.
They are PIN 2 and PIN 3
Which power mode consumes the least power with Arduino?
The Power-down mode takes the least power, in other words, it provides the maximum battery life.
There are some side effects such as slower wakeup time since the clock will take some time to stabilize.

In the image above, you can see that, at room temperature, the power consumption is very close to 1 uA or less.
Conclusion
In this article, we learned several ways of waking up Arduino from sleep. I have given a couple of example templates that you can use for your future projects.
It will be a great experience to learn what projects you are working on and how you will use the sleep modes. You can let me know in the comments section.
I am sure that you can build your next Arduino project involving sleep modes and wakeup in the way you need it to be.
If you have any doubts or questions, you can always reach out to me using the comments section below.
What would you like to read about next?
Do you have any suggestions on the topics I should write about more?
Kindly let me know!

I am Puneeth. I love tinkering with open-source projects, Arduino, ESP32, Pi and more. I have worked with many different Arduino boards and currently I am exploring, Arduino powered LoRa, Power line communication and IoT.
saad
Sunday 29th of January 2023
thank you very much
Frans
Wednesday 11th of January 2023
Hello, Interesting article. I want to put Arduino in Power Down. I want to wake it up by a switch which goes open. When the switch is closed the Arduino must go Power Down. Can you help me with the code so I can try this? I’m a beginner. Thanks, Frans