Welcome back to our Arduino blog! Today, we are diving into the world of displays for Arduino projects. Whether you are a beginner or an experienced maker, having a display can greatly enhance your project. From simple character LCDs to vibrant color TFT screens, there is a wide range of display options available. In this blog post, we will give you an overview of the different types of displays and their main features.
Makerguides.com is a participant in the Amazon Services LLC Associates Program, an affiliate advertising program designed to provide a means for sites to earn advertising fees by advertising and linking to products on Amazon.com. As an Amazon Associate we earn from qualifying purchases.
LCD displays
Liquid Crystal Display (LCD) is a display technology that uses liquid crystals sandwiched between two sheets of polarizing material. The crystals act as both a mirror and a light source in response to electric current, which allows them to display images or text on a screen.
LCDs are widely used in various applications due to their low power consumption, high brightness, and excellent color reproduction. They are typically used in Arduino projects that require a simple, reliable, and cost-effective display solution.
However, LCDs also have their drawbacks. They have a relatively slow refresh rate, which can result in motion blur in fast-moving images. They are also not very flexible and can be damaged if bent or twisted.
The picture below shows a typical 20×4 LCD display that can be controlled via an I2C interface. We have multiple tutorials on how to control an LCD display with an Arduino or an ESP32.
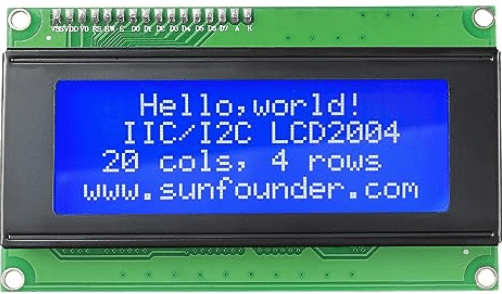
SunFounder IIC I2C TWI Serial 2004 20×4 LCD Module Shield
Key considerations
LCD displays typically operate at 5V, however, some displays may require a different voltage, so it’s important to check the specifications of your particular display.
Some LCD displays come with a built-in backlight, which can consume a significant amount of power.
There are several libraries available for interfacing LCD displays with Arduino, such as the LiquidCrystal library, which simplifies the code required to control the display a lot.
Graphical LCD displays
Graphical LCD displays are LCD displays that, in addition to text, can also display graphics or even animations. The strength of graphical LCD displays lies in their ability to provide a visual interface with a high level of detail, which is especially useful in projects where data visualization is important.
However, these displays also have some weaknesses. They are generally more complex to use than other types of displays, as they require the use of a special library and more code to control. Additionally, they tend to consume more power than simpler displays, which can be a concern in battery-powered projects. Graphical LCD displays are typically used in projects where detailed visual output is required, such as data loggers, weather stations, or games.
The following picture shows a typical, graphical LCD display with a resolution of 128×64 pixels. See our tutorial on how to control a 128×64 LCD display with an Arduino. There are two common driver chips for graphical LCD displays; for details see the datasheets for the KS0108 and the ST7920.
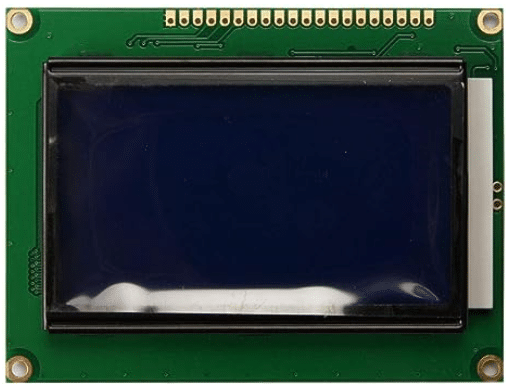
Ximimark 1PCS 5V 12864 LCD Display Module 128×64 Dots Graphic Matrix LCD Blue Backlight
Key Considerations
Make sure that the display is compatible with the voltage level of your Arduino. Most Arduino boards operate at either 5V or 3.3V. You need to choose a display that can work with these voltages.
You also need to consider the memory requirements of the display. Graphical LCD displays often require a significant amount of memory to store the screen buffer, which can be a problem on memory-limited Arduino boards.
OLED displays
Organic Light Emitting Diode (OLED) displays are a popular choice for Arduino projects due to their high contrast ratios and wide viewing angles. They are self-emissive, meaning each pixel emits its own light, resulting in vibrant colors and deep blacks. OLED displays also have a faster refresh rate compared to other display types, making them ideal for projects that require quick response times.
However, OLED displays are not without their weaknesses. They tend to consume more power compared to LCD displays, especially when displaying bright or white content. This can be a concern in battery-powered projects. Additionally, OLED displays have a shorter lifespan compared to other types of displays due to the organic materials used in their construction. Over time, these materials degrade, resulting in color shifts and loss of brightness.
OLED displays are commonly used in wearable tech, handheld devices, and any projects that require high contrast and color accuracy. They are also suitable for projects that require a fast refresh rate, such as mini gaming consoles or animation displays.
Below you see a typical color OLED display module. See our tutorial on how to interface an Arduino with an OLED display. Common driver chips are the SSD1306 or the SH1106.
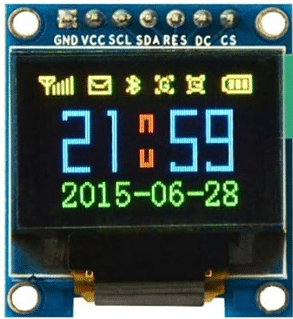
HiLetgo 0.95″ Inch 7 Pin Colorful 65K SPI OLED Display Module SSD1331 96 * 64
Key considerations
Ensure that the display operates at a voltage compatible with your Arduino board. Most OLED displays operate at 3.3V or 5V, but it’s always best to check the specifications.
Typically, OLED displays use either SPI (Serial Peripheral Interface) or I2C (Inter-Integrated Circuit) for communication. Make sure you buy the one you want.
Also consider the power consumption of the display. OLED displays can draw significant power, especially when displaying bright or white content.
TFT displays
Thin Film Transistor (TFT) displays are a type of LCD panel that are commonly used in Arduino projects. The main strength of a TFT display is its ability to provide full-color visuals, making it ideal for projects that require complex and detailed graphics. They have a high resolution and are capable of displaying images, animations, and even videos.
However, the main drawback of TFT displays is that they consume more power compared to other types of displays. This is because each pixel in a TFT display is illuminated individually, which requires a significant amount of energy. Therefore, they may not be suitable for battery-powered projects or applications where power efficiency is a priority.
Typically, TFT displays are used in Arduino projects that require a sophisticated user interface, such as digital photo frames, smart home controllers, or portable game consoles. They are also often used in educational settings, as they can provide a visual and interactive way to learn about programming and electronics.
You can see a picture of a typical TFT display below. For more details see our tutorial on how to connect a TFT display with an Arduino. Two common driver chips for TFT displays are the ILI9341 and the ST7735. See their datasheets for details.
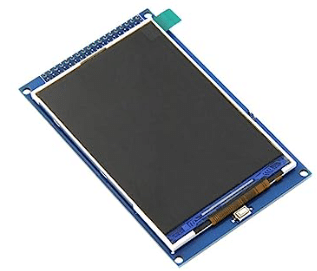
HiLetgo 3.5″ TFT LCD Display ILI9486/ILI9488 480×320 36 Pins
Key Considerations
Firstly, you should ensure that the display is compatible with the voltage of your Arduino board. Most TFT displays operate at 3.3V, but some models may require 5V.
Secondly, most TFT displays use the SPI or the 8-bit parallel interface. The SPI interface is easier to use and requires fewer pins, but it is slower than the 8-bit parallel interface. If your project requires fast screen updates, you may want to choose a display with an 8-bit parallel interface.
Keep in mind that higher resolution displays will require more memory and processing power from the Arduino, which may affect the performance of your project.
7-segment displays
7-segment displays are among the simplest and most commonly used display types for Arduino. They are named for their seven individually lit segments that can be combined to represent different characters or symbols, most typically numbers and a limited set of letters.
The strengths of 7-segment displays lie in their simplicity, low cost, and low power consumption. They are easy to use and interface with an Arduino, making them a great choice for beginners and for projects where only a small amount of data needs to be displayed. They also have a high visibility and can be read from a distance, which is advantageous in many applications.
The main weakness of 7-segment displays is their limited character set. They can only display numbers and a limited set of letters, which can be a constraint in projects that require displaying more complex information.
Typical applications of 7-segment displays include digital clocks, timers, counters, calculators, and any application that requires the display of numerical data.
Below you will find the image of a 7-segment display with 4 digits. We have several tutorial on how to use 7-segment displays with an Arduino or ESP32.
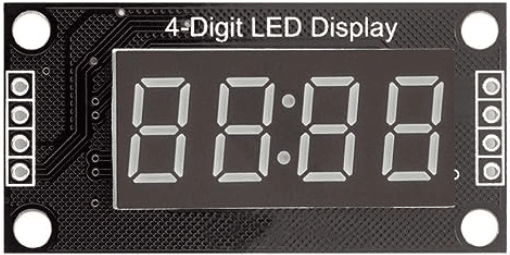
diymore TM1637 0.56″ LED Display 7 Segment 4 Digit Serial Driver Board
Key considerations
7-segment displays typically operate at 5V, which is the same as the operating voltage of most Arduino boards. However, always check the specifications of your particular display to ensure it is compatible with your Arduino.
Each segment of the display draws a certain amount of current. Make sure your Arduino can supply enough current for all segments you plan to light up simultaneously.
Each segment of the display requires a separate control pin on the Arduino. This can quickly use up a lot of pins, especially for projects that require multiple displays. Consider using a display driver IC or a multiplexing technique to reduce the number of pins required.
The brightness of the display depends on the current supplied to the segments. You may need to use resistors to limit the current and adjust the brightness to a suitable level.
If you are multiplexing the display, you need to refresh it at a high enough rate to prevent flickering. The exact rate depends on the number of digits in the display.
Dot matrix displays
Dot matrix displays are a versatile display option that utilizes a grid of LEDs to present alphanumeric characters and simple graphic symbols. This display type is quite popular due to its flexibility and cost-effectiveness. A significant advantage of dot matrix displays is their ability to display a wide variety of characters and symbols, unlike segment-based displays that are limited to certain shapes. Moreover, they are known for their high visibility and brightness, which makes them suitable for outdoor use and in bright environments.
However, dot matrix displays do come with their own set of weaknesses. They are more complex to control compared to other display types due to the larger number of individual LEDs that need to be managed. This can also lead to increased power consumption, especially for larger displays. Furthermore, the resolution of dot matrix displays is usually lower than that of other display types like LCDs or OLEDs.
In terms of applications, dot matrix displays are commonly used in a wide range of devices such as digital clocks, electronic billboards, railway departure indicators, and more. They are also frequently used in DIY projects with microcontrollers like Arduino due to their simplicity and versatility.
The picture below shows a typical dot matrix module. Two common driver chips for these modules are the MAX7219 and HT16K33 chip. Have a look at their datasheet. We have a tutorial on how to connect a dot-matrix module with a MAX7219 driver to an Arduino.
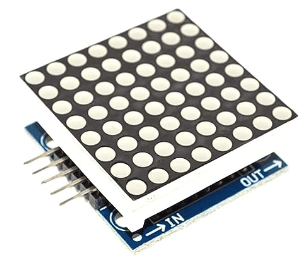
ALAMSCN MAX7219 Dot Matrix Module 32×8 4 in 1 LED Display Modules 5Pin Wires
Key Considerations
As usual, ensure that the voltage requirements of the display match the output of the Arduino. Most dot matrix displays operate at 5V, which is compatible with standard Arduino boards.
Consider the number of pins required to control the display. Dot matrix displays often require a significant number of pins for control, which can limit the number of other components that can be connected to the Arduino.
Lastly, keep in mind the power consumption of the display. As mentioned earlier, dot matrix displays can consume a significant amount of power, especially when all LEDs are lit. This can quickly drain batteries in portable projects, so it’s important to plan power management carefully.
LED matrix displays
LED Matrix Displays are essentially larger Dot matrix displays with more dots. This type of display is composed of a grid of LEDs that can be individually controlled to display a wide range of patterns, symbols, and even text. They are typically available in single color or RGB variants, with the latter providing a full spectrum of colors for each LED.
The strengths of LED Matrix Displays lie in their brightness, wide viewing angle, and the ability to create dynamic and colorful visual effects. They can be used in low-light or outdoor environments where other types of displays may not be as effective.
LED Matrix Displays are commonly used in digital advertising boards, event displays, and DIY projects that require visual output. They can also be found in a variety of consumer electronics, such as clocks, music players, and gaming devices. Below you can see a picture of a LED display.
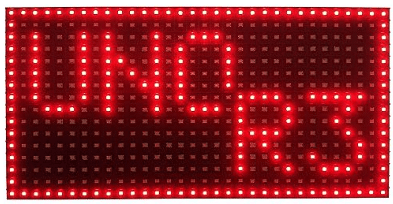
EEEEE P10 Red LED Panel Display Large Size 32cm X 16cm, 512 pcs of LED, Each Individual addressable
Key Considerations
LED Matrix Displays consume a significant amount of power, especially when many LEDs are lit up at the same time.
Also, since each LED in the matrix can be individually controlled, you’ll need to manage a lot of pins if you’re directly connecting it to the Arduino. This can be mitigated by using a driver or controller board, which can simplify the wiring and the code needed to control the display.
Nextion displays
Nextion displays are advanced Human Machine Interface (HMI) panels that are used in a wide range of applications. They are known for their ease of use and rich features. One of the key strengths of Nextion displays is that they offload a lot of work from the microcontroller. The display itself handles touch events, animations, button presses, and more, freeing up resources on the Arduino. Furthermore, they come with a user-friendly editor that allows you to create visually appealing interfaces with buttons, sliders, progress bars, and more.
However, they do have their weaknesses. Nextion displays are more expensive than other Arduino compatible displays. They can also be overkill for simple projects that only require a basic display.
Nextion displays are typically used in applications where a rich user interface is needed, such as home automation systems, industrial controls, and DIY projects that require a sophisticated interface. See a picture of a Nextion display below.
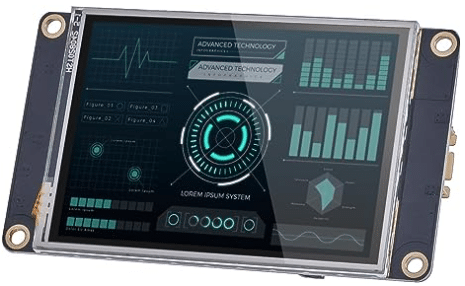
Nextion 2.8″ HMI Display NX3224K028 Resistive LCD-TFT Touch Screen 320 * 240, Nextion Display with RTC Function and 8 Digital GPIOs
Key Considerations
Make sure the correct voltage is applied. Most Nextion displays run on 5V, but always check the specifications of your particular model.
Nextion displays use a serial interface to communicate with the Arduino. Make sure the RX and TX pins of the display are correctly connected to the Arduino.
Finally, while the Nextion editor is powerful, it has a steep learning curve, especially for beginners.
E-ink displays
E-ink displays, also known as electronic paper displays, are a popular choice for Arduino projects due to their low power consumption and excellent readability under direct sunlight. These displays can retain the displayed image even when power is disconnected, making them ideal for projects requiring minimal power usage.
Typical applications of E-ink displays in Arduino projects include e-readers, digital signage, smart labels, and any project where long-term static display with minimal power usage is required.
Below you see a picture of a three color E-ink display. For more details have a look at our tutorial on how to interface an E-ink display with an Arduino.
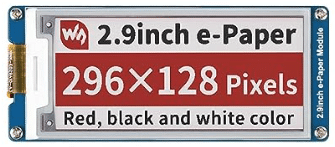
Three Color 2.9inch E-Ink Display Module (B), 296×128 Resolution 3.3V/5V E-Paper
Key considerations
E-ink displays typically operate at 3.3V!. Make sure your Arduino board can supply this voltage level to avoid damaging the display. Note, that not all E-ink displays are supported by Arduino libraries.
The refresh rate of these displays is slow compared to other types, which means they are not suitable for projects requiring fast screen updates. Also, most E-ink displays only support grayscale, limiting their use in projects that require color displays.
Touchscreen displays
Touchscreen displays are typically TFT displays with an additional screen layer to detect touches. Most touchscreens are resistive or capacitive. Where, resistive touchscreens are pressure-sensitive and can be used with gloves, while capacitive touchscreens are more sensitive and provide a better user experience.
The strengths of touchscreen displays lie in their interactivity and versatility. They can be used to create a wide range of applications, from simple button interfaces to complex graphical user interfaces. They are also capable of displaying a wide range of colors and graphics, making them ideal for visually rich applications.
Typical applications for touchscreen displays include home automation systems, interactive kiosks, and handheld devices. They can also be used to create custom control panels for a variety of applications. For more details see our tutorial on how to interface a TFT touchscreen with an Arduino.

ELEGOO UNO R3 2.8 Inches TFT Touch Screen with SD Card Socket
Key Considerations
You need to ensure that the display is compatible with your Arduino board. Some touchscreen displays may require a specific type of Arduino board or additional hardware to function properly.
Programming a touchscreen display can be more complex than programming other types of displays, especially if you want to create complex user interfaces.
Finally, touchscreen displays can be sensitive to environmental conditions such as temperature and humidity, so they may not be suitable for all applications.
Summary
In this blog post, we provided an overview of the various types of displays that are commonly used with Arduino’s or similar MCUs. We covered graphical LCD displays, OLED displays, TFT displays, 7-segment displays, dot matrix displays, LED matrix displays, Nextion displays, E-ink displays, and touchscreen displays.
Graphical LCD displays are versatile and capable of displaying complex graphics and text. OLED displays, on the other hand, offer vibrant colors, high contrast, and excellent visibility from different angles. TFT displays provide full-color graphics and are commonly used in multimedia applications.
For simple numeric displays, 7-segment displays are a popular choice. They can display numbers and some letters by illuminating different segments. Dot matrix displays, on the other hand, consist of multiple LEDs arranged in a grid, allowing for the display of both numbers and characters.
LED matrix displays take dot matrix displays a step further by allowing you to control individual LEDs, making them perfect for scrolling text, animations, and graphics. Nextion displays come with a built-in touch interface, making them ideal for creating interactive projects with graphical user interfaces.
E-ink displays mimic the appearance of ink on paper and are known for their low power consumption and readability in various lighting conditions. Lastly, touchscreen displays combine a display and touch input in one, enabling users to interact directly with the screen.
By understanding the characteristics, advantages, and limitations of each display type, you can make an informed decision when choosing the right display for your project. Whether you’re looking for high-resolution graphics, energy efficiency, touch capabilities, or simplicity, there is a display type that suits your needs.
Stefan is a professional software developer and researcher. He has worked in robotics, bioinformatics, image/audio processing and education at Siemens, IBM and Google. He specializes in AI and machine learning and has a keen interest in DIY projects involving Arduino and 3D printing.