Introduction
Welcome to the C++ Style Guide for Arduino projects! In this guide, we will explore the best practices and coding standards for C++ programming in the context of Arduino development. Whether you are a beginner or an experienced developer, this guide will provide you with valuable tips and guidelines to improve your Arduino coding style.
Arduino projects often involve writing C++ code to control various hardware components and create interactive applications. By following a consistent coding style and adhering to established conventions, you can ensure that your code is readable, maintainable, and efficient.
In this comprehensive guide, we will cover a wide range of topics related to C++ programming for Arduino projects. From naming conventions and indentation to error handling and memory management, we will discuss key aspects of coding in C++ for Arduino. Additionally, we will explore techniques for organizing files, managing dependencies, testing, debugging, and optimizing performance.
By the end of this guide, you will have a solid understanding of the C++ programming guidelines specific to Arduino development.
C++ Naming Conventions
In this section of the C++ Style Guide for Arduino projects, we will discuss the best practices and coding standards for naming conventions in C++ programming. The naming conventions are an essential part of the C++ guidelines and Arduino coding style, as they help in maintaining the readability and consistency of the code.
Variables
Variables should be named in a way that indicates their purpose. Use a lowercase letter for the first word and capitalize the first letter of each subsequent word. This is often called “camelCase”. For example:
int myVariable;
Constants
Constants should be named using uppercase letters with underscores between words. This makes it clear that their value should not change.
const int MY_CONSTANT = 10;
Functions
Function names should also follow the “camelCase” convention. The name should clearly indicate what the function does.
void calculateSum();
Classes
Class names in C++ programming for Arduino projects should start with a capital letter and follow the “CamelCase” convention.
class MyClass{};
File Names
File names should be in lowercase and can include underscores to improve readability. The filename should relate to the content of the file.
sensors.cpp
Consistency in your Arduino development and C++ programming style is important, so always stick to the conventions you choose throughout your Arduino project.
C++ Indentation and Formatting
In this section, we will discuss some guidelines and tips for C++ indentation and formatting in Arduino development.
Use Consistent Indentation
Consistent indentation helps to visually organize the code and makes it easier to identify blocks of code, such as loops, conditionals, and function definitions. In C++, the recommended indentation style is to use four spaces for each level of indentation.
void myFunction() {
    for (int i = 0; i < 10; i++) {
        if (i % 2 == 0) {
            // Do something
        } else {
            // Do something else
        }
    }
}
Align Code Elements
Aligning code elements, such as variable declarations and function parameters, can greatly improve code readability. By aligning similar elements vertically, it becomes easier to scan and understand the code structure. However, be cautious not to overdo alignment, as it can lead to unnecessarily long lines of code.
int    variableOne = 10;
float  variableTwo = 3.14;
String variableThree = "Hello, World!";

void myFunction(int parameterOne,
                float parameterTwo,
                String parameterThree) {
    // Function implementation
}
Use Braces for Code Blocks
In C++, it is recommended to always use braces, even for single-line code blocks. This practice helps to avoid potential bugs and makes the code more resilient to future modifications.
void myFunction() {
    if (condition) {
        // Do something
    }

    for (int i = 0; i < 10; i++) {
        // Do something
    }
}
Limit Line Length
To ensure code readability, it is advisable to limit the line length to a reasonable number of characters, typically around 80-120 characters. This helps to prevent horizontal scrolling and makes the code easier to read, especially when viewing it on smaller screens or in terminal windows.
Use Whitespace for Clarity
Use whitespace to separate logical sections of code, such as functions or classes. Additionally, add a space between operators and operands to enhance code clarity.
void myFunction() {
    int result = 0;

    for (int i = 0; i < 10; i++) {
        result += i * 2;
    }
}
C++ Comments and Documentation
Comments and documentation ensure that your code is easy to understand and maintain. This section of the C++ Style Guide provides best practices for writing comments and documentation in your Arduino programming.
Single Line Comments
Single line comments start with //. Use them to provide brief explanations of complex code segments. Here’s an example:
// Initialize the LED pin
int ledPin = 13;
Multi-Line Comments
Multi-line comments start with /* and end with */ .Use these for longer explanations or commenting out sections of code. For example:
/*
  This function blinks an LED.
  It turns the LED on, delays for a specified period, then turns it off.
*/
void blinkLED(int pin, int delayPeriod) {
  digitalWrite(pin, HIGH);
  delay(delayPeriod);
  digitalWrite(pin, LOW);
}
Documentation Comments
For more formal documentation, use Doxygen-style comments. These start with /** and end with */. They’re especially useful for functions and classes. For instance:
/**
  * @brief This function blinks an LED.
  * @param pin The pin the LED is connected to.
  * @param delayPeriod The delay period in milliseconds.
  * @return void
  */
void blinkLED(int pin, int delayPeriod) {
  digitalWrite(pin, HIGH);
  delay(delayPeriod);
  digitalWrite(pin, LOW);
}
Commenting Guidelines
When commenting your code, follow these Arduino coding guidelines:
- Write comments in clear, simple English.
- Avoid unnecessary comments. If the code is self-explanatory, don’t comment.
- Update your comments when you change your code. Outdated comments can mislead.
Good comments and documentation are a sign of high-quality C++ programming style. They’re as important as the code itself in Arduino development.
C++ Variable and Constant Declarations
In this section of the C++ Style Guide, we will discuss the best practices and coding conventions for declaring variables and constants when working on Arduino projects.
Use Descriptive and Meaningful Names
When declaring variables and constants, it is important to use descriptive and meaningful names that accurately reflect their purpose. This makes your code more readable and helps other developers understand the intention behind each variable or constant. Avoid using generic names like “x” or “temp” and instead opt for names that provide clear context, such as “sensorReading” or “ledPin”.
Declare Variables Close to Their First Use
To improve code readability and reduce the chances of errors, it is recommended to declare variables as close to their first use as possible. This approach makes it easier to understand the scope and purpose of each variable, as they are introduced when needed. Avoid declaring variables at the beginning of a function or block unless necessary.
Initialize Variables and Constants
Always initialize variables and constants when declaring them. This ensures that they have a defined initial value and helps prevent unexpected behavior or bugs. It is a good practice to initialize variables immediately after declaration, even if the initial value is zero or null. For example:
int sensorReading = 0;
const int ledPin = 13;
Use the Appropriate Data Types
Choose the appropriate data type for each variable or constant based on its purpose and expected range of values. Using the correct data type not only saves memory but also prevents potential issues like overflow or truncation. For example, if a variable will only hold positive values up to 255, it is more efficient to use an uint8_t (unsigned 8-bit integer) instead of an int.
Group Related Variables
When declaring multiple variables that are related or serve a similar purpose, it is a good practice to group them together. This improves code organization and makes it easier to understand the relationship between the variables. For example:
int redPin = 9;
int greenPin = 10;
int bluePin = 11;
Comment on Variable and Constant Usage
Consider adding comments to explain the purpose or usage of variables and constants, especially if their names alone may not provide sufficient context. This helps other developers understand the intention behind each variable and promotes code readability. For example:
// Store the current temperature reading in Celsius
float temperatureCelsius = 25.5;
C++ Function and Class Definitions
In this section, we will discuss the best practices and guidelines for defining functions and classes in C++ when working on Arduino projects.
Function Definitions
When defining functions in C++ for Arduino projects, it is important to adhere to the following guidelines:
Function Naming: Use descriptive and meaningful names for your functions. Follow a consistent naming convention, such as camel case or snake case, to enhance code readability. For example:
void calculateSensorData();
Function Parameters: Clearly define the parameters required by your functions. Use meaningful names for parameters and ensure they are properly documented. For example:
void setLedBrightness(int brightness);
Return Types: Specify the return type of your functions to indicate the data they will produce. For example:
int addNumbers(int a, int b);
If a function does not return any value, use void. See example before.
Class Definitions
When defining classes in C++ for Arduino projects, it is essential to follow these best practices:
Class Naming: Use descriptive and meaningful names for your classes. Follow a consistent naming convention, such as Pascal case, to distinguish classes from functions and variables. For example:
class TemperatureSensor {
  // Class members and methods
};
Class Structure: Organize your class members and methods in a logical and consistent manner. Group related variables and functions together to improve code readability. For example:
class TemperatureSensor {
private:
  int pin;
  float temperature;

public:
  TemperatureSensor(int pin);
  float readTemperature();
};
Constructors and Destructors: Provide constructors and destructors for your classes when necessary. Constructors initialize the class members, while destructors clean up any resources used by the class. For example:
class TemperatureSensor {
public:
  TemperatureSensor(int pin);
  ~TemperatureSensor();
};
Adhering to coding conventions and best practices will greatly enhance the readability and maintainability of your code, making it easier for you and others to work on and modify your Arduino projects.
C++ Control Structures and Loops
Control structures and loops are essential components of C++ programming, especially when working on Arduino projects. They allow you to control the flow of your code and repeat certain actions based on specific conditions. In this section, we will discuss some best practices and guidelines for using control structures and loops in your Arduino projects.
If-else Statements
When using if-else statements, it is important to follow consistent coding standards to improve code readability and maintainability. Here are a few tips to keep in mind:
Always use braces {} to enclose the code block, even if it consists of a single statement. This helps avoid potential bugs and makes the code more readable.
if (condition) {
    // code block
} else {
    // code block
}
Use meaningful variable and function names to enhance code understanding.
if (temperature < threshold) {
    // code block
} else {
    // code block
}
For Loops
For loops are commonly used in Arduino programming to iterate over a range of values or elements. To ensure clarity and consistency, consider the following guidelines:
Declare loop variables outside the loop to avoid unnecessary variable creation and destruction in each iteration.
int i;
for (i = 0; i < 10; i++) {
    // code block
}
Use meaningful loop variable names that describe their purpose.
int sensorValue;
for (sensorValue = 0; sensorValue < 100; sensorValue += 10) {
    // code block
}
While Loops
While loops are useful when you need to repeat a block of code until a specific condition is met. Here are some tips for using while loops effectively:
Ensure that the loop condition is eventually met to prevent infinite loops.
while (condition) {
    // code block
}
Use descriptive variable and function names to improve code comprehension.
while (isButtonPressed()) {
    // code block
}
Switch Statements
Switch statements provide a convenient way to handle multiple cases or conditions. To maintain code consistency and readability, consider the following suggestions:
Always include a default case to handle unexpected or unhandled conditions.
switch (variable) {
    case 1:
        // code block
        break;
    case 2:
        // code block
        break;
    default:
        // code block
        break;
}
Indent the code within each case statement to improve readability.
switch (variable) {
    case 1:
        // code block
        break;
    case 2:
        // code block
        break;
    default:
        // code block
        break;
}
C++ Error Handling and Exception Handling
This section of the C++ Style Guide will provide you with the best practices and coding standards for C++ error and exception handling in Arduino programming.
Error Handling
In C++ programming, error handling is typically done using return codes. Here’s a simple example:
int divide(int a, int b) {
  if (b == 0) {
    return -1; // Error code for division by zero
  }
  return a / b;
}
In this code, if the function encounters an error (division by zero), it returns an error code (-1). This is a basic way to handle errors in C++ programming style.
Exception Handling
In contrast to error handling, C++ guidelines recommend using exception handling when the error is less predictable. Exception handling in C++ is done using try, catch, and throw keywords. Here’s a simple example:
int divide(int a, int b) {
  if (b == 0) {
    throw "Division by zero condition!";
  }
  return a / b;
}

void function() {
  try {
    int result = divide(10, 0);
  }
  catch (const char* msg) {
    Serial.print(msg);
  }
}
In this Arduino coding style, if the function encounters an error (division by zero), it throws an exception. The calling function then catches this exception and handles it. It is important to handle all possible exceptions to prevent unexpected behavior or crashes.
C++ Memory Management
In Arduino projects, efficient memory management is crucial due to the limited resources available. The C++ style guide provides some best practices to follow for Arduino programming.
Dynamic Memory Allocation
In C++ programming, dynamic memory allocation is a common practice. However, in Arduino programming, it’s best to avoid it. Dynamic memory allocation can lead to memory fragmentation, which is problematic in resource-constrained environments. Instead, prefer static or automatic variables.
// Avoid
char* str = new char[10];

// Prefer
char str[10];
Pointers
When using pointers in your Arduino projects, always initialize them. Uninitialized pointers can lead to undefined behavior.
// Avoid
char* str;

// Prefer
char* str = nullptr;
Also, if you must use dynamic memory, always ensure to deallocate any memory you’ve allocated once you’re done with it. This is a fundamental C++ programming tip that helps prevent memory leaks.
// Avoid
char* str = new char[10];
// ... forgot to delete

// Prefer
char* str = new char[10];
// ... use str
delete[] str;
Arrays
Arrays are a common feature in C++ programming. When using arrays in your Arduino coding style, prefer to use array size declarations instead of hard coding the size. This makes your code more maintainable and less prone to errors.
// Avoid
int arr[5] = {1, 2, 3, 4, 5};

// Prefer
const int SIZE = 5;
int arr[SIZE] = {1, 2, 3, 4, 5};
These are just a few of the C++ guidelines for memory management in Arduino development.
In the next section of this C++ programming guide, we’ll look at how to handle files and organize your code properly in Arduino projects. Stay tuned for more Arduino project tips and C++ programming style advice!
C++ File Organization
This section of our Style Guide will provide you with some best practices and guidelines to organizing your C++ files,
Header Files
In C++ programming, header files play a significant role. They contain function declarations, macro definitions, and other necessary pieces of information.
// Example of a header file

#ifndef MY_HEADER_H
#define MY_HEADER_H

// Function Declarations
void myFunction();

#endif
The above example demonstrates how to structure a header file. The #ifndef, #define, and #endif preprocessor directives prevent multiple inclusions of the same header file. This is a common best practice in C++ programming style.
Source Files
Source files contain the actual implementation of the functions declared in the header files.
// Example of a source file

#include <my_header.h>;

void myFunction() {
    // Function implementation
}
In the example above, we include the header file and provide the implementation for myFunction(). It’s a C++ coding standard to keep the implementation in source files separate from the declarations in header files.
File Naming Conventions
When it comes to file naming conventions, the C++ guidelines suggest using descriptive names and consistent casing. This enhances readability and maintainability of your Arduino projects.
For instance, if you have a file that defines a Motor class, you might name it Motor.h for the header and Motor.cpp for the source file.
C++ Libraries and Dependencies
When working on Arduino projects, managing C++ libraries and dependencies is an essential part of the development process.
Including Libraries
In C++ programming, libraries are included at the beginning of the code. The #include directive is used to include a library. For instance, to include the Arduino standard library, you would write:
#include <Arduino.h>;
The angle brackets (<>) are used when including standard libraries. If you’re including a custom library, use double quotes ("") instead.
Managing Dependencies
Dependencies are external libraries or modules that your Arduino project relies on. It’s important to manage these dependencies properly to ensure your Arduino programming is efficient and error-free.
One of the best practices is to explicitly declare all dependencies at the beginning of your code. This improves code readability and makes it easier for others to understand what libraries your code depends on.
For instance, if your Arduino project uses the Servo library, include it at the beginning:
#include <Servo.h>;
Using Namespaces
In C++, namespaces are used to organize code and prevent naming conflicts. When using a library, it’s a good practice to use its namespace. This makes your code more readable and helps avoid naming conflicts.
C++ Testing and Debugging
This part of the C++ Style Guide will provide you with best practices and C++ guidelines for testing and debugging your Arduino programming.
Unit Testing
Unit testing is a fundamental aspect of C++ programming. Each function in your code should be tested individually to ensure it behaves as expected. Here’s a simple example of a test for a function that adds two numbers:
void testAdd() {
    assert(add(2, 2) == 4);
    assert(add(-2, 2) == 0);
    assert(add(-2, -2) == -4);
}
In this example, the assert function checks if the statement is true. If it’s not, the program will terminate.
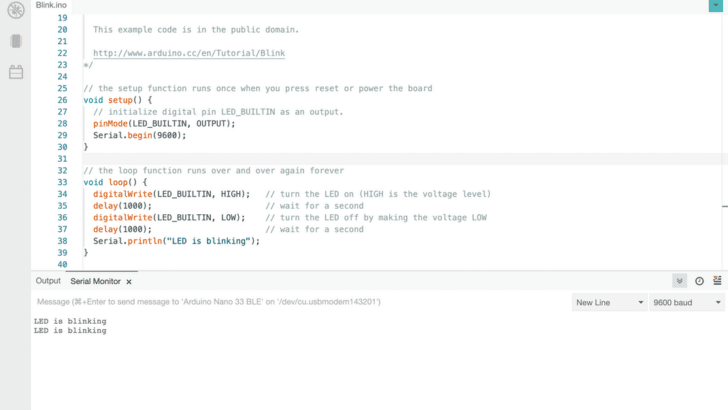
Debugging
Debugging is a critical part of Arduino development. The Arduino IDE provides a Serial Monitor for debugging purposes. You can print values to the Serial Monitor with Serial.println().
void setup() {
    Serial.begin(9600);
}

void loop() {
    int sensorValue = analogRead(A0);
    Serial.println(sensorValue);
    delay(1000);
}
In this example, the sensor value is printed to the Serial Monitor every second.
Automated Testing
Automated testing is one of the best practices in C++ programming. It helps you to find and fix bugs early in the development cycle. There are several libraries available for automated testing in C++, such as Google Test.
Error Messages
Good error messages can greatly facilitate debugging. When something goes wrong, your program should fail with a clear, concise, and informative error message.
int sensorValue = readSensor();
if (sensorValue >= 0) {
    // Continue with the program
    Serial.println(sensorValue);
} else {
    Serial.println("Could not read sensor!");
}
In this example, if the sensor data could not be read, the program prints an error message.
C++ Performance Optimization
Performance optimization is a critical aspect of C++ programming, especially for Arduino projects. It involves making your code run faster or use fewer resources. Here are some C++ best practices to follow for performance optimization in your Arduino development.
Use Inline Functions
Inline functions can speed up your Arduino projects. The compiler replaces the function call with the function code, reducing the overhead of function calls.
inline int max(int a, int b) {
    return (a > b) ? a : b;
}
The ‘inline’ keyword tells the compiler to insert the code of the function in place. This can significantly speed up small functions.
Avoid Unnecessary Copying
Copying large objects can slow down your program. Instead, consider passing by reference or using pointers.
void process(vector<int>& data) {
    // process data
}
In the above code, ‘data’ is passed by reference, avoiding the need for copying.
Use const Where Possible
The ‘const’ keyword can help the compiler optimize your code. It tells the compiler that the variable will not change, allowing it to make certain assumptions and optimizations.
const int pin = 13;
In this Arduino coding style, ‘pin’ is declared as a constant, and its value cannot be changed.
Preallocate Memory
For dynamic data structures like vectors, preallocating memory can improve performance. This avoids the need for the structure to be resized during execution.
vector<int> data;
data.reserve(1000);
In this C++ programming tip, ‘data’ is a vector that has its memory preallocated for 1000 integers.
Use Appropriate Data Structures
Using the right data structure can significantly improve performance. For example, if you need to frequently search for elements, a set or map may be more efficient than a list or vector.
Conclusion
In this C++ Style Guide for Arduino projects, we’ve covered a variety of topics, from C++ naming conventions to C++ libraries and dependencies. The goal of this guide is to provide a roadmap for Arduino programming, ensuring that your code is clean, readable, and efficient.
Adhering to these C++ guidelines and best practices will not only improve the quality of your Arduino projects, but also make them easier to maintain and debug. Remember, coding standards are not just about aesthetics, they also have a significant impact on the efficiency of your code.
Here’s a brief recap of what we discussed:
- Naming Conventions: Choose clear, descriptive names for your variables, functions, and classes. This makes your code easier to understand.
- Indentation and Formatting: Use consistent indentation and formatting to increase readability.
- Comments and Documentation: Document your code using comments. This makes it easier for others (and future you) to understand what your code does.
- Variable and Constant Declarations: Declare variables and constants at the top of your functions. This makes your code easier to debug and understand.
- Function and Class Definitions: Keep your functions and classes small and focused. This makes them easier to test and maintain.
- Control Structures and Loops: Use control structures and loops wisely. Avoid unnecessary complexity.
- Error and Exception Handling: Handle errors and exceptions gracefully. This makes your code more robust.
- Memory Management: Be mindful of memory management. This can help prevent memory leaks and other issues.
- File Organization: Organize your files logically. This makes your project easier to navigate.
- Libraries and Dependencies: Use libraries and dependencies wisely. They can save you a lot of time and effort.
- Testing and Debugging: Test your code thoroughly. This helps catch bugs early.
- Performance Optimization: Strive for efficient code. This can make your Arduino projects run faster and smoother.
This C++ style guide is not exhaustive, but it provides a solid foundation for Arduino programming. Always continue learning and refining your Arduino programming style. Happy coding!
Stefan is a professional software developer and researcher. He has worked in robotics, bioinformatics, image/audio processing and education at Siemens, IBM and Google. He specializes in AI and machine learning and has a keen interest in DIY projects involving Arduino and 3D printing.
Edgar Bonet
Friday 12th of April 2024
Hi!
Thanks for publishing this. Lots of good advice here. I would like to add a few remarks and suggestions:
> the recommended indentation style is to use four spaces for each level > of indentation.
Four spaces do give nice readability. I suggest you apply this to the examples you provide, which currently have a mixture of two-space and four-space indentations.
> Use [multi-line comments] for longer explanations or commenting out > sections of code.
Multi-line comments don't work for commenting-out sections of code that have multi-line comments. A better option is `#if 0`.
> Declare loop variables outside the loop to avoid unnecessary variable > creation and destruction in each iteration.
There is no point in “avoiding unnecessary variable creation and destruction”, as these operations cost exactly zero CPU cycles (check the generated assembly if you doubt this). Declaring the variable within the `for` loop makes its purpose clearer and limits its scope.
> error handling is typically done using return codes.
Be careful when using a return value that can be either a result or an error code. Case in point: −1 is a perfectly valid result for the quotient of two integers.
> Exception Handling
Note that there are still AVR-based Arduinos out there, and the AVR toolchain does not support exceptions.
> #include ;
No semicolon after `#include`.
> The ‘inline’ keyword tells the compiler to insert the code of the > function in place.
The `inline` keyword is essentially ignored by modern compilers: use `static` instead. A non-`static` function may be called from another compilation unit, meaning the compiler must output a callable version of the function even if it decides to inline all the calls it can see. A `static` function need not be compiled into a callable version, which makes it a prime candidate for inlining. A `static` function that is called from a single place will almost certainly be inlined.
If you need to be absolutely sure the function is always inlined, use this:
static inline __attribute__((always_inline)) int max(int a, int b)
Stefan Maetschke
Friday 12th of April 2024
Hi Edgar, Thanks for the add-on. Much appreciated!