In this tutorial, I will present the complete guide required to build temperature sensor projects using NTC and Arduino.
NTCs are widely used in temperature sensing applications.
They take up less space and cost significantly less. You can easily interface an NTC using an analog input pin of the Arduino.
By the end of this tutorial, you will be comfortable choosing NTCs, going through the datasheets, and understanding the critical parameters needed for the proper selection to select the correct parameters.
You will find an Arduino code example, a step-by-step connection guide, and a compilation of frequently asked questions about NTC projects with answers.
Let’s get started!
Components Needed To Build Arduino NTC Project
Hardware Components
- Dupont wire x 1 set
- Arduino USB cable (for powering Arduino and programming) x 1
Software
Makerguides.com is a participant in the Amazon Services LLC Associates Program, an affiliate advertising program designed to provide a means for sites to earn advertising fees by advertising and linking to products on Amazon.com.
Basics of An NTC Sensor
NTC stands for Negative Temperature Coefficient resistor. NTCs are a type of thermistor.
The resistance of the NTC varies a lot with the temperature.
As the temperature rises, the NTC resistance drops and vice versa.
This specific property of the NTC makes it an excellent sensor for measuring temperatures.
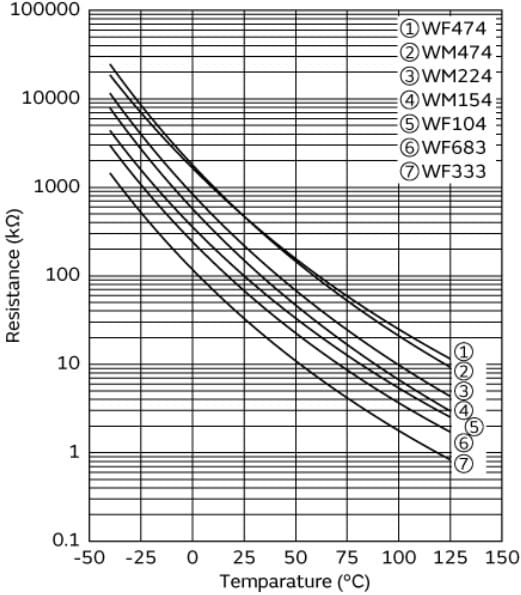
For your quick reference, here is an example of an NTC whose characteristics are shown in the image below.
The resistance changes from 1 Mohms to 1 kOhms for a temperature change, as shown in the figure.
Let us go through some typical NTC parameters.
Zero power measurement
The resistance of the NTC at a given temperature is measured. When you measure it, you usually supply some amount of current through it.
If the current through the NTC is too high, self-heating will occur, resulting in erroneous measurements.
You can’t measure the resistance without pushing some current through it.
So, you supply a tiny, almost negligible current and do the measurements.
Hence you call it zero power measurement.
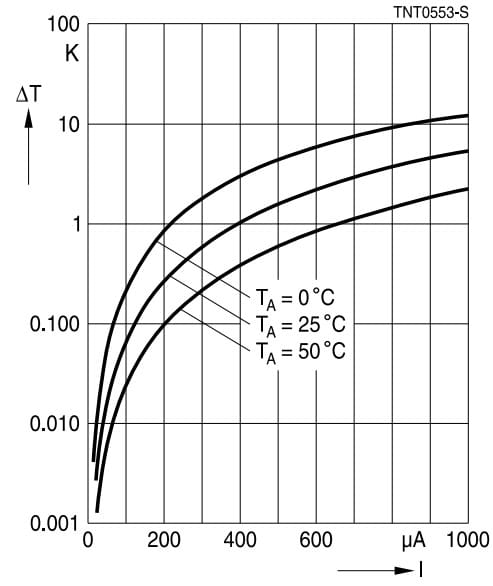
Self-heating of NTC temperature sensors
The resistance of the NTC will drop a little because when you supply the current through the NTC, you also heat up the NTC resulting in a temperature rise.
In the below graph, you can see that as the current rises, the resistance drops, leading to an indication that there is a temperature rise.
Thermal time constant
The thermal time constant is an essential sensor parameter. The value tells how fast the NTC sensor can detect the change in the temperature of the sensor’s environment.
Assume you take the sensor from one stable temperature area to a new temperature area quickly.
The thermal time constant is the time the sensor takes to reach 63.2% of the new temperature.
Steinhart-Hart Equation
The NTC curve is not linear. You need to find an equation that fits the non-linear curve of the NTC sensors (resistance versus temperature).
We use the Steinhart-Hart equation as it is an industry-wide accepted equation.
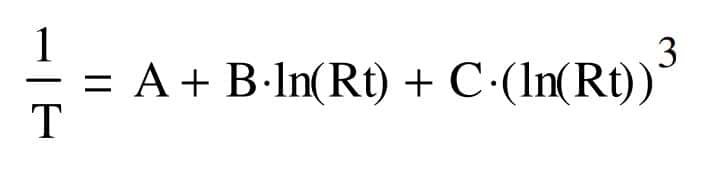
Where A, B, and C are coefficients that are usually shared by the NTC suppliers.
There is another version that uses beta values (available in the NTC datasheets)
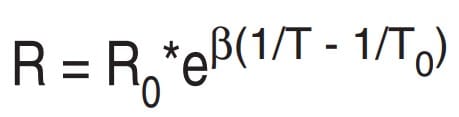
The temperature is in kelvin, and the resistance is in ohms.
How do you monitor the change in the temperature?
The simplest circuit is a voltage divider. Here is one example.
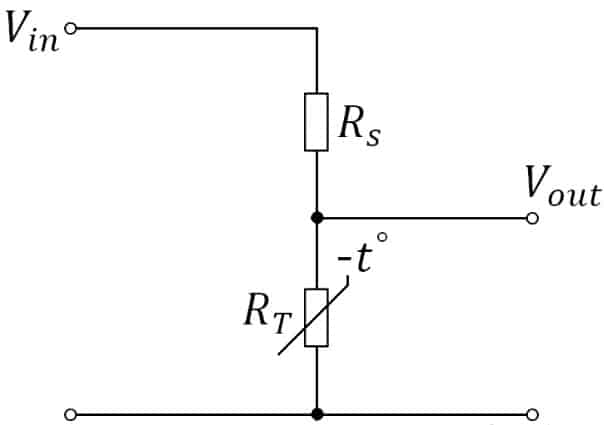
You can measure the Vout using an analog input of the Arduino. As the temperature changes, the resistance of the NTC changes.
The change in the resistance leads to a change in the voltage Vout.
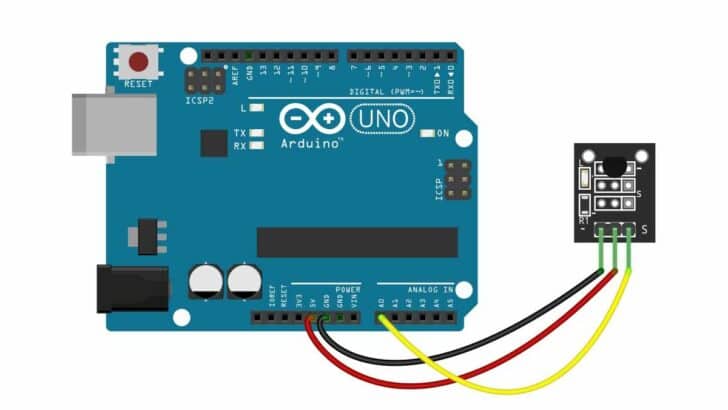
Here is the NTC module image and the details of the components present on it.
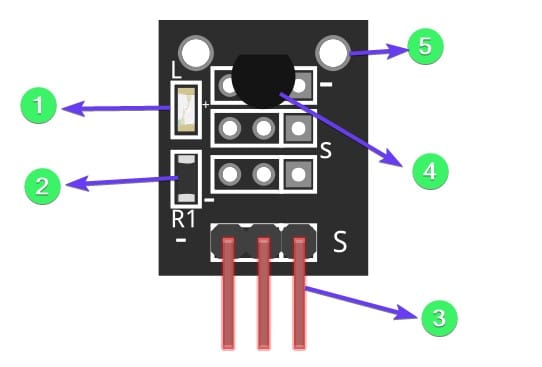
1 – LED – Indicates that the 5 V is present
2 – 10 kOhms resistor (fixed value)
3 – Arduino connection pins
4 – NTC sensor 10 kOhms
5 – Mounting holes
Applications Of The NTC Sensor
- Sensing temperature in battery charger ICs. NTCs help monitor and control the battery charging rate to not overheat the battery management system components.
- NTCs are used in LED lighting systems. LEDs have a significant dependency on temperature and lifetime. NTCs help regulate the current, so the LEDs will provide a better life.
- NTCs also find applications in hard disks and computer processors to protect the components from overheating due to excessive usage.
- I have worked on projects where NTCs were used to monitor room temperature. The feedback was given to regulate the room’s temperature by controlling the amount of heating.
- NTC also finds applications in chemical labs, industrial production equipment, electronic soldering tools, etc.
Step-By-Step Instructions To Connect An NTC To An Arduino
In this section, I will give you step-by-step instructions to complete the needed wiring connection between the Arduino and the NTC sensor module.
In this example, we will use an NTC sensor on a module with three pins.
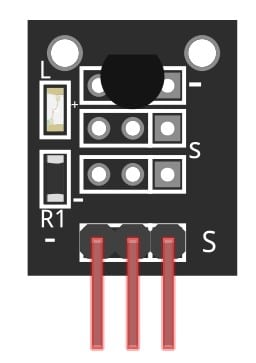
The module above has an LED to indicate that the module is powered.
The module also has the voltage divider circuit formed using the NTC and the resistor.
The three pin details are as below.
| Pin name | Pin Description |
| – | Negative supply (GND) |
| + | Positive Power Supply |
| S | Signal (resistive divider output) |
Let’s get started with the hardware connections!
How To Connect The NTC Sensor To The Arduino UNO?
Below is the step-by-step connection guide to complete the Arduino and the temperature sensor module.
Step 1: Make the Ground connection

Pin 1 of the temperature sensor module goes to the GND pin on the Arduino.
You can choose the closest GND pin available to complete the connection.
It is an excellent practice to start the connections with the GND connection first.
Step 2: Connect the 5 V VCC pin
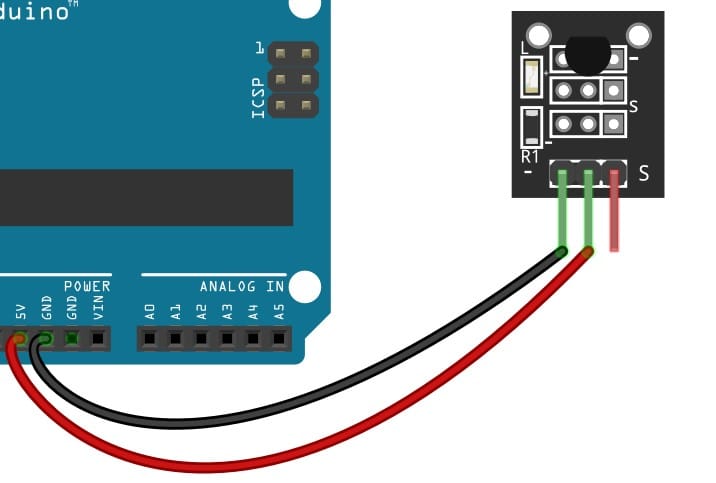
Connect the 5 V pin of the NTC sensor to the Arduino UNO. The power consumed by the NTC sensor is very low.
Step 3: Connect the Analog Signal Pin
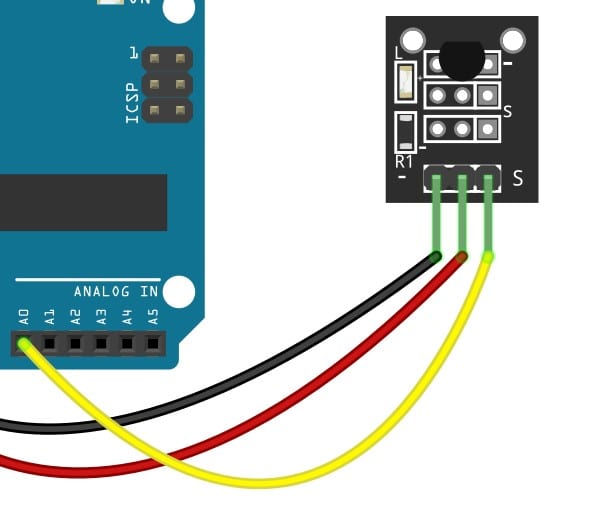
To complete the connection, connect the Sensor output pin to Pin A0 of the Arduino. You can choose any analog input pins available on the Arduino (A0, A1, A2, A3, A4, and A5).
Ensure that you also update the Arduino code to reflect the new analog input so that the code and the connection match.
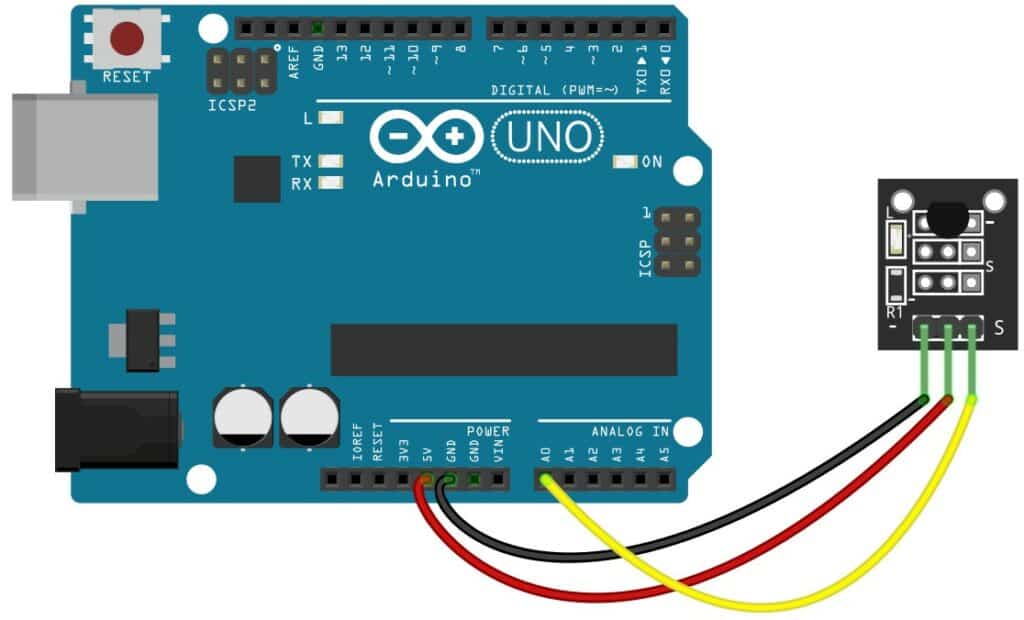
Further, you can also add an LED or a buzzer to one of the Arduino GPIO. You can drive the LED or the buzzer to indicate that the over temperature is detected.
You can also add two LEDs (green and red) to indicate whether the temperature is within or beyond limits.
The final connection should look like below.
Arduino Code Example For The NTC Sensor
In this section, we will see a simple example code to read the temperature of the environment using a NTC module. Let’s get started.
Arduino Code Example For The NTC sensor (basic Code)
const float BETA = 3950; // should match the Beta Coefficient of the thermistor

void setup() {
  Serial.begin(9600);
}

void loop() {
  int analogValue = analogRead(A0);
  float celsius = 1 / (log(1 / (1023. / analogValue - 1)) / BETA + 1.0 / 298.15) - 273.15;
  Serial.print("Temperature: ");
  Serial.print(celsius);
  Serial.println(" ℃");
  delay(1000);
}
Arduino Code Example For The NTC sensor (Advanced Code)
The second example from Adafruit shows you how to improve reading accuracy using software algorithms. You can average to cancel out the noise efficiently.
Since the temperature is not expected to vary drastically within milliseconds, averaging can be done for 30 or even 50 samples.
The averaging removes the noise and provides a more consistent reading.
// which analog pin to connect
#define THERMISTORPIN A0
// resistance at 25 degrees C
#define THERMISTORNOMINAL 10000
// temp. for nominal resistance (almost always 25 C)
#define TEMPERATURENOMINAL 25
// how many samples to take and average, more takes longer
// but is more 'smooth'
#define NUMSAMPLES 5
// The beta coefficient of the thermistor (usually 3000-4000)
#define BCOEFFICIENT 3950
// the value of the 'other' resistor
#define SERIESRESISTOR 10000

int samples[NUMSAMPLES];

void setup(void) {
  Serial.begin(9600);
  analogReference(EXTERNAL);
}

void loop(void) {
  uint8_t i;
  float average;

  // take N samples in a row, with a slight delay
  for (i=0; i< NUMSAMPLES; i++) {
   samples[i] = analogRead(THERMISTORPIN);
   delay(10);
  }

  // average all the samples out
  average = 0;
  for (i=0; i< NUMSAMPLES; i++) {
     average += samples[i];
  }
  average /= NUMSAMPLES;

  Serial.print("Average analog reading ");
  Serial.println(average);

  // convert the value to resistance
  average = 1023 / average - 1;
  average = SERIESRESISTOR / average;
  Serial.print("Thermistor resistance ");
  Serial.println(average);

  float steinhart;
  steinhart = average / THERMISTORNOMINAL;     // (R/Ro)
  steinhart = log(steinhart);                  // ln(R/Ro)
  steinhart /= BCOEFFICIENT;                   // 1/B * ln(R/Ro)
  steinhart += 1.0 / (TEMPERATURENOMINAL + 273.15); // + (1/To)
  steinhart = 1.0 / steinhart;                 // Invert
  steinhart -= 273.15;                         // convert absolute temp to C

  Serial.print("Temperature ");
  Serial.print(steinhart);
  Serial.println(" *C");

  delay(1000);
}
In the above code, the line.
// The beta coefficient of the thermistor (usually 3000-4000)
#define BCOEFFICIENT 3950
Provides you an option to set the beta coefficient to the right value.
FAQs About The Arduino NTC Temperature Sensor Projects
I have compiled a list of the most frequently asked questions about the NTC temperature sensor.
If you have any other questions, please post them in the comments section.
1) What are the properties of an NTC temperature sensor?
The following are the essential properties of an NTC sensor.
- Resistance in Ohms at 25 degree Celsius
- Tolerance (tighter tolerance will be costlier)
- Operating temperature
- Mounting type
- Package
- B tolerance. The Beta curves will have different constants needed to convert the resistance into the correct temperature.
2) Are NTC thermistors linear?
The NTCs are nonlinear. Hence it is not straightforward to convert the resistance into temperature.
Therefore, we use unique curve fitting formulas to best match the resistance to the temperature.
3) What are the datasheet parameters for an NTC sensor ?
Here is a brief description of the datasheet parameters (taken from the Murata part).
| Parameter | Value | Description |
| Resistance (25 ℃) | 100 kOhms | This is the resistance at room temperature. When people say ten kOhm NTC, the NTC resistance is ten kOhms at room temperature. |
| Resistance value tolerance (at 25 ℃) | +/- 1% | The tolerance in percentage. You have to consider this in your error budget. The other error source can be the ADC error. |
| B-constant (25/50 ℃ ) | 4250 K | B constant is provided at different temperature ranges. You can choose the correct constant value based on the temperature range of the target environment. |
| B-constant (25/80 ℃ ) tolerance | 4303 K | Same as above |
| B-constant (25/85 ℃ ) reference value | 4311 K | Same as above |
| B-constant (25/100 ℃ ) reference value | 4334 K | Same as above |
| Max. voltage | 5 V | Maximum voltage rating for the NTC. It means you cannot supply the NTC with more than 5 V. |
| Maximum operating current | 0.031 mA | To measure the resistance, you will pass through some current. The current will lead to the self-heating of the NTC. Hence it is better to keep the current as low as possible. The maximum value of current is for the safety of the NTC. |
| Typical dissipation constant | 1 mW / ℃ | The Dissipation constant provides information to calculate the rise in the temperature for an mW power dissipation. |
| Operating temperature range | -40 ℃ to 150 ℃ | Maximum operating temperature range |
| Size code (in mm) | 1 x 0.5 mm | Dimensions in mm |
| MSL | 1 | Moisture Sensitivity Level of the NTC |
Conclusion
In this article, we learned how to interface an NTC to the Arduino UNO.
We covered the basics, datasheet parameters, and design considerations.
I hope you are now confident to build your own Arduino project, which uses an NTC sensor.
I have worked on HVAC (Heating, Ventilation, and Air Conditioning) projects where NTC was used to monitor the room temperature and give feedback to the boiler.
Do you have suggestions to improve this article? I welcome all feedback.
What would you love to read next? Which topics have interested you more? Please let me know.
Don’t forget to share this article with your friends if you find this helpful!

I am Puneeth. I love tinkering with open-source projects, Arduino, ESP32, Pi and more. I have worked with many different Arduino boards and currently I am exploring, Arduino powered LoRa, Power line communication and IoT.