In this tutorial, I will take you through the necessary details to build an Arduino and an SD card project. SD cards enable you to log a considerable amount of data.
Hence, Arduino and SD cards are a good combination for data logger projects.
The SD cards can store many images which you can use in games, navigation menus, Point Of Sale terminals, and more.
You can also store text files and display them in your e-Book reader project.
SD Cards are tiny memory cards that provide you a lot of storage space.
You can interface an Arduino with the SD card with the help of an SD card module.
By the end of this tutorial, you will understand the basics of SD cards, available SD card module options, a step-by-step connection guide, an example Arduino code, and a collection of frequently asked questions.
Let’s get started!
Components Needed To Build Arduino And A SD Card Project
Hardware Components
- Dupont wire x 1 set
- Arduino USB cable (for powering Arduino and programming) x 1
- Breadboard
Software
Makerguides.com is a participant in the Amazon Services LLC Associates Program, an affiliate advertising program designed to provide a means for sites to earn advertising fees by advertising and linking to products on Amazon.com.
Basics of A SD Card and the SD Card Module
SD Card stands for Secure Digital Card. The SD cards are non-volatile flash memories designed for portable devices (Mobile, MP3 players, Dataloggers, etc. )
Let us look at the SD card closely.
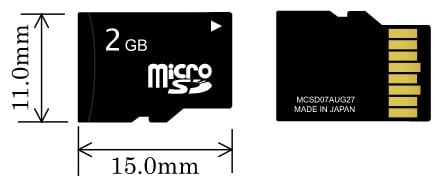
The below image provides you with pin details of the SD card and a Micro SD card. Micro SD cards are more common.
You can easily find many modules with a Micro SD card holder on one end and accessible to us DIP pins to connect to the breadboard.
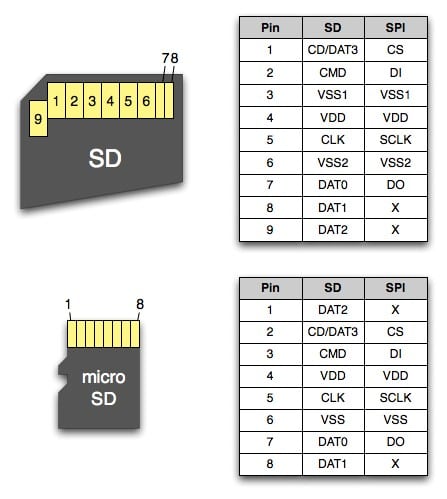
There are two interfaces, SD and SPI. We use the SPI interface in this article. You will find a lot of libraries for Arduino and SD cards with the SPI interface.
The SPI protocol is used in most of the Arduino projects you see.
You can switch between SD mode and SPI mode of communication during power-up.
By default, the card always starts in SD mode. The Arduino has to perform the switch using the Chip select and control lines.
Once you put the SD card into SPI mode, you cannot change the communication mode without providing a power reset.
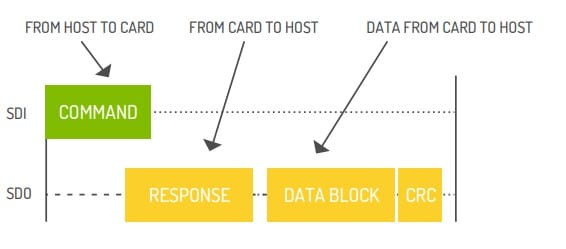
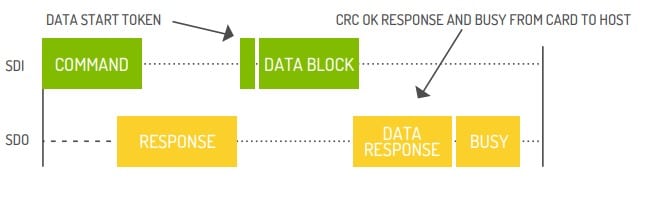
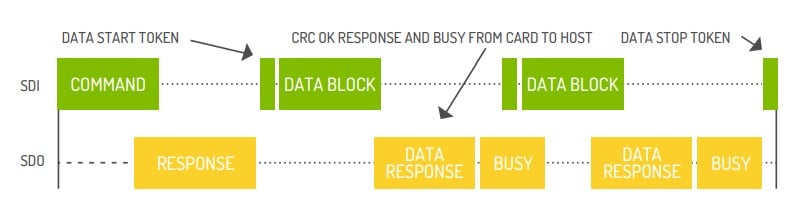
Communication happens in the form of commands and responses. The data communication consists of packet transfer.
Each data packet will have a checksum associated with it.
The below images show high-level communication protocol between a host (Arduino) and the SD card.
Single Block Read via SPI communication
Multiple Block read – SPI mode

Single Block Write, SPI mode
Multiple Block write, SPI mode
The SD cards commonly found in portable devices work at 3.3 V. Arduino UNO works at 5 V. Hence a level shifter is necessary.
Therefore, most of the SD card modules will have an onboard voltage translator, which helps to protect the SDcard lines from the Arduino UNO line.
SPI lines for communication and 5 V for the supply are the standard connections needed.
You can find some SD card modules in the image below.
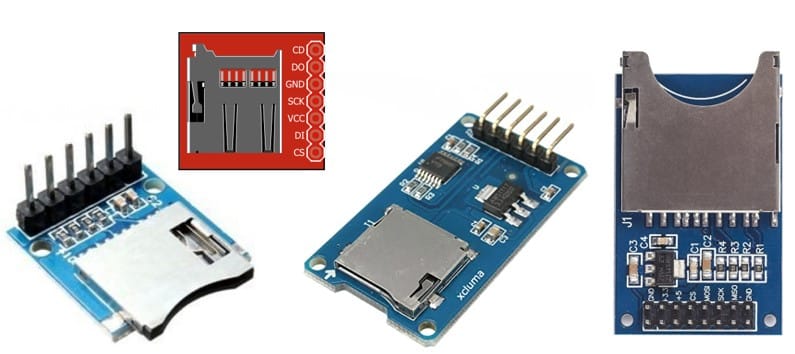
Let’s start with the commonly found SD Card module, which also has a 3.3 V regulator on board. I will be using the below module for the connection guide.

The table below provides a brief description of the Pins found on the SD card module.
| Pin Label | Pin Description |
| GND | Ground connection. Connect to any of the GND pins on the Arduino board |
| 3.3 V | This is the 3.3 V output of the onboard linear voltage regulator, which accepts 5 V and provides the necessary 3.3 V for the SD Card as well as an optional output for other peripherals |
| +5 V | Connect the 5 V pin on the Arduino to this pin. 5 V is the input supply for the SD card module. |
| CS | Chip select pin. This pin is the output pin of the Arduino and the input pin for the SD card module. |
| MOSI | Master Out Slave In Pin. This pin is the output pin of the Arduino and the input pin for the SD card module. |
| SCK | SPI Clock line. This pin is the output pin of the Arduino and the input pin for the SD card module. |
| MISO | SPI MISO line. This pin is the input pin of the Arduino and the output pin for the SD card module. |
| GND | Ground connection |
The usual connections needed between Arduino and the SD card module are summarised in the table below.
| SD Card Module pins | Arduino UNO SPI IO pins | Arduino Mega SPI IO pins |
| GND | GND | GND |
| 3.3 V | NC | NC |
| +5 V | 5 V | 5 V |
| CS | 4 | 53 |
| MOSI | 11 | 51 |
| SCK | 13 | 52 |
| MISO | 12 | 50 |
| GND | GND | GND |
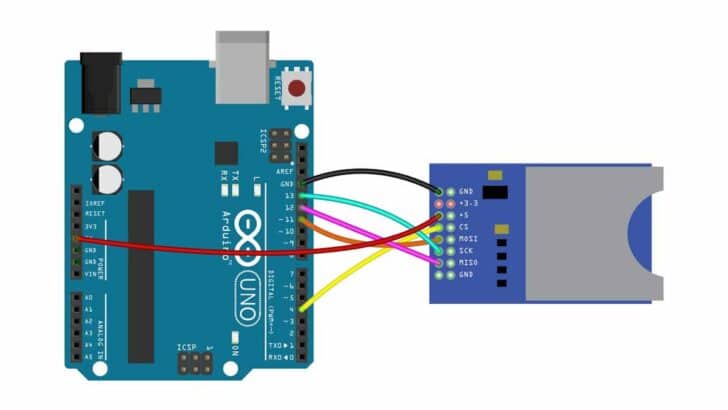
Step-By-Step Instructions To Connect An SD Card Module with Arduino
In this section, I will give step-by-step instructions to complete the needed wiring between the Arduino UNO and the SD Card module.
SD Card modules come in various shapes and sizes. Although the number of pins or the connector type changes, the primary connection details remain the same.
Let’s get started!
How To Connect The SD Card Module To The Arduino UNO?
Below is the step-by-step connection guide to complete the Arduino and the SD Card module wiring.
Step 1: Make the Ground connection
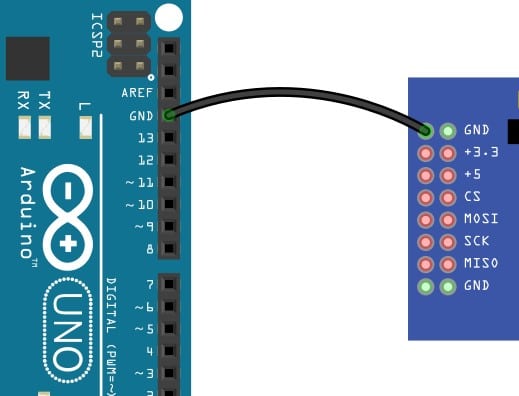
Pin GND of the SD card module connects with the GND pin on the Arduino.
You can choose the closest GND pin available to complete the connection.
It is a perfect way to start the connections with the GND connection first.
Step 2: Connect the CS pin
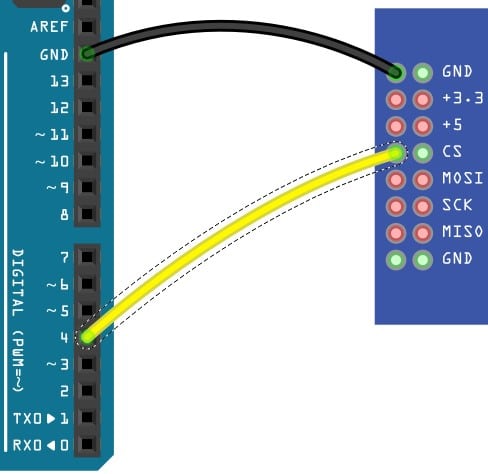
Connect the CS pin of the SD card module to the Pin 4 of the Arduino UNO.
Step 3: Connect the SPI MISO Signal Pin
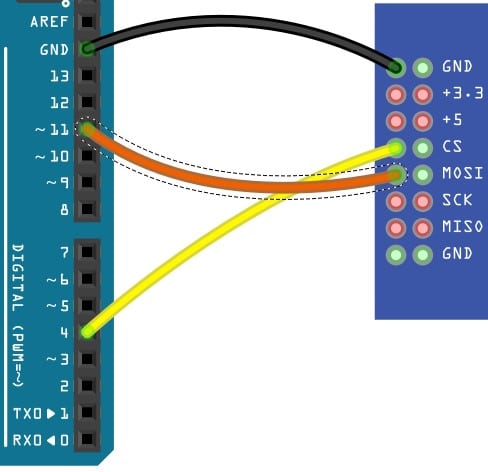
Connect Pin 11 of the Arduino UNO to the MISO pin of the SD card module.
Step 4: Connect the SPI Clock Signal Pin
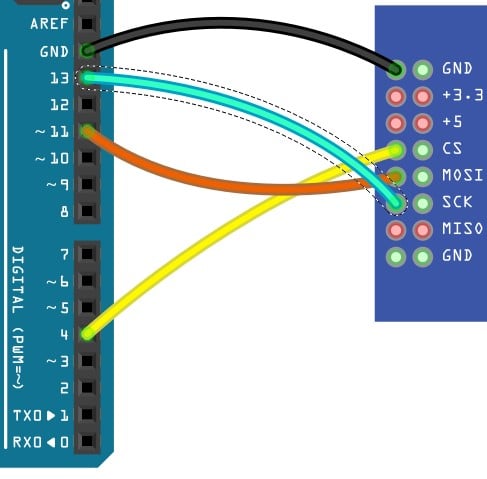
Connect Pin 13 of the Arduino UNO to the SCK pin of the SD card module.
Step 5: Connect the SPI MISO Pin
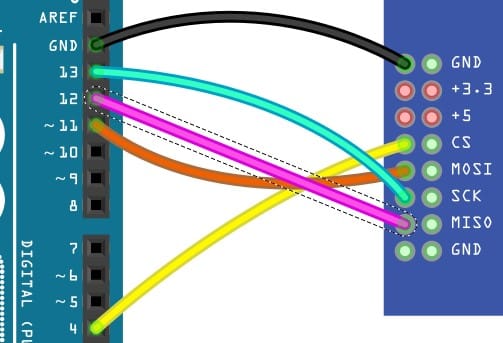
Connect Pin 12 of the Arduino UNO to the MISO pin of the SD card module.
Step 6: Connect the 5 V Pin
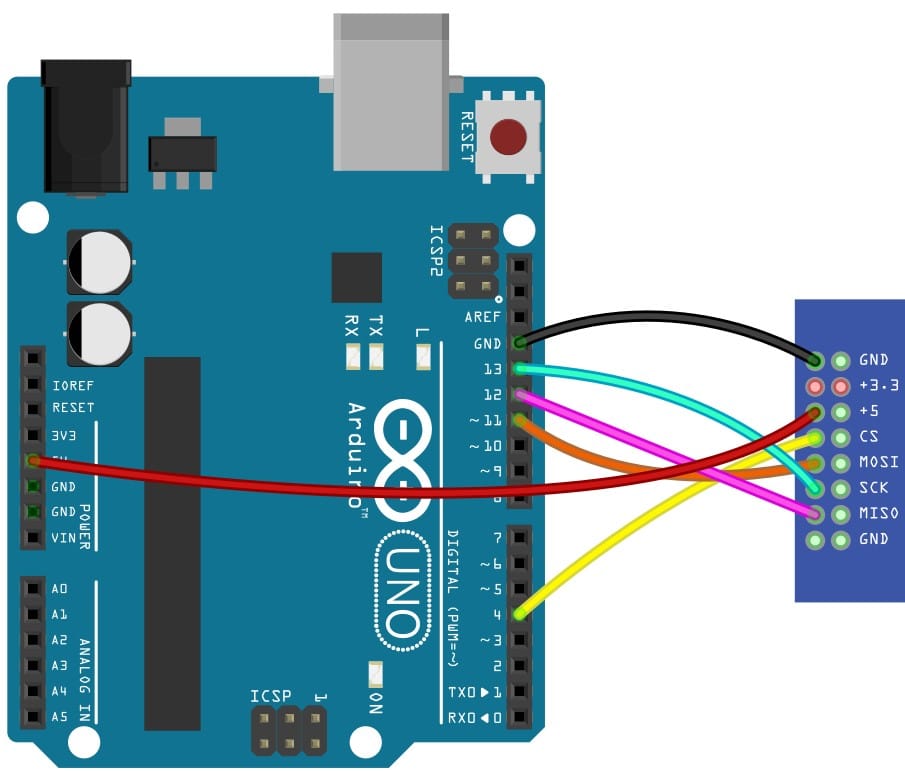
Connect Pin 5 V of the Arduino UNO to the 5 V pin of the SD card module. You can also connect another GND pin, but it is optional.
Arduino Code Example For The SD Card Interface
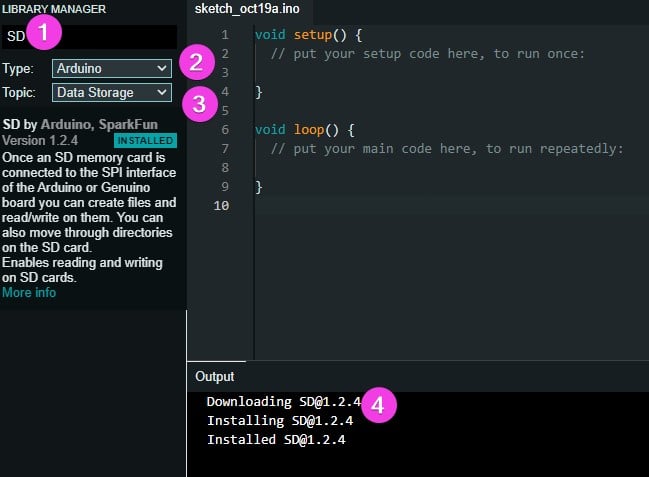
This section will see an Arduino code example to verify the connection. You need the SD library installed to use the sample Arduino code.
To install the SD library:
- Go to Tools → Manage Libraries.
- Enter SD in the search window and hit enter.
- Locate the SD library in the search results and click on install. Once installation is complete, you can use the library.
If you have any trouble accessing it, please drop a comment. I will try to support you.
The Complete Arduino Code To Read The Card Information
In this project, you read the status of the card.
Open the Arduino IDE and click on the “File” option. Under the file options, select “Examples.” Select SD → CardInfo project.
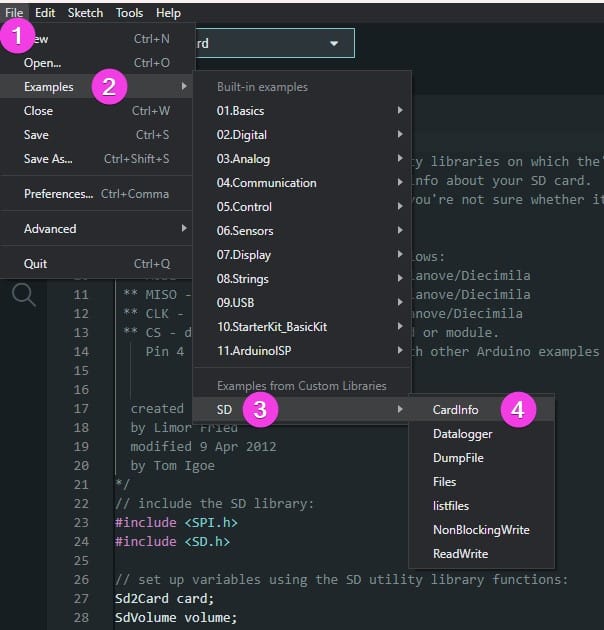
Here is the complete code.
/*
  SD card test

  The circuit:
    SD card attached to SPI bus as follows:
 ** MOSI - pin 11 on Arduino Uno/Duemilanove/Diecimila
 ** MISO - pin 12 on Arduino Uno/Duemilanove/Diecimila
 ** CLK - pin 13 on Arduino Uno/Duemilanove/Diecimila
 ** CS - depends on your SD card shield or module.
    Pin 4 used here for consistency with other Arduino examples


  created  28 Mar 2011
  by Limor Fried
  modified 9 Apr 2012
  by Tom Igoe
*/

// include the SD library:
#include "SPI.h"
#include "SD.h"

// set up variables using the SD utility library functions:
Sd2Card card;
SdVolume volume;
SdFile root;

// change this to match your SD shield or module;
// Arduino Ethernet shield: pin 4
// Adafruit SD shields and modules: pin 10
// Sparkfun SD shield: pin 8
// MKRZero SD: SDCARD_SS_PIN
const int chipSelect = 4;

void setup() {
  // Open serial communications and wait for port to open:
  Serial.begin(9600);
  while (!Serial) {
    ; // wait for serial port to connect. Needed for native USB port only
  }


  Serial.print("\nInitializing SD card...");

  // we'll use the initialization code from the utility libraries
  // since we're just testing if the card is working!
  if (!card.init(SPI_HALF_SPEED, chipSelect)) {
    Serial.println("initialization failed. Things to check:");
    Serial.println("* is a card inserted?");
    Serial.println("* is your wiring correct?");
    Serial.println("* did you change the chipSelect pin to match your shield or module?");
    while (1);
  } else {
    Serial.println("Wiring is correct and a card is present.");
  }

  // print the type of card
  Serial.println();
  Serial.print("Card type:         ");
  switch (card.type()) {
    case SD_CARD_TYPE_SD1:
      Serial.println("SD1");
      break;
    case SD_CARD_TYPE_SD2:
      Serial.println("SD2");
      break;
    case SD_CARD_TYPE_SDHC:
      Serial.println("SDHC");
      break;
    default:
      Serial.println("Unknown");
  }

  // Now we will try to open the 'volume'/'partition' - it should be FAT16 or FAT32
  if (!volume.init(card)) {
    Serial.println("Could not find FAT16/FAT32 partition.\nMake sure you've formatted the card");
    while (1);
  }

  Serial.print("Clusters:          ");
  Serial.println(volume.clusterCount());
  Serial.print("Blocks x Cluster:  ");
  Serial.println(volume.blocksPerCluster());

  Serial.print("Total Blocks:      ");
  Serial.println(volume.blocksPerCluster() * volume.clusterCount());
  Serial.println();

  // print the type and size of the first FAT-type volume
  uint32_t volumesize;
  Serial.print("Volume type is:    FAT");
  Serial.println(volume.fatType(), DEC);

  volumesize = volume.blocksPerCluster();    // clusters are collections of blocks
  volumesize *= volume.clusterCount();       // we'll have a lot of clusters
  volumesize /= 2;                           // SD card blocks are always 512 bytes (2 blocks are 1KB)
  Serial.print("Volume size (Kb):  ");
  Serial.println(volumesize);
  Serial.print("Volume size (Mb):  ");
  volumesize /= 1024;
  Serial.println(volumesize);
  Serial.print("Volume size (Gb):  ");
  Serial.println((float)volumesize / 1024.0);

  Serial.println("\nFiles found on the card (name, date and size in bytes): ");
  root.openRoot(volume);

  // list all files in the card with date and size
  root.ls(LS_R | LS_DATE | LS_SIZE);
}

void loop(void) {
}
Once you run the code, open the serial terminal on the Arduino IDE. You will see messages similar to the one here.
Initializing SD card...Wiring is correct and a card is present.
Later, the code will display the card’s capacity and information on available used and free space.
FAQs About The Arduino SD Card Projects
In this section, you will find answers to the most frequently asked questions regarding Arduino and SD Card projects.
1) How do I use a Micro SD card with an Arduino?
Most SD cards support the SPI interface. You will need SPI lines on the Arduino UNO with the SD card. The SPI lines needed are SPI MISO, SPI MOSI, SPI CLK, and SPI CS.
You can also use a software library for SPI if the hardware SPI lines of the Arduino are occupied.
2) Does Arduino use SD Card?
Yes, Arduino can store and access the data using an SD card.
For example, in an application involving room temperature sensing, you can record the room temperature for days or even months without worrying about losing the data due to a power failure.
Arduino can manage the file system in the SD card in a way that is also recognized by your computer.
It means you can directly access the log files from a Microsoft application.
Arduino can also use an SD card to store your projects’ videos and images with a TFT controller.
Hence, SD Card capability is a practical option for future Arduino projects.
3) Can you store data on the Arduino?
You can store data from the Arduino onto a PC if you have connected the Arduino via a serial port.
The Arduino has significantly less memory; hence you can’t use it to store log files.
If the data to be stored is tiny, then EEPROM is the better option. The EEPROM size inside your Arduino depends on the type of board you have.
You may have EEPROM of size 512 bytes, one kilobyte, or four kilobytes, depending on the type of the MCU.
An SD card is the best option for storing enormous amounts of data using Arduino.
It is portable, the file system is recognized on other computers, and it is also a cheaper option.
4) How do I add more memory to the Arduino UNO?
The Arduino UNO has a limited amount of RAM and internal flash memory. If you have to add more memory, either you can plan to upgrade the board to an Arduino Mega or use an SD card option.
Arduino Mega has four times more RAM, four times more EEPROM, and eight times more internal flash memory when compared to an Arduino UNO.
5) What is the maximum size of SD card I can use with Arduino?
According to the SdFat library specifications, you can use up to 2 GB of SD cards. The 2 GB is enough to store 1000+ images at 2 MP.
Arduino also supports SDHC cards, which can be up to 32 GB.
If you are logging weather information every 1 minute once, and the amount of logged data is 20 bytes, you can log the data for more than 200 years using a 2 GB SD card!
Conclusion
I hope you successfully brought up the Arduino and the SD card module project. I have taken you through the basics of the SD card step-by-step connection guide.
We also saw an example code that will verify the connections.
I have previously used an SD card to log the data into a simple text file.
The Arduino logged the GPS, outdoor temperature, and air quality data.
All the recorded data was contained in one frame of size 64 bytes. I was storing the frames on the SD card every 1 minute.
I will be excited to read about the projects you plan to build using SD cards.
Please share the links to your projects. I am hoping that the article was straightforward to follow.
If you have any feedback to improve the article, Please mention them in the comments.
Don’t forget to share the article with your friends and fellow Arduino enthusiasts.

I am Puneeth. I love tinkering with open-source projects, Arduino, ESP32, Pi and more. I have worked with many different Arduino boards and currently I am exploring, Arduino powered LoRa, Power line communication and IoT.
Lauqué
Saturday 23rd of September 2023
hello When I remove the SD card to read its content, and I insert it again, the systeme seams not to wrtie to the card an does notz give any error message.after a program reset it continue to write to the file. how to proceed in order not to have to reset the CPU.