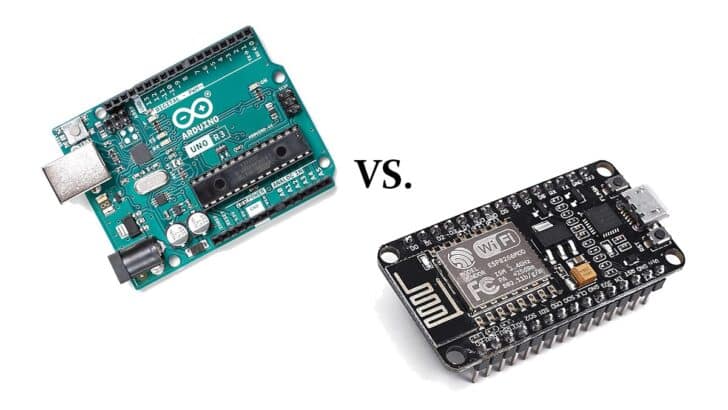
This article will give you all the necessary information about the pinout and the difference between NodeMCU ESP8266 and Arduino UNO boards.
I have included a detailed specification pin diagram of NodeMCU ESP8266 and Arduino UNO.
After this article, you will learn how to use Arduino UNO and ESP8266 board with Arduino IDE and the technical difference between the two boards.
Supplies
Hardware components
Software
| Arduino IDE | Arduino IDE |
Makerguides.com is a participant in the Amazon Services LLC Associates Program, an affiliate advertising program designed to provide a means for sites to earn advertising fees by advertising and linking to products on Amazon.com.
What is the difference between NodeMCU and ESP8266?
The NodeMCU ESP8266 is a low-power 32-bit microcontroller with a built-in Tensilica 32-bit RISC processor that runs at 160 MHz clocks and has a built-in WiFi module.
The Arduino UNO is the most popular board among beginners. Arduino UNO is based on the ATmega328P 8-bit microcontroller that runs at 16 MHz clock speed.
Arduino UNO microcontroller runs at 5V logic, and all pins are 5V tolerant.
It comes with 2KB of RAM, 32KB of flash memory for storing programs, and 1 KB of EEPROM for storing parameters.
Specification of NodeMCU ESP8266 and Arduino UNO
| Function | Description (NodeMCU ESP8266) | Description (Arduino UNO) |
| Microcontroller | Tensilica 32-bit Xtensa LX106 | ATmega328P |
| Flash Memory | 4 MB | 32 KB (0.5 KB is used for Bootloader) |
| SRAM | 128 KB | 2 KB |
| EEPROM | Not Available512 bytes (Software) | 1 KB |
| CLOCK Speed | 80 MHz or 160 MHz | 16 MHz |
| Operating Voltage | 3.3V DC | 5V DC |
| Input Voltage | 7-12 DC | 6V-20V DC |
| Current consumption | 15 µA – 400 mA | 45 mA – 80 mA |
| DC Current per I/O Pin | 12 mA | 40 mA |
| Digital IO Pins | 17 | 14 |
| Analog Input Pins | 1 | 6 |
| UARTs | 2 | 1 |
| SPI | 2 | 1 |
| I2C | 1 | 1 |
| PWM | 4 | 6 |
| WiFi | Yes | No |
| Bluetooth | No | No |
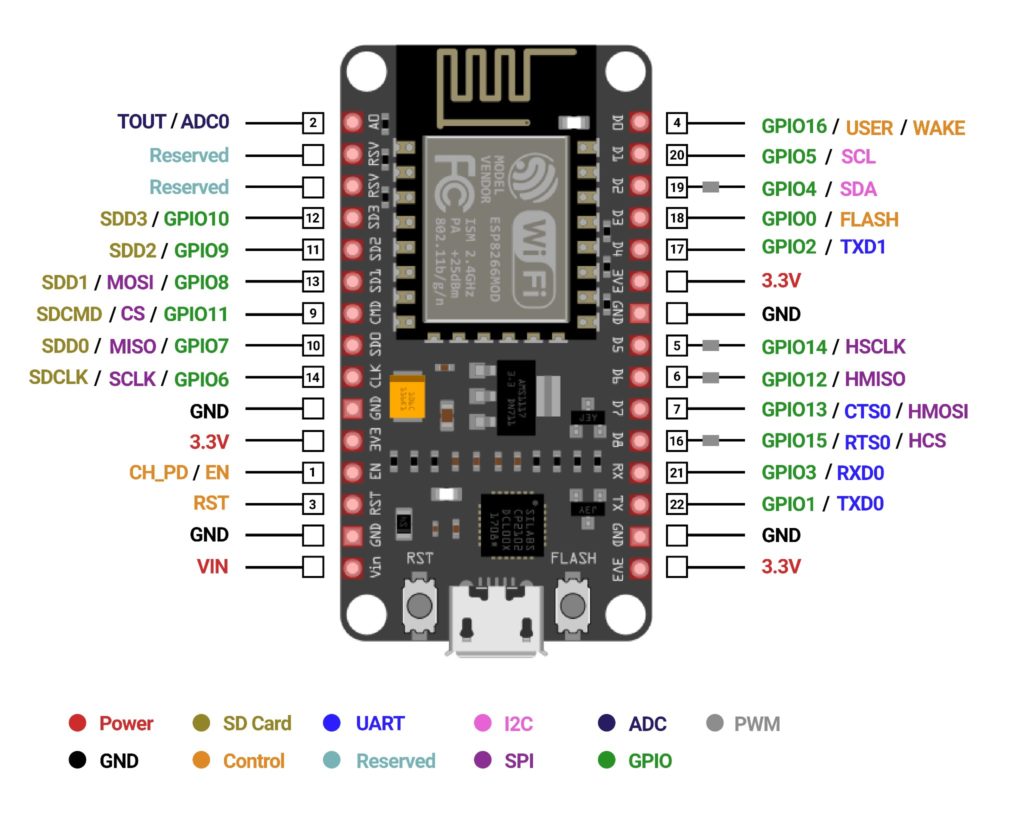
Pin Comparison of NodeMCU ESP8266 and Arduino UNO
You can refer to the NodeMCU ESP8266 Schematic diagram for more details about the components present on the ESP8266 board.
The pin diagram of ESP8266 is depicted below.
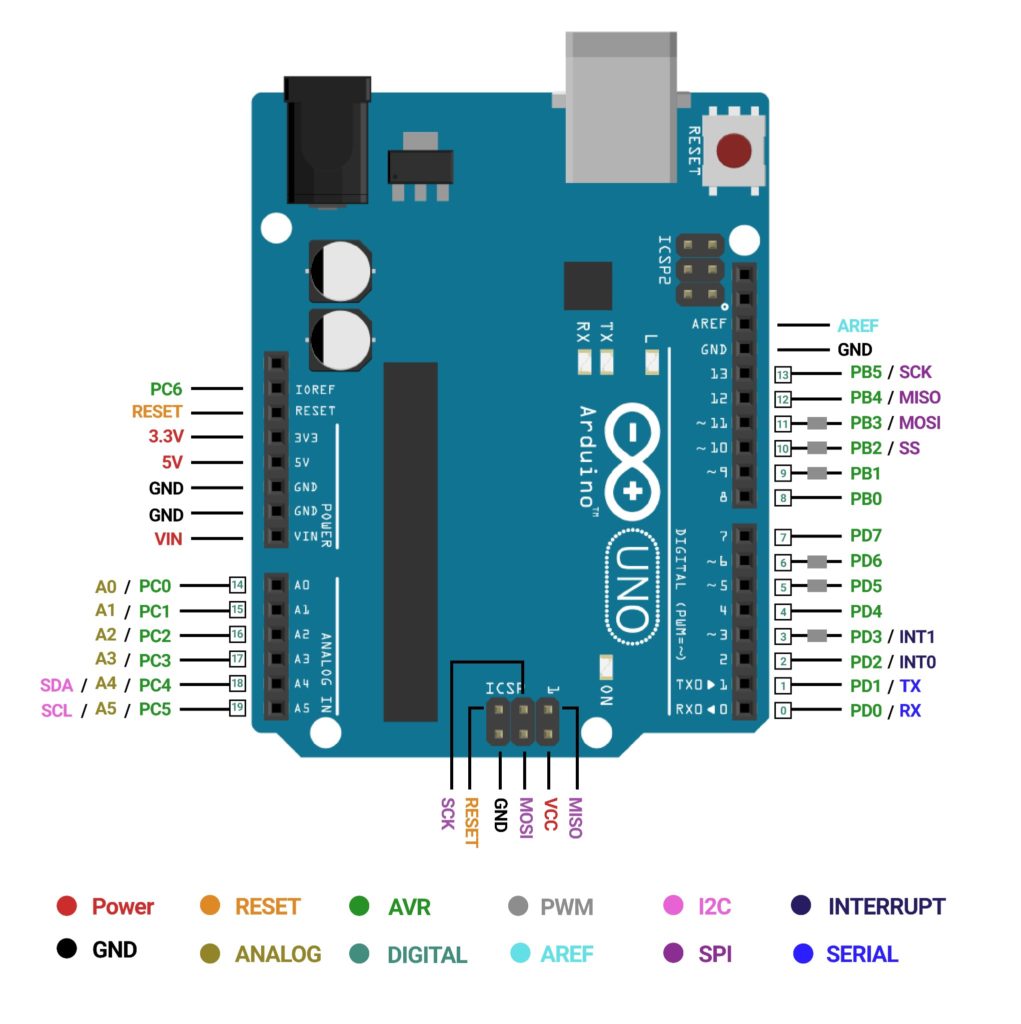
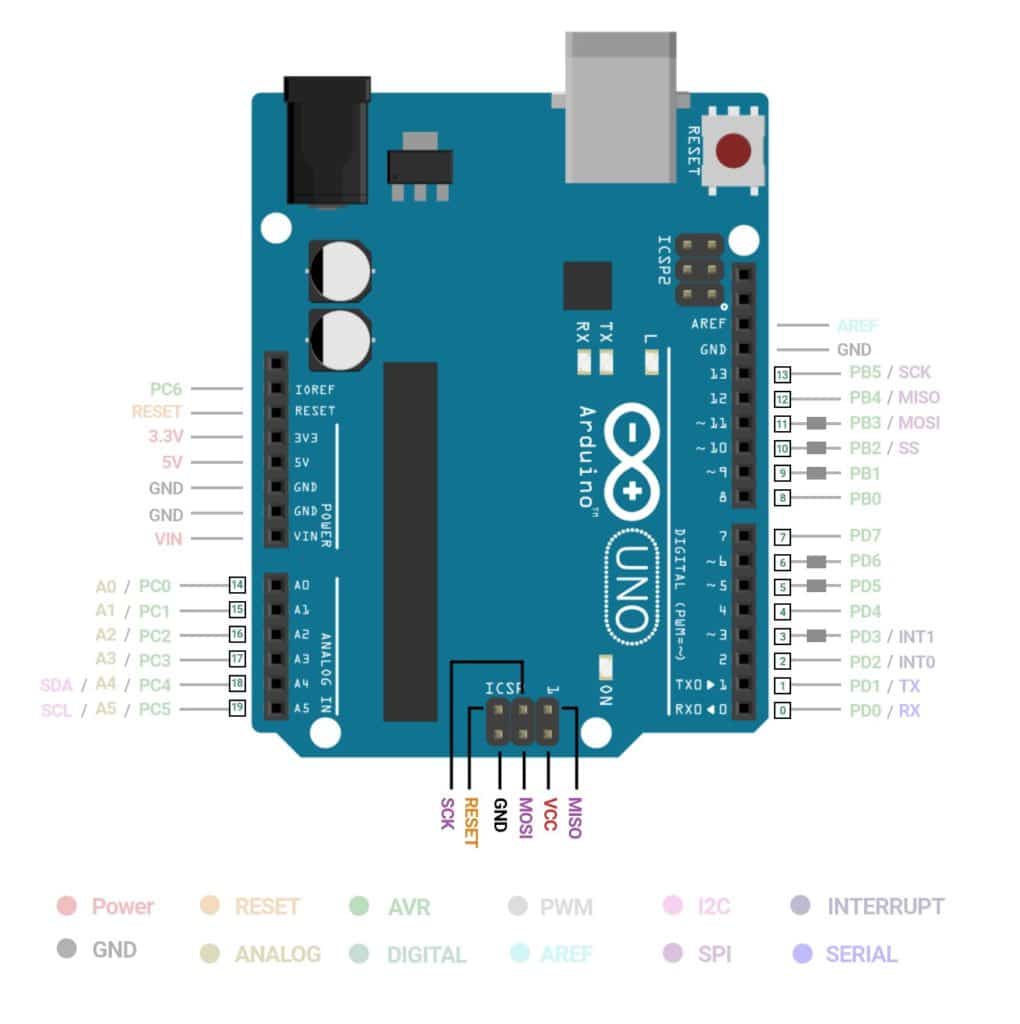
You can also refer to the Arduino Uno Schematic diagram for details of components present on the Arduino UNO board.
The pin diagram of Arduino UNO is depicted below.
Power Supply
You can supply a regulated 5V DC voltage to power up the ESP8266. Internal voltage regulatory circuits will convert this 5V to 3.3V DC because NodeMCU ESP8266 works on 3.3V logic.
The VIN pin can directly supply the NodeMCU ESP8266 and its peripherals with a regulated 5V voltage source.
The 3.3V pins are the output of an onboard voltage regulator.
These pins can be used to supply power to external components.
Similarly, For Arduino UNO Input voltage (VIN) is used to provide an external power supply from 5V to 9V DC.
3.3V and 5V pins are the output of the onboard voltage regulator.
The maximum current draw is 50mA. GND represents the grounds of NodeMCU ESP8266 and Arduino UNO.
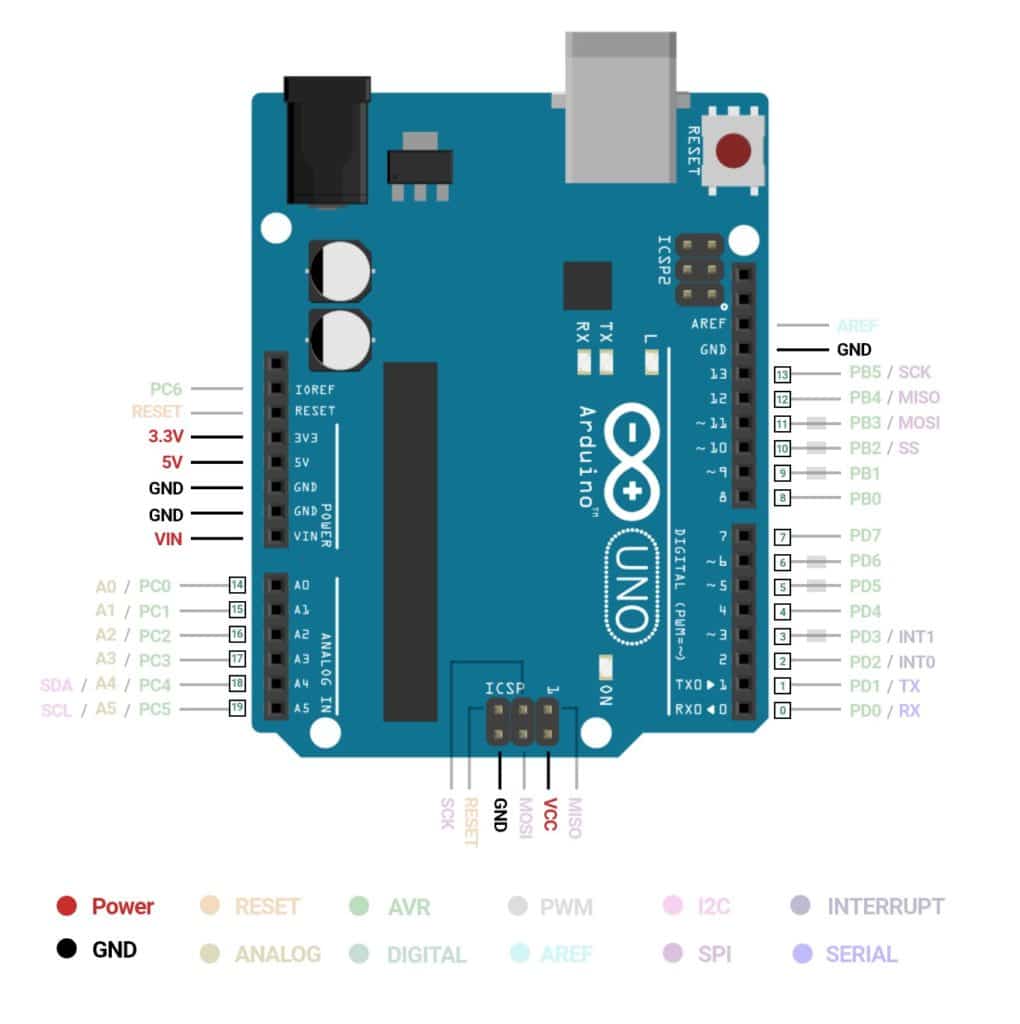
General Purpose Input Output (GPIO) Pin
NodeMCU ESP8266 has 17 GPIO pins which can be set as digital Input or Output. It can also be used for various functions such as I2C, SPI, UART, PWM programmatically.
Each digital-enabled GPIO can be configured to internal pull-up or pull-down or set to high impedance.
When configured as an input, it can also be set to edge-trigger or level-trigger to generate CPU interrupts.
Arduino Uno has 14 digital input/output pins, out of which six can be used as PWM outputs, six analog input pins.
In Arduino code, you can use pinMode(pin, direction) function to set the direction of the pin as input or output, digitalRead(pin, value) to get the value on the digital pin, and digitalWrite(pin, value) to write the digital value on the pin.
Analog Pin
NodeMCU ESP8266 has one analog pin (A0). Arduino UNO has six Analog pins (A0 – A5).
They are used to provide analog input in the range of 0-5V.
Both boards have an ADC of 10-bit resolution, which means you will get values between 0 to 1023.
In Arduino code, you can use the analogRead() function to read analog pin values and analogWrite() functions to write on analog pins.
Serial Peripheral Interface (SPI) Pin
There are two SPI Interfaces on NodeMCU ESP8266 (SPI and HSPI). Both support Master and Slave Operations.
Master mode clock can be configured to 80 MHz while slave mode clock is up to 20 MHz. Only the master can generate a clock cycle.
HSPI_CLK – GPIO14, HSPI_MISO – GPIO12, HSPI_MOSI – GPIO13, HSPI_CS – GPIO15 GPIO pins are used for SPI communication.
SCLK–GPIO6, MISO–GPIO7, MOSI – GPIO8, CS – GPIO11 pins are not available onboard for the user.
Arduino Uno has one SPI communication interface. Pin number 10 (SS), 11 (MOSI), 12 (MISO), and 13 (SCK).

You can refer to the SPI library for SPI communication examples.
I2C Pin
In NodeMCU ESP8266, GPIO4 and GPIO5 can be used as SDA and SCL for the I2C interface.
The clock frequency is 100 kHz at a maximum. It has no alternative functions.
Arduino UNO has one I2C communication interface. Pin A4 (SDA) and A5 (SCL) are used for the I2C interface.
You can refer to the wire library for I2C communication examples.
Universal Asynchronous Receiver Transmitter (UART) Pin
NodeMCU ESP8266 has two hardware UARTs (UART0 and UART1) with baud rates up to 115200 and can communicate at up to 4.5 Mbps.
- UART0 TX – GPIO1, UART0 RX – GPIO3
- UART1 TX – GPIO15, UART1 RX – GPIO13
- UART2 TX – GPIO2, UART2 RX – GPIO8 (Not Available).
Arduino Uno has one UART for serial communication, and you can use 0 (RX) and 1(TX) pin with a specified baud rate.
You can use the serial library for UART. You can also use the Software Serial library to set any GPIO pin as Tx and Rx for UART communication.
Interrupts Pin
All the GPIO pins except GPIO16 support Interrupts on NodeMCU ESP8266.
Arduino Uno Pin 2 and 3 can be configured to trigger an interrupt on a low value, a rising or falling edge, or a change in value.
Use attach interrupt for attaching interrupt to the mentioned pins.
Pulse Width Modulation (PWM) Pins
The NodeMCU ESP8266 board has four channels of PWM.
The PWM output can be implemented programmatically and used for driving digital motors and LEDs. PWM frequency range is adjustable from 1000 μs to 10000 μs.
Arduino UNO Pin 3, 5, 6, 9, 10, and 11 provide a PWM output by using analog input pins, each of which provides 10 bits of resolution, i.e., 0 to 1023 different values.
SDIO Pins
The NodeMCU ESP8266 features a Secure Digital Input/Output Interface (SDIO), which is used to interface SD cards directly.
4-bit 25 MHz SDIO v1.1 and 4-bit 50 MHz SDIO v2.0 are also supported.
SDIO pin is not available on Arduino UNO.
CONTROL Pins
EN pin – The NodeMCU ESP8266 chip is enabled when the EN pin is pulled HIGH. When pulled LOW, the chip works at minimum power.
WAKE pin – A wake pin is used to wake the chip from a deep sleep.EN and WAKE pin is not available on Arduino UNO.
RST pin – RST pin is used to reset the ESP8266 chip and Arduino UNO MCU.
ICSP HEADER
Arduino Uno has an ICSP female header. In-circuit serial programming (ICSP) is the ability of Arduino UNO to be programmed without disconnecting from the circuitry.
Arduino UNO has developed its own in-circuit serial programming headers.
There are six ICSP pins (MISO, MOSI, SCK, VCC, Ground, Reset) available on the Arduino Uno board that can be hooked to a programmer device via a programming cable.
How to write codes for NodeMCU ESP8266?
There are a variety of development platforms that can be equipped to program the NodeMCU ESP8266.
You can develop firmware for NodeMCU ESP8266 using the Arduino IDE.
Follow the steps below to setup Arduino IDE for NodeMCU ESP8266.
Step 1: First Download Arduino IDE Software
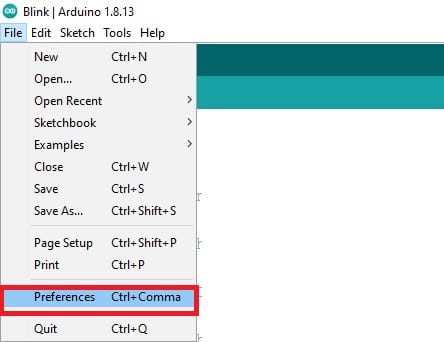
Step 2: Open Arduino IDE and Go to File > Preference.
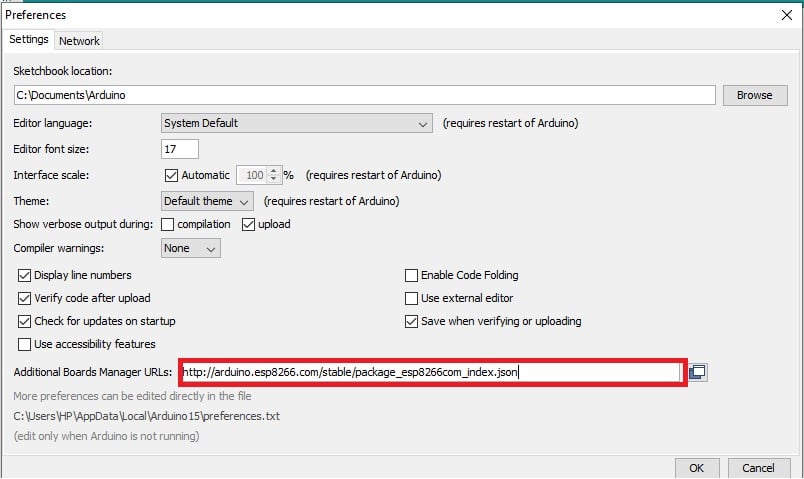
Step 3: In Preference windows, copy-paste the below link in Additional Boards Manager URLs.
Note that if you want to add another link, then you can put a comma and then paste another link. http://arduino.esp8266.com/stable/package_esp8266com_index.json
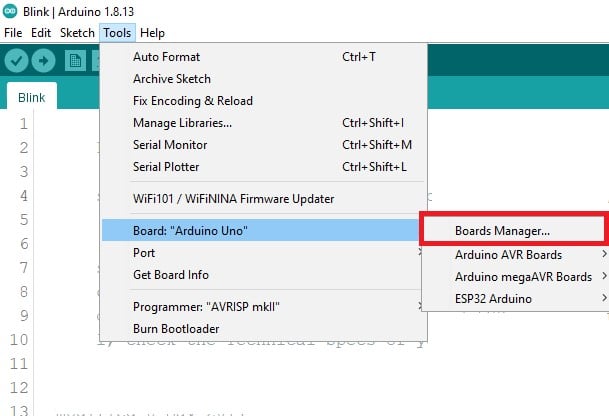
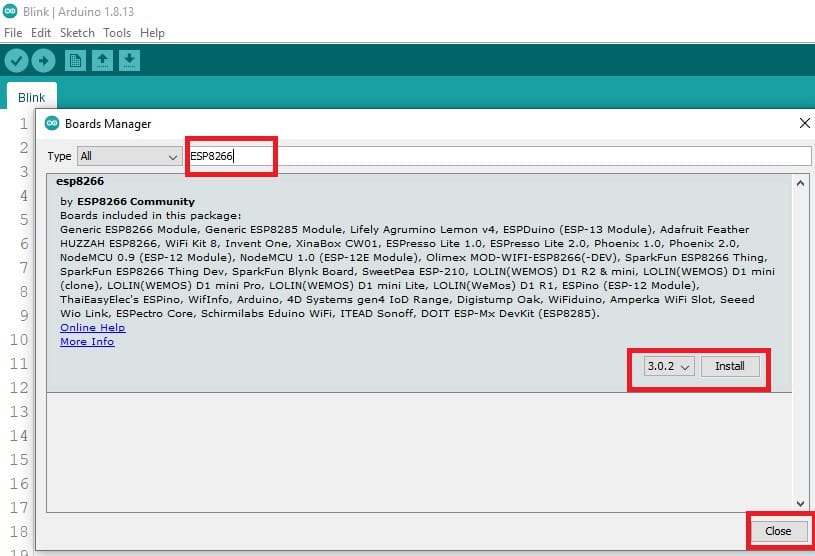
Step 4: Now close the Preference window and go to Tools > Board > Boards Manager
Step 5: In the Boards Manager window, type ESP8266 in the search box. ESP266 will be listed in the search result Now, select the latest version of the board and click on install.
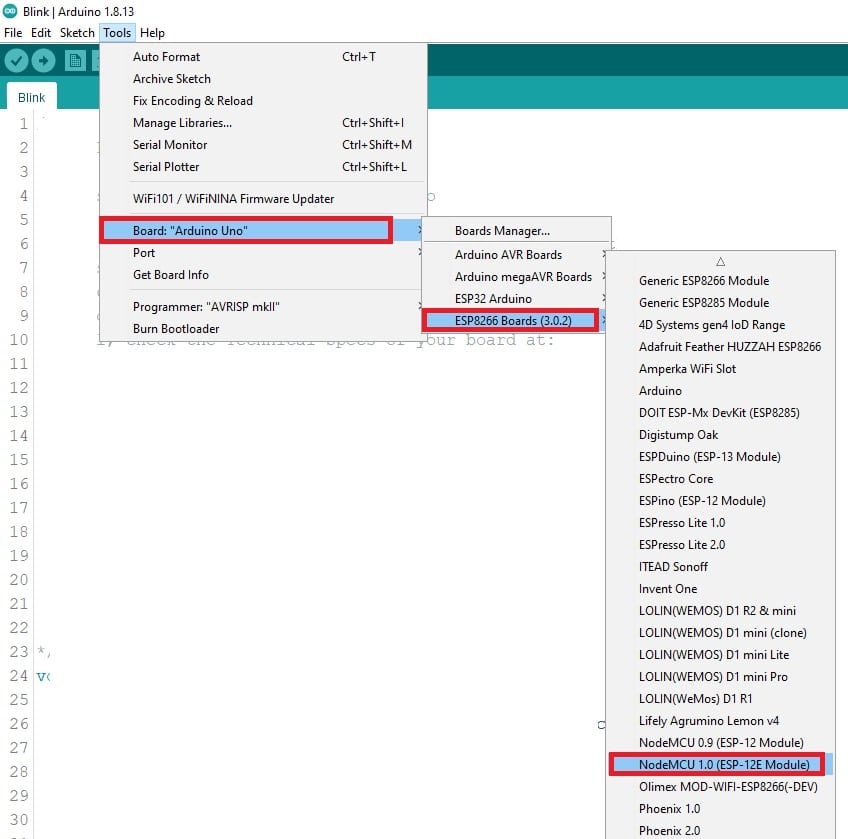
Step 6: After installation of the board is complete, open Tools > Board > and select NodeMCU ESP8266 1.0 (ESP-12E Module).
Again to select the Port, go to Tools > Port and select the ESP8266 COM Port.
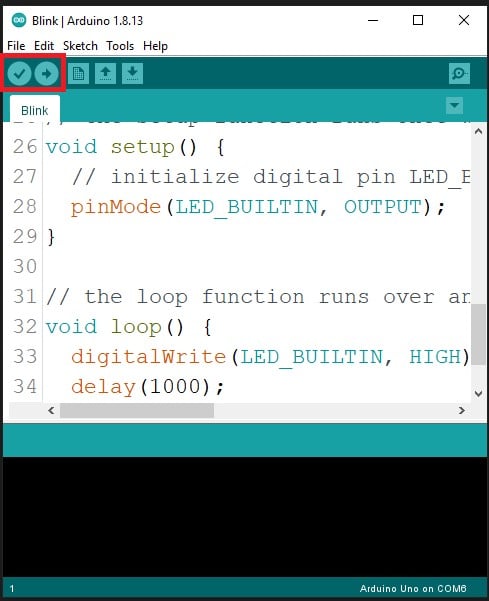
Step 7: In the File menu, go to Example and then open Blink example.

Step 8: Click on Verify code and then upload it on your board.
How to write codes for Arduino Uno?
You can write firmware code for Arduino Uno with a well-known Arduino IDE.
You can develop immeasurably more applications on Arduino Uno using the Arduino IDE in C++.
Step 1: First, Download Arduino IDE. Arduino IDE
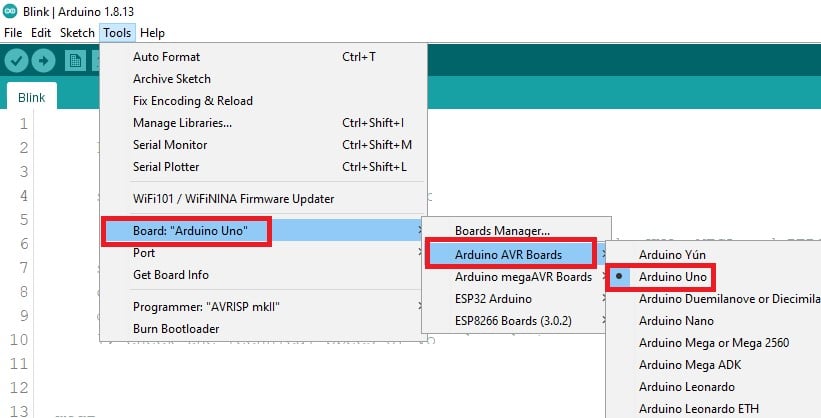
If you can not understand the instructions, also see the image and follow the steps.
Step 2: Open Arduino IDE and Go to Tools > Board > Arduino AVR Boards > Select Arduino Uno.
Again to select the Port, go to Tools > Port and select the Arduino UNO COM Port.
Step 3: In the File menu, go to Example and then open Blink example.
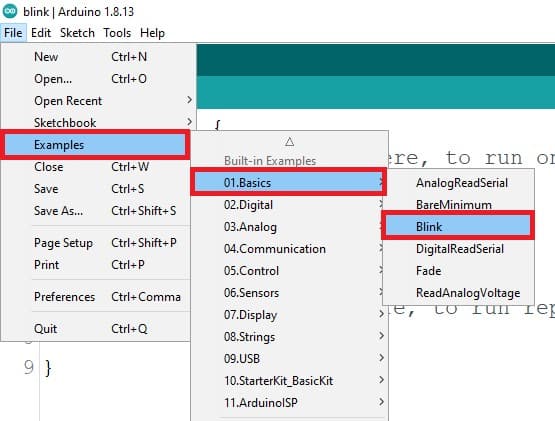
Step 4: Click on Verify code and then upload it on your board.

What are the advantages of NodeMCU?
- The NodeMCU ESP8266 is Low power and Low-cost device suitable for embedded applications.
- It comes with an integrated WiFi module, which makes it suitable for Internet of Things (IoT) applications.
- NodeMCU ESP8266 also supports FreeRTOS, which allows the programmer to design parallel tasks for the board.
- Better memory and processing than Arduino UNO.
- ESP8266 board is compatible with breadboard and also suitable to place on Printed Circuit Board (PCB).
- Easy to program using Arduino IDE and open-source software.
What are the advantages of Arduino Uno?
- Arduino UNO is an inexpensive and most popular board for beginners.
- Open-source hardware and software also provide great community support.
- Arduino UNO has more analog pins compared to ESP8266.
What can you do with NodeMCU ESP8266?
You can build a beginner-level embedded and IoT project using NodeMCU ESP8266.
A few of the examples are given below.
- IoT Home Automation
- Web Controlled Servo using ESP8266
- Air Pollution Monitoring Using ESP8266
- Wi-Fi controlled robot
- Humidity and Temperature Monitoring
Is ESP8266 better than Arduino UNO?
If you compare performance, cost, power, and functionality, then ESP8266 is far better than Arduino UNO.
NodeMCU ESP8266 supports WiFi for web servers, and it can be set in STA or AP mode.
You can update the firmware of ESP8266 over the air (OTA).
Due to FreeRTOS, you can achieve the parallel tasks in ESP8266.
The only disadvantage of ESP8266 is that it has only one built-in analog pin, so you can not interface more than one analog interface with a built-in ESP8266.
Conclusion
In my opinion, there are only a few use cases where you should not go with a NodeMCU ESP8266 based board.
The NodeMCU ESP8266 based boards have low power consumption, high memory, and built-in Wi-Fi.
However, if you are a beginner and want a ready-made example of everything, you should go for Arduino UNO. It has great community support.
I would love to know what project you plan on building or have already made with the Arduino.
If you have any questions or suggestions, or if you think things are missing in this tutorial, please leave a comment below.
Note that comments are held for moderation to prevent spam.

Hiren is a professional Embedded Engineer with a Master’s Degree
in Electronics and Communication Engineering. He is proficient in C and
C++ and enjoys building DIY projects on Arduino, ESP32, PIC32, STM32 & Raspberry PI boards.
jrb
Monday 16th of May 2022
Hello, nice write-up, personnally, I would have insisted that beginners should use the UNO with the socket mounted 328 chip solely because it is a great option to be able to replace it should you ever destroy some IOs... that is a, seldom mentioned, great feature specially for beginners...