This tutorial will show you how to interface a BMP180 digital pressure and temperature sensor to the Arduino.
By the end of this tutorial, you can read the BMP180 data easily. You can use the data in your upcoming Arduino projects.
You will find that the BMP180 sensor is helpful in several applications to calculate vertical speed, monitor weather, sports applications, indoor navigation, etc.
You will have all the expertise needed to understand and work with the BMP180 sensor.
I will provide you with the BMP180 sensor pinouts, the operating range, and the sensor’s accuracy in the initial sections of the article.
The remaining section will show you how to connect BMP180 to the Arduino and the example Arduino sketches to read the sensor values.
Components Needed To Connect BMP180 To Arduino
Hardware Components
- Arduino Uno Rev3 x 1
- BME180 sensor x 1
- Dupont wire x 4
- Arduino USB cable (for powering and programming) x 1
Software
Makerguides.com is a participant in the Amazon Services LLC Associates Program, an affiliate advertising program designed to provide a means for sites to earn advertising fees by advertising and linking to products on Amazon.com.
You can read the BMP180 sensor values using the parts listed above. Let us begin!
What Is The BMP180 Sensor?
BMP180 is a dedicated barometric pressure sensor. It helps you create exciting projects that can find applications in:
- Building weather stations
- Sports projects (altitude based)
- Drone-based projects
- Enhanced GPS navigation
- Room heating and ventilation etc.
The circuit connection is simple. You don’t need complex circuitry for powering and reading the BMP180 sensor.
BMP180 works over I2C and can run at a high speed of up to 3.4 MHz.
You can read the pressure and temperature data from the BMP180 sensor at different accuracy levels:
- Ultra-Low Power Mode (Least power consumption)
- Standard
- High-Resolution
- Ultra-High Resolution (Highest power consumption)
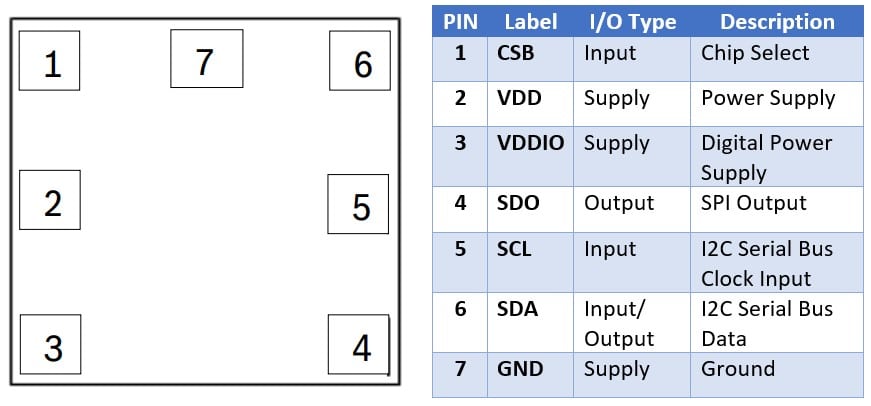
BMP180 comes in a very tiny 7 pin package. I have given the Pinouts of the BMP180 sensor in the below table.
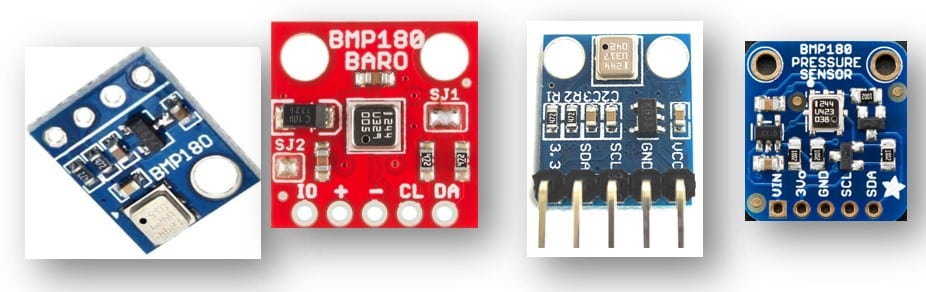
You will find Several BMP180 sensor expansion boards around. It will help you to easily connect to Arduino boards using Dupont wires.
If you follow this tutorial, you can work with any BMP180 expansion board. I am using a BMP180 board from Adafruit.
Here are the commonly found BMP180 expansion sensor boards.
This article will show you the connections and the code using the Adafruit BMP180 sensor. In the following image, you will see the parts of the BMP180 sensor board in the image below.
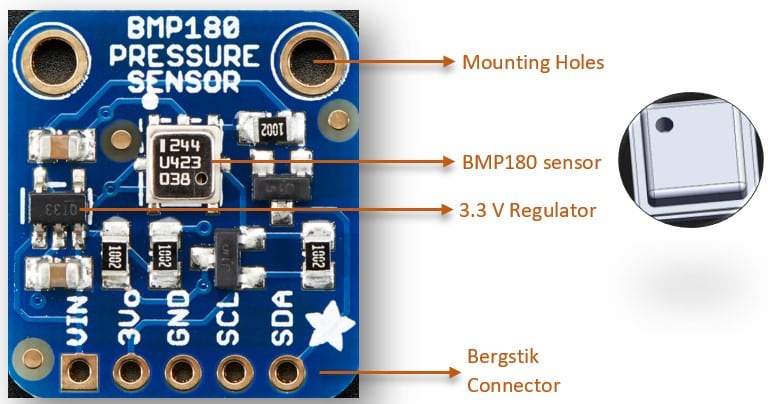
SCL and SDA lines need pullup resistors. In the sensor board, the resistors are already available.
The BMP180 sensor board has 5 Pins. I will brief you about the 5 Pins in the table below:
| VIN | Input supply voltage. The range is 3 V to 5 V |
| 3V0 | 3 V pin out from the regulator |
| GND | Ground pin. Connect this to Arduino GND pin |
| SCL | I2C Clock line (Serial CLock) |
| SDA | I2C Data line (Serial DAta) |
The operation range of the BMP180 is as follows:
- Temperature range: -40 °C to 85 °C. Hence this can be used in a variety of applications with extreme temperatures. Note that the accuracy specification will cover a limited temperature range 0 °C to 65 °C.
- Pressure range: 300 to 1100 hPa. This range can help you build applications for indoor such as navigation, as well as in gaming.
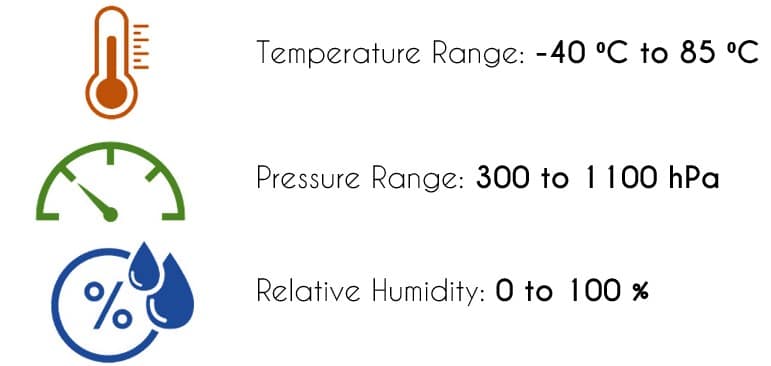
| Temperature Range | -40 °C to 85 °C |
| Pressure Range | 300 to 1100 hPa |
| Temperature Accuracy | +/- 1 °C |
| Pressure Accuracy (Relative) | +/- 0.12 hPa |
| Pressure Accuracy (Absolute) | +/- 1 hPa |
You can find more details in the datasheet:
Step-By-Step Instructions To Connect BMP180 To Arduino
I will highlight the pin details and the connections first. The following steps will take you through a step-by-step connection guide to complete this project.
BMP180 Pinout information
| Arduino UNO | BMP180 Board |
| 5 V | VIN |
| GND | GND |
| PIN A4 | SDA |
| PIN A5 | SCL |
| No connection | 3V0 |
In the next section, you will step-by-step connection guide to connecting the BMP180 sensor to the Arduino UNO.
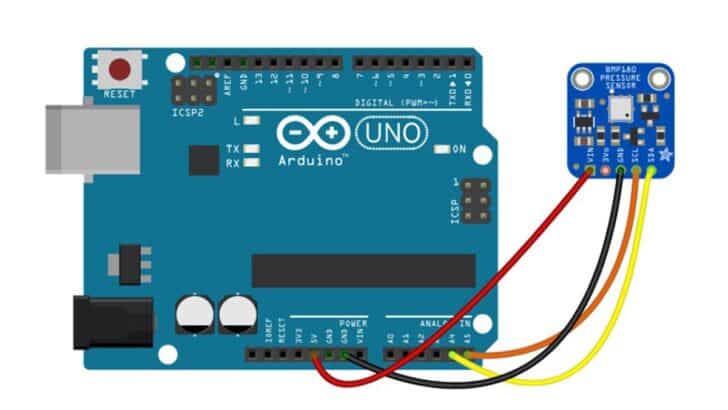
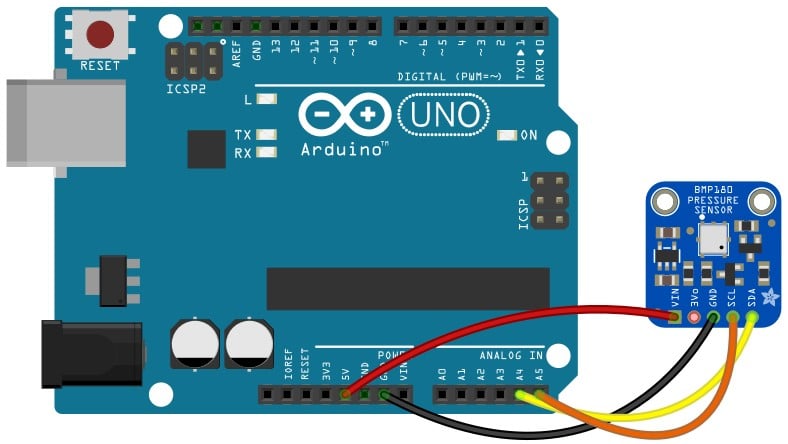
Step 1: Wiring Arduino and the BMP180 Board
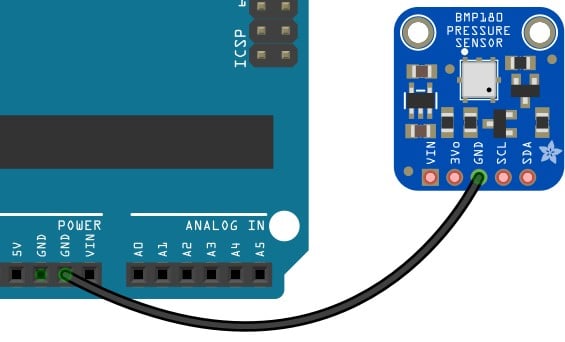
1) Connect GND of both Arduino UNO and BMP180 sensors
Take a jumper (Dupont cable) and connect one end to the GND pin of the Arduino.
Connect the other end of the jumper to the GND pin of the BMP180 sensor board.
It is always a good practice to connect GND pins first.
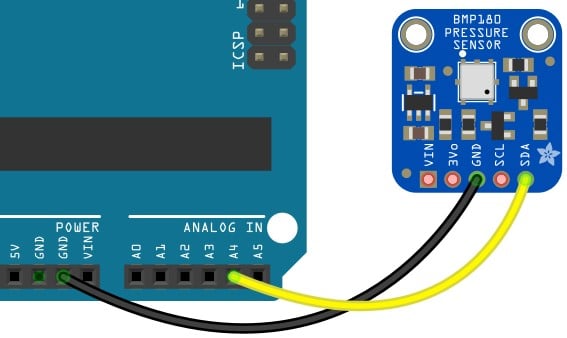
2) Connect another cable between the Arduino A4 pin and the SDA pin of the BMP180.
3) Make the third connection between Arduino Pin A5 and SCL pin of the BMP180 board.
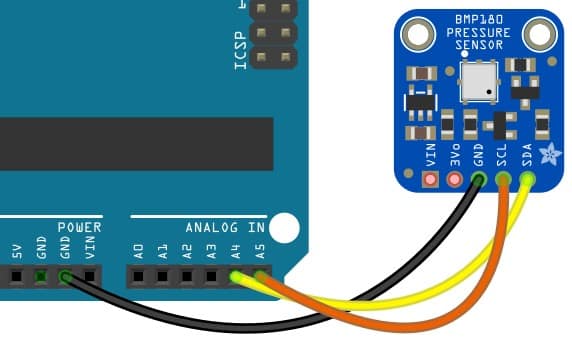
4) Make the last connection between the Arduino 5V pin and the VIN pin on the BMP180 module.

You will find three GND pins on the Arduino UNO. You can connect to the GND pin, which is more easily accessible.
Congratulations! You have completed the connections between Arduino UNO and the BMP180 sensor.
Wiring the BMP180 sensor with Arduino Mega is similar to earlier steps. Here are the required connection details.

The I2C lines for the Arduino Boards are present on different pins. The below table will help you find the I2C pins for the boards you have.
| Arduino UNO, Ethernet | A4 (SDA), A5 (SCL) |
| Arduino Mega2560 | 20 (SDA), 21 (SCL) |
| Arduino Leonardo | 2 (SDA), 3 (SCL) |
| Arduino Due | 20 (SDA), 21 (SCL), SDA1, SCL1 |
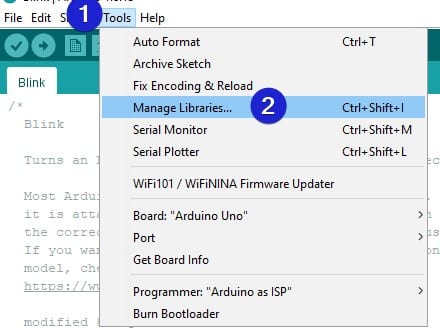
Step 2: How To Install Arduino Libraries Needed For BMP180 Sensor
1) Open Arduino sketch and go to Tools – Click on Manage Libraries
You can use this option to install the third-party libraries which are not already there in the IDE available
2) Search for the Adafruit BMP180 library and hit Enter. You will find the Adafruit BMP180 library in the results. Click on Install.
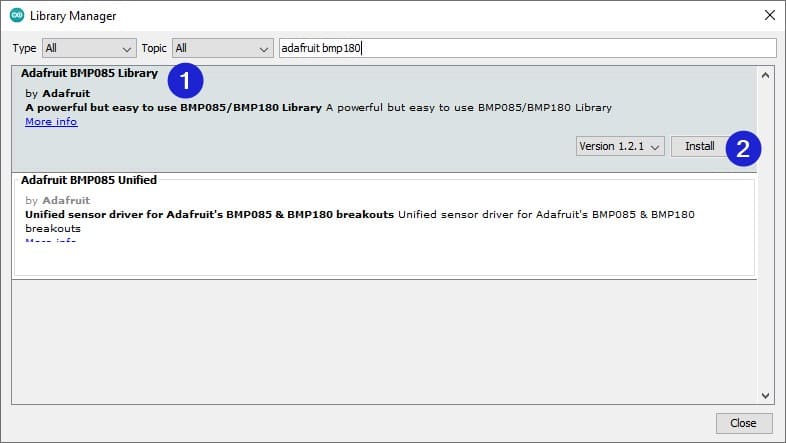
3) Also install the needed Adafruit unified sensor in the same way.

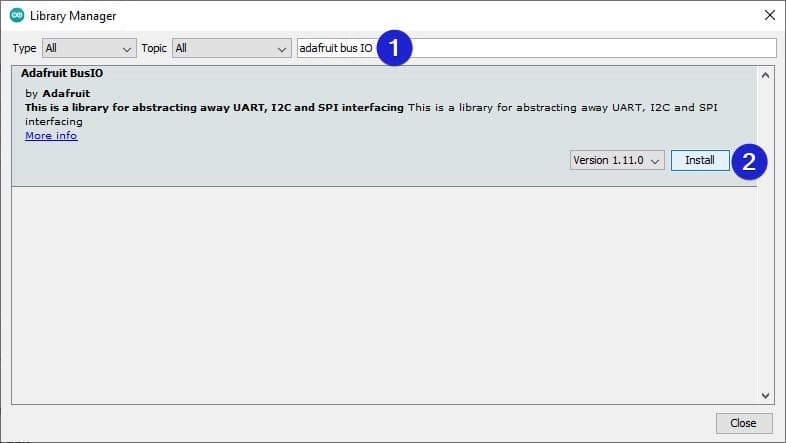
4) You also need the Adafruit Bus IO library. Install it as well.
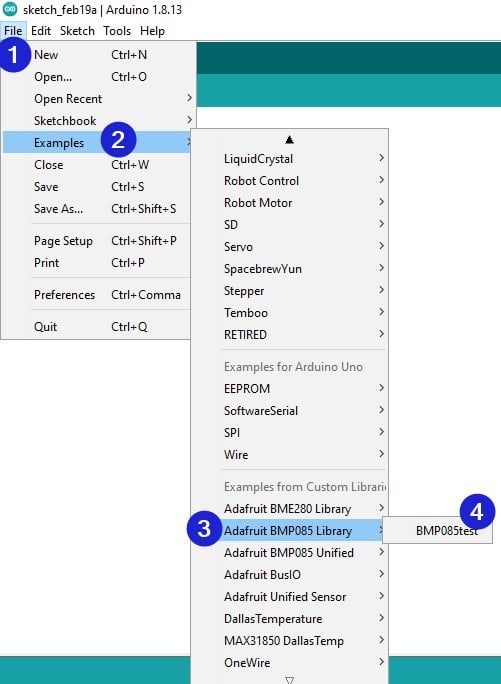
5) You can find the BMP180 working examples in the path given below.
Step 3: I2C Arduino Code for BMP180 sensor
1) Open the Arduino IDE and paste the below code in an empty sketch
#include "Adafruit_BMP085.h"

Adafruit_BMP085 bmp;

void setup() {
  Serial.begin(9600);
  if (!bmp.begin()) {
    Serial.println("Could not find a valid BMP085 sensor, check wiring!");
    while (1) {}
  }
}

void loop() {
  Serial.print("Temperature = ");
  Serial.print(bmp.readTemperature());
  Serial.println(" *C");

  Serial.print("Pressure = ");
  Serial.print(bmp.readPressure());
  Serial.println(" Pa");

  // Calculate altitude assuming 'standard' barometric
  // pressure of 1013.25 millibar = 101325 Pascal
  Serial.print("Altitude = ");
  Serial.print(bmp.readAltitude());
  Serial.println(" meters");

  Serial.print("Pressure at sealevel (calculated) = ");
  Serial.print(bmp.readSealevelPressure());
  Serial.println(" Pa");

  // you can get a more precise measurement of altitude
  // if you know the current sea level pressure which will
  // vary with weather and such. If it is 1015 millibars
  // that is equal to 101500 Pascals.
  Serial.print("Real altitude = ");
  Serial.print(bmp.readAltitude(101500));
  Serial.println(" meters");

  Serial.println();
  delay(500);
2) Description of major parts in the BMP180 code
Adafruit_BMP085 bmp; Creates the bme object of type Adafruit_BMP180
Serial.begin(9600); Enable Serial communication so that the parameters from BMP180 sensor can be displayed on the serial terminal
readTemperature(); Read the temperature in degree celsius. If you want in Fahrenheit, you can use the equation below
°F = °C * 1.8000 + 32.00
readPressure(); Returns the Pressure measured in hPa
readAltitude(SEALEVELPRESSURE_HPA); Returns the height computed based on the pressure and the parameter sent.
FAQs About The BMP180 Sensor And Arduino
I have compiled the most Frequency asked questions about the BMP180 sensor in this section.
If you have any further questions, please reply in the comments.
1) What is the accuracy of the BMP180 sensor?
The accuracy of the temperature sensors is ±0.5 °C at room temperature.
For a more comprehensive operating temperature range, the accuracy is ±1 °C.
The pressure sensor has a noise range of 0.02 hPa with Advanced resolution mode.
2) What is the I2C address of the BMP180 sensor?
BMP180 sensor has a fixed I2C address of 0x77.
This means you cannot have two sensors onboard without extra circuitry to handle two I2C devices with the same address.
3) What is the difference between BMP180 and BMP085 sensors?
BMP180 sensor is the successor of BMP085. BMP180 has higher precision and advanced modes, making it a state-of-the-art pressure sensor.
BMP085 and BMP180 are 100% compatible with commands and data format.
4) How do you calibrate a BMP180 sensor?
BMP180 sensor has factory programmed trimming values stored in its non-volatile internal memory EEPROM). You can read them but can not alter them.
The trimming values can improve the sensor’s accuracy using the formulae given in the BMP180 datasheet.
5) What are the pull-up values needed for the BMP180 I2C bus?
A resistor between 2.2 kΩ and 10 kΩ is necessary for the BMP180 sensor I2C bus.

I am Puneeth. I love tinkering with open-source projects, Arduino, ESP32, Pi and more. I have worked with many different Arduino boards and currently I am exploring, Arduino powered LoRa, Power line communication and IoT.