This article includes everything you need to know about controlling a 28BYJ-48 stepper motor with the ULN2003 driver board and Arduino. I have included datasheets, a wiring diagram, and many example codes!
First we take a look at the easy to use Arduino Stepper library. This library is great when you are just starting out, but doesn’t have many extra features.
I highly recommend to also take a look at the example codes for the AccelStepper library at the end of this tutorial. This library is fairly easy to use and can greatly improve the performance of your hardware.
After each example, I break down and explain how the code works, so you should have no problems modifying it to suit your needs.
If you want to learn more about controlling larger stepper motors with more torque and more speed, take a look at the articles below. In these articles I teach you how to control NEMA 17 stepper motors, with drivers like the A4988.
Other stepper motor tutorials:
- Control a stepper motor with L298N motor driver and Arduino
- How to control a Stepper Motor with Arduino Motor Shield Rev3
- How to control a stepper motor with A4988 driver and Arduino
- How to control a stepper motor with DRV8825 driver and Arduino
If you have any questions, please leave a comment below.
Supplies
Hardware components
 | 28BYJ-48 stepper motor | × 1 | Amazon |
| ULN2003 driver board | × 1 | Amazon | |
| Arduino Uno Rev3 | × 1 | Amazon | |
| Jumper wires (male to female) | × 10 | Amazon | |
| Breadboard (optional, makes wiring easier) | × 1 | Amazon | |
| USB cable type A/B | × 1 | Amazon | |
| 5V power supply (powering the stepper motor directly from the Arduino can damage it!) | × 1 | Amazon |
Software
Makerguides.com is a participant in the Amazon Services LLC Associates Program, an affiliate advertising program designed to provide a means for sites to earn advertising fees by advertising and linking to products on Amazon.com. As an Amazon Associate we earn from qualifying purchases.
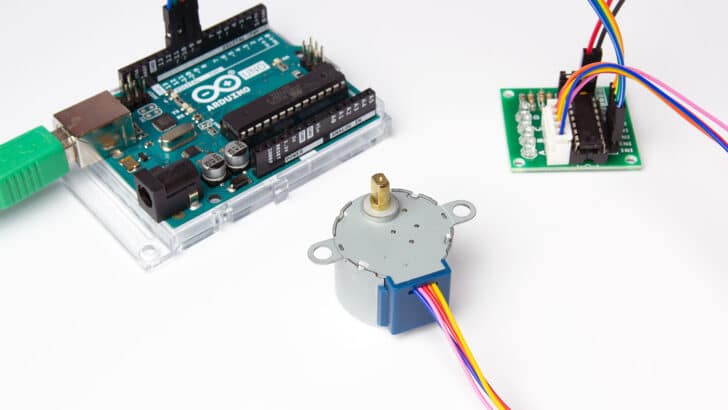
Information about the 28BYJ-48 stepper motor and ULN2003 driver board
The 28BYJ-48 is one of the cheapest stepper motors you can find. Although it is not super accurate or powerful, it is a great motor to use for smaller projects or if you just want to learn about stepper motors.
This motor is often used to automatically adjust the vanes of an air conditioner unit. It has a built-in gearbox, which gives it some extra torque and reduces the speed drastically.
Below you can find the specifications for both the stepper motor and driver that are used in this tutorial.
28BYJ-48 Stepper Motor Specifications
| Rated voltage | 5 V |
| Coil Resistance | 50 Ohms |
| Coil Type | Unipolar |
| Diameter – shaft | 0.197″ (5.00 mm) |
| Length – shaft and bearing | 0.394″ (10 mm) |
| Features | Flatted shaft |
| Size/dimension | Round – 1.100″ dia (28.00 mm) |
| Mounting hole spacing | Flatted Shaft |
| Gear reduction | 1/64 (see note) |
| Step angle | Half step mode (recommended): 0.0879° Full step mode: 0.176° |
| Steps per revolution | Half step mode: 4096 (see note) Full step mode: 2048 |
| Termination style | Wire leads with connector |
| Motor type | Permanent Magnet Gear Motor |
| Number of phases | 4 |
| Cost | Check price |
For more information you can check out the datasheet here.
Important note: Manufacturers usually specify that the motors have a 64:1 gear reduction. Some members of the Arduino Forums noticed that this wasn’t correct and so they took some motors apart to check the actual gear ratio. They determined that the exact gear ratio is in fact 63.68395:1, which results in approximately 4076 steps per full revolution (in half step mode).
I am not sure if all manufacturers use the exact same gearbox, but you can just adjust the steps per revolution in the code, to match your model.
The Adafruit Industries Small Reduction Stepper Motor uses the same form factor as the 28BYJ-48, but does have a different gear ratio. It has a roughly 1/16 reduction gear set, which results in 513 steps per revolution (in full-step mode). You can download the datasheet for it here.
For more information about the driver you can check out the datasheet below.
Wiring – Connecting 28BYJ-48 stepper motor and ULN2003 driver board to Arduino UNO
The wiring diagram/schematic below shows you how to connect the ULN2003 driver board to the 28BYJ-48 stepper motor and the Arduino. The connections are also given in the table below.
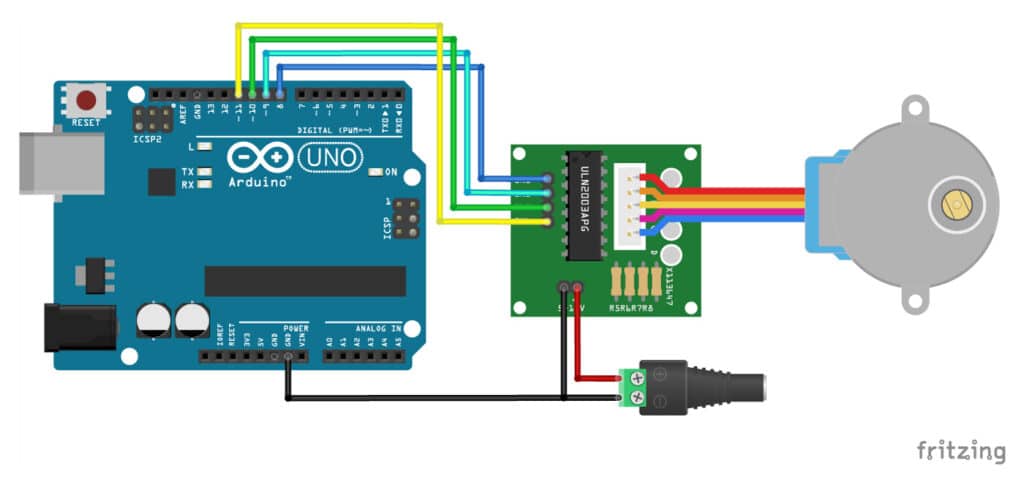
I used a breadboard and some jumper wires to connect the driver board to an external power supply.
ULN2003 and 28BYJ-48 to Arduino Connections
| ULN2003 Driver Board | Connection |
|---|---|
| IN1 | Pin 8 Arduino |
| IN2 | Pin 9 Arduino |
| IN3 | Pin 10 Arduino |
| IN4 | Pin 11 Arduino |
| – | Logic GND Arduino |
| – | GND power supply |
| + | 5 V power supply |
Please note: It is possible to directly power the stepper motor from the 5 V output of the Arduino. This however, is not recommended. When the stepper motor draws too much current you can damage the Arduino. I also found that when powering the Arduino with USB power only, I would get inconsistent behavior and bad performance of the stepper motor.
I recommend to power the driver board/stepper motor with an external 5 V power supply, like this one. It should come with a female DC connector, so you can easily connect it to some (jumper) wires. Note that you also need to connect the GND of the Arduino to the – pin on the ULN2003 driver board.
After uploading the code you also need to power the Arduino, either with a USB type-B cable or via the 5.5 mm power jack.
The jumper next to power connections on the driver board can be used to disconnect power to the stepper motor.
Basic Arduino example code to control a 28BYJ-48 stepper motor
You can upload the following example code to your Arduino using the Arduino IDE.
This example uses the Stepper.h library, which should come pre-installed with the Arduino IDE. This sketch turns the stepper motor 1 revolution in one direction, pauses, and then turns 1 revolution in the other direction.
/*
  Example sketch to control a 28BYJ-48 stepper motor
  with ULN2003 driver board and Arduino UNO.
  More info: https://www.makerguides.com
*/

// Include the Arduino Stepper.h library:
#include "Stepper.h"

// Define number of steps per rotation:
const int stepsPerRevolution = 2048;

// Wiring:
// Pin 8 to IN1 on the ULN2003 driver
// Pin 9 to IN2 on the ULN2003 driver
// Pin 10 to IN3 on the ULN2003 driver
// Pin 11 to IN4 on the ULN2003 driver

// Create stepper object called 'myStepper', note the pin order:
Stepper myStepper = Stepper(stepsPerRevolution, 8, 10, 9, 11);

void setup() {
  // Set the speed to 5 rpm:
  myStepper.setSpeed(5);

  // Begin Serial communication at a baud rate of 9600:
  Serial.begin(9600);
}

void loop() {
  // Step one revolution in one direction:
  Serial.println("clockwise");
  myStepper.step(stepsPerRevolution);
  delay(500);

  // Step one revolution in the other direction:
  Serial.println("counterclockwise");
  myStepper.step(-stepsPerRevolution);
  delay(500);
}
Code explanation:
The sketch starts by including the Stepper.h Arduino library. More information about this library can be found on the Arduino website.
// Include the Arduino Stepper.h library:
#include "Stepper.h"
Next, I defined how many steps the motor takes to rotate 1 revolution. In this example we will be using the motor in full-step mode. This means it takes 2048 steps to rotate 360 degrees (see motor specifications above).
// Define number of steps per rotation:
const int stepsPerRevolution = 2048;
Next, you need to create a new instance of the Stepper class, which represents a particular stepper motor connected to the Arduino. For this we use the function Stepper(steps, pin1, pin2, pin3, pin4) where steps is the number of steps per revolution and pin1 through pin4 are the pins to which the motor is connected. To get the correct step sequence, we need to set the pins in the following order: 8, 10, 9, 11.
// Create stepper object called 'myStepper', note the pin order:
Stepper myStepper = Stepper(stepsPerRevolution, 8, 10, 9, 11);
In this case I called the stepper motor ‘myStepper’ but you can use other names as well, like ‘z_motor’ or ‘liftmotor’ etc. Stepper liftmotor = Stepper(stepsPerRevolution, 8, 10, 9, 11);. You can create multiple stepper motor objects with different names and pins. This allows you to easily control 2 or more stepper motors at the same time.
In the setup, you can set the speed in rpm with the function setSpeed(rpm). The maximum speed for a 28byj-48 stepper motor is roughly 10-15 rpm at 5 V.
void setup() {
  // Set the speed to 5 rpm:
  myStepper.setSpeed(5);

  // Begin Serial communication at a baud rate of 9600:
  Serial.begin(9600);
}
In the loop section of code, we simply call the step(steps) function which turns the motor a specific number of steps at a speed determined by the setSpeed(rpm) function. Passing a negative number to this function reverses the spinning direction of the motor.
void loop() {
  // Step one revolution in one direction:
  Serial.println("clockwise");
  myStepper.step(stepsPerRevolution);
  delay(500);

  // Step one revolution in the other direction:
  Serial.println("counterclockwise");
  myStepper.step(-stepsPerRevolution);
  delay(500);
}
Example codes for 28BYJ-48 stepper motor with Arduino and AccelStepper library
In the following three examples I will show you how you can control both the speed, the direction and the number of steps the stepper motor should take. In these examples I will be using the AccelStepper library.
The AccelStepper library written by Mike McCauley is an awesome library to use for your project. One of the advantages is that it supports acceleration and deceleration, but it has a lot of other nice functions too.
You can download the latest version of this library here or click the button below.
You can install the library by going to Sketch > Include Library > Add .ZIP Library… in the Arduino IDE.
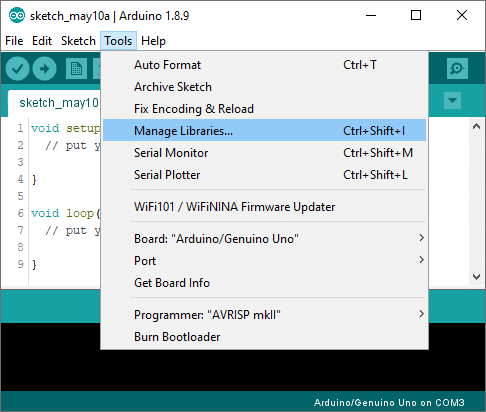
Another option is to navigate to Tools > Manage Libraries… or type Ctrl + Shift + I on Windows. The Library Manager will open and update the list of installed libraries.
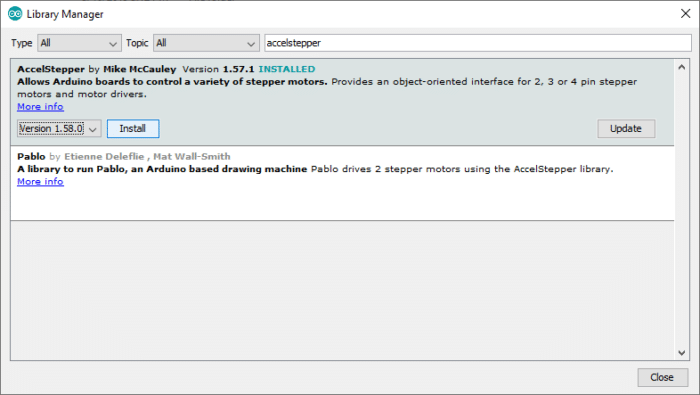
You can search for ‘accelstepper‘ and look for the library by Mike McCauley. Select the latest version and then click Install.
1. Continuous rotation example code
The following sketch can be used to run one or more stepper motors continuously at a constant speed. (No acceleration or deceleration is used).
You can copy the code by clicking on the button in the top right corner of the code field.
/*
  Example sketch to control a 28BYJ-48 stepper motor
  with ULN2003 driver board, AccelStepper and Arduino UNO:
  continuous rotation. More info: https://www.makerguides.com
*/

// Include the AccelStepper library:
#include "AccelStepper.h"

// Motor pin definitions:
#define motorPin1  8      // IN1 on the ULN2003 driver
#define motorPin2  9      // IN2 on the ULN2003 driver
#define motorPin3  10     // IN3 on the ULN2003 driver
#define motorPin4  11     // IN4 on the ULN2003 driver

// Define the AccelStepper interface type: 4 wire motor in half step mode:
#define MotorInterfaceType 8

// Initialize with pin sequence IN1-IN3-IN2-IN4
AccelStepper stepper = AccelStepper(MotorInterfaceType, motorPin1, motorPin3, motorPin2, motorPin4);

void setup() {
  // Set the maximum steps per second:
  stepper.setMaxSpeed(1000);
}

void loop() {
  // Set the speed of the motor in steps per second:
  stepper.setSpeed(500);
  // Step the motor with constant speed as set by setSpeed():
  stepper.runSpeed();
}
How the code works:
Again the first step is to include the library with #include "AccelStepper.h“.
// Include the AccelStepper library:
#include "AccelStepper.h"
The next step is to define the ULN2003 to Arduino connections.
The statement #define is used to give a name to a constant value. The compiler will replace any references to this constant with the defined value when the program is compiled. So everywhere you mention motorPin1, the compiler will replace it with the value 8 when the program is compiled.
// Motor pin definitions:
#define motorPin1  8      // IN1 on the ULN2003 driver
#define motorPin2  9      // IN2 on the ULN2003 driver
#define motorPin3  10     // IN3 on the ULN2003 driver
#define motorPin4  11     // IN4 on the ULN2003 driver
The next step is to specify the motor interface type for the AccelStepper library. In this case we will be driving a 4 wire stepper motor in half step mode, so we set the interface type to ‘8’. You can find the other interface types here. If you want to run the motor in full-step mode (fewer steps per revolution), just change the 8 to 4.
// Define the AccelStepper interface type: 4 wire motor in half step mode:
#define MotorInterfaceType 8
Next, you need to create a new instance of the AccelStepper class with the appropriate motor interface type and connections. To get the correct step sequence, we need to set the pins in the following order: motorPin1, motorPin3, motorPin2, motorPin4.
In this case I called the stepper motor ‘stepper’ but you can use other names as well, like ‘z_motor’ or ‘liftmotor’ etc. AccelStepper liftmotor = AccelStepper(MotorInterfaceType, motorPin1, motorPin3, motorPin2, motorPin4);. You can create multiple stepper motor objects with different names and pins. This allows you to easily control 2 or more stepper motors at the same time.
// Initialize with pin sequence IN1-IN3-IN2-IN4
AccelStepper stepper = AccelStepper(MotorInterfaceType, motorPin1, motorPin3, motorPin2, motorPin4);
In the setup section of the code, we define the maximum speed in steps/second with the function setMaxSpeed(). Speeds of more than 1000 steps per second can be unreliable, so I set this as the maximum. Note that I specify the name of the stepper motor (‘stepper’), for which I want to define the maximum speed. If you have multiple stepper motors connected, you can specify a different speed for each motor: stepper2.setMaxSpeed(500);.
void setup() {
  // Set the maximum steps per second:
  stepper.setMaxSpeed(1000);
}
In the loop, we first set the speed that we want the motor to run at with the function setSpeed(). (you can also place this in the setup section of the code).
stepper.runSpeed() polls the motor and when a step is due it executes 1 step. This depends on the set speed and the time since the last step. If you want to change the direction of the motor, you can set a negative speed: stepper.setSpeed(-400); turns the motor the other way.
void loop() {
  // Set the speed of the motor in steps per second:
  stepper.setSpeed(500);
  // Step the motor with constant speed as set by setSpeed():
  stepper.runSpeed();
}
In half step mode, one revolution takes 4096 steps, so 500 steps/sec results in roughly 7 rpm.
2. Sketch to control number of steps or revolutions
With the following sketch you can control both the speed, direction and the number of steps/revolutions.
In this case, the stepper motor turns 1 revolution clockwise with 500 steps/sec, then turns 1 revolution counterclockwise at 1000 steps/sec, and lastly turns 2 revolutions clockwise at 1000 steps/sec.
/* Example sketch to control a 28BYJ-48 stepper motor with
  ULN2003 driver board, AccelStepper and Arduino UNO
  More info: https://www.makerguides.com */

#include "AccelStepper.h"

// Motor pin definitions:
#define motorPin1  8      // IN1 on the ULN2003 driver
#define motorPin2  9      // IN2 on the ULN2003 driver
#define motorPin3  10     // IN3 on the ULN2003 driver
#define motorPin4  11     // IN4 on the ULN2003 driver

// Define the AccelStepper interface type; 4 wire motor in half step mode:
#define MotorInterfaceType 8

// Initialize with pin sequence IN1-IN3-IN2-IN4 for using the AccelStepper library with 28BYJ-48 stepper motor:
AccelStepper stepper = AccelStepper(MotorInterfaceType, motorPin1, motorPin3, motorPin2, motorPin4);

void setup() {
  // Set the maximum steps per second:
  stepper.setMaxSpeed(1000);
}

void loop() {
  // Set the current position to 0:
  stepper.setCurrentPosition(0);

  // Run the motor forward at 500 steps/second until the motor reaches 4096 steps (1 revolution):
  while (stepper.currentPosition() != 4096) {
    stepper.setSpeed(500);
    stepper.runSpeed();
  }
  delay(1000);

  // Reset the position to 0:
  stepper.setCurrentPosition(0);

  // Run the motor backwards at 1000 steps/second until the motor reaches -4096 steps (1 revolution):
  while (stepper.currentPosition() != -4096) {
    stepper.setSpeed(-1000);
    stepper.runSpeed();
  }

  delay(1000);

  // Reset the position to 0:
  stepper.setCurrentPosition(0);
  // Run the motor forward at 1000 steps/second until the motor reaches 8192 steps (2 revolutions):
  while (stepper.currentPosition() != 8192) {
    stepper.setSpeed(1000);
    stepper.runSpeed();
  }

  delay(3000);
}
Code explanation:
The first part of the code up to the loop() section is exactly the same as in the previous example.
In the loop I make use of a while loop in combination with the currentPosition() function. First, I set the current position of the stepper motor to zero with stepper.setCurrentPosition(0).
  // Set the current position to 0:
  stepper.setCurrentPosition(0);
Next, we make use of the while loop. A while loop will loop continuously, and infinitely, until the expression inside the parenthesis, () becomes false. So in this case I check if the current position of the stepper motor is not equal to 4096 steps (!= means: is not equal to). While this is not the case, we run the stepper motor at a constant speed as set by setSpeed().
  // Run the motor forward at 500 steps/second until the motor reaches 4096 steps (1 revolution):
  while (stepper.currentPosition() != 4096) {
    stepper.setSpeed(500);
    stepper.runSpeed();
  }
In the rest of the loop, we do exactly the same, just with a different speed and target position.
3. Acceleration and deceleration example code
With the following sketch you can add acceleration and deceleration to the movements of the stepper motor, without any complicated coding. The first section of this sketch is the same as in example 1, but the setup and the loop are different.
The motor will run two revolutions back and forth with a speed of 1000 steps per second and an acceleration of 200 steps/second2.
/*
  Example sketch to control a 28BYJ-48 stepper motor with ULN2003 driver board,
  AccelStepper and Arduino UNO: acceleration and deceleration.
  More info: https://www.makerguides.com
*/

#include "AccelStepper.h"

// Motor pin definitions:
#define motorPin1  8      // IN1 on the ULN2003 driver
#define motorPin2  9      // IN2 on the ULN2003 driver
#define motorPin3  10     // IN3 on the ULN2003 driver
#define motorPin4  11     // IN4 on the ULN2003 driver

// Define the AccelStepper interface type; 4 wire motor in half step mode:
#define MotorInterfaceType 8

// Initialize with pin sequence IN1-IN3-IN2-IN4
AccelStepper stepper = AccelStepper(MotorInterfaceType, motorPin1, motorPin3, motorPin2, motorPin4);

void setup() {
  // Set the maximum steps per second:
  stepper.setMaxSpeed(1000);
  // Set the maximum acceleration in steps per second^2:
  stepper.setAcceleration(200);
}

void loop() {
  // Set target position:
  stepper.moveTo(8192);
  // Run to position with set speed and acceleration:
  stepper.runToPosition();

  delay(1000);

  // Move back to original position:
  stepper.moveTo(0);
  // Run to position with set speed and acceleration:
  stepper.runToPosition();

  delay(1000);
}
How the code works:
In the setup, besides the maximum speed, we also need to define the acceleration/deceleration. For this, we use the function setAcceleration().
void setup() {
  // Set the maximum steps per second:
  stepper.setMaxSpeed(1000);
  // Set the maximum acceleration in steps per second^2:
  stepper.setAcceleration(200);
}
In the loop section of the code, I used a different way to let the motor rotate a predefined number of steps. First I set the target position with the function moveTo(). Next, we simply use the function runToPosition() to let the motor run to the target position with the set speed and acceleration. The motor will decelerate before reaching the target position.
void loop() {
  // Set target position:
  stepper.moveTo(8192);
  // Run to position with set speed and acceleration:
  stepper.runToPosition();

  delay(1000);

  // Move back to original position:
  stepper.moveTo(0);
  // Run to position with set speed and acceleration:
  stepper.runToPosition();

  delay(1000);
}
Finally, we set the new target position back to the 0, so that we return to the origin.
Conclusion
In this article I have shown you how you can control a 28BYJ-48 stepper motor with a ULN2003 driver and Arduino. We have looked at 4 examples, using both the Stepper and AccelStepper libraries. I hope you found it useful and informative. If you did, please share it with a friend that also likes electronics!
I would love to know what projects you plan on building (or have already built) with this stepper motor.If you have any questions, suggestions, or if you think that things are missing in this tutorial, please leave a comment down below.
Benne is professional Systems Engineer with a deep expertise in Arduino and a passion for DIY projects.
Adam
Sunday 3rd of March 2024
Is your first link to the MEAN WELL power supply a mistake? I've been waiting all week to get it in and now I'm seeing you link to an Alitove power supply adapter and DC connector that isn't in your part list...?
Stefan Maetschke
Monday 4th of March 2024
Hi, both of them are fine. Any DC power supply with 5V (up to 12V) output and sufficient current will work. The current will depend on the motors, and the number of motors you want to control. A single ULN2003 Driver can output up to 500mA.
John
Wednesday 7th of February 2024
Well that was fun. Brings several projects to mind. Using a Nano and powering the motor externally. All codes worked flawless. Many thanks!
Stefan Maetschke
Friday 9th of February 2024
Thanks, much appreciated!
Jan
Monday 20th of November 2023
Tried the first sketch only. Power the driver board from the Arduino's 5v pin as I had with the example sketch from manufacturer. Added the before I started but it still just made the motor buzz. Dropped the speed to 1rpm, still buzzing. changed the number of steps per rev to 4096 and the motor now turns half a revolution, stops for a buzz and then continues for another half a revolution. Increase the speed to 5rpm but no change to the behaviour. Tried it with the other steppers in the set that were not faulty and got the same result. Methinks the code and/or the library cause a problem with my 28BYJ-48s or my UNO. The sketch provided with the manufacturer's wiki didn't call a library and worked (after I edited it a bit), and ran all my motors backward (as a result of a different edit). I am not good enough at this to start a sketch, I have to attempt to mend other people's sketches, and half the time they still don't work.
Jan
Tuesday 21st of November 2023
@Stefan Maetschke, This has now been deleted twice from my posts by the website, so maybe that is why it does not in the sketch I was using. The line "(pointy bracket)Stepper.h(pointy bracket)" See if that gets censored as well. Inside the pointy brackets is the phrase Stepper(dot)h
Jan
Tuesday 21st of November 2023
@Stefan Maetschke, yes, good call. I was using 5V from the Arduino, in error; but all morning I have now been using a bench power supply for the motor, 5V at 350mA. After another half day's research and testing I have established that my motors are 4096 steps per revolution, achieved by 64 steps geared down by 64. The manufacturer's code (corrected) turns one revolution clockwise and then buzzes for the same time, then starts a second CW revolution. The Dronebot Workshop single motor code does not work at all, even after I have corrected the steps per rev and changed the firing sequence back to 8-9-10-11 (that gave me 1/4 revolution just once, the rest of the time gentle buzzing). The first code on this site exactly half works if edited as follows. I have not yet tried any more. 1 add below #include. 2 Change stepsPerRevolution to 2048 3 reduce the setSpeed to my motor's absolute maximum (from testing) of 11 rpm. This half works in so far as it does a clockwise revolution, pauses for half a second and does another. The serial monitor started by editing out the counterclockwise revolutions, even on the few occasions it did one or tries. Now the Serial Monitor writes clockwise and counterclockwise alternately while the spindle only turns clockwise. As it looks like the code may be sorted it seems that all five of my motors are faulty in so far as they don't take any notice of the minus sign at the start of (-stepsPerRevolution). Or China has managed to map produce millions of individually unique items.
Stefan Maetschke
Tuesday 21st of November 2023
I tested all 4 code examples with the given wiring and they work. Are you powering the stepper motor from your Arduino or from an external power source? If you power the stepper motor from the Arduino that is likely to cause issues. The Arduino may not provide sufficient current to run the motor and the Arduino may get damaged. It sounds like that the stepper motor get insufficient voltage (should be 5V...12V) or current.
Bubbles
Saturday 29th of October 2022
HELP. I've tried everything....
Im using the motor and driver specified here with an arduino nano and CANNOT get any coding to move the motor. The LED lights are on at full on the driver but theres no movement like its cycling through the phases. I have swapped two drivers and two motors to make sure the components aren't fried. When I hook the motor directly to the Nano I can feel it vibrating like its trying to move but it clearly is underpowered (which I know it is). When I have it connected back to the driver I am powering it with an external 5V 2.1A power supply.
What am I missing here? I feel as though I've been through every topic that has to do with this motor on the arduino community site and still am so so so stuck.
Jan
Tuesday 21st of November 2023
@Bubbles, I have a similar but slightly different problem. these things are spectacularly temperamental. You look like you have the power sorted. vibration means juice is getting through. most likely is that your setup is sending the pulses too quickly for the motor to cope with them. Try reducing the "setSpeed" to 5. If it still buzzes try 1. I don't think you can go lower than that, my computer running IDE1.8.19 and an UNO can't cope with rpm below 1, but that doesn't mean yours won't either. If that still doesn't work, keep the speed low but play around with the number of pulses per revolution. My motors say the step angle is "5.625 x 1/64" which actually means the internal motor takes 64 pulses per 360 degree circle, and that is geared down 64fold by cogs on its way to the output shaft, meaning 4096 pulses. But for the purposes of the first sketch here, my 4096 step motors need the "stepsPerRevolution" set to 2048 to do one rotation. If changing speed and number of pulses per rev don't work, try reversing the direction of the spindle in your code by putting a minus before the stepsPerRevolution in the second line of code in the loop. Otherwise it is not impossible that your motor is faulty. We still have the rational rule that cheap = rubbish, even with China out-Capitalism-ing the West. Good luck
r4Y
Tuesday 30th of March 2021
Hi, it kinda works but the stepper motor doesnt rotate. ot vibrates littlebit tho. how can i fix this?
Travis
Friday 6th of May 2022
@r4Y, this i believe would be due a possibility of a few things. one) could be the speed is set too high and the torque is just not being produced, or the number of defined steps in the code is off, or even how many steps are called in the loop or whatever are not actual whole integers after the conversion to hex/binary by the compiler, three) signals going to the motor in an incorrect phase or sequence. if you look at the UN2003 breakout module thing, the output LEDs essentially look like a Binary Counter, and when the motor is stepping fine it follows the binary counting sequence its been set to do. however, when wires are placed in mis ordered pins the magnetic field is not being rotated in a logical or smooth fashion and haphazardly produces seemingly random rotational force, but its just whatever phase its connected as, and the output LEDs show this ugly sequential pattern. i know this is late so sorry.
r4Y
Tuesday 30th of March 2021
im using arduino mega 2560 BTW