In this tutorial, you will learn how DHT11 and DHT22/AM2302 digital temperature and humidity sensors work and how you can use them with Arduino. These sensors are very popular for DIY electronics projects and are perfect for remote weather stations, home automation projects, and plant/garden monitoring systems.
In this article, I have included wiring diagrams and several example codes so you can start experimenting with your sensor. After each example, I break down and explain how the code works, so you should have no problems modifying it to suit your needs.
First, we will take a look at the Adafruit DHT library. Next, I will show you how you can combine the sensor with a 16×2 LCD to create a simple weather station.
Recommended articles
- LM35 analog temperature sensor with Arduino tutorial
- TMP36 analog temperature sensor with Arduino tutorial
Supplies
Hardware components
| 4 pin DHT11 sensor | × 1 | Amazon |
| 4 pin DHT22/AM2302 sensor | × 1 | Amazon |
| 3 pin DHT11 sensor (recommended) | × 1 | Amazon |
| 3 pin DHT22/AM2302 sensor (recommended) | × 1 | Amazon |
| 5 – 10 kΩ resistor (only for 4 pin sensors) | × 1 | Amazon |
| Arduino Uno Rev3 | × 1 | Amazon |
| Breadboard | × 1 | Amazon |
| Jumper wires | ~ 10 | Amazon |
| USB cable type A/B | × 1 | Amazon |
| 16×2 character I2C LCD (optional) | × 1 | Amazon |
Software
Makerguides.com is a participant in the Amazon Services LLC Associates Program, an affiliate advertising program designed to provide a means for sites to earn advertising fees by advertising and linking to products on Amazon.com. As an Amazon Associate we earn from qualifying purchases.
How do DHT11 and DHT22/AM2302 temperature and humidity sensors work?
If you open up a DHT11 or DHT22/AM2302 sensor, you will see that it contains two sensing elements: a humidity sensing element and an NTC (thermistor).
The humidity sensing element consists of two electrodes with a moisture holding substrate in between. The sensor measures the resistance between the electrodes, which changes depending on the amount of moisture in the air.
On the back of the sensor, you will find a small IC that measures and processes the analog signal. It also stores the calibration coefficients and does the analog to digital conversion.
What is relative humidity?
When you look at the datasheet of the DHTxx sensors, you will see that they measure the relative humidity (RH) of the air and not the absolute humidity. But what’s the difference? The absolute humidity is the amount of water vapor in the air (expressed in g/m³), regardless of temperature. The relative humidity does take temperature into account.
Relative humidity is the ratio between the actual amount of water vapor present in the air and the maximum amount of water vapor that the air can hold at a given temperature.
Warm air can hold more water than cold air. This means that for the same amount of water vapor in the air, the relative humidity in cool air will be higher than that in warm air. At 100 percent relative humidity, the air is saturated and is at its dewpoint.
DHT11 Specifications
| Operating voltage | 3.3 – 5.5 V |
| Operating current | Measuring: 0.3 mA, standby: 60 μA |
| Humidity measuring range | 5 – 95 % RH ± 5 % RH |
| Temperature measuring range | -20 – 60 °C ± 2 °C |
| Communication protocol | 1-Wire |
| Sampling period | > 2 seconds |
| Body dimensions | 15.5 x 12 x 5.5 mm |
| Pin dimensions | 8 mm length, 2.54 mm spacing |
| Advantage | Ultra low cost |
| Cost | Check price |
For more information you can check out the datasheet below:
DHT22/AM2302 Specifications
| Operating voltage | 3.3 – 5.5 V |
| Operating current | Measuring: 0.5 mA, standby: 15 μA |
| Humidity measuring range | 0 – 99.9 % RH ± 2 % RH |
| Temperature measuring range | -40 – 80 °C ± 1 °C |
| Communication protocol | 1-Wire bus protocol |
| Sampling period | 2 seconds |
| Body dimensions | 25 x 15 x 7 mm, ⌀ 3 mm mounting hole |
| Pin dimensions | 7 mm length, 2.54 mm spacing |
| Advantage | More accurate |
| Cost | Check price |
You can download the datasheet for the DHT22/AM2302 below:
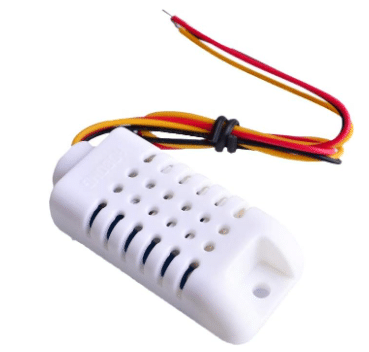
Note that the AM2302 is simply a wired version of the DHT22 sensor with 3 leads.
As you can see, the specifications of the DHT11 and the DHT22/AM2302 are quite similar. The main difference is that the DHT22 is more accurate and has a larger measuring range. The DHT11 is a bit smaller than the DHT22 and is also less expensive.
The nice thing about these sensors is that they are interchangeable, meaning that you can just replace the DHT11 with a DHT22 or vice versa, the wiring is exactly the same. You will only have to make a small change in the code setup, as you will see later.
Wiring – Connecting DHT11 and DHT22/AM2302 to Arduino Uno
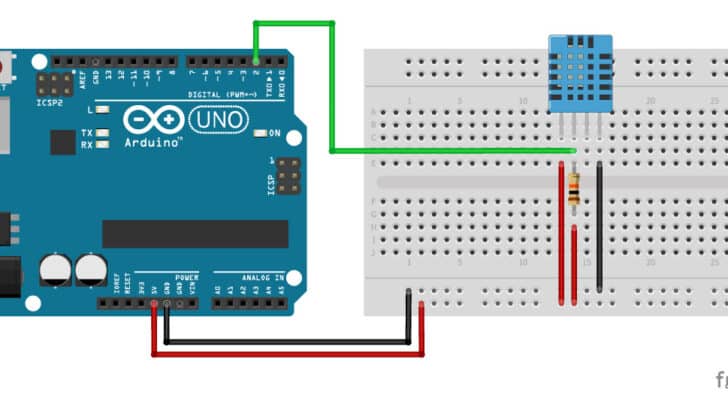
The wiring diagrams/schematics below show you how to connect 3 or 4 pin temperature and humidity sensors to the Arduino Uno. A 10 kΩ pull-up resistor is needed between the signal line and 5 V to make sure the signal level stays high by default (see the datasheet for more info).
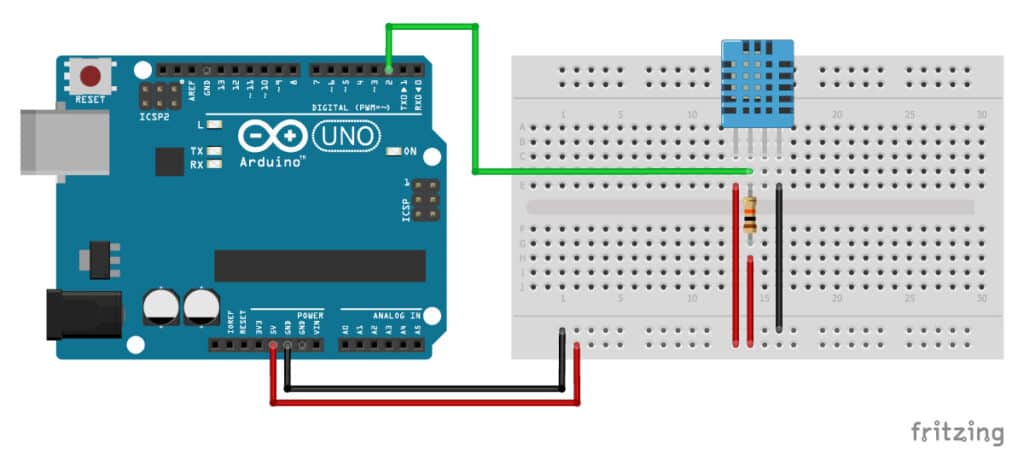

Note that the DHT22/AM2302 sensor is connected in the exact same way as the DHT11. The connections are also given in the table below. I numbered the pins 1 to 4 from left to right when the holes in the sensor are facing towards you.
4 Pin DHT11 and DHT22 Connections
| DHT11/DHT22 | Arduino |
|---|---|
| Pin 1 | 5 V |
| Pin 2 | Connect to digital pin 2 and to 5 V via 10 kΩ resistor |
| Pin 3 | Not connected |
| Pin 4 | GND |
You can also buy the sensors mounted on a small PCB (3 pin sensors). These breakout boards make it easier to connect the sensor to the Arduino and also already include a pull-up resistor. Be sure to check the label of the sensor, the order of the pins can be different depending on the manufacturer.
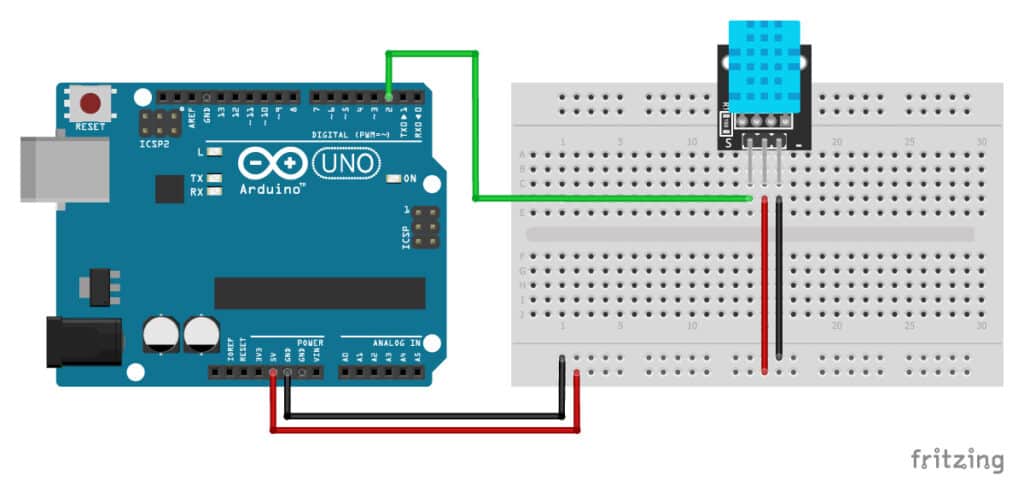
3 Pin DHT11 Connections
| 3 Pin DHT11 | Arduino |
|---|---|
| s | Digital pin 2 |
| + | 5 V |
| – | GND |
The code examples below use digital pin 2 to receive the sensor data, but you can change this to any digital pin you want.
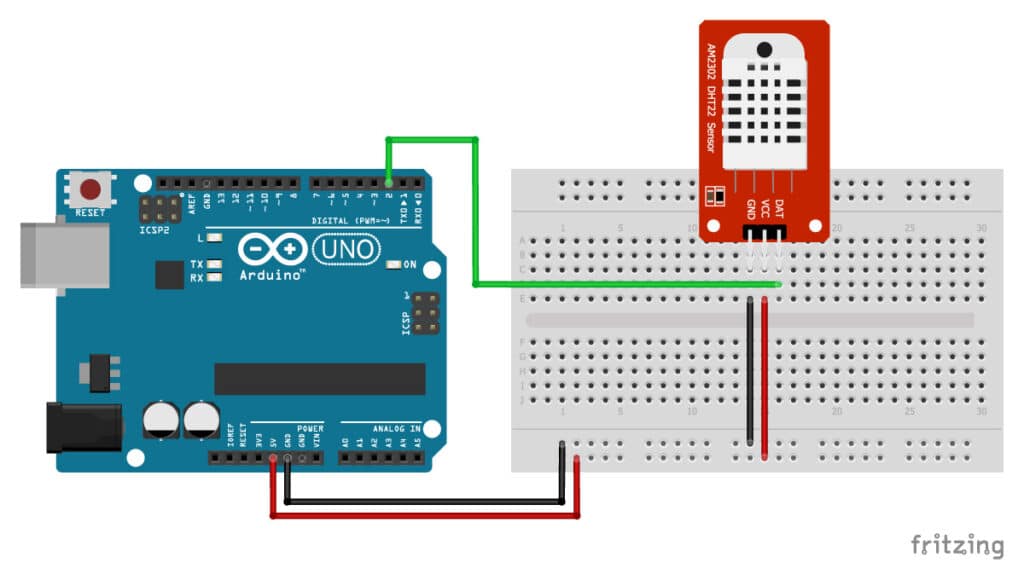
3 Pin DHT22/AM2302 Connections
| 3 Pin DHT22 | Arduino |
|---|---|
| DAT | Digital pin 2 |
| VCC | 5 V |
| GND | GND |
Installing the required Arduino libraries
The code below uses the Adafruit DHT sensor library which you can download here on GitHub. This library only works if you also have the Adafruit Unified Sensor library installed, which is also available on GitHub.
You can also download the two libraries by clicking on the buttons below:
You can install the library by going to Sketch > Include Library > Add .ZIP Library in the Arduino IDE.
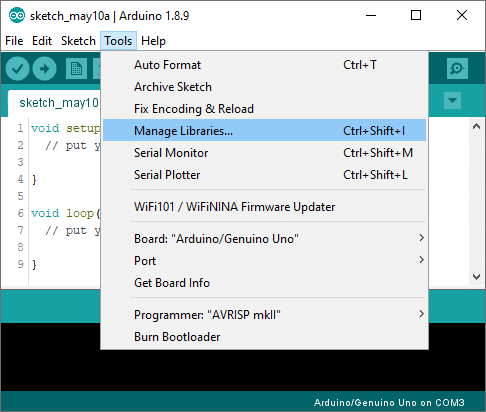
Another option is to navigate to Tools > Manage Libraries… or type Ctrl + Shift + I on Windows. The Library Manager will open and update the list of installed libraries.
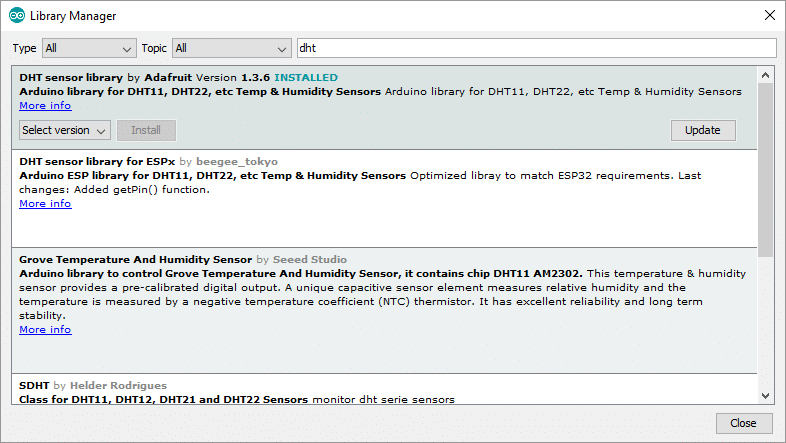
You can search for ‘dht’ and ‘adafruit unified sensor’ and look for the library by Adafruit. Select the latest version and then click Install.
DHT11/DHT22 temperature and humidity sensor Arduino example code
You can upload the following example code to your Arduino using the Arduino IDE. Next, I will explain how the code works.
You can copy the code by clicking on the button in the top right corner of the code field.
/* Arduino example code for DHT11, DHT22/AM2302
   and DHT21/AM2301 temperature and humidity sensors.
   More info: www.www.makerguides.com */

#include "Adafruit_Sensor.h"
#include "DHT.h"

// Set DHT pin:
#define DHTPIN 2

// Set DHT type, uncomment whatever type you're using!
#define DHTTYPE DHT11   // DHT 11
//#define DHTTYPE DHT22   // DHT 22  (AM2302)
//#define DHTTYPE DHT21   // DHT 21 (AM2301)

// Initialize DHT sensor for normal 16mhz Arduino:
DHT dht = DHT(DHTPIN, DHTTYPE);

void setup() {
  // Begin serial communication at a baud rate of 9600:
  Serial.begin(9600);

  // Setup sensor:
  dht.begin();
}

void loop() {
  // Wait a few seconds between measurements:
  delay(2000);

  // Reading temperature or humidity takes about 250 milliseconds!
  // Sensor readings may also be up to 2 seconds 'old' (its a very slow sensor)

  // Read the humidity in %:
  float h = dht.readHumidity();
  // Read the temperature as Celsius:
  float t = dht.readTemperature();
  // Read the temperature as Fahrenheit:
  float f = dht.readTemperature(true);

  // Check if any reads failed and exit early (to try again):
  if (isnan(h) || isnan(t) || isnan(f)) {
    Serial.println("Failed to read from DHT sensor!");
    return;
  }

  // Compute heat index in Fahrenheit (default):
  float hif = dht.computeHeatIndex(f, h);
  // Compute heat index in Celsius:
  float hic = dht.computeHeatIndex(t, h, false);


  Serial.print("Humidity: ");
  Serial.print(h);
  Serial.print(" % ");
  Serial.print("Temperature: ");
  Serial.print(t);
  Serial.print(" \xC2\xB0");
  Serial.print("C | ");
  Serial.print(f);
  Serial.print(" \xC2\xB0");
  Serial.print("F ");
  Serial.print("Heat index: ");
  Serial.print(hic);
  Serial.print(" \xC2\xB0");
  Serial.print("C | ");
  Serial.print(hif);
  Serial.print(" \xC2\xB0");
  Serial.println("F");
}
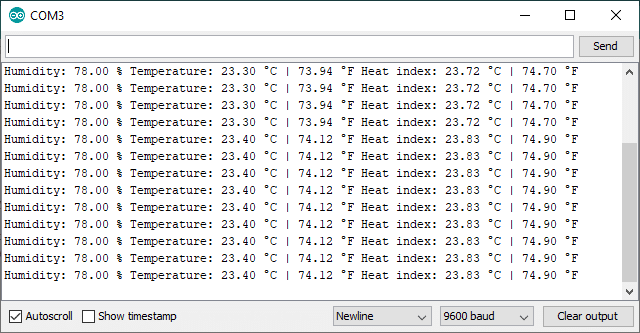
You should see the following output in the serial monitor (Ctrl + Shift + M):
Code explanation
The first step is to include the Adafruit DHT and Unified Sensor library.
#include "Adafruit_Sensor.h"
#include "DHT.h"
Next, we need to define the DHT to Arduino connection pin and also set the DHT sensor type. In our example, we are using a DHT11 sensor connected to pin 2.
The statement #define is used to give a name to a constant value. The compiler will replace any references to this constant with the defined value when the program is compiled. So everywhere you mention DHTPIN, the compiler will replace it with the value 2 when the program is compiled.
// Set DHT pin:
#define DHTPIN 2

// Set DHT type, uncomment whatever type you're using!
#define DHTTYPE DHT11   // DHT 11
//#define DHTTYPE DHT22   // DHT 22  (AM2302)
//#define DHTTYPE DHT21   // DHT 21 (AM2301)
Next, you need to create a new instance of the DHT class with the appropriate DHT type and connection. For this, we use the function DHT(pin,type).
In this case, I called the sensor ‘dht’ but you can use other names as well, like ‘temperature_sensor’ or ‘dht11’ etc. DHT temperature_sensor = DHT(DHTPIN, DHTTYPE);. You can create multiple instances of the DHT class with different names and pins/types. This allows you to easily use 2 or more sensors at the same time.
// Initialize DHT sensor for normal 16mhz Arduino:
DHT dht = DHT(DHTPIN, DHTTYPE);
Setup function
In the setup(), we start serial communication at a baud rate of 9600. Make sure that the Serial Monitor is also set to 9600! We also initialize the sensor with dht.begin().
void setup() {
  // Begin serial communication at a baud rate of 9600:
  Serial.begin(9600);

  // Setup sensor:
  dht.begin();
}
Loop function
The loop() section of the code starts with a delay of 2 seconds. This delay is there to give the sensor some time to do the readings. The maximum sensing rate of the DHT22 is every 2 seconds and that of the DHT11 is once every second.
// Wait a few seconds between measurements:
delay(2000);
Taking temperature and humidity readings is super easy because the library has several functions built-in. To get a humidity reading in ‘%’, you can use the function readHumidity(). In this case, we are saving the reading as the ‘h’ variable. Note that it is of the type float.
When you want to use a function on the DHT object, you first need to specify the name that you gave to the sensor. So in our case this is ‘dht’.
// Read the humidity in %:
float h = dht.readHumidity();
Taking temperature readings is just as easy with the function readTemperature().
// Read the temperature as Celsius:
float t = dht.readTemperature();
If you want to get the temperature in Fahrenheit instead of Celsius, you have two options. You can pass true to the readTemperature function, or you can use the convert function:
// Read the temperature as Fahrenheit:
float f = dht.readTemperature(true);
// Alternative, use convert function:
float f = dht.convertCtoF(t);
Next, there is a small section of code that checks if the sensor is connected correctly and is returning a reading. If not, an error message will be printed on the Serial Monitor.
// Check if any reads failed and exit early (to try again):
if (isnan(h) || isnan(t) || isnan(f)) {
  Serial.println("Failed to read from DHT sensor!");
  return;
}
The library also has a function built-in that can compute the heat index by combining the temperature and humidity readings. The heat index is also known as the “felt air temperature” or “apparent temperature”.
// Compute heat index in Fahrenheit (default):
float hif = dht.computeHeatIndex(f, h);
// Compute heat index in Celsius:
float hic = dht.computeHeatIndex(t, h, false);
Finally, the readings are displayed on the Serial Monitor. Note that the line Serial.print(" \xC2\xB0"); is used to print the degree symbol.
Serial.print("Humidity: ");
Serial.print(h);
Serial.print(" % ");
Serial.print("Temperature: ");
Serial.print(t);
Serial.print(" \xC2\xB0");
Serial.print("C | ");
Serial.print(f);
Serial.print(" \xC2\xB0");
Serial.print("F ");
Serial.print("Heat index: ");
Serial.print(hic);
Serial.print(" \xC2\xB0");
Serial.print("C | ");
Serial.print(hif);
Serial.print(" \xC2\xB0");
Serial.println("F");
Example code for DHT11 and DHT22/AM2302 temperature and humidity sensor with I2C LCD and Arduino
By combining a temperature and humidity sensor with a small LCD, you can create a cheap weather station.
In the following example, I will be using an I2C character LCD like this one from Amazon. You can read more about using an I2C LCD with Arduino in the article below:
If you have a normal LCD without an I2C backpack, check out the tutorial below:
You will need to make some extra connections to the Arduino so we can control the 16×2 character LCD. The DHT11 or DHT22/AM2302 sensor is connected in the same way as before.
The wiring diagram below shows you how to connect an I2C LCD to the Arduino.
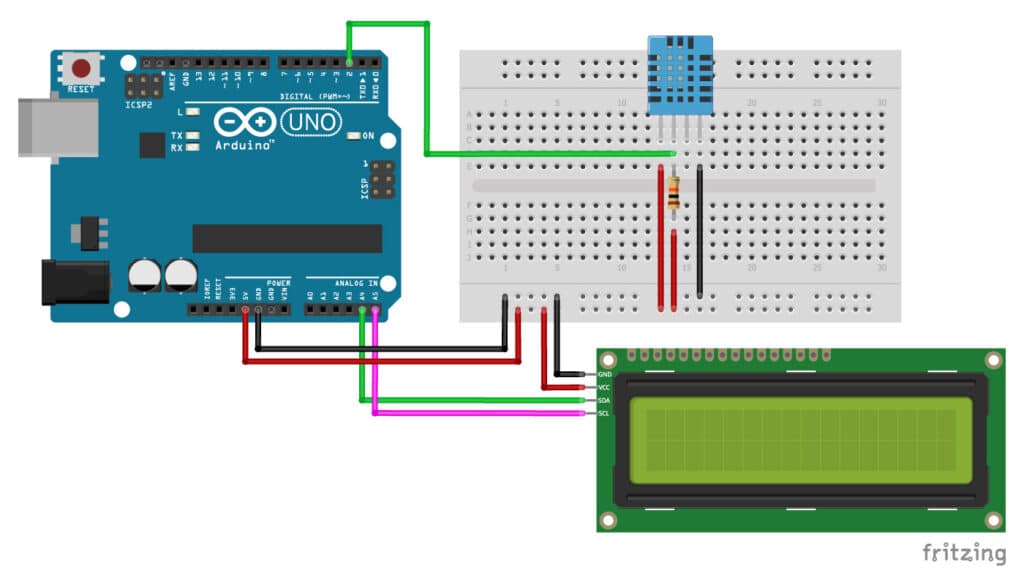
The connections are also given in the following table:
I2C LCD Connections
| I2C LCD | Arduino |
|---|---|
| GND | GND |
| VCC | 5 V |
| SDA | A4 |
| SCL | A5 |
If you are not using an Arduino Uno, the SDA and SCL pins can be at a different location. An Arduino UNO with the R3 layout (1.0 pinout), also has the SDA (data line) and SCL (clock line) pin headers close to the AREF pin. Check the table below for more details.
| Board | SDA | SCL |
|---|---|---|
| Arduino Uno | A4 | A5 |
| Arduino Nano | A4 | A5 |
| Arduino Micro | 2 | 3 |
| Arduino Mega 2560 | 20 | 21 |
| Arduino Leonardo | 2 | 3 |
| Arduino Due | 20 | 21 |
The code uses the LiquidCrystal_I2C library, which you can download here on GitHub. It also includes the Wire.h library, which allows you to communicate with I2C devices. This library should come pre-installed with the Arduino IDE.
The code below is mostly the same as before, but now we display the temperature and humidity on the LCD instead of the Serial Monitor.
You can copy the code by clicking on the button in the top right corner of the code field.
/* Arduino example code for DHT11, DHT22/AM2302
  and DHT21/AM2301 temperature and humidity sensors
  with I2C LCD. More info: www.www.makerguides.com */

#include "Adafruit_Sensor.h"
#include "DHT.h"
#include "Wire.h"
#include "LiquidCrystal_I2C.h"

// Set DHT pin:
#define DHTPIN 2

// Define SDA and SCL pin for LCD:
#define SDAPin A4 // Data pin
#define SCLPin A5 // Clock pin

// Set DHT type, uncomment whatever type you're using!
#define DHTTYPE DHT11   // DHT 11
//#define DHTTYPE DHT22   // DHT 22  (AM2302)
//#define DHTTYPE DHT21   // DHT 21 (AM2301)

// Initialize DHT sensor for normal 16mhz Arduino:
DHT dht = DHT(DHTPIN, DHTTYPE);

// Connect to LCD via I2C, default address 0x27 (A0-A2 not jumpered):
LiquidCrystal_I2C lcd = LiquidCrystal_I2C(0x27, 16, 2); //Change to (0x27,20,4) for 2004 LCD

void setup() {
  // Setup sensor:
  dht.begin();

  // Initiate the LCD:
  lcd.init();
  lcd.backlight();
}

void loop() {
  // Wait a few seconds between measurements:
  delay(2000);

  // Reading temperature or humidity takes about 250 milliseconds!
  // Sensor readings may also be up to 2 seconds 'old' (its a very slow sensor)

  // Read the humidity in %:
  float h = dht.readHumidity();
  // Read the temperature as Celsius:
  float t = dht.readTemperature();
  // Read the temperature as Fahrenheit:
  float f = dht.readTemperature(true);

  // Compute heat index in Fahrenheit (default):
  float hif = dht.computeHeatIndex(f, h);
  // Compute heat index in Celsius:
  float hic = dht.computeHeatIndex(t, h, false);


  // Print the temperature and the humidity on the LCD:
  lcd.setCursor(0, 0);
  lcd.print("Temp: ");
  lcd.print(t);
  lcd.print(" " "\xDF" "C");
  lcd.setCursor(0, 1);
  lcd.print("Humid: ");
  lcd.print(h);
  lcd.print(" %");
}
DHT11/DHT22 troubleshooting guide
When working with these sensors, you might get the following error messages:
“Failed to read from DHT sensor!”
This message can appear in the serial monitor when the sensor does not return a reading. This can have several causes:
- Sensor type: Make sure you have uncommented the correct DHTTYPE in the code setup. Check the example above.
- Sampling rate: The DHT sensors are quite slow, the maximum sampling rate is around 2 seconds. Increasing the delay between measurements might solve this error.
- Power: Although the DHTxx sensors can work from 3.3 to 5 V, the manufacturer recommends 5 V. In some cases, powering the sensor with 5 V solves the problem. Make sure that your microcontroller also supports 5 V on the GPIO pins.
Fatal error: Adafruit_Sensor.h: No such file or directory
You might get this error when you try to compile the code. This means that you did not (properly) install the Adafruit Unified Sensor library.
Just scroll up a bit in this post and you will see where and how you can download and install the library.
Conclusion
In this article, I have shown you how DHT11 and DHT22/AM2302 temperature and humidity sensors work and how you can use them with Arduino. I hope you found it useful and informative. If you did, please share it with a friend who also likes electronics and making things!
I would love to know what projects you plan on building (or have already built) with this sensor. If you have any questions, suggestions or if you think that things are missing in this tutorial, please leave a comment down below.
Note that comments are held for moderation to prevent spam.

This work is licensed under a Creative Commons Attribution-NonCommercial-ShareAlike 4.0 International License.
Other Useful Links From Around The Web:
Benne is professional Systems Engineer with a deep expertise in Arduino and a passion for DIY projects.
Hamid
Saturday 11th of April 2020
Thanks it was very helpful and everything explained one and one that's why I learned how to write basic code for first step. Thank you again
Robert Colinares
Sunday 12th of January 2020
Can you provide the pinout for LCD1602 without the I2C?
Benne de Bakker
Saturday 16th of May 2020
Yes, see this article: https://www.makerguides.com/character-lcd-arduino-tutorial/