The Raspberry Pi is a small, affordable, and versatile single-board computer that has gained immense popularity among makers, hobbyists, and professionals alike. In this article you will learn how to set it up.
At its core, the Raspberry Pi is a credit card-sized computer that runs on a Linux-based operating system. It is equipped with a processor, memory, storage, and various input/output ports, allowing it to perform tasks similar to a traditional desktop computer.
With its compact size and low power consumption, the Raspberry Pi can be used for a wide range of projects, from home automation and media centers to robotics and IoT applications.
But before you can set it up and use it let’s make sure have all the parts.
Required parts
Before you can start setting up your Raspberry Pi, you will need the following parts.
Raspberry Pi Board
The heart of your setup is the Raspberry Pi board itself. There are several models available, but for beginners, the Raspberry Pi 4 Model B is a popular choice.
Power Supply
To power your Raspberry Pi, you’ll need a compatible power supply. The Raspberry Pi 4 Model B requires a USB-C power supply with a minimum output of 3A.
MicroSD Card
The Raspberry Pi doesn’t have built-in storage, so you’ll need a microSD card to install the operating system and store your files. Look for a high-quality microSD card with a capacity of at least 16GB. Class 10 or higher cards are recommended for better performance.
HDMI Cable
To connect your Raspberry Pi to a monitor or TV, you’ll need an HDMI cable. Make sure you have a suitable HDMI cable that matches the ports on your Raspberry Pi and display device.
Keyboard and Mouse
For interacting with your Raspberry Pi, you’ll need a USB keyboard and mouse. Any standard USB keyboard and mouse should work fine.
Monitor or TV
To see the output from your Raspberry Pi, you’ll need a monitor or TV with an HDMI input. Ensure that your display device has an available HDMI port and the necessary cables to connect to your Raspberry Pi.
Ethernet Cable or Wi-Fi Adapter
To connect your Raspberry Pi to the internet, you’ll need either an Ethernet cable or a compatible Wi-Fi adapter. If you have a wired network connection, an Ethernet cable is the simplest option.
Once you have gathered all the necessary equipment and tools, you’re ready to move on to the next step: downloading and installing the operating system on your Raspberry Pi.
Downloading and Installing the Operating System
Once you have set up your Raspberry Pi hardware, the next step is to download and install the operating system (OS) that will run on it. The Raspberry Pi Foundation provides an official operating system called Raspberry Pi OS, formerly known as Raspbian. In this section, we will guide you through the process of downloading and installing Raspberry Pi OS.
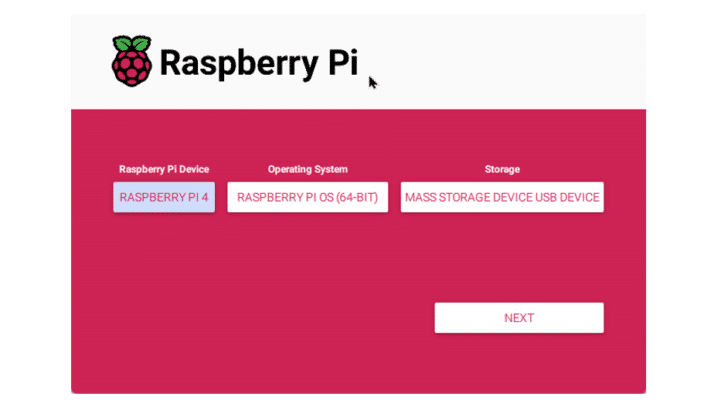
There are essentially two versions to choose from: Raspberry Pi (32Bit) Desktop and other Raspberry Pi OS options. If you want a full desktop experience with a graphical user interface (GUI), choose Raspberry Pi OS with desktop. For most beginners, we recommend starting with Raspberry Pi OS with desktop.
Install Raspberry Pi Imager
To install Raspberry Pi OS on your Raspberry Pi, you will need an SD card with a minimum capacity of 8GB. Insert the SD card into your computer’s SD card reader.
Step 1: Firstly, Insert your microSD card into your System (Computer / Laptop).
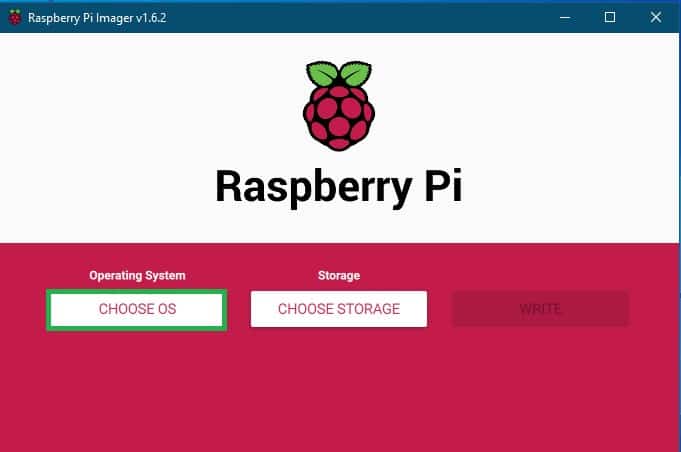
Step 2: Download and install the official Raspberry Pi Imager. You can select any Option for selecting Windows, macOS, or Linux. I prefer to Download the Windows version and install it.
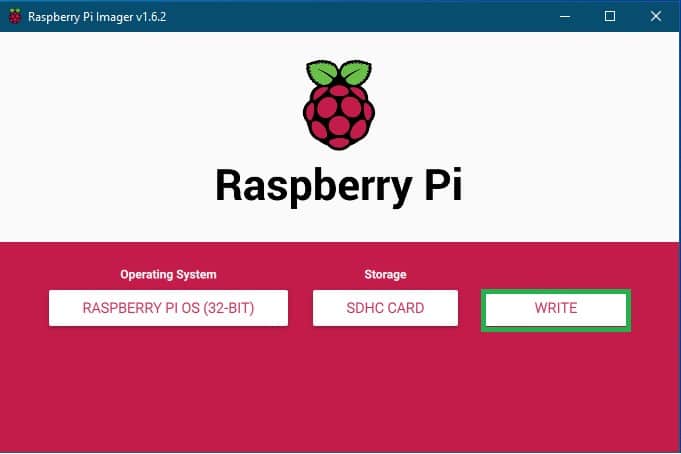
Step 3: Open the Raspberry Pi Imager, Click CHOOSE OS, and select Raspberry Pi OS (32-bit) from the OS menu. You have other options also.
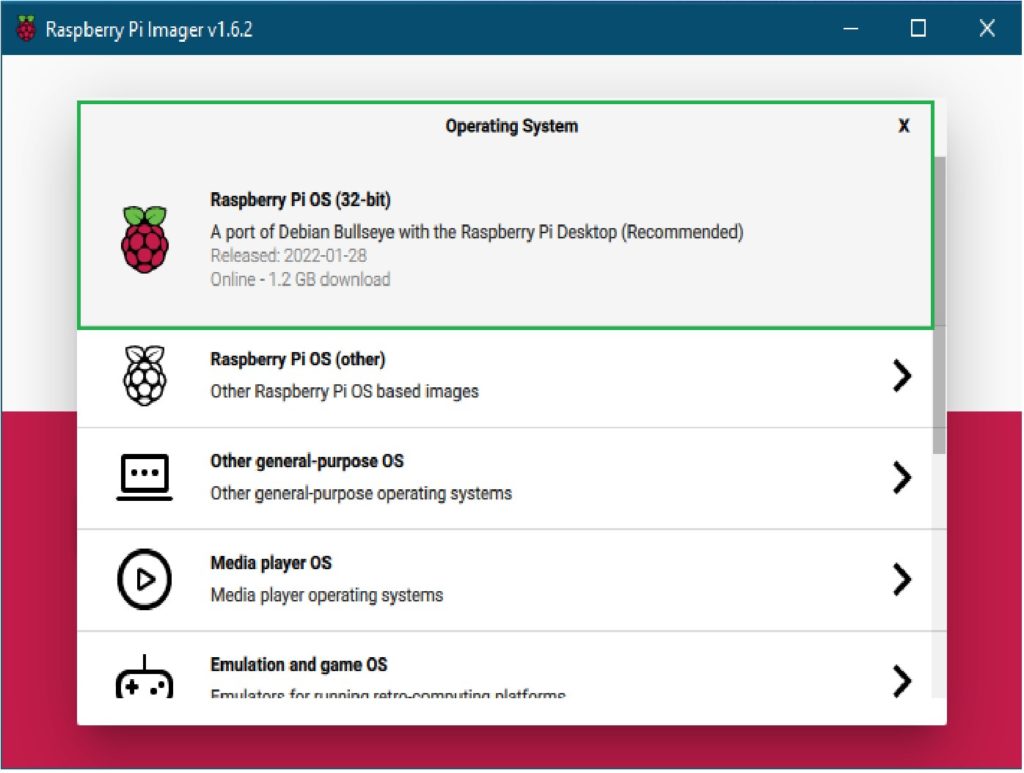
Step 4: Open the Raspberry Pi Imager, Click CHOOSE OS, and select Raspberry Pi OS (32-bit) from the OS menu. You have other options also.
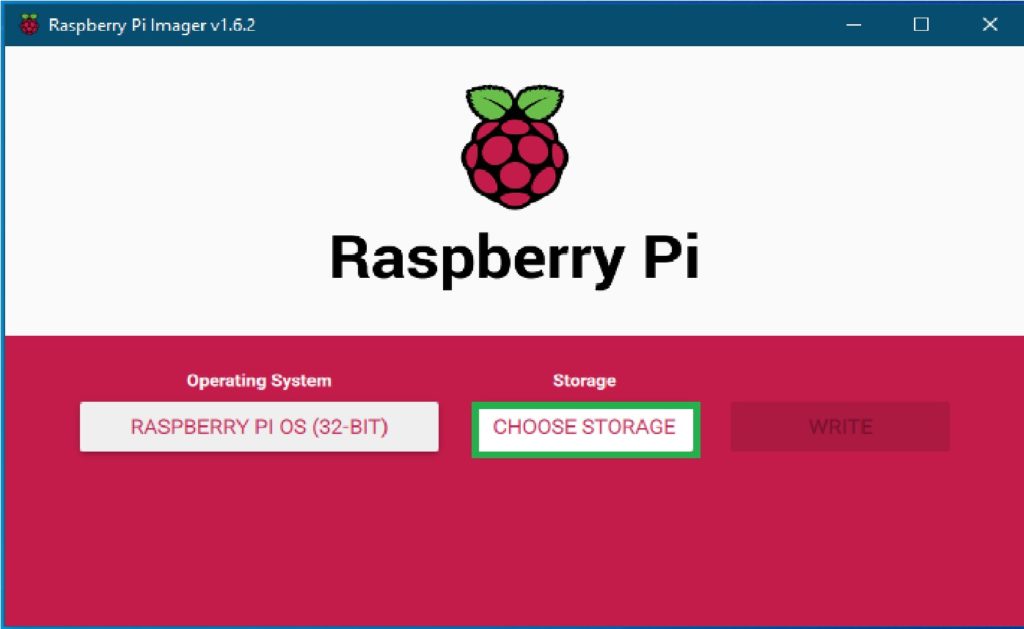

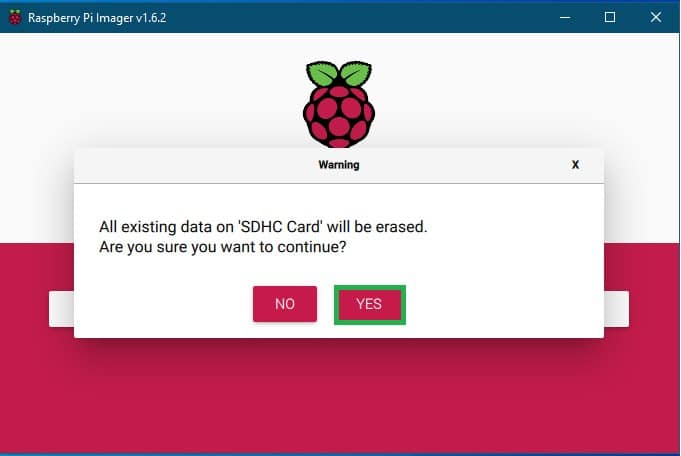
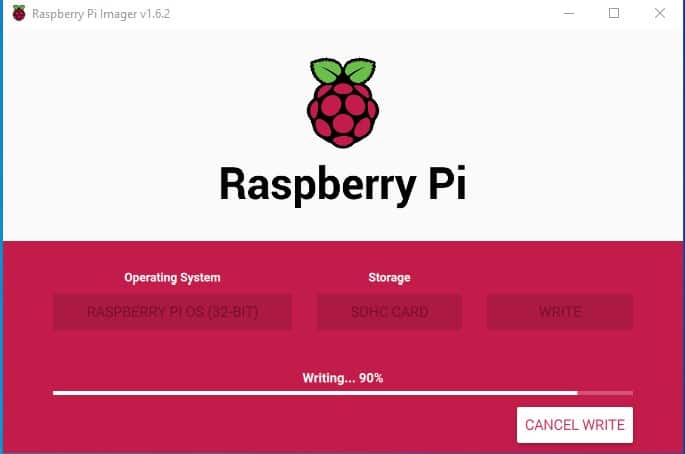
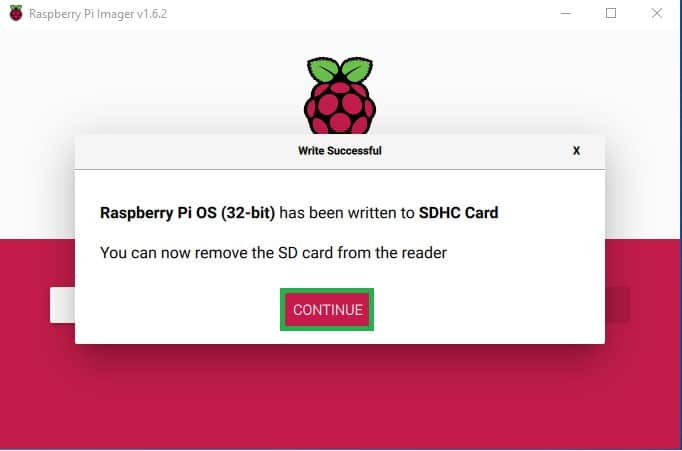
Step 5: Then a pop-up window will come; select the YES option, and The app will now take several minutes to download the OS and write to your card.
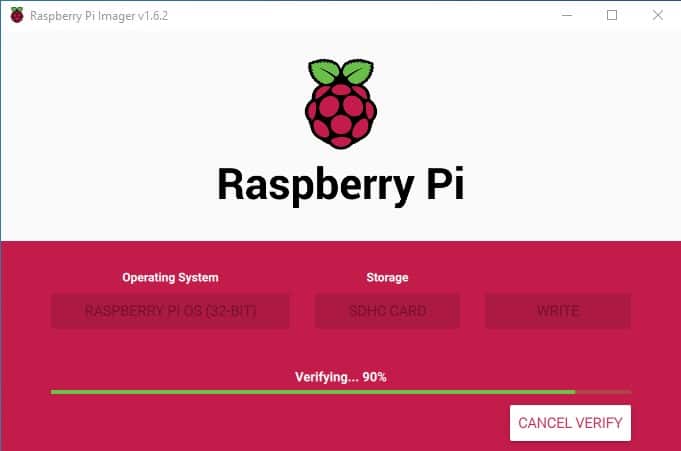
The app is automatically written and verified. You can see the image below.
Step 6: Finally, select the CONTINUE option, and you can use the Raspberry Pi OS.
Booting Up Raspberry Pi with the OS
With the OS image successfully written to the SD card, it’s time to boot up your Raspberry Pi. Insert the SD card into the Raspberry Pi’s SD card slot.
Connect your Raspberry Pi to a power source using a micro USB cable. The device will start booting up, and you should see the Raspberry Pi logo on your screen if you are using a display.
During the first boot, Raspberry Pi OS will perform some initial setup tasks. This may take a few minutes, so be patient. Once the setup is complete, you will be prompted to set up your preferences, such as language, time zone, and password.
Follow the on-screen instructions to configure these settings according to your preferences. After completing the setup, Raspberry Pi OS will load the desktop environment, and you will be ready to start exploring and using your Raspberry Pi.
Here are the detailed steps:
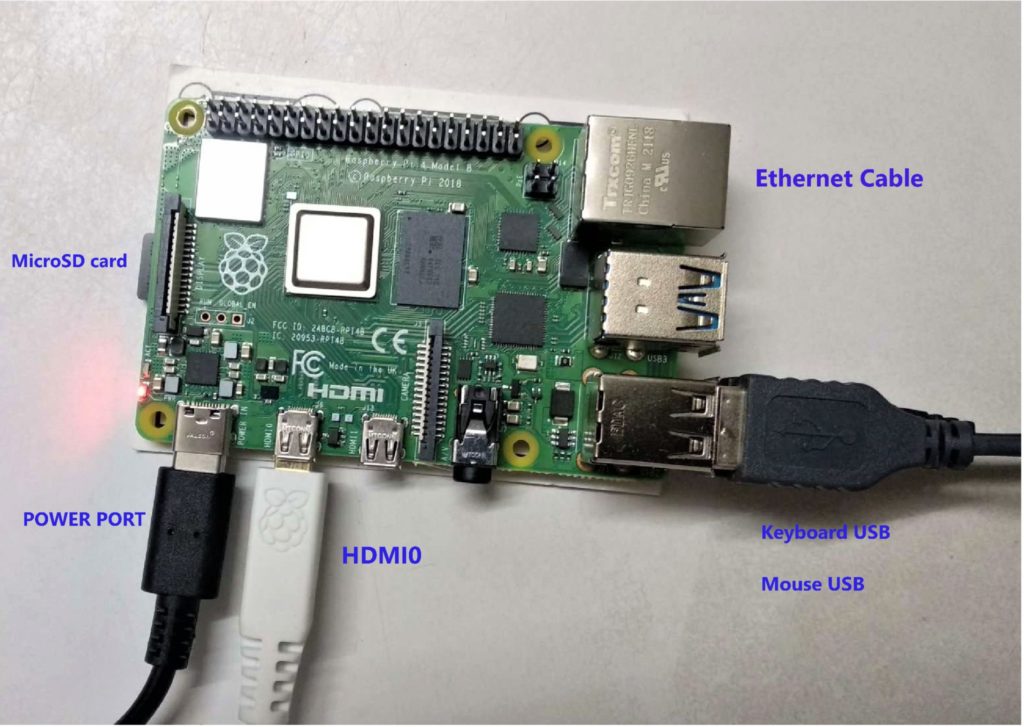
Step 1: Insert the microSD card into the card slot on the underside of the Raspberry Pi. Plug the USB keyboard and USB mouse into USB ports.
Step 2: Turn on your monitor and make sure it is set to the proper input (e.g., HDMI 1); Plug the HDMI or video component cable into the monitor or TV set, another cable end into the Raspberry Pi.
Step 3: Connect an ethernet cable or connect the Wi-Fi adapter to the Raspberry Pi. You can see the connection Image below.
Step 4: Connect the power supply to the Raspberry Pi. and turn on Raspberry Pi. A power indicator light will glow, letting you know that you are connected.
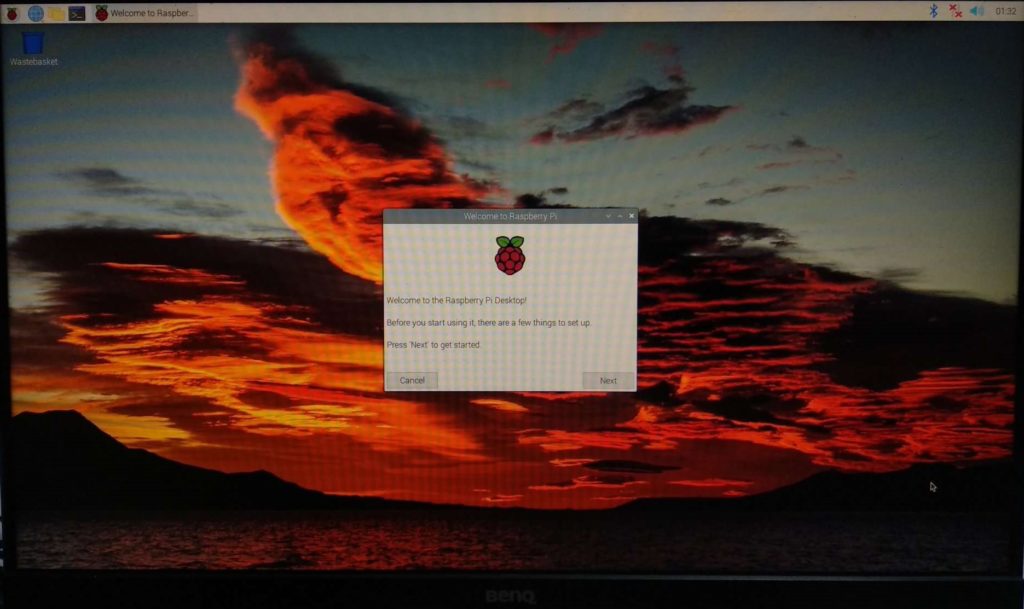
Step 5: When you turn on the system, Pop up window will appear. You can see the image below.
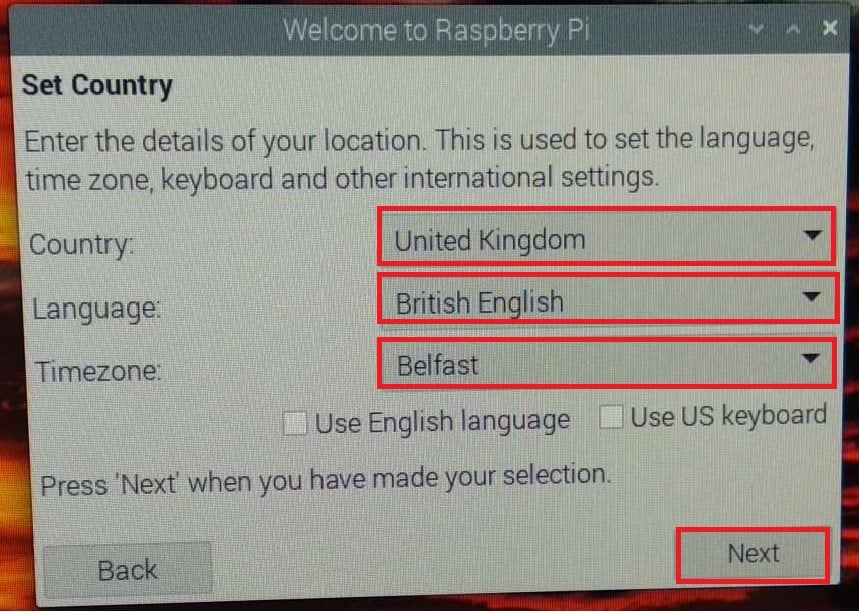
Step 6: Set up your Country, Language, and TimeZone. And click next.
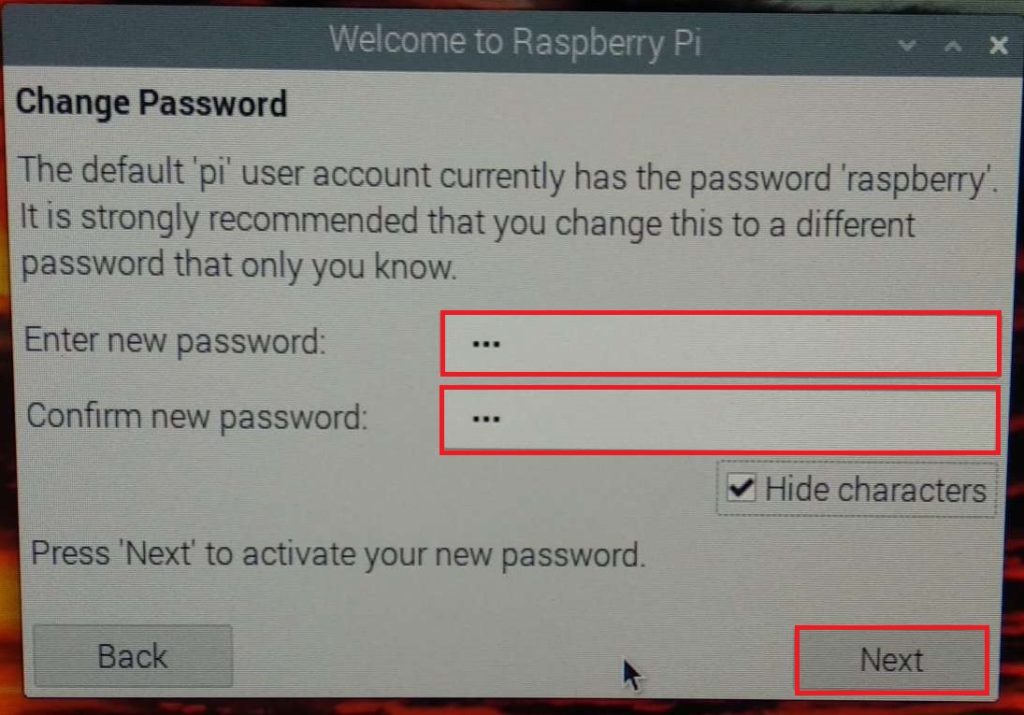
Step 7: Now, configure your system first, change the system password and confirm it. Click Next.
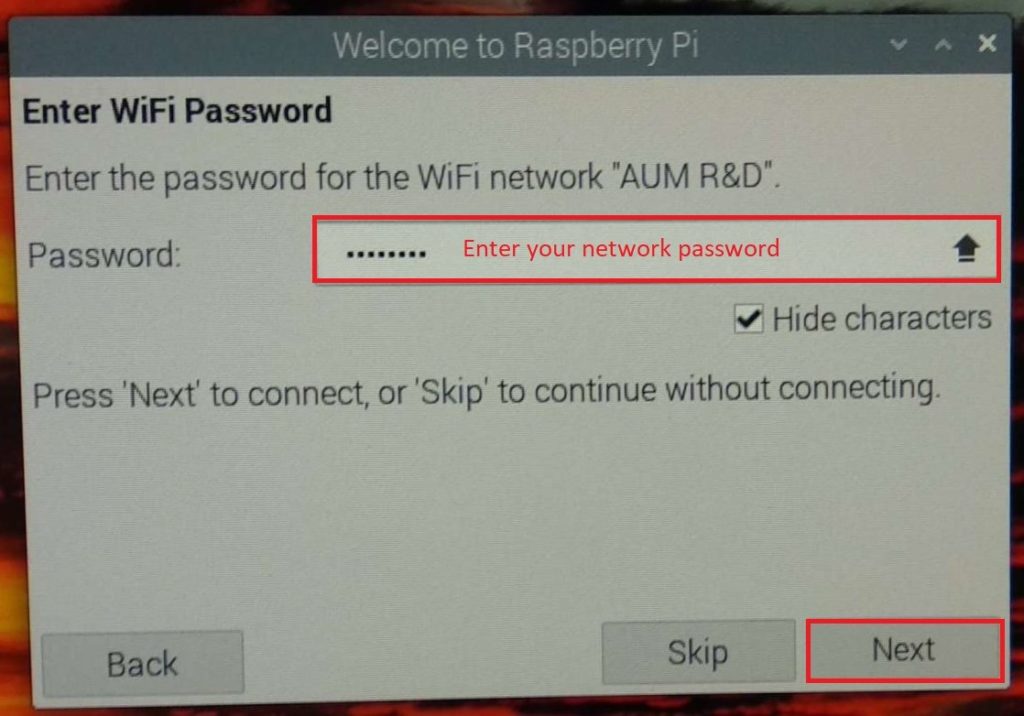
Step 8: If you connect to the WiFi, connect your WiFi network from the list, and enter the password.

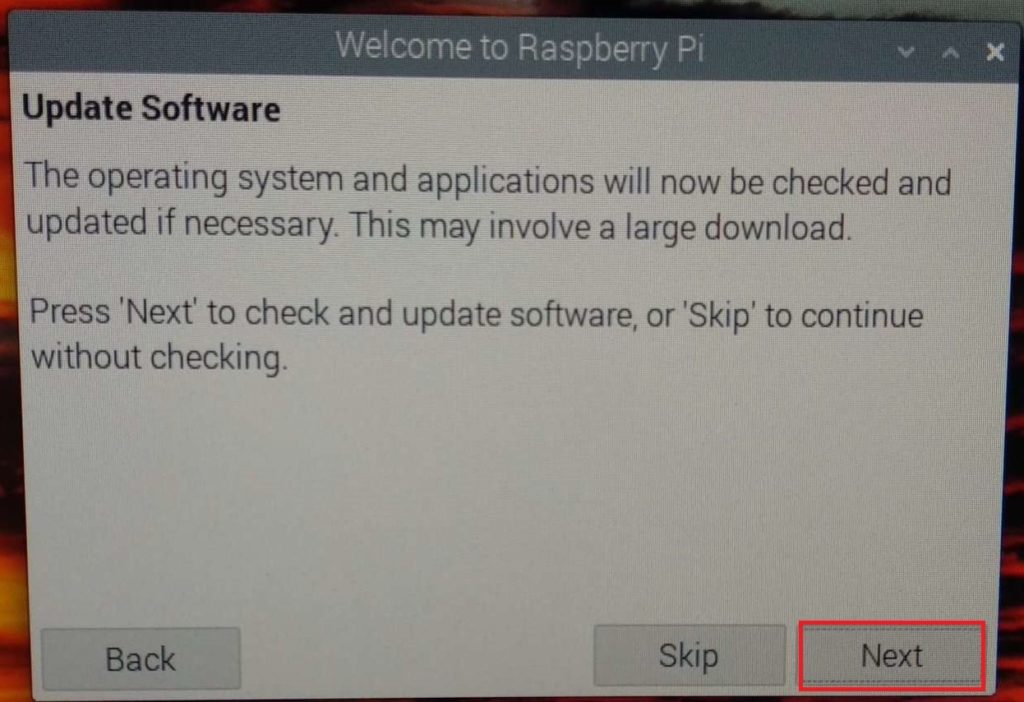
Step 9: If you require updating the software, press Next. Otherwise, Skip continuing the next slide.
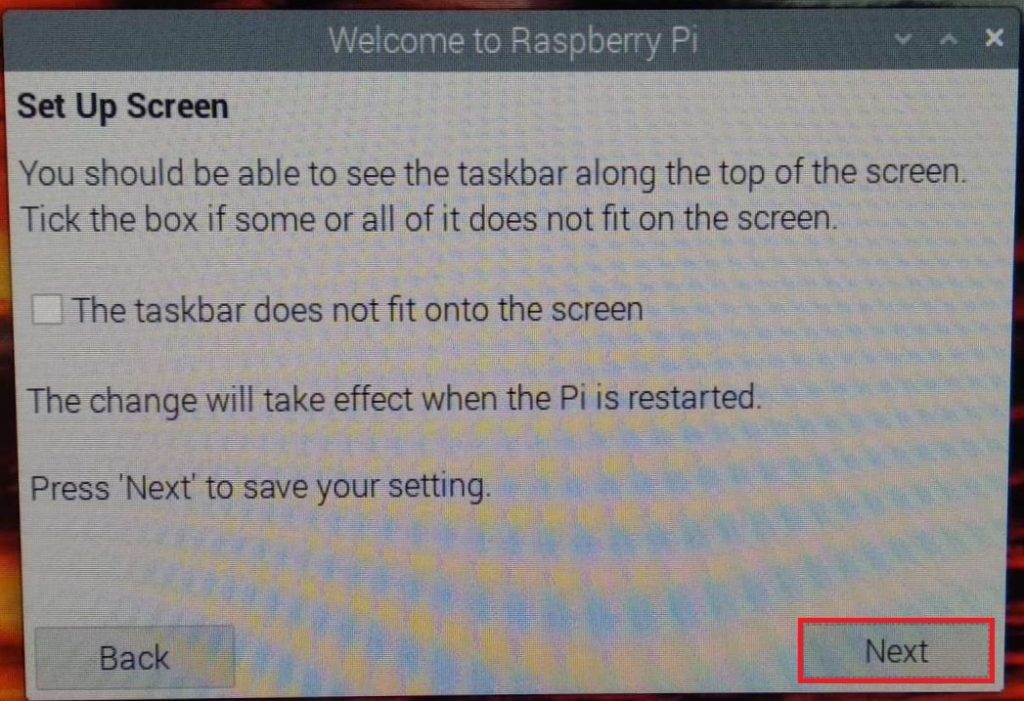
Step 10: Next window about setup screen, if you require change setting, otherwise click Next.
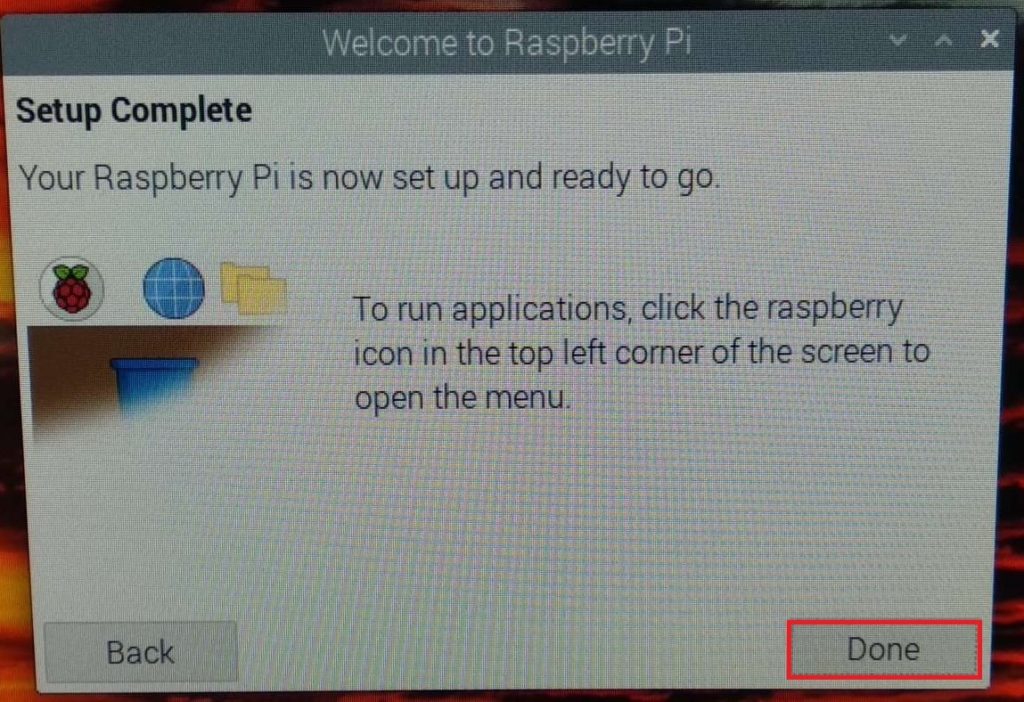
Step 11: Your Raspberry Pi setup is done and ready to use. Click on Done to finish.
Congratulations! You have successfully downloaded and installed the Raspberry Pi OS on your Raspberry Pi.
Connecting to the Internet and Updating Software
Once you have set up your Raspberry Pi and installed the Raspberry Pi OS, the next step is to connect it to the internet and update the software. This will ensure that you have the latest security patches and bug fixes, as well as access to the wide range of software available for the Raspberry Pi.
Connecting to Wi-Fi
To connect your Raspberry Pi to the internet, you can use either an Ethernet cable or Wi-Fi. If you have an Ethernet cable, simply connect one end to the Ethernet port on your Raspberry Pi and the other end to your router or modem.
If you prefer to use Wi-Fi, follow these steps:
- Click on the Wi-Fi icon in the top-right corner of the desktop environment.
- Select your Wi-Fi network from the list of available networks.
- Enter your Wi-Fi password when prompted.
- Wait for the Raspberry Pi to connect to the network.
Updating Software
Once your Raspberry Pi is connected to the internet, it’s important to update the software to ensure that you have the latest features and security patches. To update the software, open the terminal and enter the following commands:
sudo apt update
sudo apt upgrade
The first command, sudo apt update, will update the package lists for upgrades and new installations. The second command, sudo apt upgrade, will actually perform the software upgrades.
Depending on the number of updates available, this process may take some time. You may be prompted to confirm the installation of certain packages or to restart the Raspberry Pi after the updates are complete.
Enabling Automatic Updates
To ensure that your Raspberry Pi stays up to date in the future, you can enable automatic updates. This will automatically download and install software updates in the background, without requiring any manual intervention.
To enable automatic updates, open the terminal and enter the following command:
sudo apt install unattended-upgrades
Once the installation is complete, you can configure the automatic updates by editing the configuration file. Open the file using the following command:
sudo nano /etc/apt/apt.conf.d/50unattended-upgrades
In the configuration file, you can specify which updates to install automatically and when to install them. Save the changes and exit the editor.
With automatic updates enabled, your Raspberry Pi will regularly check for updates and install them as necessary, keeping your system up to date without any manual intervention. Connecting your Raspberry Pi to the internet and updating the software are essential steps to ensure that your device is secure and up to date.
Troubleshooting Common Raspberry Pi Issues
In this section, we will discuss some common issues that you may encounter while using your Raspberry Pi and provide troubleshooting tips to help you resolve them.
Power Supply Problems
One of the most common issues with the Raspberry Pi is power supply-related problems. Insufficient power can cause the Pi to behave erratically or not function at all. To troubleshoot this issue, ensure that you are using a reliable power supply with a voltage rating of 5V and a current rating of at least 2.5A.
SD Card Corruption
Another frequent problem is SD card corruption. This can occur if the Raspberry Pi is abruptly powered off or if the SD card is removed while the Pi is still running. To prevent SD card corruption, always shut down your Raspberry Pi properly before turning off the power or removing the SD card. Additionally, using a high-quality SD card and regularly backing up your data can help mitigate the risk of data loss.
Overheating
The Raspberry Pi can generate heat during intensive tasks or when operating in a hot environment. Overheating can cause the Pi to throttle its performance or even shut down to prevent damage. To avoid overheating, make sure that the Raspberry Pi is placed in a well-ventilated area and consider using a heatsink or a fan to dissipate the heat. Monitoring the temperature using software tools can also help you identify potential overheating issues.
Networking Problems
If you are experiencing networking issues with your Raspberry Pi, there are a few things you can check. First, ensure that the Ethernet cable or Wi-Fi connection is properly connected. If using Wi-Fi, verify that you have entered the correct network credentials. Additionally, check your router settings to ensure that the Raspberry Pi is allowed to connect to the network. If all else fails, restarting your router and Raspberry Pi can often resolve networking problems.
GPIO Connection Errors
When working with GPIO pins, it is not uncommon to encounter connection errors. If you are having trouble with your GPIO connections, double-check that the wires are securely connected to the correct pins. It is also essential to ensure that you are using the correct voltage levels and that the GPIO pins are not overloaded.
In the next section, we will share some valuable tips and tricks for maximizing Raspberry Pi performance. Stay tuned!
Tips and Tricks for Maximizing Raspberry Pi Performance
Here are some tips and tricks to help you maximize the performance of your Raspberry Pi:
Overclocking the Raspberry Pi
One way to boost the performance of your Raspberry Pi is by overclocking it. Overclocking involves running the processor at a higher speed than its default clock frequency. This can result in improved performance, but it also increases power consumption and generates more heat. Therefore, it’s crucial to monitor the temperature and stability of your Raspberry Pi when overclocking.
To overclock your Raspberry Pi, you can modify the configuration file by running the following command in the terminal:
sudo nano /boot/config.txt
Within the file, you can adjust the values for the CPU frequency, GPU frequency, and memory frequency to increase the performance. However, it’s recommended to gradually increase the values and test the stability of your system after each change.
Disable Unnecessary Services
By disabling unnecessary services and processes, you can free up system resources and improve the overall performance of your Raspberry Pi. Some services, such as Bluetooth or Wi-Fi, may not be required for your specific project and can be disabled to reduce resource consumption.
To disable a service, you can use the following command:
sudo systemctl disable <service_name>
Replace with the name of the service you want to disable. Be cautious when disabling services, as some may be essential for certain functionalities.
Optimize Power Management
Efficient power management can significantly impact the performance of your Raspberry Pi. By optimizing power settings, you can reduce power consumption and prevent overheating, which can lead to performance throttling.
To optimize power management, consider the following:
- Use a high-quality power supply that provides sufficient voltage and current.
- Disable unnecessary USB devices and peripherals.
- Enable power-saving features, such as USB suspend mode or Wi-Fi power management.
Utilize Lightweight Software
Choosing lightweight software and applications can help improve the performance of your Raspberry Pi. Avoid resource-intensive programs that may strain the limited processing power and memory of the device.
Instead, opt for lightweight alternatives or software specifically designed for low-power devices. For example, you can use lightweight desktop environments like LXDE or Xfce instead of resource-heavy ones like GNOME or KDE.
Keep the Raspberry Pi Cool
Heat can negatively impact the performance and lifespan of your Raspberry Pi. To prevent overheating, ensure proper ventilation and consider using a heatsink or fan to dissipate heat effectively.
Additionally, you can monitor the temperature of your Raspberry Pi using the vcgencmd command:
vcgencmd measure_temp
If the temperature exceeds safe limits, take appropriate measures to cool down the device, such as adjusting the overclocking settings or adding additional cooling solutions.
By following these tips and tricks, you can maximize the performance of your Raspberry Pi and ensure optimal operation for your projects. Experiment with different settings and configurations to find the best balance between performance and stability.
Conclusion
In this blog post, we covered the entire process of setting up a Raspberry Pi, from gathering the necessary equipment to configuring the operating system. Additionally, we discussed troubleshooting common issues and shared tips for maximizing Raspberry Pi performance.
Whether you’re interested in home automation, robotics, IoT, or any other project, the Raspberry Pi provides a versatile platform to bring your ideas to life.
Happy making!

Hiren is a professional Embedded Engineer with a Master’s Degree
in Electronics and Communication Engineering. He is proficient in C and
C++ and enjoys building DIY projects on Arduino, ESP32, PIC32, STM32 & Raspberry PI boards.