Does it annoy you having to adjust all clocks to daylight saving time twice a year? If so, then this article is for you! I will show you how to build a digital clock that adjusts itself automatically. In addition, you will also get a clock that is always accurate.
By synchronizing the clock via WiFi with an internet time provider, we can ensure that our clock always displays the correct time, regardless of changes in daylight saving time or when we move across different time zones. Additionally, we will learn how to parse JSON and datetime strings and how to show the time on an LCD display.
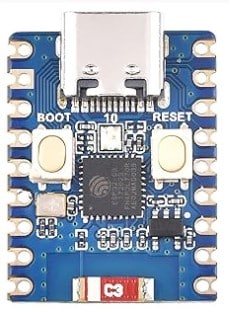
I will use an ESP32-C3 SuperMini for this project but any ESP32, ESP8266 or an Arduino with WiFi shield will work as well.
Let’s get started!
Required Parts
Here are the required parts for the project. Instead of the ESP32-C3 Mini Development Board listed below, I used very similar board called ESP32-C3 SuperMini from AliExpress. Mine had only a single color built-in LED, while the board below has an RGB LED. But apart form that they should be almost identical and both should work.
ESP32-C3 Mini
USB C Cable
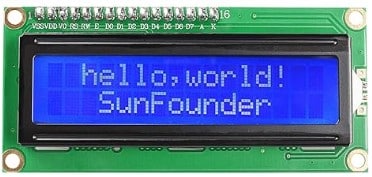
LCD 16×2

Dupont Wire Set

Breadboard
Makerguides.com is a participant in the Amazon Services LLC Associates Program, an affiliate advertising program designed to provide a means for sites to earn advertising fees by advertising and linking to products on Amazon.com. As an Amazon Associate we earn from qualifying purchases.
Daylight Savings Time
Daylight Saving Time (DST) is a practice of adjusting the clock forward by one hour during the summer months to extend daylight in the evenings. This adjustment is made to save energy and make better use of natural daylight. However, not all countries or regions observe DST, and the start and end dates vary.
Most countries change time at 1am or 2am and then shift by one hour. But there are special cases such as Lord Howe Island belonging to Australia that shifts by 30mins, Cuba changes time at midnight and some countries change at 1am UTC versus 1am local time. For a complete overview have a look at the Wikipedia article: Daylight saving time by country.
To ensure our digital clock automatically adjusts for DST, we need to implement a mechanism that takes into account the DST rules of the specific time zone. However, the variety of rules between countries makes it rather complex to implement DST adjustments ourselves. Instead, we will rely on an internet time provider that handles all of that for us.
When synchronizing our clock with an internet time provider, we can retrieve the current time along with additional data, such as the time zone and whether DST is in effect. This information is typically provided in a JSON format, which we need to parse to extract the relevant details.
In the next section, we will have a look at some internet time providers, how to connect to them and what their JSON format is.
Internet Time Provider
In this section we will quickly discuss three internet time providers, how to use their APIs and what information is contained in the JSON output they provide. I will also tell you a bit about the Network Time Protocol (NTP) and why we don’t use it here.
WorldTimeAPI
WorldTimeAPI is a simple web service, which returns the current time as either plain-text or JSON. You can use this website to get the time for a given timezone or based on the IP address of your computer. We will use the latter. It is easier and our clock will then also automatically adjust not only to DST but also when moved to a different timezone.
It is very easy to try out WorldTimeAPI. Just click on this link: http://worldtimeapi.org/api/ip or enter it in the search bar of your browser. Note that you don’t explicitly have to provide your IP address. The web service figures this out by itself based on where the query originates from. What you then will get in your browser is an output similar to the following (I added some formatting to make it nicer to read and obfuscated my IP address)
{
    "abbreviation": "AEDT",
    "client_ip": "122.150.000.000",
    "datetime": "2023-11-16T12:09:46.409360+11:00",
    "day_of_week": 4,
    "day_of_year": 320,
    "dst": true,
    "dst_from": "2023-09-30T16:00:00+00:00",
    "dst_offset": 3600,
    "dst_until": "2024-04-06T16:00:00+00:00",
    "raw_offset": 36000,
    "timezone": "Australia/Melbourne",
    "unixtime": 1700096986,
    "utc_datetime": "2023-11-16T01:09:46.409360+00:00",
    "utc_offset": "+11:00",
    "week_number": 46
}
This output is in JSON format. It contains other information beyond the current time. But we are specifically interested in the datetime field, which gives us the current local time. In this example it is "2023-11-16T12:09:46.409360+11:00".
Every time you go to this link, you will get an updated time. Just make sure that you don’t hit this link too frequently, otherwise you may get blocked!
WorldTimeAPI is the internet time provider we will use for our clock. But I will also give you two alternatives that return slightly different information, which might be more suitable for your use case.
timezonedb
Timezonedb offers several other APIs that you can use to get time zone information. But it also has a service that returns the current time. However, you have to register to get an API_KEY that allows you to use their service. There is a free plan and once you have your API_KEY you can use the following link to receive time information in JSON format:
http://api.timezonedb.com/v2/get-time-zone?key=API_KEY&format=json&by=zone&zone=Australia/Melbourne
Unfortunately, you have to provide a time zone. You need the paid, premium plan to query by IP address.
{
    "status": "OK",
    "message": "",
    "countryCode": "AU",
    "countryName": "Australia",
    "regionName": "",
    "cityName": "",
    "zoneName": "Australia\/Melbourne",
    "abbreviation": "AEDT",
    "gmtOffset": 39600,
    "dst": "1",
    "zoneStart": 1696089600,
    "zoneEnd": 1712419199,
    "nextAbbreviation": "AEST",
    "timestamp": 1700145739,
    "formatted": "2023-11-16 14:42:19"
}
However, the advantage of this service is that it returns a nice, already formatted time string that is easy to use. See the formatted field above.
ipgeolocation
As a third option, we have ipgeolocation. You also will have to register to get an API_KEY. But the free developer plan is very generous with 1K daily and 30k monthly requests, which is plenty. Here is the link to get time information based on your IP address: https://api.ipgeolocation.io/timezone?apiKey=API_KEY. Obviously, you will have to put your own API_KEY in there.
The returned information is very rich and not only contains the time but also the geolocation of the requester. As you can see, I currently live in Melbourne, Australia.
{
    "geo": {
        "country_code2": "AU",
        "country_code3": "AUS",
        "country_name": "Australia",
        "country_name_official": "Commonwealth of Australia",
        "state_prov": "Victoria",
        "state_code": "AU-VIC",
        "district": "",
        "city": "Melbourne",
        "zipcode": "3004",
        "latitude": "-37.8",
        "longitude": "144.9"
    },
    "timezone": "Australia/Melbourne",
    "timezone_offset": 10,
    "timezone_offset_with_dst": 11,
    "date": "2023-11-16",
    "date_time": "2023-11-16 14:57:36",
    "date_time_txt": "Thursday, November 16, 2023 14:57:36",
    "date_time_wti": "Thu, 16 Nov 2023 14:57:36 +1100",
    "date_time_ymd": "2023-11-16T14:57:36+1100",
    "date_time_unix": 1700107056.275,
    "time_24": "14:57:36",
    "time_12": "02:57:36 PM",
    "week": 46,
    "month": 11,
    "year": 2023,
    "year_abbr": "23",
    "is_dst": true,
    "dst_savings": 1
}
ipgeolocation is my preferred time provider due to the conveniently formatted date time information they return (see the fields date_time, date_time_txt, and date_time_wti) and the additional data.
However, to keep things as simple as possible, for our clock example, I will use WorldTimeAPI, since you don’t have to register to use their service.
Network Time Protocol
Finally a word about the Network Time Protocol (NTP): “The Network Time Protocol (NTP) is a networking protocol for clock synchronization between computer systems over packet-switched, variable-latency data networks.” (source: Wikipedia).
It is specifically designed to accurately synchronize clocks but as you can guess from the description, it is not necessarily easy to use and for a simple clock that automatically adjusts to DST, it is overkill. If you don’t believe me have a look at TimeNTP library and the example code. However, as I said if you need accurate synchronization that is the way to go.
In the next section, I show you how to connect an LCD display to an ESP32, so that we can nicely display the time and date.
Connecting the Parts
We need some display to show the time of our clock. Any display would do but for simplicity we will use a 16×2 LCD display connected via I2C. For more detailed information on LCD displays have a look at our tutorials on How to use a 16×2 character LCD with Arduino and Character I2C LCD with Arduino Tutorial (8 Examples).
Connecting the LCD display to the ESP32 is very simple. First, connect 5V to VCC and G to Ground. Then connect SDA to pin 8 (yellow wire) and SCL to pin 9 (orange wire) on the ESP32.
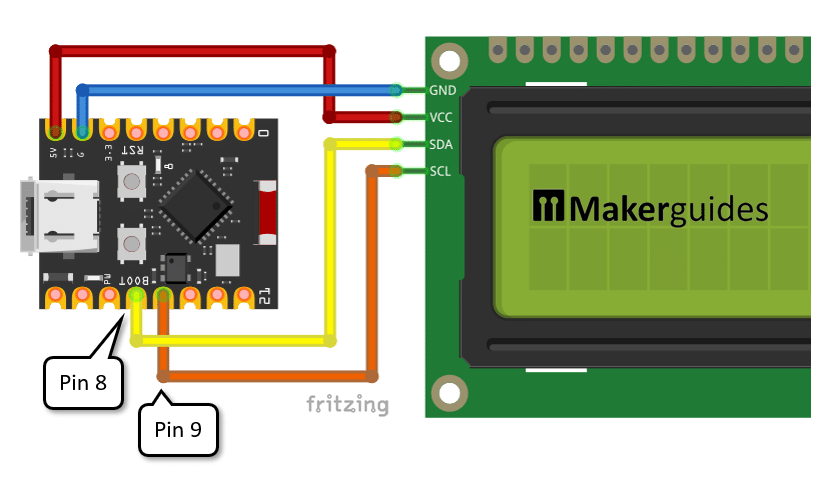
Make sure to connect SDA and SCL correctly. If you use a different board you may want to change to the pins that support the I2C interface on your board. Just look for the pins marked with SDA and SCL in the pinout. Here is the pinout for the ESP32-C3 Supermini, I am using in this project:
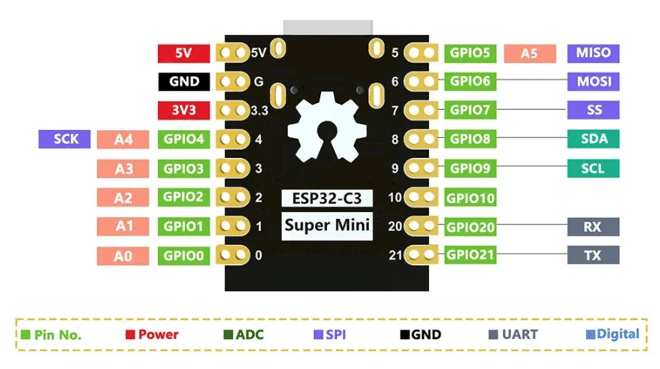
While the pins GPIO8 and GPIO9 are supposed to be the native pins for the I2C interface, I had to set them explicitly in the code below to get it working.
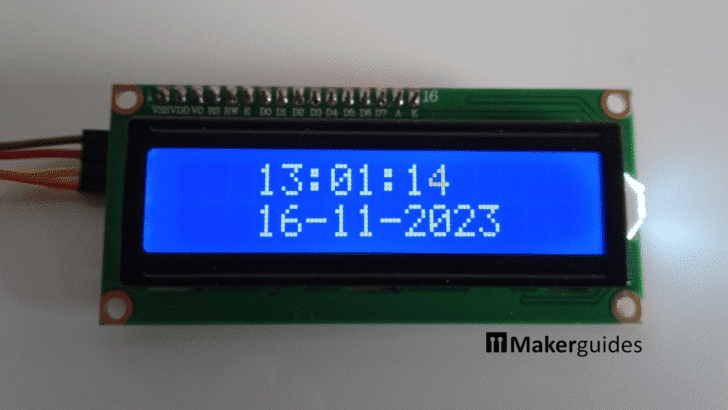
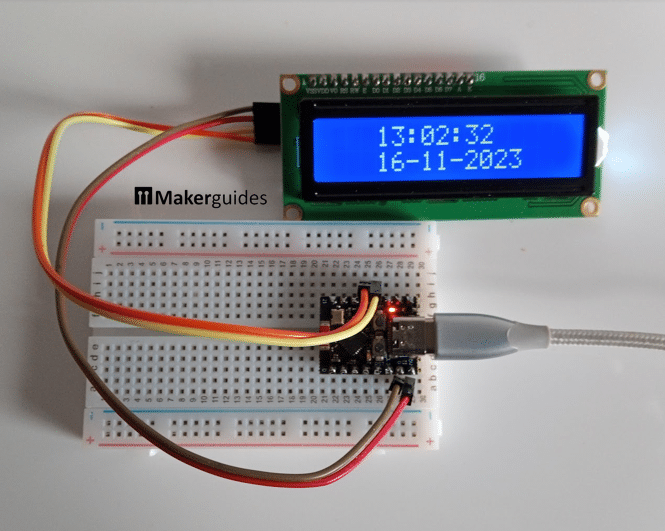
Here a picture how our Automatic Daylight Savings Time Clock looks like in real life when the wiring is complete and the code is running.
Code for the Clock
In this section, we will write the code for our automatic Daylight Savings Time Clock. There are 5 steps involved.
First, we need to check the time and decide if want to synchronize, for instance, once every hour. If we do, we need to download the time information from the internet time provider. This data will be in JSON format. So we will need to parse it and extract the time.
Once we have the time we will set the internal clock of the ESP32 and then display the time on the LCD. The following code does all of that. Have a quick look first and I will explain the details in the text below.
#include "WiFi.h"
#include "stdarg.h"
#include "HTTPClient.h"
#include "ArduinoJson.h"
#include "TimeLib.h"
#include "LiquidCrystal_I2C.h"
#include "Wire.h"

#define WIFI_SSID "YOUR_WIFI_SSID"
#define WIFI_PASSPHRASE "YOUR_WIFI_PASSWORD"
#define URL "http://worldtimeapi.org/api/ip"

StaticJsonDocument<2048> doc;
LiquidCrystal_I2C lcd = LiquidCrystal_I2C(0x3F, 16, 2);

void lcd_print_time() {
  time_t t = now();
  char buff[24];
  sprintf(buff, "%d:%02d:%02d ", hour(t), minute(t), second(t));
  lcd.setCursor(3, 0);
  lcd.print(buff);
  sprintf(buff, "%02d-%02d-%04d ", day(t), month(t), year(t));
  lcd.setCursor(3, 1);
  lcd.print(buff);
}

bool should_sync_time() {
  time_t t = now();
  bool wifi_on = WiFi.status() == WL_CONNECTED;
  bool should_sync = (minute(t) == 0 && second(t) == 3) || (year(t) == 1970);
  return wifi_on && should_sync;
}

void sync_time() {
  delay(1000);
  HTTPClient http;
  http.begin(URL);
  if (http.GET() > 0) {
    String json = http.getString();
    auto error = deserializeJson(doc, json);
    if (!error) {
      int Y, M, D, h, m, s, ms, tzh, tzm;
      sscanf(doc["datetime"], "%d-%d-%dT%d:%d:%d.%d+%d:%d",
             &Y, &M, &D, &h, &m, &s, &ms, &tzh, &tzm);
      setTime(h, m, s, D, M, Y);
    }
  }
  http.end();
}

void setup() {
  Serial.begin(115200);
  Wire.begin(8, 9);  // I2C for ESP32-C3 Supermini
  WiFi.mode(WIFI_STA);
  WiFi.begin(WIFI_SSID, WIFI_PASSPHRASE);
  while (WiFi.status() != WL_CONNECTED)
    delay(500);
  lcd.init();
  lcd.backlight();
  lcd.clear();
}

void loop() {
  if (should_sync_time())
    sync_time();
  lcd_print_time();
  delay(100);
}
Now let’s take a closer look at the parts of the code and understand how it all works.
Constants and Libraries
We start by including the necessary libraries for this project, such as “WiFi.h“, “HTTPClient.h“, “ArduinoJson.h“, “TimeLib.h“, and “LiquidCrystal_I2C.h“. These libraries provide the required functionality for WiFi connectivity, making HTTP requests, parsing JSON, managing time, and controlling the LCD display.
You will need to install the ArduinoJson, TimeLib and the LiquidCrystal_I2C libraries. The other ones are part of the ESP32/Arduino standard library.
#include "WiFi.h"
#include "stdarg.h"
#include "HTTPClient.h"
#include "ArduinoJson.h"
#include "TimeLib.h"
#include "LiquidCrystal_I2C.h"
#include "Wire.h"
Next, we define the WiFi SSID and passphrase for connecting to the network. Replace “YOUR_WIFI_SSID” and “YOUR_WIFI_PASSWORD” with your actual network credentials.
#define WIFI_SSID "YOUR_WIFI_SSID"
#define WIFI_PASSPHRASE "YOUR_WIFI_PASSWORD"
We also define the URL of the internet time provider API that we will use to synchronize the clock. In this example, we use “http://worldtimeapi.org/api/ip“, but you can replace it with one of the other time providers we discussed above. However, since the data format differs between providers you would need to adjust the parsing code accordingly.
#define URL "http://worldtimeapi.org/api/ip"
We then create a static JSON document with a capacity of 2048 bytes to store the response from the internet time provider. If the response is larger you will get an error. So if you pick a different API that returns a larger response make sure to increase this number.
StaticJsonDocument<2048> doc;
We initialize the LCD display using the LiquidCrystal_I2C library. The parameters passed to the LiquidCrystal_I2C constructor specify the I2C address of the display (0x3F) and the number of columns and rows (16 and 2, respectively). If you use the common 20×4 LCD display instead you need to change this. Also note that some displays have the I2C address 0x27 instead of 0x3F.
LiquidCrystal_I2C lcd = LiquidCrystal_I2C(0x3F, 16, 2);
Helper Functions
It is always good to break complex code in smaller more manageable parts using functions. I implemented three helper functions to show the time on the LCD display, to check if need to synchronize the time, and to download the current time.
lcd_print_time
The helper function lcd_print_time() prints the current time on the LCD display. It retrieves the current time using the now() function from the TimeLib library and formats it into a string using the sprintf() function. The formatted time string is then printed on the LCD display using the lcd.print() function. We write to column 3 and the rows 0 and 1 to place the text nicely in the center.
void lcd_print_time() {
  time_t t = now();
  char buff[24];
  sprintf(buff, "%d:%02d:%02d ", hour(t), minute(t), second(t));
  lcd.setCursor(3, 0);
  lcd.print(buff);
  sprintf(buff, "%02d-%02d-%04d ", day(t), month(t), year(t));
  lcd.setCursor(3, 1);
  lcd.print(buff);
}
should_sync_time
We define another helper function called should_sync_time() that determines whether the clock should be synchronized with the internet time provider.
It checks if the current minute is zero and 3 seconds or if the current year is 1970. That means we synchronize every hour and we do it 3 seconds past the full hour to catch the change in daylight saving time that might occur at the full hour. So worst case our clock is 3 seconds off.
bool should_sync_time() {
  time_t t = now();
  bool wifi_on = WiFi.status() == WL_CONNECTED;
  bool should_sync = (minute(t) == 0 && second(t) == 3) || (year(t) == 1970);
  return wifi_on && should_sync;
}
You can synchronize more frequently but don’t overdo it! The internet time provider will block you if you try to fetch the time every second! Every ten minutes or so would be probably fine.
We also check if the current year is 1970. This is the year that your ESP32 clock will report when just started (start of Unix time). This means, when the ESP32 is powered on the first thing we will do is to synchronize the time, even if we are not at a full hour. Without this our time might be completely of for up to an hour!
sync_time
Next we define the sync_time() function that is responsible for synchronizing the clock with the internet time provider. It starts by creating an instance of the HTTPClient class and making a GET request to the specified URL. If the request is successful (HTTP response code > 0), it retrieves the response body as a string and parses it as JSON using the ArduinoJson library.
If the JSON parsing is successful, it extracts the year, month, day, hour, minute, second, and time zone information from the JSON object using the sscanf() function. Finally, it sets the time using the setTime() function from the TimeLib library.
void sync_time() {
  delay(1000);
  HTTPClient http;
  http.begin(URL);
  if (http.GET() > 0) {
    String json = http.getString();
    auto error = deserializeJson(doc, json);
    if (!error) {
      int Y, M, D, h, m, s, ms, tzh, tzm;
      sscanf(doc["datetime"], "%d-%d-%dT%d:%d:%d.%d+%d:%d",
             &Y, &M, &D, &h, &m, &s, &ms, &tzh, &tzm);
      setTime(h, m, s, D, M, Y);
    }
  }
  http.end();
}
For debugging you could add the following line after scanf to print the parsed time:
Serial.printf("sync: %2d:%02d:%02d %4d-%02d-%02d\n", h, m, s, Y, M, D);
Note that I added a delay of 1 second at the beginning of sync_time. This is to avoid that we are synchronizing multiple times within the second. You will later see that time display is updated every 100ms in the loop function. That means the second(t) == 3 condition would be true for 10 times in the loop and we would synchronize multiple times.
There are better ways to handle this. But to keep the code simple, I just used a delay. However, this also means that the displayed time will not update for a second every hour. Feel free to improve on this.
Setup Function
In the setup() function, we initialize the serial communication at a baud rate of 115200. We also initialize the I2C interface using the Wire.begin() function.
Then, we set the WiFi mode to station mode using WiFi.mode() and connect to the WiFi network using WiFi.begin(). We wait until the connection is established by continuously checking the WiFi status using WiFi.status().
Finally, we initialize the LCD display, turn on the backlight, and clear the display calling the lcd.init(), lcd.backlight(), and lcd.clear() functions, respectively.
void setup() {
  Serial.begin(115200);
  Wire.begin(8, 9);  // I2C for ESP32-C3 Supermini
  WiFi.mode(WIFI_STA);
  WiFi.begin(WIFI_SSID, WIFI_PASSPHRASE);
  while (WiFi.status() != WL_CONNECTED)
    delay(500);
  lcd.init();
  lcd.backlight();
  lcd.clear();
}
Note that I explicitly had set the SDA and SCL pins for the I2C interface using Wire.begin(8,9). I could not get I2C working on the ESP32-C3 Supermini without that. If someone finds a better solution, please let me know in the comments.
Loop Function
In the loop() function, we continuously check if the clock should be synchronized with the internet time provider by calling the should_sync_time() function. If synchronization is required, we call the sync_time() function to update the clock. Then, we call the lcd_print_time() function to display the current time on the LCD display. We add a small delay of 100 milliseconds using the delay() function to avoid excessive updates.
void loop() {
  if (should_sync_time())
    sync_time();
  lcd_print_time();
  delay(100);
}
That’s it! With this code, we have a digital clock that automatically adjusts to daylight saving time and different time zones by synchronizing the clock via WiFi with an internet time provider. The current time is displayed on an LCD display, and the clock is synchronized periodically.
Extensions
There are many possible extensions to this project. In addition to time and date we could display the time zone, the time zone offset and whether DST is active or not. Obviously an hourly beep or an alarm function would be nice to have as well.
Depending on your country you may prefer time to be displayed with AM/PM instead of a 24 hour clock or for multiple time zones. Also showing the name of the weekday and name of the month would be easy to add.
We are not limited to just internet time providers. Any information available on the internet such as weather forecasts, stock tickers or general news could be displayed in addition to time. It is just another HTTP request with data that can be parsed.
Finally, since we are connecting to the internet in regular intervals we could utilize this to monitor internet speed or loss of connectivity.
Conclusion
In this tutorial, we have learned how to build a digital clock that automatically adjusts to daylight saving time and different time zones. By synchronizing the clock via WiFi with an internet time provider, we can ensure that our clock always displays the accurate time.
We started by discussing the required parts for this project, which include an WiFi enabled ESP32 board and an LCD display. We then explained how to connect these parts together to create the clock.
Next, we discussed the concept of daylight saving time and its importance in adjusting the clock for seasonal time changes. We explored how to handle daylight saving time in our code to ensure that the clock updates correctly.
To synchronize our clock with an internet time provider, we utilized JSON parsing techniques to extract the time data from the provider’s API. We also learned how to work with datetime strings to convert and display the time on the LCD display.
If you have any further questions or need additional guidance, please refer to the Frequently Asked Questions section or visit the provided links for more resources and information.
Frequently Asked Questions
Here are some frequently asked questions about building a digital clock that automatically adjusts to daylight saving time and different time zones:
Q: Can I use any board with WiFi for this project?
A: Yes, you can use any microcontroller board that has WiFi or can be equipped with a WiFi shield. Some popular options include ESP8266 and ESP32 modules, which have built-in WiFi capabilities.
Q: How does the clock adjust to daylight saving time?
A: The clock adjusts to daylight saving time by synchronizing with an internet time provider. These time providers provide accurate time information, including the current time zone and whether daylight saving time is in effect. By parsing this information and adjusting the clock accordingly, you can ensure that your clock always displays the correct time.
Q: Do I need an LCD display for this project?
A: While an LCD display is not mandatory, it is recommended for this project as it allows you to visually see the time. However, if you prefer, you can also output the time to a serial monitor or any other output device of your choice.
Q: Can I customize the code to add additional features?
A: Absolutely! The provided code is a starting point, and you can customize it to add additional features or modify its behavior to suit your needs. For example, you could add support for multiple time zones, display additional information, or integrate other sensors or modules into the project.
Q: Are there any limitations to using an internet time provider?
A: While using an internet time provider is a convenient way to synchronize your clock, it does rely on an internet connection. If your clock is unable to connect to the internet, it may not be able to update the time accurately. Additionally, if the time provider experiences downtime or issues, it may also affect the accuracy of your clock.
Links
Here some useful links to similar projects:
- NTP ESP32: Use Internet to get date and time with Arduino code
- NTP ESP32: Use Internet to get date and time with Arduino code
- NTP with Day Light Saving Time for the ESP32
- ESP32 Useful Wi-Fi Library Functions
- ESP32 HTTP GET and HTTP POST
Stefan is a professional software developer and researcher. He has worked in robotics, bioinformatics, image/audio processing and education at Siemens, IBM and Google. He specializes in AI and machine learning and has a keen interest in DIY projects involving Arduino and 3D printing.