
In this article, I will show you how to use the LM35 temperature sensor with the ESP32 microcontroller.
The LM35 series are precise temperature sensors that give you a voltage output directly proportional to the Centigrade temperature that it senses.
Monitoring temperature is critical in many different applications. If the battery temperature is very high, you stop charging. If the CPU is overheating, you either improve the heatsink or reduce CPU speed.
Temperature monitoring is also needed in food industries for storage. To make sure the food is always stored at the right temperature. If there is a power outage, the cooling may have failed, and food might be spoiled.
LM35 is one such precise sensor that can assist in sensing temperatures and the data output from this can be utilized to trigger a wide range of actions – alarms, motors, fans, backup systems etc.
I will teach you all the essential information you need to know about the LM35 in this article, and I will show you how to use an LM35 sensor with the ESP32.
You will get a connection guide, ESP32 code for the LM35 sensor, and I will also answer some frequently asked questions about the LM35.
Let’s get started!
Components Needed To Build ESP32 And LM35 Sensor Project
Hardware Components
- Dupont wire x 1 set
- Micro USB Cable for ESP32 (for powering ESP32 and programming) x 1
Software
Guide
Makerguides.com is a participant in the Amazon Services LLC Associates Program, an affiliate advertising program designed to provide a means for sites to earn advertising fees by advertising and linking to products on Amazon.com.
Fundamentals Of The LM35 Sensors
Let us understand the basic working principle, features, pinouts, and applications of the LM35 temperature sensor.
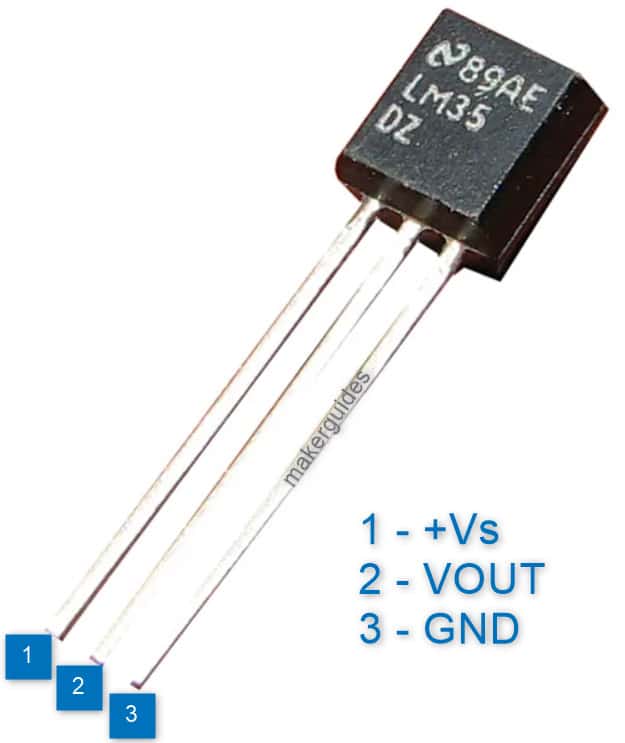
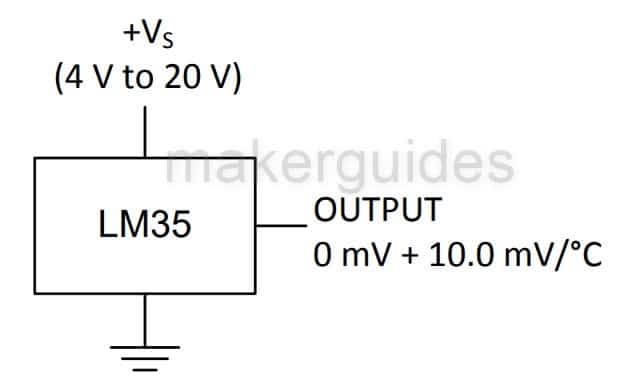
The LM35 comes in both a three pin package and SMD small outline package. The image below shows an LM35 sensor in an easy-to-use three-pin package, along with labels for the 3 pins:
- +Vs
- VOUT
- GND
LM35 IC also comes in a TO-220 package. The package can connect to a heatsink or, in other words, be attached easily to a surface where you want to monitor the temperature.
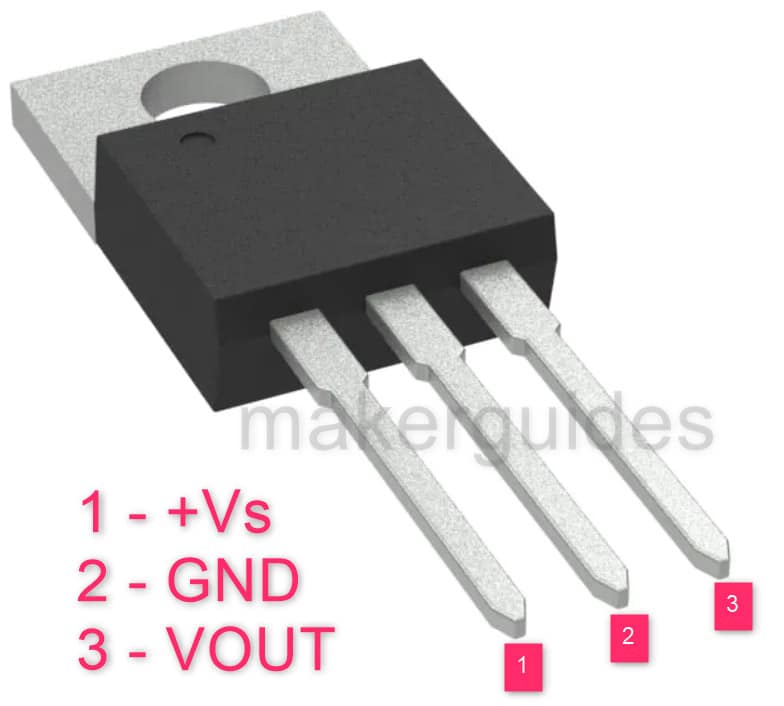
This diagram shows the pins on the LM35 sensor.
Note that the center pin is no more the output pin. The center pin is the ground pin. The output pin is the third pin.
Hence, there is a subtle difference between the TO-220 and TO-92 packages. Please take care of this in your application too.
LM35 IC is simple to use as there is no slave/master concept, no specific addresses, CRC computation, serial communication setup, etc. You only need to perform the three operations.
To get the temperature reading, simply read the analog value using an ADC. Then, convert this value into a voltage reading.
Next, refer to a provided reference table to convert the voltage reading into the corresponding temperature value.
Features of the LM35 Sensor
Here are the key features of the LM35 sensor summarized in a table:
| Parameter | Range |
| Output voltage calibration | Directly in Celsius |
| Operating temperature range | -55 ℃ to 150 ℃ |
| Temperature Accuracy | ± 0.5 ℃ (typical), ±1 ℃ (maximum) |
| Supply voltage | 4 V to 30 V |
| Nonlinearity | ±0.18 ℃ (typical) |
| Quiescent current | 131 uA (max) |
| Scaling | 10 mV / ℃ |
| Temperature coefficient of quiescent current | 0.39 uA/℃ |
What is the temperature coefficient of quiescent current?
The temperature coefficient defines the dependence of the quiescent current value on the temperature.
In this case, the quiescent current increases by 0.39 uA for every centigrade rise in the operating ambient temperature.
It is insignificant for most applications since it is a small value for LM35 sensor IC.
Pin Definition of LM35 Temperature Sensor
You can use the below reference to quickly refer to the pinouts of the LM35 temperature sensor IC. The LM35 IC below is in the TO-92 package.
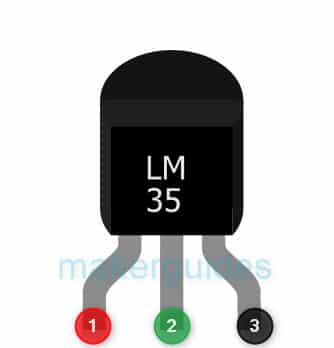
| Pin Number | Pin | Description |
| 1 | +Vs | Power supply pin. ( 4 V to 30 V) |
| 2 | VOUT | Output analog voltage (calibrated to show the temperature in Celsius) |
| 3 | GND | Ground connection |
In the SMD version, you have eight pins, as shown in the diagram below..
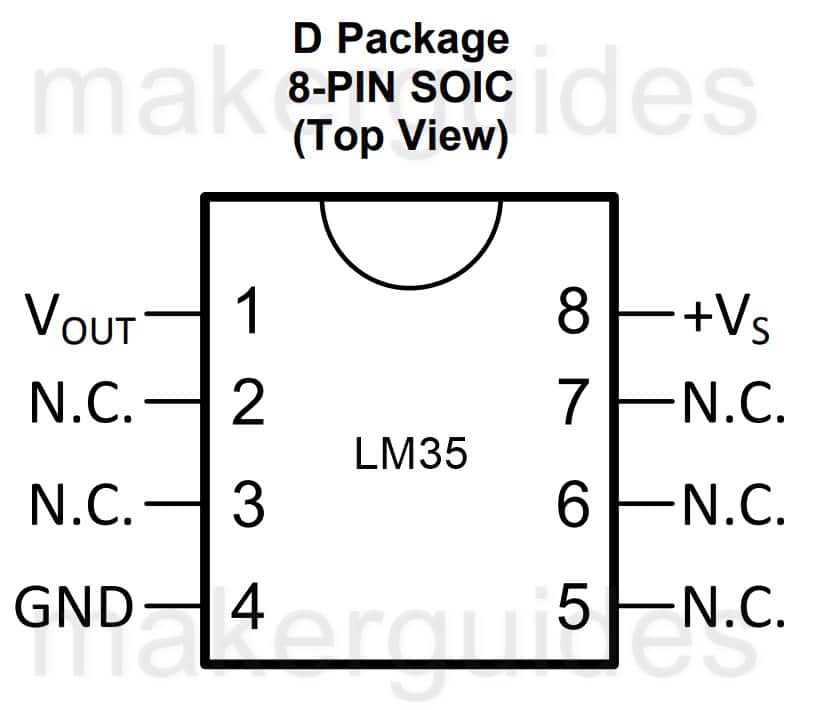
The three pins are common to the other versions: Power, Ground, and output voltage. The remaining five pins are No-connect pins.
You don’t connect those pins anywhere. Leave it open.
How to Derive Temperature From VOUT of LM35 Sensor?
This is special. In the case of LM35, you can convert the VOUT voltage into temperature using a simple equation.
The output voltage in mV is a product of temperature in Celsius and the numeral 10.
You can derive the temperature value in Celsius by dividing the read VOUT analog voltage in mV by 10, as expressed in this simple formula:

It also means when the temperature is positive, you will be able to read the voltages properly.
Since the ADC cannot measure negative voltages, the above logic is valid for temperature ranges from 0 ℃ to 155 ℃.
Most room sensing applications, battery chargers, and similar applications work in the temperature range between 10 ℃ and 40 ℃. Hence, the simple connection works for this kind of application.
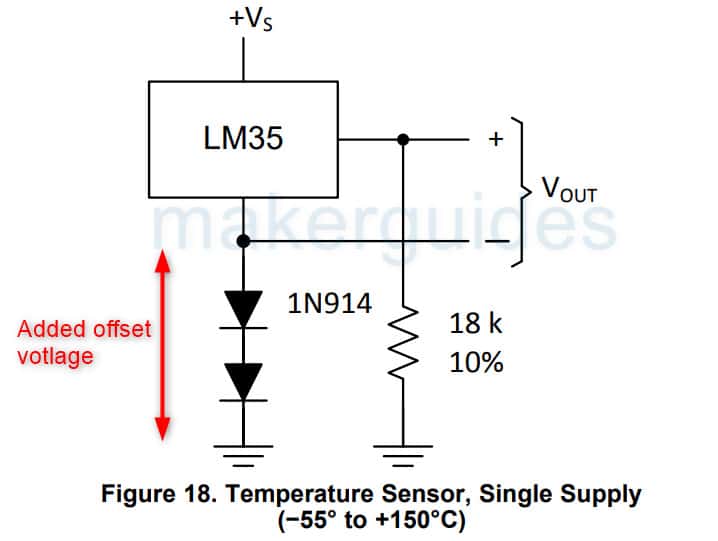
When measuring the negative temperature, you need to offset the output voltage.
Here is one circuitry you can use with LM35 where you can cancel the VOUT so that the VOUT will give positive voltage for both negative and positive temperatures.
Applications of LM35 sensor
LM35 is a primary sensor used for temperature sensing, and can be used in the following applications:
- Medical equipment – You can use the sensor to monitor patient temperature and ensure the ICU and other critical areas are healthy temperatures controlled for the comfort and accuracy of the restorative procedure. LM35 to the rescue!
- HVAC systems – Heating Ventilation and Air conditioning systems will always need a temperature sensor as a core component. LM35 is a valuable solution for those systems as it meets the requirements for range and measurement accuracy.
- Food processing – To make sure the food remains fresh and is cooked at the appropriate temperature, it is essential to have a temperature monitoring system. The LM35 is a suitable option for such applications.
- Industrial processes: Several industrial processes depend on the LM35 sensor to ensure that the parts are produced at the proper temperature to ensure production accuracy.
The temperature variation can bring in dimensional or color changes for specific processes. Hence it is critical to track and monitor the temperature using LM35 or similar sensors.
Fun Fact: Did you know the crocodile eggs can turn into a male or female crocodile based on the temperature the eggs were stored at? The LM35 sensor can also help in DIY incubation projects.
What application are you using the LM35 temperature sensor for? Share it in the comments section below.
How To Connect The LM35 Sensor Module with ESP32
I will show you how to build a project using ESP32 and the LM35 temperature sensor. Let’s get started with the hardware connections.
Step 1: Complete the hardware connections
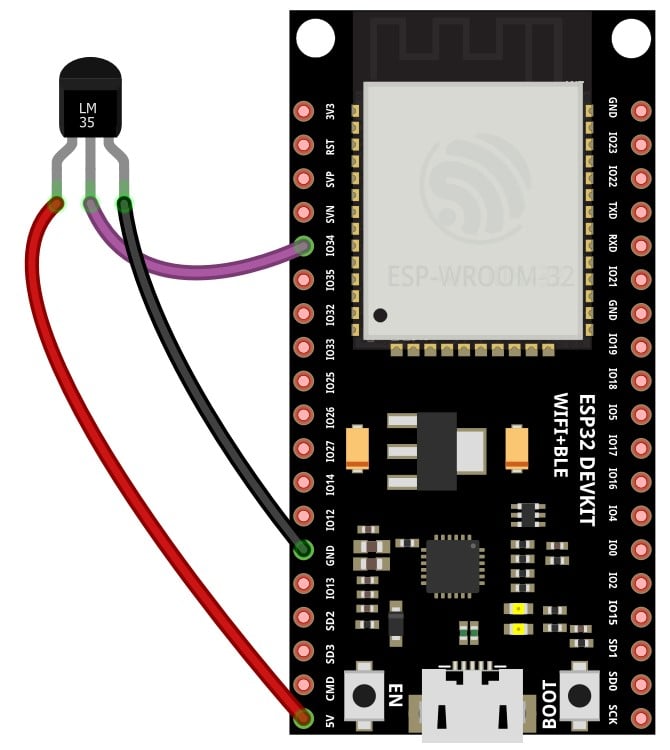
LM35 is only a 3-pin IC. The connections are also simple to understand and follow as show in the above diagram.
Always start with the ground connections. Power the entire system only after completing all the connections.
I am using GPIO34 in my example. You can choose any other ADC pin. If you have to use other pins, edit the code accordingly.
Step 2: Program the ESP32 with the code below
Follow the next step to understand the code implementation. You can use the code below to test the ESP32 module and the connected LM35 temperature sensor.
Please follow our guide to install the ESP32 core on the Arduino IDE.
//source
#define ADC_VREF_mV    3300.0 // in millivolt
#define ADC_RESOLUTION 4096.0
#define PIN_LM35       34 // ESP32 pin GIOP34 (ADC1) connected to LM35

void setup() {
  Serial.begin(9600);
}

void loop() {
  // read the ADC value from the temperature sensor
  int adcVal = analogRead(PIN_LM35);
  // convert the ADC value to voltage in millivolt
  float milliVolt = adcVal * (ADC_VREF_mV / ADC_RESOLUTION);
  // convert the voltage to the temperature in °C
  float tempC = milliVolt / 10;
  // convert the °C to °F
  float tempF = tempC * 9 / 5 + 32;

  // print the temperature in the Serial Monitor:
  Serial.print("Temperature: ");
  Serial.print(tempC);   // print the temperature in °C
  Serial.print("°C");
  Serial.print("  ~  "); // separator between °C and °F
  Serial.print(tempF);   // print the temperature in °F
  Serial.println("°F");

  delay(500);
}
Step 3: Code Walkthrough
Let’s walk through the code. This example tests LM35 temperature sensors. The code is used to read the temperature and print on the serial terminal.
You can build your project upon this code further to activate lights and control the relay modules based on the value read by the temperature sensors.
#define ADC_VREF_mV    3300.0 // in millivolt
#define ADC_RESOLUTION 4096.0
#define PIN_LM35       34 // ESP32 pin GIOP34 (ADC1) connected to LM35
The lines above define three constants. ADC_VREF_mV is the voltage reference of the ADC in millivolts, ADC_RESOLUTION is the ADC resolution, and PIN_LM35 is the pin to which the LM35 temperature sensor is connected.
Defining constants helps you to change the details in just one place in the future.
void setup() {
  Serial.begin(9600);
}
In the setup()function above, you initialize serial communication with a baud rate of 9600. No other settings are needed to be initialized.
In the loop() function, we perform the following actions repeatedly (every 0.5 seconds)
- Read the voltage from the LM35 temperature sensor using the analogRead function and store it in the integer variable adcVal.
- Calculate the voltage in mV from the ADC value using the formula adcVal * (ADC_VREF_mV / ADC_RESOLUTION) and store it in the float variable milliVolt. I hope the formula is easy to understand
- Calculates the temperature in Celsius using the formula milliVolt / 10 and stores it in the float variable tempC. This is due to the scaling factor.
- Calculates the temperature in Fahrenheit using the formula tempC * 9 / 5 + 32 and store it in the float variable tempF. This is optional, but for completeness, we print in both centigrade and Fahrenheit.
- Print the temperature in Celsius and Fahrenheit to the Serial Monitor.
delay(500);
Wait for 500 milliseconds using the delay function and start over again.
I hope this code explanation helped. Let me know if you have any questions at all in the comments section below.
FAQs About The LM35 Temperature Sensors
I have included a list of the most frequently asked questions about projects built using the ESP32 and the LM35 sensors.
What is an LM35 sensor?
LM35 is a temperature sensor IC that produces an output voltage proportional to the temperature. It operates from a wide supply voltage (4 V to 30 V), making it the first choice for various applications with different power supply needs.
With very low nonlinearity and a simple output option, LM35 is an easy-to-use sensor.
What is the temperature range of the LM35?
The LM35 has a temperature range of -55°C to 150°C. The accuracy is better in the range around room temperature, which is a common application (HVAC, for example).
The self-heating causes less than 0.1 ℃ error making LM35 a reliable temperature sensor for your application on long-term use.
What is the output voltage of the LM35?
The output voltage of the LM35 is 10 mV per degree Celsius. The output voltage is calibrated directly in Celsius. The scale factor is 10 mV/℃.
What is the accuracy of the LM35 temperature sensor?
The accuracy of the LM35 is typically ±0.5 ℃ at room temperature and ±2.0 ℃ over the entire temperature range.
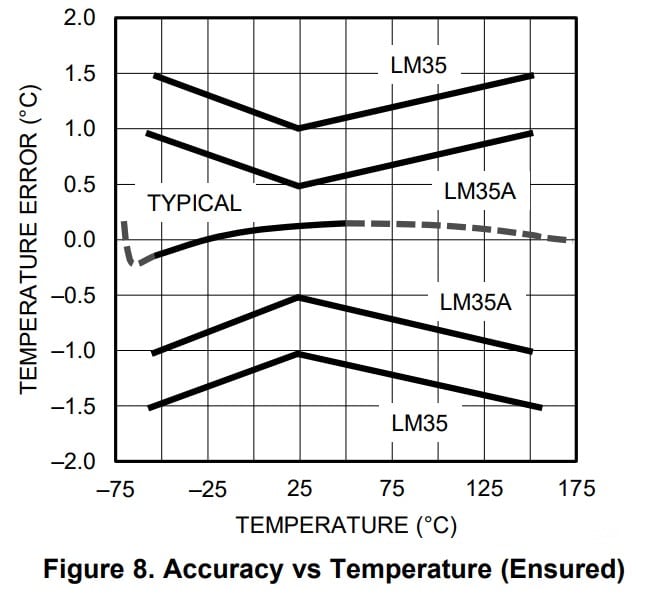
In the graph above, you can see that the LM35A variant has a tighter tolerance compared to the LM35 IC.
What is the advantage of using the LM35 sensor?
The LM35 is a low-cost temperature sensor that requires minimal external components and is easy to use. It has a linear analog voltage output, making it simple to interpret temperature readings.
There is no need to set up a serial communication protocol to talk to the IC. All you need is an ADC pin and a formula to convert the voltage to the temperature.
How is the LM35 sensor calibrated?
The LM35 does not require calibration as it is calibrated during manufacturing. Trimming and calibration are done at the factory itself. It helps you to save time and money on the calibration process.
What are some typical applications where you can use the LM35 temperature sensor?
The LM35 is a temperature sensor with a wide range. You can use LM35 sensors in applications such as thermostats, temperature control systems, and temperature monitoring devices.
Please refer to the basic section for a list of applications where you can find the LM35 sensor as a good fit.
How many pins are there in the LM35 sensor?
The basic TO-92 package comes with three pins. There are other pin variants such as SOIC and TO-220. Please refer to the basics section for pin details of all packages available.
Conclusion
This article has covered all the essential information about the LM35 sensors and how to use them with an ESP32 microcontroller.
I have given you complete information on the working of the LM35 temperature sensor and the advantages of using the LM35 sensors in applications where temperature monitoring is a must.
I provided an ESP32 connection guide and the example code with an explanation of how it works.
If you have further questions about the sensors, please post them in the comments section.
Let us know if there’s anything else you’d like me to cover in future articles.

I am Puneeth. I love tinkering with open-source projects, Arduino, ESP32, Pi and more. I have worked with many different Arduino boards and currently I am exploring, Arduino powered LoRa, Power line communication and IoT.