In this article, I will show you how to use a force sensor with an ESP32 microcontroller.
The force sensor commonly available varies its resistance based on the force applied.
You can think of a force sensor as similar to a light sensor. As the light sensor is sensitive to the level of light it senses, a force sensor is sensitive to the force applied to it.
Monitoring force is critical in many applications. If the driver is not seated in the car, you can apply brakes automatically (consider a use case where you park the car but forget to apply brakes!)
A force sensor finds applications in automobiles, industries, robotics, and more which I will cover below.
I will teach you all the essential information you need to know about force sensors and how to use them with an ESP32.
You will get a connection guide, ESP32 code for the force sensor, and I also answer some frequently asked questions that you may have as well.
Let’s get started!
Components Needed To Build ESP32 And Force Sensor Project
Hardware Components
- Dupont wire x 1 set
- Micro USB Cable for ESP32 (for powering ESP32 and programming) x 1
Software
Guide
Makerguides.com is a participant in the Amazon Services LLC Associates Program, an affiliate advertising program designed to provide a means for sites to earn advertising fees by advertising and linking to products on Amazon.com.
Fundamentals Of The Force Sensors
Energy sensing resistors are durable polymer thick film (PTF) devices that exhibit decreased resistance with increasing force sensed.
Let’s have a look at the force sensor construction in this image:
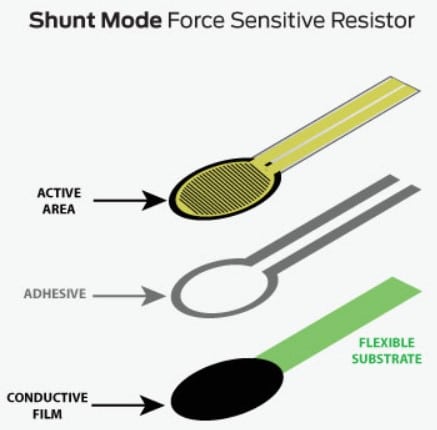
The resistance dynamically changes according to the amount of force applied to the surface of the sensor. The resistance decreases as more force is applied, and this change is inversely proportional to the force applied.
The specific characteristics of the sensor will depend on the construction materials, shape, and size. Please refer to the datasheet of the specific sensor you are looking at.
Please note that force-sensing resistors are designed to detect changes in applied force and are not intended for high-accuracy or weight measurement applications.
Let’s go through one Force sensor example datasheet.
The sensor is ultra-thin and measures only 5 mm in diameter.
Here are the features of the sensor
- Linearity exceeding 99% over 0 to 10 N
- Up to 10 million operations supported before it fails to work as a reliable sensor
- Operating temperature range of -10 ℃ to 65 ℃
- Compatible with simple voltage divider circuit
Every sensor reacts differently to the force applied. Some support a lower range of force by providing more resolution. You should choose the right sensor based on the minimum and maximum force you would like to measure.
A few jargons used in the datasheet are explained below:
- Linearity indicates how well force vs. sensor conductance is correlated linearly.
- Repeatability accounts for how well the sensor can reproduce a reading when the same force is applied within the rated operating force range using precision actuation systems.
- Hysteresis is the difference between sensor output values when force is added or removed continuously from the sensor
- Drift is the gradual shift of the sensor output versus the sensor being subjected to a fixed force. Typically, the sensor conductance will increase gradually with time, so such a factor should be considered to derive accurate force measurement.
- Response time is the time for the incremental change in the output to get from 10% to 90% of the final value when subjected to a change in applied force.
- Temperature Sensitivity is measured by the percentage change in output conductance per change in operating temperature. The rating only applies when the sensor operates within the conditions mentioned in the spec.
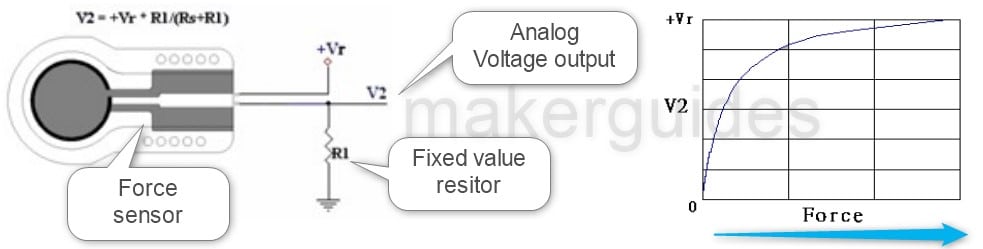
The easiest way to connect a force sensor is to form a resistive divider network. The upper element will be the force sensor, and the lower element will be a fixed resistor.
Now, you can use the ADC pin of the ESP32 to monitor the voltage. You can use a lookup table to convert the ADC voltage into applier pressure.
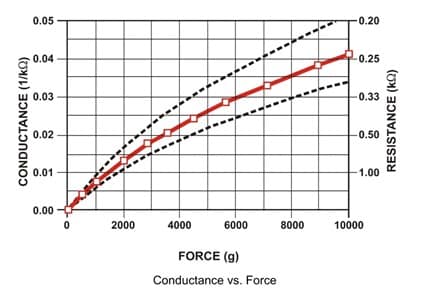
Below you will see another example of a sensor that exhibits a change in the resistance based on the applied force:
Applications of Force sensors
Industrial Automation: Energy sensors are used in manufacturing and industrial systems to measure energy in various components such as robots, assembly lines, and maintenance
You can test the durability of the components by consuming enough energy used to test them. Alternatively, you can use energy sensors to ensure products are within expected performance standards before shipping.
Automotive Industry: The automotive industry uses energy sensors to measure energy in areas such as engine performance, braking systems, suspension systems, etc. Safety sensors can also detect how quickly impacts have been made to trigger safety or emergency calls. How about seat occupancy detection?
Medical Devices: Medical devices such as blood pressure machines, surgical machines, and prosthetics use force sensors to measure force and strain during procedures Also, force sensors can tell you if you are squeezing your leg correctly or not you need some improvement in the way you walk or sit down.
I worked on a project where we built chairs with force sensors. It is used to guide the user to sit correctly so that he/she is not prolonged in the problem of bad posture due to incorrect posture.
Aerospace Industry: The aerospace industry uses force sensors to measure force and pressure in areas such as flight controls, landing gear, and fuel systems.
Robotics: Robotics uses force sensors to respond to the amount of force applied by a robotic arm or gripper. Assume you are carrying weight. You will know how to adjust your body posture based on the weight. It happens intrinsically for us. For the robots, the force sensor can guide them.
Consumer electronics: Consumer electronics such as smartphones and tablets use force sensors to detect forced touch, enabling features like 3D and tactile feedback (think of game controllers, BP machines, etc., which can light up as long as you hold them).
Material testing: Material testing uses strength sensors to measure the strength and durability of materials under various conditions. For example, using automated equipment and force sensors, you can test furniture for its lifetime holding capacity and durability.
If you look around, I am sure you see many fun and practical applications where you can apply a force sensor and an ESP32.
- Build a doormat with a pressure sensor to detect entry/exit or to automate door opening.
- Build a force sensor bed to make sure the person is moving, awake or sleeping (To monitor elderly patients who are alone and even in hospitals for patient safety)
Instructions To Connect The Force Sensor Module with ESP32
I will show you how to build a project using ESP32 and a force sensor. Let’s get started with the hardware connections.
Step 1: Complete the hardware connections
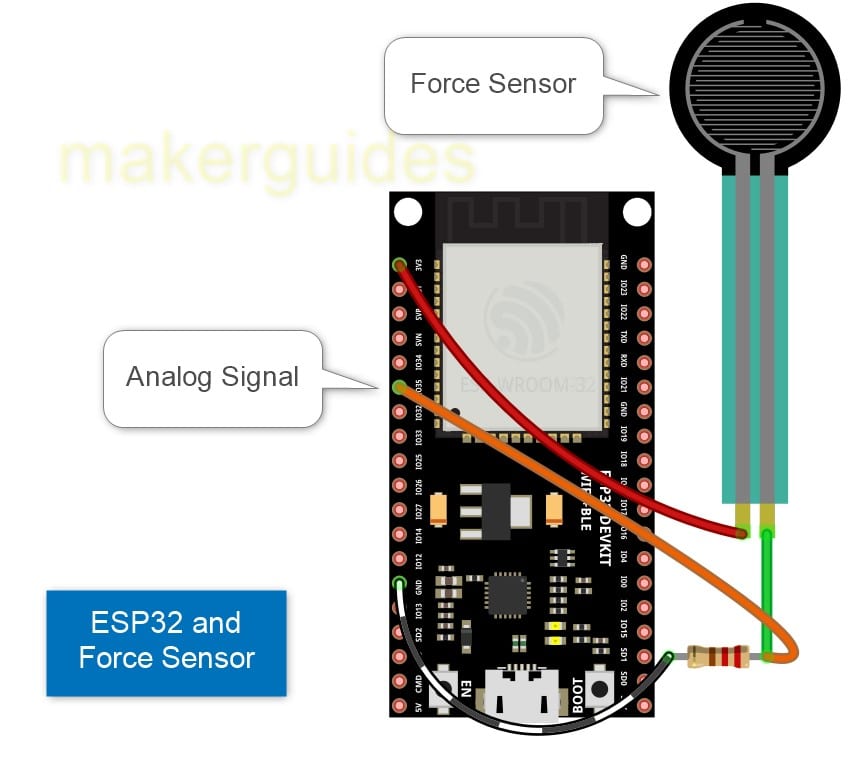
We are using the force sensor as a variable resistor. The analog output voltage can vary between 3.3 V and 0 V maximum, depending on the force on the sensor. Use a fixed 10 kOhms resistor.
I am using GPIO35 in my example to connect the ADC. You can choose any other ADC pin. If you have to use other pins, edit the code accordingly.

Here is the connection summary for ESP32 and the Force sensor project.
- Connect pin 1 of the force sensor to the 3V pin of the ESP32.
- Connect the other pin of the sensor to the terminal of the resistor and the GPIO35 pin of the ESP32.
- Connect the other terminal of the resistor to the GND.
Step 2: Program the ESP32 with the code below
Follow the next step to understand the code implementation. You can use the code below to test the ESP32 module and the connected force sensor.
Please follow our guide to install the ESP32 core on the Arduino IDE.
/*
   This ESP32 code is created by esp32io.com
   This ESP32 code is released in the public domain
   For more detail (instruction and wiring diagram), visit https://esp32io.com/tutorials/esp32-force-sensor
*/

#define FORCE_SENSOR_PIN 35 // ESP32 pin GIOP35 (ADC1):

void setup() {
  Serial.begin(9600);
}

void loop() {
  int analogReading = analogRead(FORCE_SENSOR_PIN);

  Serial.print("The force sensor value = ");
  Serial.print(analogReading); // print the raw analog reading

  if (analogReading < 10)       // from 0 to 9
    Serial.println(" -> no pressure");
  else if (analogReading < 200) // from 10 to 199
    Serial.println(" -> light touch");
  else if (analogReading < 500) // from 200 to 499
    Serial.println(" -> light squeeze");
  else if (analogReading < 800) // from 500 to 799
    Serial.println(" -> medium squeeze");
  else // from 800 to 1023
    Serial.println(" -> big squeeze");

  delay(1000);
}
Step 3: Code Walkthrough
Let’s walk through the code. This example tests force sensors. The code is used to read the force and print the suitable message on the serial terminal based on the measured force.
You can build your project upon this code further to activate lights and control the relay modules based on the value read by the force sensors.
Note that you may have to first calibrate the limits based on the actual force sensors used.
#define FORCE_SENSOR_PIN 35 // ESP32 pin GIOP35 (ADC1):
The lines above define one constant. FORCE_SENSOR_PIN is the voltage input of the ADC of ESP32. You can change the pin name here to reflect the actual ADC you are using.
Defining constants helps you to change the details in just one place in the future.
void setup() {
  Serial.begin(9600);
}
In the setup()function above, you initialize serial communication with a baud rate of 9600. No other settings are needed to be initialized.
In the loop() function, we perform the following actions repeatedly (every 1 second)
Read the voltage from the ADC using the analogRead function and store it in the integer variable analogReading.
Based on the FSR datasheet, you can decide whether the particular value of the ADC means the force is light, medium, high, or maximum.
You print the same on the terminal.
Wait for 1000 milliseconds using the delay function and start over again!
FAQs About The Force Sensors and ESP32 Projects
Here are some frequently asked questions about force sensors used with the ESP32.
What is a force sensor?
A force sensor is a device that measures the amount of force applied, usually in newtons (N) or pounds (lbs). The sensors may not directly give the force, but you can use a calculator based on the resistance measured.
How does the force sensor work?
Force sensors convert applied energy into an electrical signal, which can be measured and analyzed by a microcontroller or electronic device.
What are some of the most common force sensors?
Some common force sensors are strain gauges, load cells, and piezoelectric sensors.
How to use force sensors with the ESP32?
The force sensors can be connected to the ESP32 using analog or digital inputs. The ESP32 can then read the sensor data and send it to other devices or the cloud for analysis.
What are force sensors applications involving ESP32?
Force sensors with ESP32 can be used in various applications, including smart home appliances, wearables, robotics, and industrial automation.
Are there advantages of using force sensors with the ESP32?
The advantages of using force sensors with the ESP32 include easy connectivity to the internet and other devices, low power consumption, and the ability to process data locally.
Conclusion
This article has covered all the essential information about using force sensors with ESP32 microcontrollers.
I have given you complete information about how force sensors work, and provided you with an ESP32 connection guide and the example code.
If you have further questions about the sensors, please post them in the comments section.
I’d love to hear from you! Let us know if there’s anything else you’d like me to cover in future articles.

I am Puneeth. I love tinkering with open-source projects, Arduino, ESP32, Pi and more. I have worked with many different Arduino boards and currently I am exploring, Arduino powered LoRa, Power line communication and IoT.