In this article, I will show you how to use the TMP36 temperature sensor with an ESP32 microcontroller.
The TMP36 is a low-cost, low-voltage temperature sensor. It is calibrated in Celsius already, which means it is easy to handle the sensor data.
You will see temperature sensing as a prime need in many different applications.
Temperature sensors protect electronic devices such as laptops and TVs from overheating. Every battery also nowadays comes with a temperature sensor to avoid overheating.
I will teach you all the essential information you need to know about the TMP36 temperature sensor in this article.
I’ll show you how to use a TMP36 sensor with ESP32. You will get a connection guide, example ESP32 code for TMP36, and also I will address some frequently asked questions about the TMP36.
Let’s get started!
Components Needed To Build ESP32 And TMP36 Sensor Project
Hardware Components
- Dupont wire x 1 set
- Micro USB Cable for ESP32 (for powering ESP32 and programming) x 1
Software
Guide
Makerguides.com is a participant in the Amazon Services LLC Associates Program, an affiliate advertising program designed to provide a means for sites to earn advertising fees by advertising and linking to products on Amazon.com.
Fundamentals Of The TMP36 Sensors
Let us understand the intrinsics of the TMP36 temperature sensor. Knowing the nitty-gritty details helps you build the project confidently and decide whether TMP36 is the right fit.
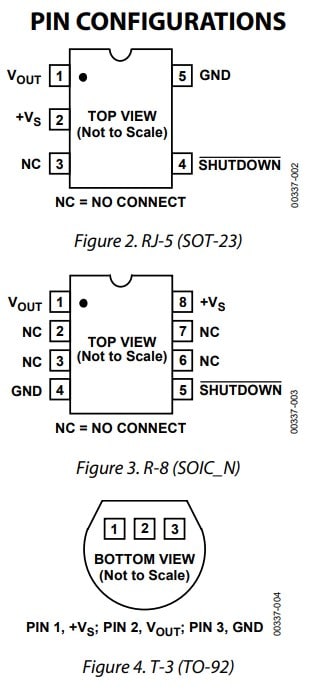
The TMP36 comes in both a three pin package and SMD small outline package.

The TMP36 IC is simple to use. There are no IC addresses, CRC computation, or serial communication, etc.
- You just use an ADC and read the analog value.
- Convert the analog value into voltage.
- Use the reference table given below to convert the voltage to the temperature.
That is it. It is simple and straightforward to use the TMP36 sensor.
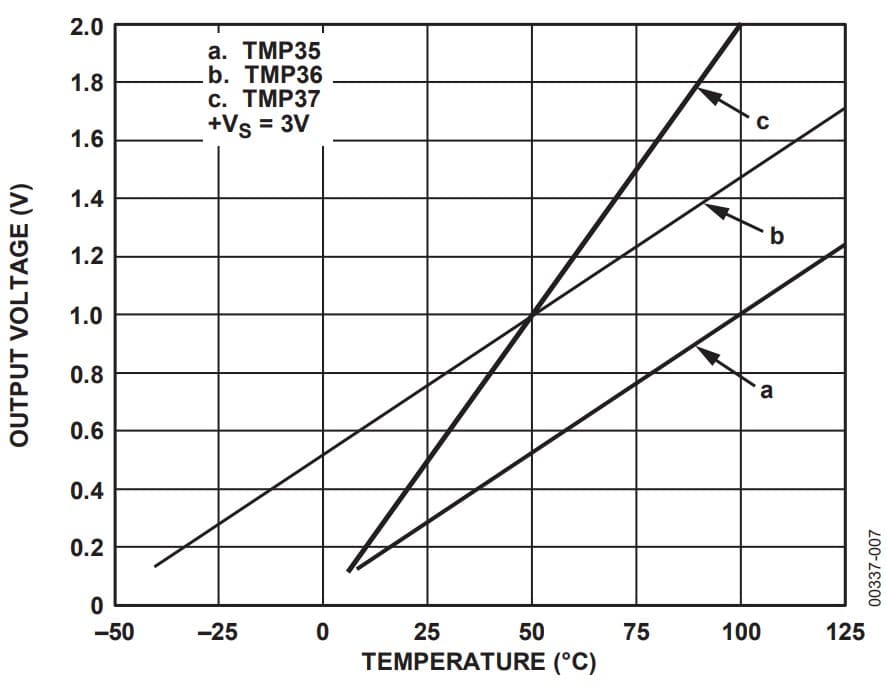
Alongside the TMP36 sensor, there is also a TMP35 and TMP37,which are very similar but have subtle differences, which I have summarized in the table below:
| Sensor | Voltage at 25 ℃ | Measurement range | Output scale factor |
| TMP35 | 250 mV | 10 °C to 125 ℃ | 10 mV/℃ |
| TMP36 | 750 mV | −40 °C to +125 ℃ | 10 mV/℃ |
| TMP37 | 500 mV | 5 °C to 100 ℃ | 20 mV/℃ |
Features of the TMP36 Sensor
Here are the key features of the TMP36 sensor summarized in a table:
| Parameter | Range |
| Operating temperature range | -40 ℃ to 125 ℃ |
| Temperature Accuracy | ± 1 ℃ (typical) , ± 2 ℃ (maximum) |
| Supply voltage | 2.7 V to 5.5 V |
| Output | 750 mV at 25 ℃ |
| Supply current | 50 uA |
| Standby current | 0.5 uA |
| Long term stability | ± 0.4 ℃ |
| Output voltage range | 100 mV to 2 V |
Pin Definition of the TMP36 Sensor
You can use the below reference to quickly refer to the pinouts of the TMP36 temperature sensor IC:
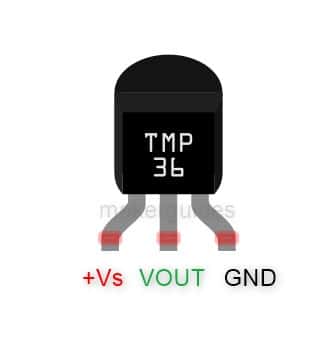
| Pin Number | Pin | Description |
| 1 | +Vs | Power supply pin. ( 2.7 V to 5.5 V) |
| 2 | VOUT | Output analog voltage |
| 3 | GND | Ground connection |
In the SMD version, you get an additional pin called shutdown. In these versions, you can save power further by putting the IC to sleep using the shutdown pin.
The current consumption will come down to 500 nA (which is fantastic for a battery-powered device!).
How to Derive Temperature from VOUT of TMP36?
You can use the graph below to convert the read analog voltage into the temperature.
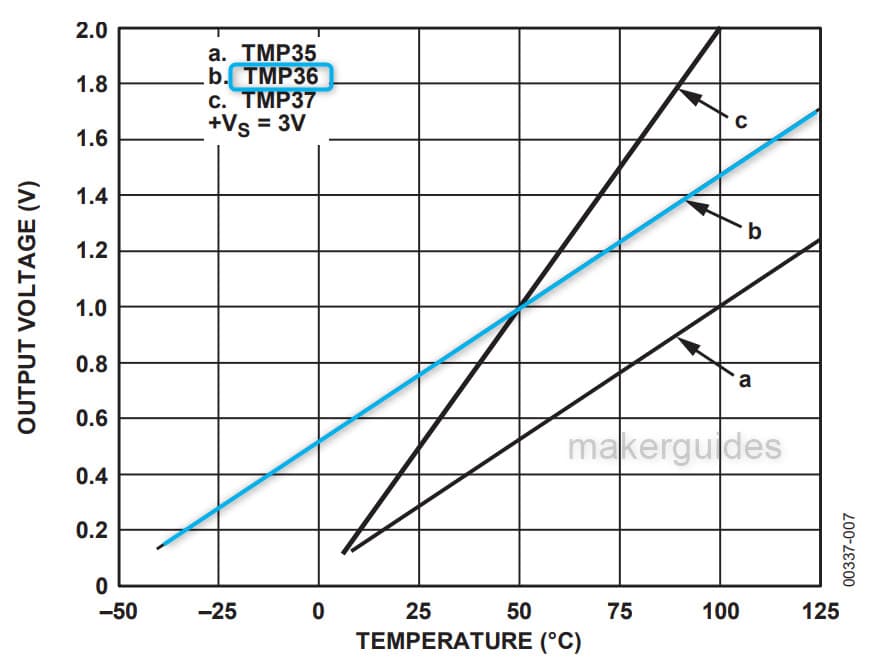
As you can see from the graph, the voltage at 25 degrees is 750 mV, and at 50 degrees it is 1 V.
Now, if you have read a voltage of 1 V from the ADC, you should come to this graph and refer to the blue line (which corresponds to the TMP36 sensor).
To convert the ADC value to voltage use the below equation.
ADC_volts_in_mV = (ADC_reading) * 3300 / 1024;
To convert the ADC voltage into temperature, you can use the formula below.
temperature = (ADC_volts_in_mV – 500) / 10;
SHUTDOWN pin feature of TMP36 sensor
All three variants, TMP35, TMP36, and TMP37, have a shutdown feature. It is an additional pin in the SMD versions. It helps you to put the current consumption down to 0.5 uA.
You have to choose the package wisely. The three-pin (TO-92) doesn’t feature this shutdown pin.
You should drive the shutdown pin low to put the IC into shutdown mode. If you are using a GPIO, you should send a logic 0. It sets the IC to sleep mode.
The shutdown pin has an internal pull-up to the power supply pin inside TMP36. Hence, you can also drive the shutdown pin using an open-drain pin.
When the TMP36 is in shutdown mode, the output voltage is no longer valid.
Also, when you put the sensor into shutdown mode, it takes some finite time to go to shutdown mode. The graph below shows the expected time after which the IC will shut down.
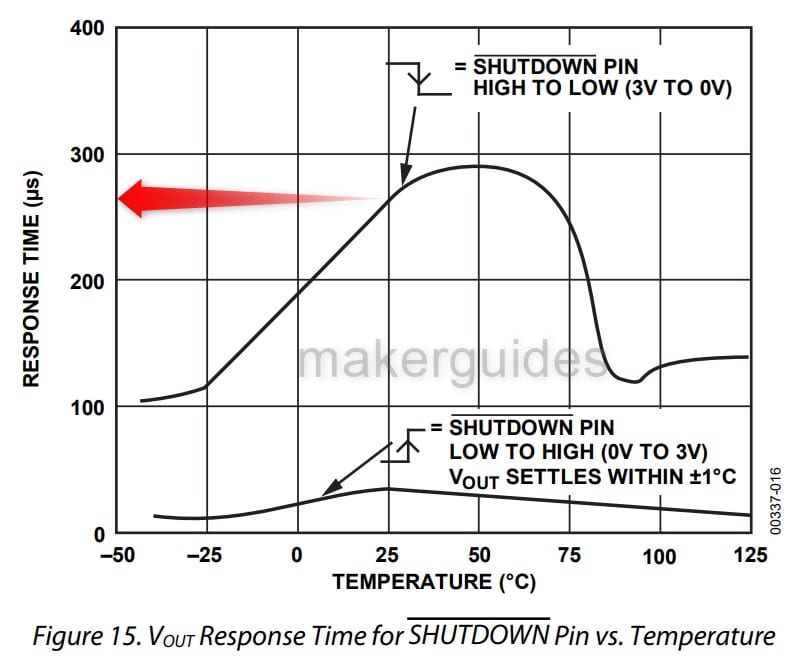
At room temperature, the response time is about 265 us, varying according to the ambient temperature. You should account for this in your code when using the shutdown feature.
Applications of the TMP36 sensor
The TMP36 is a primary sensor used for temperature sensing, and has a wide range of uses, including:
- HVAC systems – Heating Ventilation and Air conditioning systems heavily depend on the room temperature for their operation. TMP36 is a valuable solution for those systems
- Food processing – You need a temperature monitoring system to ensure food is not spoiled and cooked at the right temperature. YOu can use TMP36 in these applications.
- Medical equipment – You can use the sensor to monitor patient temperature and ensure the ICU and other critical areas are healthy temperatures controlled for the comfort and accuracy of the restorative procedure.
- Industrial processes: Several industrial processes depend on the TMP36 sensor to ensure that the parts are produced at the proper temperature to ensure production accuracy.
The temperature variation can bring in dimensional or color changes for specific processes. Hence it is critical to track and monitor the temperature.
What application are you using the TMP36 sensor for? Let us know in the comments section below.
Connecting The TMP36 Sensor Module with ESP32
I will show you how to build a project using ESP32 and the TMP36 temperature sensor. Let’s get started with the hardware connections.
Step 1: Complete the hardware connections

TMP36 is only a 3-pin IC. The simplicity of the connection is obvious from the diagram here.
Start with the ground connections. If you have to use other pins, edit the code accordingly.
Power the entire system only after completing all the connections.
Step 2: Program the ESP32 with the code below
Follow the next step to understand the code implementation. You can use the code below to test the ESP32 module and the connected TMP36 sensor.
Please follow our guide to install the ESP32 core on the Arduino IDE.
const int tempPin = 2;     //analog input pin constant
int tempVal;    // temperature sensor raw readings
float volts;    // variable for storing voltage
float temp;     // actual temperature variable

void setup()
{
  // start the serial port at 9600 baud
  Serial.begin(9600);
}

void loop()
{
  //read the temp sensor and store it in tempVal
  tempVal = analogRead(tempPin);

  volts = tempVal / 1023.0;

  temp = (volts - 0.5) * 100 ;
  Serial.print(" Temperature is:   ");
  Serial.print(temp);                  // in the same line print the temperature
  Serial.println (" degrees C");       // still in the same line print degrees C, then go to next line.

  delay(1000);                         // wait for 1 second or 1000 milliseconds before taking the next reading.
}
Step 3: Code Walkthrough
Let’s walk through the code. This example tests TMP36 sensors. The code is used to read the temperature and print on the serial terminal.
const int tempPin = 2; //analog input pin constant
First, we define a constant integer variable tempPin which is assigned the value 2. This is the pin to which we have connected the TMP36 temperature sensor.
int tempVal;    // temperature sensor raw readings
float volts;    // variable for storing voltage
float temp;     // actual temperature variable
The tempVal variable is declared as an integer to store the raw analog value read from the temperature sensor.
The volts variable is used to store the voltage value calculated from the tempVal. The temp variable is to store the actual temperature value.
In the setup() function, we call the Serial.begin() function to communicate with a baud rate of 9600.
volts = tempVal / 1023.0;
The above line is to convert the read analog value into the voltage.
temp = (volts - 0.5) * 100;
The above line is the key in this code. We subtract 500 mV from the voltage read.
Why? Please refer to the basics section of this article for detailed information.
As you know, the sensor adds an offset of 500 mV. It helps you to read the negative temperature range as well as the positive voltage.
Finally, the temperature is displayed on the serial terminal. I hope the code explanation helped. I hope you will use TMP36 in the near future in your upcoming projects.
FAQs About The TMP36 Sensors
I have included a list of the most frequently asked questions about projects built using the ESP32 and the TMP36 sensors.
What is TMP36?
TMP36 is a low voltage, precision analog temperature sensor that can measure temperatures ranging from -40°C to +125°C. It provides a voltage that is linearly proportional to the centigrade temperature.
What is the output voltage of the TMP36 sensor?
The output voltage of TMP36 varies linearly with temperature and has a scale factor of 10 mV/°C.
Example: If the temperature is 25°C, the output voltage will be 0.25 V. You can refer to the graph below to find the expected output voltage for the corresponding temperature. (graph b).
What is the operating voltage range of TMP36?
The operating voltage range of TMP36 is 2.7V to 5.5V.
What is the accuracy of the TMP36 sensor IC?
The accuracy of TMP36 is typically ±1 °C at 25 °C. TMP36 has a maximum error of ±2 °C over the temperature range of -40°C to +125 °C.
What is the resolution of the TMP36 temperature sensor?
The resolution of the TMP36 temperature sensor is 0.1°C.
How can I interface TMP36 with a microcontroller?
You can connect TMP36 to any MCU using an ADC input pin since the TMP36 provides analog output voltage (corresponding to the sensed temperature in centigrade).
ESP32 has built-in ADC, So Arduino UNO> Most MCUs have built-in ADCs.
What are the applications of TMP36?
TMP36 can be used in various applications, such as temperature sensing in electronic devices, weather stations, food processing, logistics, and HVAC systems.
Can TMP36 be used for high-temperature measurements?
TMP36 is unsuitable for high-temperature measurements as it can only measure temperatures up to +125 °C.
If you want to measure temperature in the range of 200 or 400 degrees, you should look for thermocouples. They are custom designed to monitor high temperatures.
What is the package type of TMP36?
The TMP36 comes in various packages: 3-pin (TO-92), 5-pin IC (SOT23), and even 8-pin IC (SOIC).
Please refer to the below image to understand the various pin versions of TMP36 possible for you to buy in the market. My favorite one is the TO-92, which is a three-pin version.
Conclusion
I have covered all the essential information about the TMP36 sensors in this article. I have given you complete information on the working of the TMP36 temperature sensor and the advantages of using the sensor in your future thermal sensing projects.
The ESP32 connection diagram and example code helped you test your connections and build the project faster. If you have further questions about the sensors, please post them in the comments section.
I have used TMP36 sensors while studying the thermal performance of a test PCB. I used 6 TMP36 sensors to monitor temperature at different points on the test PCB.
You can utilize the TMP36 in many different ESP32 projects and connect it with various display units to show the data.
Let us know if there’s anything else you’d like me to cover in future articles.

I am Puneeth. I love tinkering with open-source projects, Arduino, ESP32, Pi and more. I have worked with many different Arduino boards and currently I am exploring, Arduino powered LoRa, Power line communication and IoT.