
In this article, I will show you how to use the proximity distance sensor GP2Y0A21YK0F with an ESP32 microcontroller.
The proximity sensor GP2Y0A21YK0F is an easy to use and precise distance sensor, which gives you a voltage output proportional to the distance between the sensor and the objects.
You can see proximity sensors used in many applications, such as automated door openers, robotics, security devices and gaming devices.
This article will show you how to use the proximity sensor GP2Y0A21YK0F with an ESP32.
I will teach you how the sensor works, show you the wiring connection for an ESP32, and share example code that you can utilize for your own project.
I also answer some frequently asked questions about using the proximity sensor GP2Y0A21YK0F with an ESP32.
Let’s get started!
Components Needed To Build ESP32 And GP2Y0A21YK0F Sensor Project
Hardware Components
- Dupont wire x 1 set
- Micro USB Cable for ESP32 (for powering ESP32 and programming) x 1
Software
Guide
Makerguides.com is a participant in the Amazon Services LLC Associates Program, an affiliate advertising program designed to provide a means for sites to earn advertising fees by advertising and linking to products on Amazon.com.
Fundamentals Of The GP2Y0A21YK0F Sensors
I have worked with this sensor on a commercial project where it was used to power on a display as soon as the user approached the Human-Machine Interface (HMI) in an HVAC system.
It helped us to increase the lifetime of the LEDs and the display module used.
When the user is not close to the HMI unit, the brightness was lowered to a minimum to save power, increase the lifetime of the product and also be eco-friendly.
Once you understand the fundamentals, the GP2Y0A21YK0F sensor is very easy to work with.
In the below image, you can see a typically available GP2Y0A21YK0F. Proximity sensor:
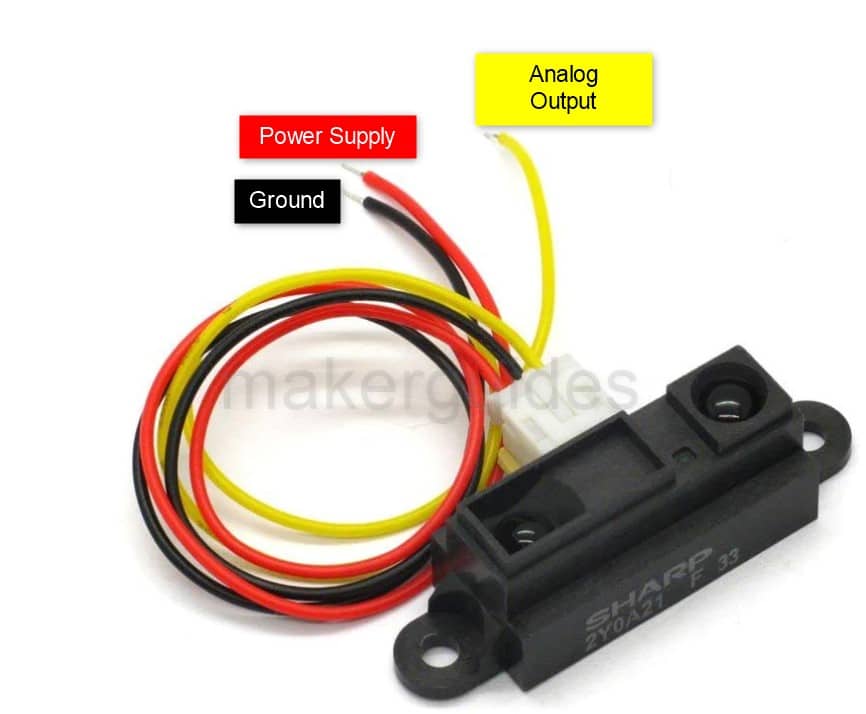
I have summarized the GP2Y0A21YK0F pin functions of the sensor in the table below:
| Pin Name | Pin Function | Remarks |
| Analog Output | Represents the distance between the sensor and the object in Volts | Connect this signal to an ADC pin of the microcontroller |
| Power | Typical 5 V | Connect it to the VIN pin of ESP32 when you use it USB to power the ESP32 |
| Ground | Ground connections | All voltages are referred to ground |
Here is the functional block diagram of the sensor GP2Y0A21YK0F:
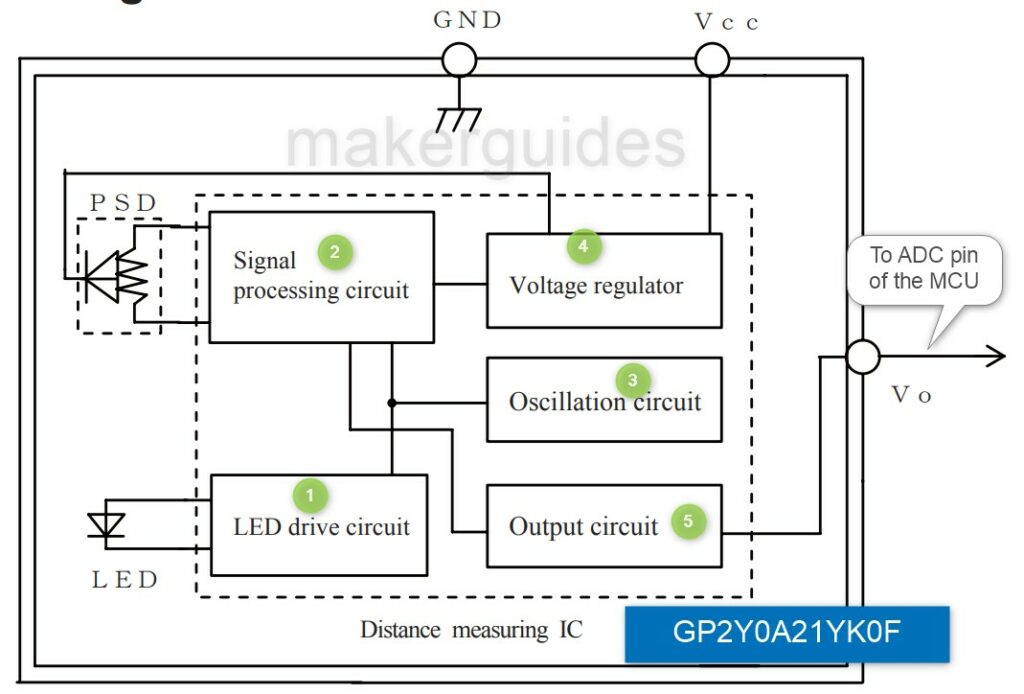
Here is a brief explanation of the sub-systems present in the proximity sensor GP2Y0A21YK0F.
- LED Drive circuit – Drives the IR LED (Infrared LED). So it won’t be visible to the naked eye. IR LED is visible from the outside.
- Signal Processing unit – This block works in synchronously with the IR LED drive circuit. It has a PSD unit (Position sensitive detector), assuming it as an IR sensor that can receive the reflected IR signal from the object.
- Oscillation circuit – To clock all the subunits inside the sensor GP2Y0A21YK0F
- Voltage regulator – Provides a stable regulated voltage. This relaxes the supply voltage requirement of the IC.
- Output circuit – Produces the voltage corresponding to the received IR light.
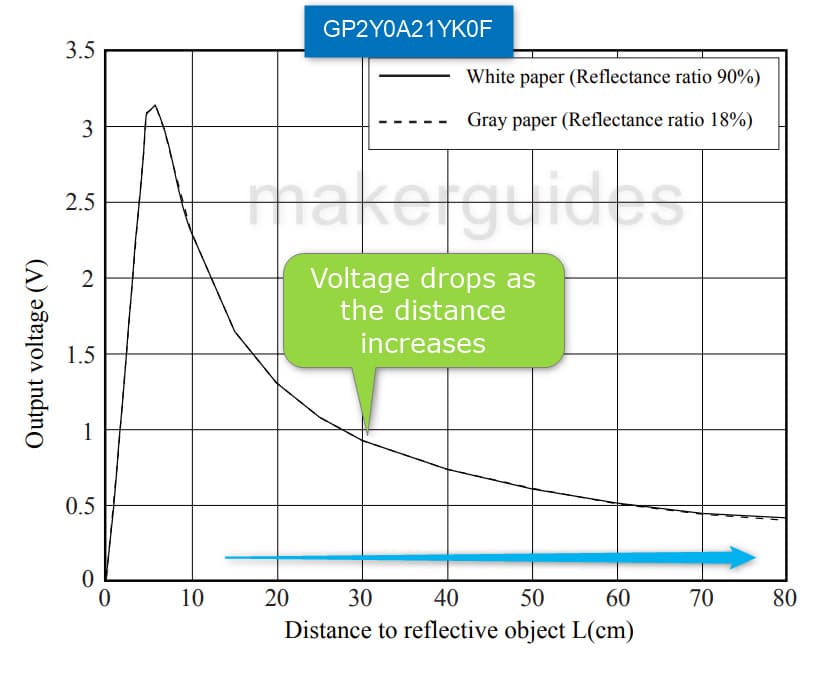
In the image below, you can see the relationship of the distance between the sensor and the output voltage of the sensor.
You can see how the output voltage increases as the distance to the reflective object gets smaller.
Some tips to get the best out of the proximity sensor GP2Y0A21YK0F
- Stabilize the external power supply using a 10 uF capacitor between the VCC pin and the GND pin.
- Do not expose the product to excessive mechanical stress and harsh chemical environment
- Make sure there is no easy way for the dust to accumulate on the LED and PSD
- Never wash or use harsh chemicals to clean the lens
Features of the GP2Y0A21YK0F Sensor
Here are the key features of the GP2Y0A21YK0F sensor summarized in a table:
| Parameter | Range |
| Distance measuring range | 10 to 80 cm |
| Output type | Analog |
| Supply voltage | 4.5 to 5.5 V |
| Consumption current | 30 mA (typical) |
| Output Voltage (10 cm to 80 cm) | 1.9 V |
| Operating temperature | -10 ℃ to +60 ℃ |
| Storage temperature | -40 ℃ to +70 ℃ |
Common Applications of GP2Y0A21YK0F sensor
GP2Y0A21YK0F is a primary sensor used for proximity sensing, and can be used in some of the following applications:
Robotics
The GP2Y0A21YK0F can help robots navigate carefully and reach the products/ shelves from a safe distance using the sensor.
You can also use the proximity sensor to detect the uneven surface on the travel path. It helps avoid the small robots getting stuck or dropping the packets they carry.
You can also use the GP2Y0A21YK0F proximity sensors in drones. Drones can automatically detect the wall or an object and can avoid the accident up to some extent.
Proximity sensing
You can use GP2Y0A21YK0F sensors in automatic door openers, touchless switches, and elevators. Very helpful in COVID-like situations and when hands are busy.
You can also use the proximity sensor to ensure the patient is moving. This can also be used to monitor elders’ movement in the house. This doesn’t break privacy, yet it can help in emergencies where people are not moving for the long term.
Level sensing
You can precisely measure container liquid levels using the proximity sensor GP2Y0A21YK0F. You can use the feedback to control other units to either refill or empty further.
We used the sensor in an innovative and fun vending machine. We were delivering the number of requested drinks in the vending machine. If the user asked for 200 ml, we used to fill a beaker inside the machine slowly from a storage tanker.
We used the proximity sensor to detect the liquid height. We pre-calibrated the distance to the amount of liquid present in the beaker. It was a successful Proof of Concept.
Gaming
You can use the sensor in gaming applications. You can build gesture detection and motion sensing and improve the gaming experience for the users. Just try to reach the PS5; it already detects you and turns on the light. The user experience will be incredible.
Security
You can also build security systems to alert if someone reaches a restricted cabin or a shelf where they are not supposed to be. For example, let’s say you have kept a safe somewhere.
You can build a proximity sensor to trigger an alarm if someone approaches it. You can have a password mechanism to disable the alarm when you are accessing the safe.
What applications are you building using the proximity sensor GP2Y0A21YK0F? Let me know in the comments section below.
Instructions To Connect The GP2Y0A21YK0F Sensor Module with ESP32
I will show you how to build a project using ESP32 and the GP2Y0A21YK0F temperature sensor. Let’s get started with the hardware connections.
Step 1: Complete the hardware connections
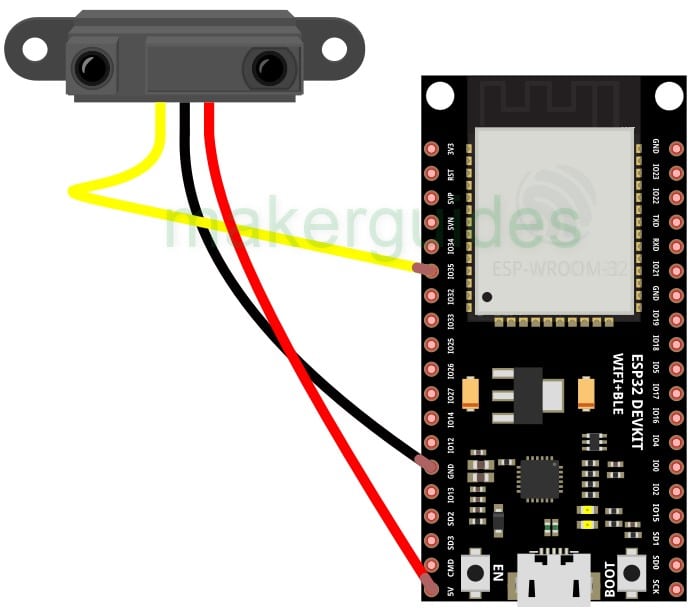
GP2Y0A21YK0F is only a 3-pin sensor module. The connections are simple to do, using the diagram above as your guide. Always start with the ground connections. Power the entire system only after completing all the connections.
Here is the connection summary guide to connecting the GP2Y0A21YK0F and ESP32.
- Connect the output of GP2Y0A21YK0F to the GPIO35 pin of ESP32 (I am using GPIO35 in my example. You can choose any other ADC pin. If you have to use other pins, edit the code accordingly. )
- Connect the GND pin of GP2Y0A21YK0F and the ESP32 pin.
- Connect the 5V pin of the ESP32 to the supply pin of the GP2Y0A21YK0F module.
Step 2: Program the ESP32 with the code below
Follow the next step to understand the code implementation. You can use the code below to test the ESP32 module and the connected proximity sensor GP2Y0A21YK0F.
Please follow our guide to install the ESP32 core on the Arduino IDE.
// Sharp IR GP2Y0A41SK0F Proximity sensor test code by Makerguides.com
#define sensor 35 // Sharp IR GP2Y0A41SK0F Sensor is connected to ADC1 (GPIO35)

void setup() {
  Serial.begin(115200); // start the serial port with baud rate of 115200
}

void loop() {
  float volts = analogRead(sensor) * 0.0008056640625; // value from sensor * (3.3/4096)
  int distance_cm = 29.988 * pow( volts, -1.173);
  delay(2000); // read data every 2 seconds

  if (distance <= 80) {
    Serial.println(distance);
  }
}
Step 3: Code Walkthrough
Let’s walk through the code. This example tests GP2Y0A21YK0F proximity sensors. The code is used to read the distance between the sensor and the obstacle and print on the serial terminal.
You can build your project upon this code further to activate lights and control the relay modules based on the value read by the proximity sensors.
#define sensor 35
The lines above define the sensor pin. The output of the proximity sensor is an analog voltage corresponding to the distance between the sensor and the object.
I am using GPIO35, which is ADC1 on ESP32. Defining constants helps you to change the details in just one place in the future.
void setup() {
  Serial.begin(115200); // start the serial port with the baud rate of 115200
}
In the setup()function above, you initialize serial communication with a baud rate of 115200. No other settings are needed to be initialized.
In the loop() function, we perform the following actions repeatedly (every 0.5 seconds)
- Read the voltage from the proximity sensor using the analogRead function, multiply it by (3.3 / 4096), and store it in the float variable volts.
- Calculate the distance using the formula derived based on the graph provided in the graph of the sharp GP2Y0A21YK0F sensor.
- Print the distance in cm on the serial terminal.
delay(2000); // read data every 2 seconds
Wait for 2 seconds using the delay function and start over again.
FAQs About The GP2Y0A21YK0F Proximity Sensors
I have included a list of the most frequently asked questions about projects built using the ESP32 and the GP2Y0A21YK0F proximity distance sensors.
What is the measuring range of the GP2Y0A21YK0F sensor?
The measuring range of the GP2Y0A21YK0F sensor is 10 cm to 80 cm.
What is the output of the GP2Y0A21YK0F sensor?
The sensor’s output is an analog voltage proportional to the distance between the sensor and the object/obstacle.
What is the operating voltage range of the GP2Y0A21YK0F sensor?
The operating voltage range of the sensor is 4.5 V to 5.5 V.
How does the GP2Y0A21YK0F sensor work?
The sensor emits infrared (IR) light and measures the reflection of that light from the object. The amount of reflection is used to calculate the distance between the sensor and the object.
What is the response time of the GP2Y0A21YK0F sensor?
The response time of the sensor is approximately 38 ms.
Can the GP2Y0A21YK0F sensor detect transparent objects?
No, the sensor cannot detect transparent objects because the infrared light emitted by the sensor passes through them. Hence, it is similar to the use case where there is no object nearby.
Is the GP2Y0A21YK0F sensor waterproof?
No, the sensor is not waterproof. Don’t expose it to water or moisture.
Can multiple GP2Y0A21YK0F sensors be used together?
Yes, multiple sensors can be used together to cover a larger area or to provide redundancy in case of sensor failure. You can also build gesture detection by using more sensors.
What is the accuracy of the GP2Y0A21YK0F sensor?
The accuracy of the sensor is approximately ±10% of the measured distance.
What is the typical current consumption of the GP2Y0A21YK0F sensor?
The typical current consumption of the sensor is 30 mA.
Conclusion
This article has covered all the essential information to interface the GP2Y0A21YK0F distance sensor with an ESP32 microcontroller.
.I have given you complete information about how the GP2Y0A21YK0F sensor works and listed the advantages of using the GP2Y0A21YK0F in applications where proximity sensing can be utilized.
I shared a wiring connection guide and example code with explanation, so you can work from this to start using this simple sensor in your own projects.
If you have further questions about the sensors, please post them in the comments section and let us know if there’s anything else you’d like me to cover in future articles.

I am Puneeth. I love tinkering with open-source projects, Arduino, ESP32, Pi and more. I have worked with many different Arduino boards and currently I am exploring, Arduino powered LoRa, Power line communication and IoT.