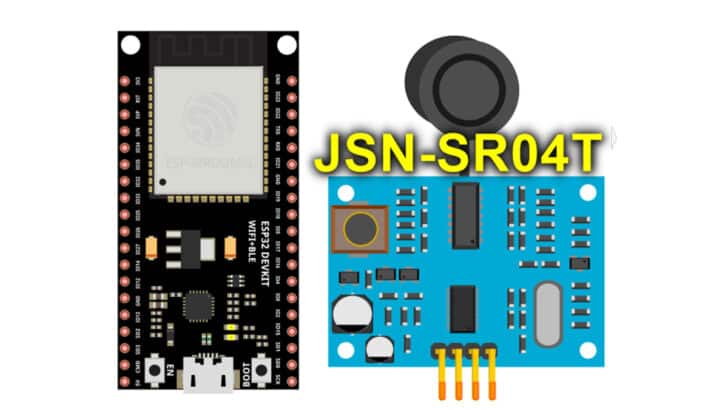
In this article, I will show you how to use the waterproof ultrasonic sensor JSN-SR04T with an ESP32 microcontroller.
The JSN-SR04T sensor is used in various applications, including autonomous driving, crash avoidance, motion detection, and more.
The additional waterproof features make it an outdoor-friendly sensor enabling you to build even more projects without limiting the scope of applications.
You will learn everything about the JSN-SR04T sensor, and I will teach you how to connect it to an ESP32, provide a working code to test the sensor with ESP32, and also answer the most frequently asked questions about it too.
You will find basic working principles, electrical characteristics, applications, tips, and tricks about the projects involving JSN-SR04T.
Let’s get started!
Components Needed To Build ESP32 And JSN-SR04T Sensor Project
Hardware Components
- Dupont wire x 1 set
- Micro USB Cable for ESP32 (for powering ESP32 and programming) x 1
Software
Guide
Makerguides.com is a participant in the Amazon Services LLC Associates Program, an affiliate advertising program designed to provide a means for sites to earn advertising fees by advertising and linking to products on Amazon.com.
Fundamentals Of The JSN-SR04T Sensor
Let us understand the basic working principle, features, pinouts, and applications of the waterproof Ultrasonic sensor JSN-SR04T. Knowing these details makes you confident in building long-term projects.
By the end of this article, you will be confident in building and debugging JSN-SR04T ultrasonic sensor projects.
Commonly available JSN-SR04T sensors are shown in the image below. The sensor is not a part of CB directly but is detachable. It allows you to comfortably place the sensor (vehicle bumper) and protect the PCB from harsh environments.
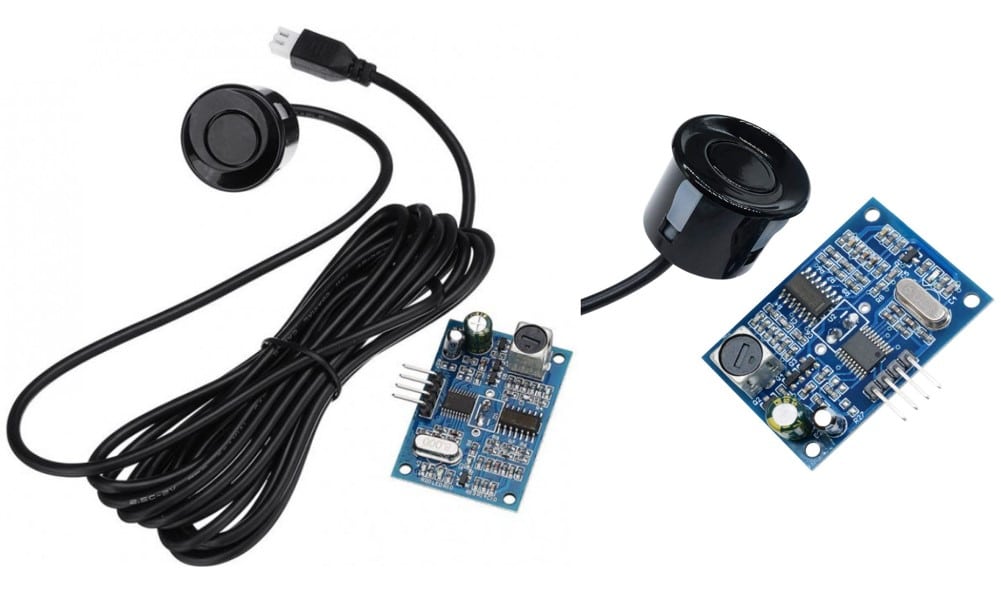
The sensor is waterproof, allowing you to seal it in harsh wet conditions.
The JSN-SR04T sensor is unique. It supports multiple modes of operation. One of the modes is the famous HC-SR04 mode, which accepts a trigger signal and provides an echo signal pulse corresponding to the time the sound takes to travel and bounce back any object.
You can use the below reference to refer to the JSN-SR04T waterproof ultrasonic sensor module pinouts quickly.
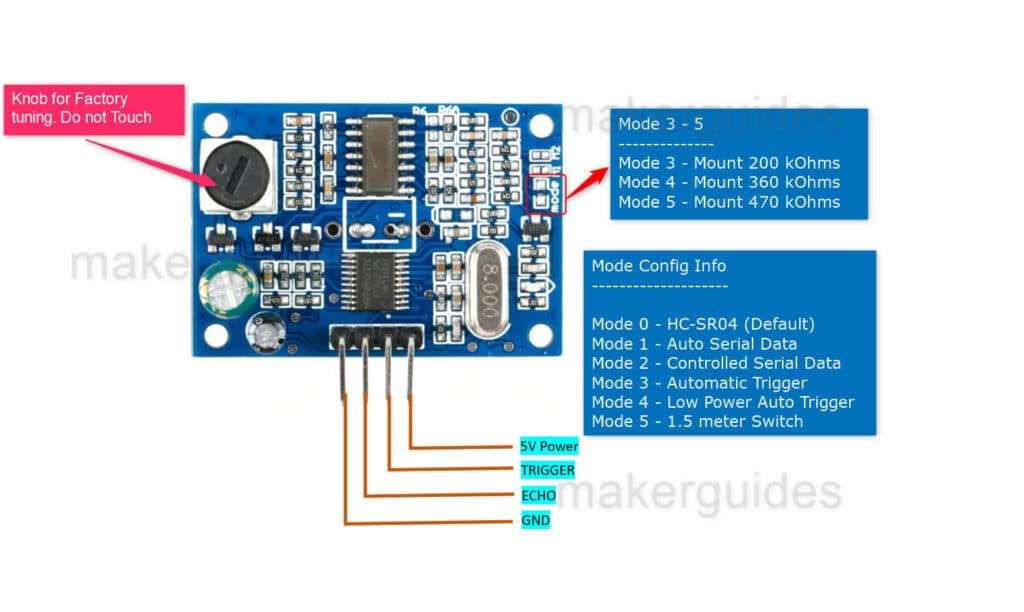
The JSN-SR04T also supports other modes, as the section below explains.
JSN-SR04T Modes of Operation
Mode 0 of JSN-SR04T Sensor
In Mode 0, the sensor mimics the operation of the HC-SR04 ultrasonic sensor. This is the default mode the PCB arrives in.
Mode 1 of JSN-SR04T Sensor
How about an ultrasonic sensor that will calculate the distance by itself and tell you the measured value serially? That is what Mode 1 does. No pressure on the ESP32.
Nothing to be calculated. Just receive the measured distance from the sensor directly over the serial port.
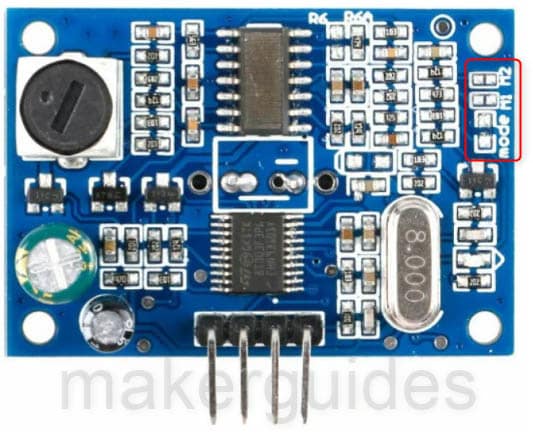
To activate Mode 1, short the small pads related to the M1 pad.
| Header | Data 1 | Data 0 | Checksum |
| 0xFF, indicates the start of the block data | Higher byte of 16-bit data | Lower byte of 16-bit data | Sum of all three bytes |
Mode 2 of JSN-SR04T Sensor
This mode is the same as mode 1. In this case, the data is not sent automatically by the sensor. You have to send a request over the serial port.
To activate Mode 2, short the small pads related to the M2 pad.
Mode 3 of JSN-SR04T Sensor
Mode 3 is the same as Mode 1 (HC-SR04 Mode). Here it won’t wait for the trigger signal from the host (ESP32). It will auto-trigger every 200 ms and give you the pulse on the echo input.
To activate Mode 3, place a 200 K ohms resistor on the “mode” pad.
Mode 4 of JSN-SR04T Sensor
Mode 4 is the same as Mode 1 (HC-SR04 Mode) with ultra-low power consumption.
To activate Mode 4, place a 360 K ohms resistor on the “mode” pad.
Mode 5 of JSN-SR04T Sensor
Mode 5 acts like a preconfigured switch. The echo pin will toggle when the sensor detects any object within a 1.5 m distance.
To activate Mode 5, place a 470 K ohms resistor on the “mode” pad.
Features of the JSN-SR04T Sensor
Here are the features of the JSN-SR04T sensor summarized in a table.
| Parameter | Range |
| Operating Voltage | DC 3 V to 5.5 V |
| Working current | Less than 8 mA |
| Probe frequency | 40 kHz |
| Farthest Range | 600 cm |
| Recent Range | 20 cm |
| Distance Accuracy | 10 mm |
| Resolution | 1 mm |
| Measurement angle | 75° |
| Operating Temperature | -20 °C to 70 °C |
Applications of The JSN-SR04T sensor
Ultrasonic sensors are used in various applications. The sensors help save power, improve user experience, and add comfort and safety. Here are some common applications:
Measure distance: Distance measurement is a crucial feature of the ultrasonic sensor, which is helpful in parking assistance, robotics navigation, and automation in industries.
Object detection: You can use the JSN-SR04T sensor to detect objects, pets’ movements, security systems to detect people in restricted places, etc.
Level measurement: You can use the sensor to detect liquid level measurements in tanks, industrial boilers, and the number of items left in containers.
For example, you can build an intelligent dustbin that can open the lid automatically.
You can also have ultrasonic sensors mounted on your desk table to detect your presence. If you get up and go away, it can automatically turn off table lamps and fans!
The possibilities with the JSN-SR04T are many – what are you building? Let me know in the comments section below.
Instructions To Connect The JSN-SR04T Sensor Module with ESP32
I will show you how to build a project using ESP32 and the JSN-SR04T ultrasonic distance sensor. Let’s get started with the hardware connections.
Step 1: Complete the hardware connections
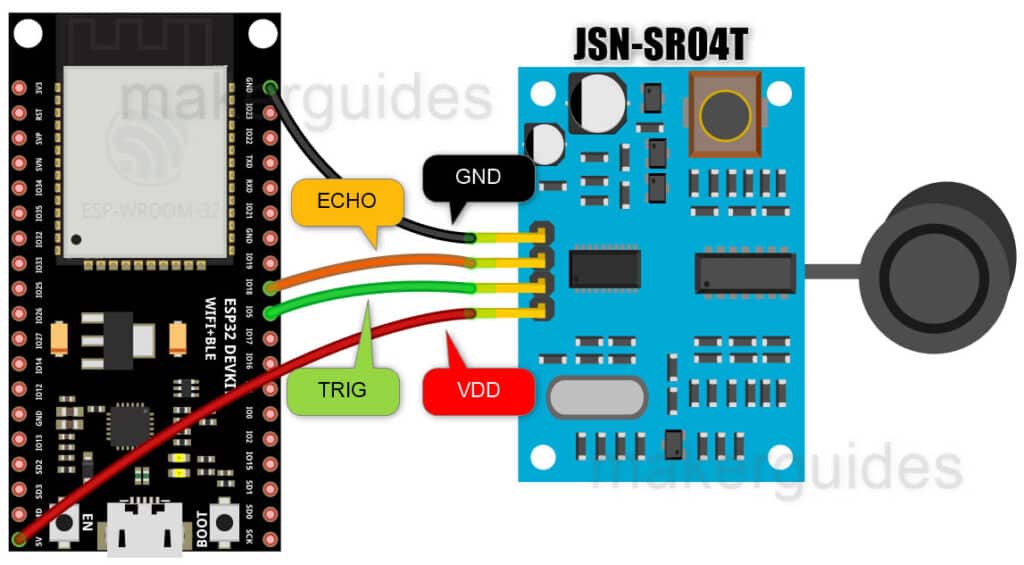
The ultrasonic sensor module JSN-SR04T has a 4-pin connector option to interface with microcontrollers.
The connections are also simple to understand and follow, as shown in the diagram above.
Always start with the ground connections. Power the entire system only after completing all the connections.
Here is the connection summary between ESP32 and the JSN-SR04T sensor.
- Connect the GND pin of the sensor to the ESP32 GND pins.
- Connect Sensor’s VCC pin to the ESP32 5V pin.
- Connect the GPIO5 pin of the ESP32 to the TRIG pin of the sensor.
- The ECHO pin of the sensor goes to the GPIO18 of the ESP32.
| JSN-SR04T Ultrasonic Sensor Pins | ESP32 Pins |
| VCC | 5V |
| TRIG | GPIO5 |
| ECHO | GPIO18 |
| GND | GND |
I am using GPIO5 and GPIO18 for TRIG and ECHO pins, respectively, in my example.
You can choose other pins on the ESP32 pin. If you have to use other pins, edit the code accordingly.
Step 2: Program the ESP32 with the code below
Follow the next step to understand the code implementation. You can use the code below to test the ESP32 module and the connected JSN-SR04T ultrasonic sensor. Please follow our guide to install the ESP32 core on the Arduino IDE.
#define echoPin 18 // attach pin GPIO18 to pin Echo of JSN-SR04
#define trigPin 5  // attach pin GPIO5 ESP32 to pin Trig of JSN-SR04

long duration; // Time taken for the pulse to reach the receiver
int distance;

void setup()
{
  pinMode(trigPin, OUTPUT);
  pinMode(echoPin, INPUT);
  Serial.begin(9600);
  Serial.println("Distance measurement using JSN-SR04T");
  delay(500);
}

void loop()
{
  digitalWrite(trigPin, LOW);
  delayMicroseconds(2);

  digitalWrite(trigPin, HIGH); // turn on the Trigger to generate pulse
  delayMicroseconds(10); // keep the trigger "ON" for 10 ms to generate pulse
  digitalWrite(trigPin, LOW); // Turn off the pulse trigger to stop pulse

  // If pulse reached the receiver echoPin
  // become high Then pulseIn() returns the
  // time taken by the pulse to reach the receiver
  duration = pulseIn(echoPin, HIGH);
  distance = duration * 0.0344 / 2;

  Serial.print("Distance: ");
  Serial.print(distance);
  Serial.println(" cm");
  delay(100);
}
Step 3: Code Walkthrough
Code Explanation:
Let’s walk through the code. You will measure the distance between the obstacle and the ultrasonic sensor sensing element of JSN-SR04T in this example.
Let’s begin!
#define echoPin 18 // attach pin GPIO18 of ESP32 to pin Echo of JSN-SR04
#define trigPin 5  // attach pin GPIO5 of ESP32 to pin Trig of JSN-SR04
The lines used to connect the JSN-SR04T sensor to ESP32 are The echoPin is used to receive the echo signal from the sensor, and trigPin is used to trigger the sensor to send an ultrasonic pulse.
long duration;
int distance;
Declare two variables: duration, and distance.
- duration is used to store the time it takes for the ultrasonic signal to bounce back to the sensor
- distance is used to store the calculated distance in cm.
the setup() function, is called once when the program starts. In this function, the trigPin is set as an output pin, and the echoPin is set as an input pin.
Serial.begin(9600) initializes the serial communication at a baud rate of 9600 and the following Serial.println() statement is used to print a message to the serial monitor.
The delay(500) function waits for 500 ms before proceeding to the loop() function.
The loop() function is called repeatedly throughout the program.
This code starts by sending a low signal to the trigPin for 2 us. Then it sends a high signal to the trigPin for 10 microseconds to generate a pulse for 10 ms. After the pulse is generated, the trigPin is turned off.
The pulseIn() function is then used to calculate the duration of the pulse. This function waits for the pulse to reach the echoPin and then measures the time it takes for the pulse to return.
  duration = pulseIn(echoPin, HIGH);
  distance = duration * 0.0344 / 2;
You can convert the delay into distance using the speed of sound information. (approximately 344 m/s).
  Serial.print("Distance: ");
  Serial.print(distance);
  Serial.println(" cm");
  delay(100);
Finally, the distance value is printed on the serial monitor. The program then waits for 100 ms. The entire operation will be repeated.
FAQs About The JSN-SR04T Sensors
I have included a list of the most frequently asked questions about projects built using the ESP32 and the JSN-SR04T sensors:
What is the JSN-SR04T ultrasonic sensor used for?
The JSN-SR04T is a waterproof ultrasonic sensor. You can use it to measure distances between objects. It works by sending out high-frequency sound waves and measuring the time it takes to return.
What is the operating voltage of the JSN-SR04T sensor?
The JSN-SR04T ultrasonic sensor operates on a voltage of 5 V DC. Please refer to the datasheet of the module you buy to be on the safer side.
What is the maximum detection range of the JSN-SR04T sensor?
The maximum detection range of the JSN-SR04T sensor is about 4 m. Some variants provide an even further range at the cost of low accuracy.
Can the JSN-SR04T sensor be used in outdoor environments?
The JSN-SR04T sensor can be used outdoors. The JSN sensor is waterproof. The sensor can be used in wet and harsh environments. The other operations are similar to that of HC-SR04 sensors.
How accurate is the JSN-SR04T sensor?
It has an accuracy of about 3 mm. You can calibrate the sensor once for the particular environment for better results. The accuracy will depend on temperature, humidity, and other environmental factors too.
Can the JSN-SR04T sensor work in different lighting conditions?
Yes, the JSN-SR04T sensor can work in different lighting conditions, as it does not rely on visible light. It works on the principle of time taken by sound to travel an appropriate distance.
What are the dimensions of the JSN-SR04T sensor?
The JSN-SR04T sensor has dimensions of 45 mm x 20 mm x 15 mm. The sensor extension comes with a cable length of 2.5 m. It might vary too.
Conclusion
This article has covered all the essential information about the JSN-SR04T sensors. I have given you complete information on the working of the JSN-SR04 sensor and the applications for which we can use it.
The basic working principle and a few tips and tricks on JSN-SR04T usage should help you to confidently use the sensor in your next project.
I have also shared an ESP32 wiring connection guide and example code with explanation.
If you have further questions about the ultrasonic sensors, please post them in the comments section. .
Let us know if there’s anything else you’d like me to cover in future articles.

I am Puneeth. I love tinkering with open-source projects, Arduino, ESP32, Pi and more. I have worked with many different Arduino boards and currently I am exploring, Arduino powered LoRa, Power line communication and IoT.