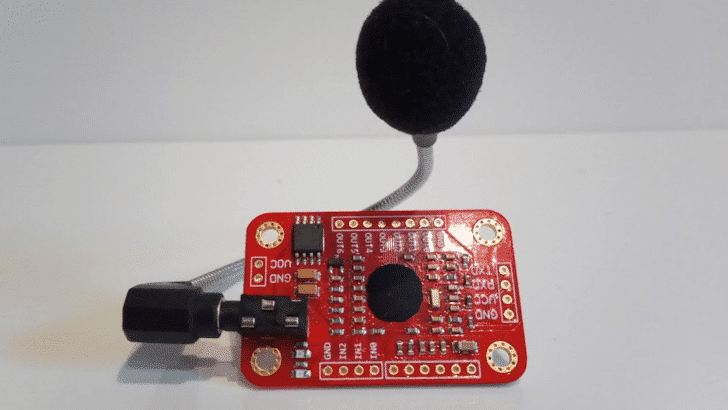
In this article you will learn how to use the Voice Recognition Module V3 to control a light with your voice. The Voice Recognition Module V3 is – as its name says – a module to recognize voices. When a specific voice command is detected, the module signals this via its GPIO pins (OUT0…OUT6) and also transfers the data via UART (RXD, TXD) to a connected microcomputer.
In the following section I will give you an overview of its capabilities and how to use it. For more technical details of the module see the datasheet linked here.
Sound Recognition
Note that the module actually can also be trained to recognize all kinds of sounds; not only voices. For instance the sound of rain, a dog barking and so on. This opens up interesting possibilities. You could for example, automatically close the windows if rain is detected. Or feed the dog, if it is barking.
Number of Commands
Overall the module can store 80 sounds, which each sound no longer than 1.5 seconds. That sounds short but is plenty for commands like “light on” or “light off”. There is another limitation. At a time only 7 commands (of the 80) can be distinguished. However, you can chain commands. For instance, you could train command sequences such as “Jarvis”, “Lights”, “On”. In each step of this chain you could recognize 7 commands resulting in 7 * 7 * 7 = 343 different command sequences overall. So, the module has plenty of memory to control a massive number of devices when chaining command groups (> 711).
Always on but offline
The module is always listing, which is great! You don’t have to push a button to start the voice recognition. And since the module is not connected to the internet and only records short sound fragments, privacy concerns are not an issue. Also, being an offline device the recognition is fast, since the module does not need to communicate to a server.
Accuracy
The manual states the recognition accuracy as 99% under ideal condition but note that the recognition is speaker dependent. Also the accuracy will drop significantly if its noisy or if you are further away from the microphone.
Stand alone
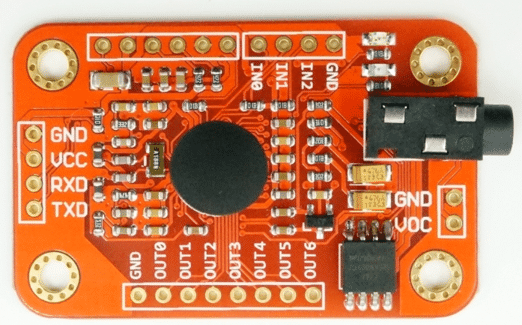
You can use the module without a microprocessor. It runs on 4.5-5.5V and draws about 40mA of current. There are 7 GPIO pins for the 7 command that can be detected at a time. There are 3 input pins (IN0, IN1, IN2) that allow you to switch between command group; these are the sets of 7 commands you’ve trained.
Communication
However, most of the time you want to use the UART serial interface (RXD, TXD) to communicate with the Arduino and program your own software that decides what to do when a command is detected. This is exactly what I will show you in the following section.
Required Parts
Below you will find the parts required for this project. Note that some of the Voice Recognition Modules do not have pins soldered. You may need to do this to be able to connect the module using the Dupont wires.

Arduino Uno

USB Cable for Arduino UNO

Dupont Wire Set

Voice Recognition Module V3
Makerguides.com is a participant in the Amazon Services LLC Associates Program, an affiliate advertising program designed to provide a means for sites to earn advertising fees by advertising and linking to products on Amazon.com. As an Amazon Associate we earn from qualifying purchases.
Connecting the Voice Recognition Module
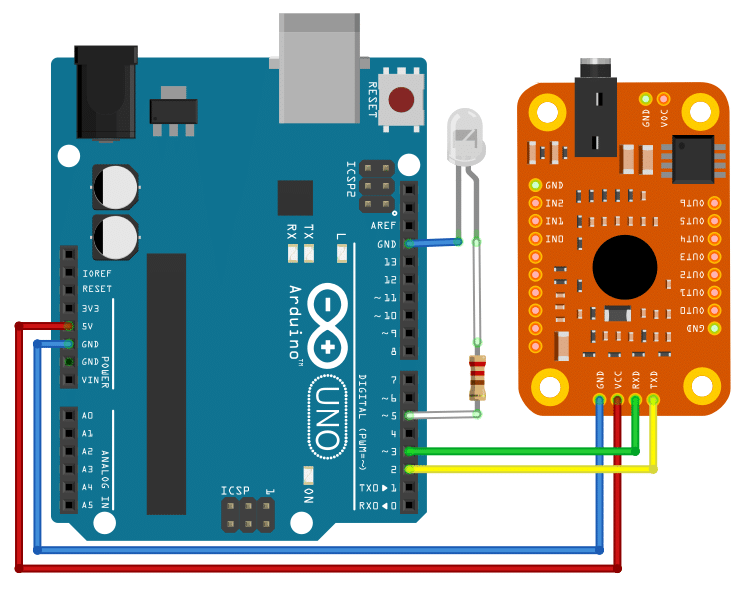
In this section I will show you how to connect the Voice Recognition Module V3 to the Arduino. Luckily it is very simple.
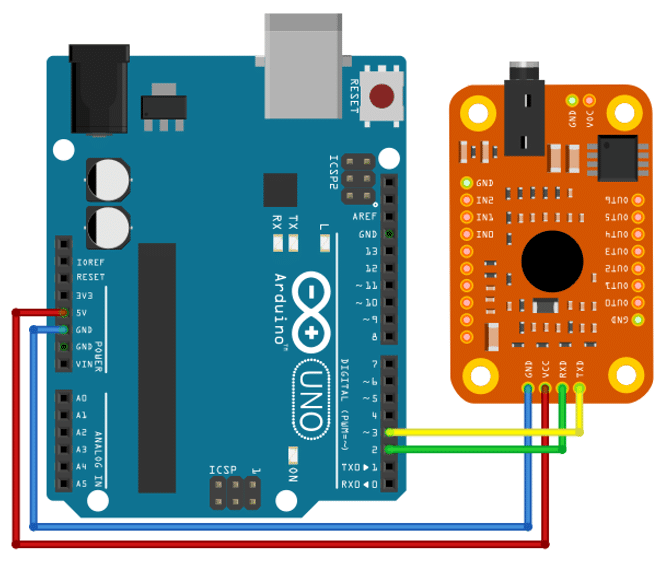
As you can see, we only need to connect power (5V and GND) to the module and then connect the UART interface:
- RXD -> Pin 2
- TXD -> Pin 3
Make sure that RXD is connected to Pin 3 and TXD to Pin 2. It is a common mistake to swap those and even the documentation within the code examples for the module is confusing this.
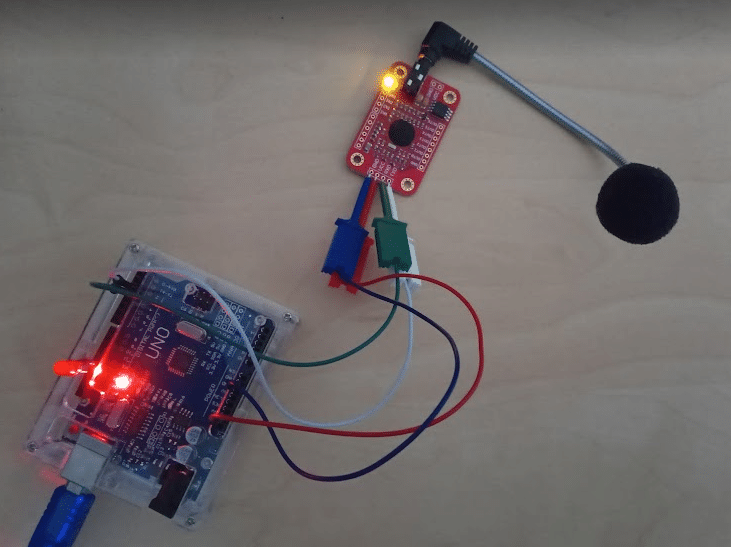
The picture below shows you how this circuit looks in reality. However, I added an additional LED and used different wires since my module did not come with soldered pins. Though later, I soldered the pins on and switched to Dupont wires for better connection.
We will use the internal LED of Arduino to test the voice control but if you want to add an external LED (like I did) here is the schematics for it. Note that we connect the LED to pin 5, which means you will have to change that in the code shown below. Also don’t forget the 220 Ohm resistor to limit the current through the LED and avoid damaging your Arduino.
In the next section I show you how to install the software for the voice module and how to test its correct setup.
Installing and Testing the Software
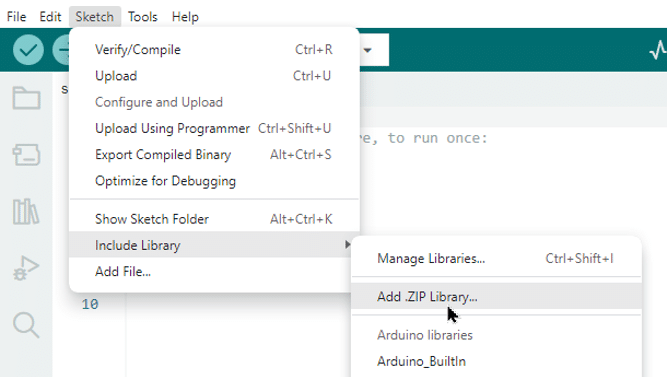
We start by downloading the VoiceRecognitionV3 library from the github repo.
Next we need to add the library to the Arduino environment. For that go to Sketch -> Include Library -> Add .ZIP library ... and select the file location where you downloaded VoiceRecognitionV3-master.zip to.
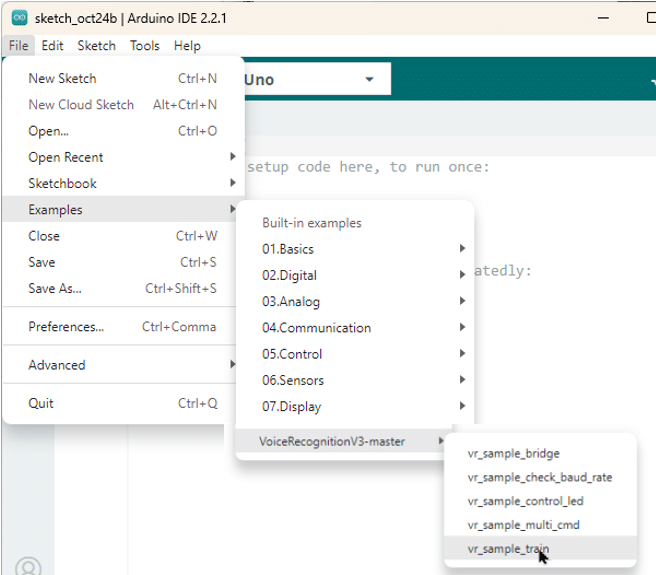
Load example code
After that you should find some example code for the library under File -> Examples -> VoiceRecognitionV3-master. Open the vr_sample_train example.
Compile the software and download it to your Arduino as usual. Next, open the Serial Monitor, set the baud rate to 115200 and the line ending to New Line. See the picture below.

Setting the correct baud rate is important, otherwise the Arduino will not be able to communicate with the module. Check this and if you have issues also check what baud rate is actually set in the code.
Check status of Voice Recognizer
If you now restart your Arduino or reload the software you should see the following output on your Serial Monitor.
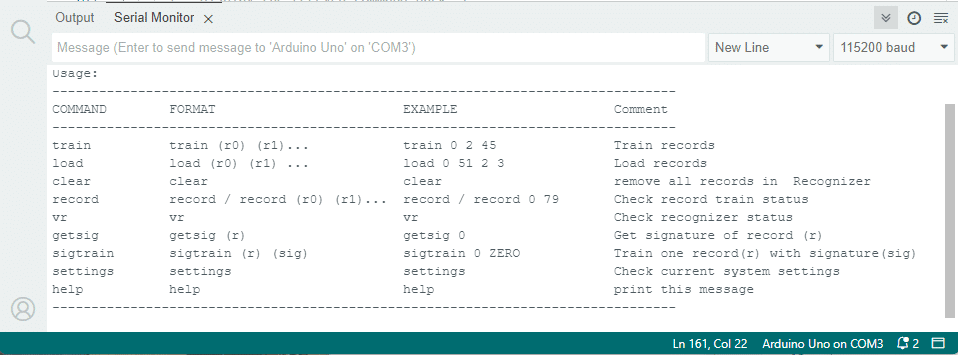
Finally, type the command vr in the message box of the Serial Monitor and hit Enter. If everything is working correctly, you should see the status of the voice recognizer (vr) shown below.
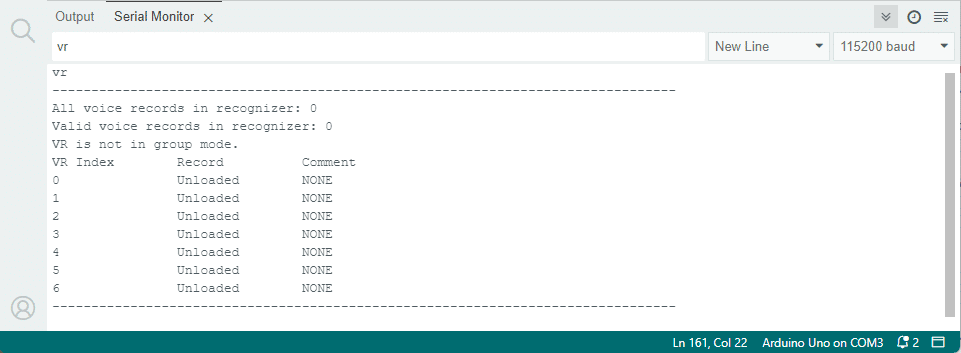
It indicates that we can communicate with the voice recognition module and that there are currently none of the 7 available commands (Record) are loaded. The system is untrained. But we are going to change that in the next section.
If you can’t see the status of the voice recognizer make sure that your wiring is correct. TXD needs to be connected to pin 2 and RXD to pin 3. Also make sure that the module has power. The yellow power LED should be on.
Training Voice Commands
Assuming you still have vr_sample_train uploaded to the Arduino and it is running, we can now start to train the module to recognize voice commands. Type “train” in the message box and then the number (0..79) this command should be stored under. For instance, train 0 and then hit Enter.
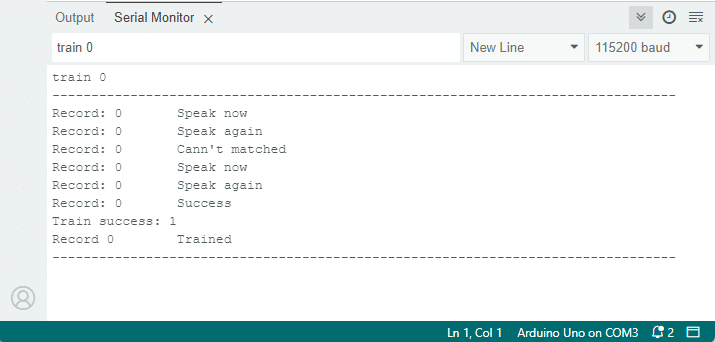
The LED on the module will switch to yellow blinking mode and then to a red color. At the same time the line “Record 0 Speak now” will appear on the Serial Monitor. Say your command, for example “Light on” and if successful the line “Record 0 Speak again” will appear. If unsuccessful, you will read “Record 0 Cann't matched“. (yes, I know the spelling and grammar are wrong, but that’s what it says 😉
After two successful recordings the Serial Monitor will indicate that the training was a success and that the command is now stored under index 0: “Record 0 Trained“
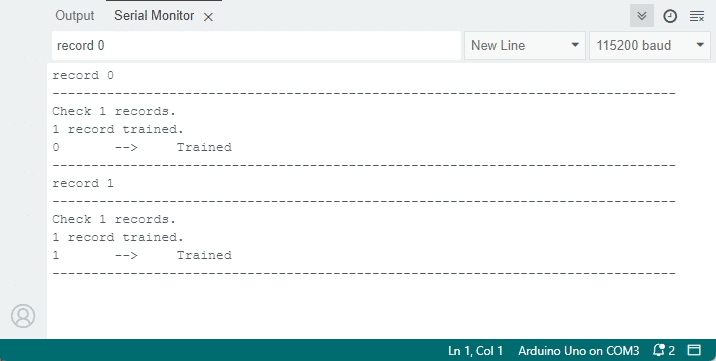
Repeat this process for a second command “Light off” by entering “train 1” in the message box. Once done, you can verify if the commands are trained. Type “record 0” and then “record 1” in the message box and you should see the following picture.
Testing the Trained Commands
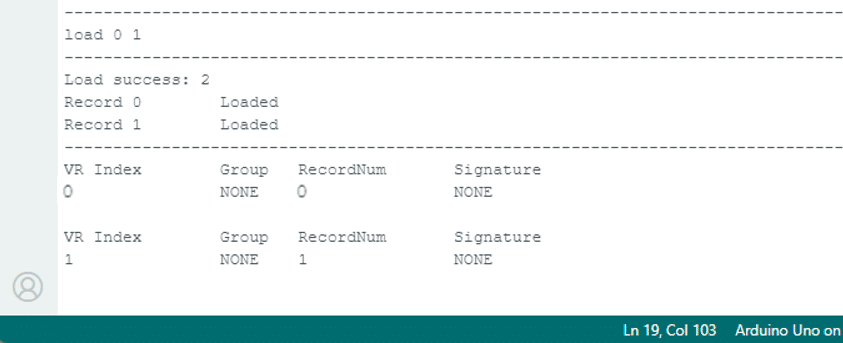
After the successful train type “load 0 1” to load the commands and start the recognition. The LEDs should now blink in a yellow color; indicating that the module is listening. If you now say your trained commands, for instance “Light on” followed by “Light off”, you should see the following output.
If the yellow LED is not blinking the module is not listing. I found that this to happen occasionally and the only way to resolve this issue was to quickly remove and then reattach the power supply. Others have reported this issue as well but no good solution was reported. It seems that the module is somewhat finicky.
In the next section we will use the trained commands to switch the built-in LED of the Arduino on and off.
Controlling an LED with your Voice
You could load the vr_sample_control_led example to control the built in LED of the Arduino with your voice but I found the code unnecessarily complex and partially confusing. For instance, you will find this piece of code in the example:
/**
 * Connection
 * Arduino    VoiceRecognitionModule
 * 2   ------->     TX
 * 3   ------->     RX
 */
VR myVR(2,3);    // 2:RX 3:TX, you can choose your favourite pins.
It contradicts itself in the pin assignment. Is RX=2 or is RX=3? It turns out the correct assignment is RX=3!.
Anyway, we will implement our own solution that is easier to understand and to extend. See the complete solution for controlling an LED below.
#include "SoftwareSerial.h"
#include "VoiceRecognitionV3.h"

VR vr(2, 3);  // 2:TX 3:RX!
uint8_t buf[64];

const int led = 13;  // built-in
const uint8_t lightOn = 0;
const uint8_t lightOff = 1;

void setup() {
  vr.begin(9600);
  Serial.begin(115200);
  pinMode(led, OUTPUT);
  vr.load(lightOn);
  vr.load(lightOff);
}

void loop() {
  if (vr.recognize(buf, 50) > 0) {
    switch (buf[1]) {
      case lightOn:
        digitalWrite(led, HIGH);
        break;
      case lightOff:
        digitalWrite(led, LOW);
        break;
    }
  }
}
Let’s have a closer look at the individual sections of the code.
Constants and Variables
We start by including the necessary libraries and defining the necessary constants and variables.
include "SoftwareSerial.h"
#include "VoiceRecognitionV3.h"

VR vr(2, 3);  // 2:TX 3:RX!
uint8_t buf[64];

const int led = 13;  // built-in
const uint8_t lightOn = 0;
const uint8_t lightOff = 1;
Here, we include the SoftwareSerial library to enable serial communication, and the VoiceRecognitionV3 library to interface with the speech recognition module. We create an instance of the VR class, specifying the RX and TX pins for communication. We also define an array called buf to store the recognized voice commands.
Additionally, we define the pin number for the built-in LED and two constants to represent the commands for turning the light on and off. If you want to control an external LED change the led constant to the pin the LED to connected to, e.g. pin 5 as in the schematic example shown before.
Setup function
In the setup() function, we initialize the speech recognition module, set the baud rate for serial communication, set the LED pin as an output, and load the voice commands for turning the light on and off.
void setup() {
  vr.begin(9600);
  Serial.begin(115200);
  pinMode(led, OUTPUT);
  vr.load(lightOn);
  vr.load(lightOff);
}
We start by calling the begin() function of the VR instance to initialize the module with a baud rate of 9600. We also initialize the serial communication with a baud rate of 115200. The LED pin is set as an output using the pinMode() function.
Finally, we load the voice commands for turning the light on and off using the load() function of the VR instance. Remember that you can only load 7 commands at a time. But you can use commands to switch or load other commands to build chains of commands.
Loop function
In the loop() function, we continuously check for voice commands and control the LED accordingly.
void loop() {
  int ret = vr.recognize(buf, 50);
  if (ret == -1) return;

  switch (buf[1]) {
    case lightOn:
      digitalWrite(led, HIGH);
      break;
    case lightOff:
      digitalWrite(led, LOW);
      break;
  }
}
Fist, we call the recognize() function of the VR instance to check for voice commands. The recognized command is stored in the buf array. If no command is recognized, the function returns -1 and we exit the loop. Otherwise, we check the value of the second element in the buf array (buf[1]) to determine the command. If the command id is lightOn, we set the LED pin to HIGH using the digitalWrite() function. If the command is lightOff, we set the LED pin to LOW.
Should you have problems understanding the code for controlling an LED have a look at our tutorial How To Blink An LED Using Arduino (4 Different Ways). And if you want to switch a relay instead of an led, just replace the LED by a Relay Module. For more details, see the tutorial How To Use A Relay With Arduino.
And that’s it. Now you have a voice controlled LED. Have fun playing with it ; )
Applications
Here are a few ideas of how you can use this module in your projects:
- Home Automation: Controlling your lights, appliances, and other devices with just your voice..
- Voice-Activated Security System: Enhance the security of your home or office by implementing a voice-activated security system.
- Voice-Controlled Robotics: With the Voice Recognition Module you can command your robots to perform specific actions or navigate through obstacles using voice commands.
- Voice-Enabled Assistants: Create your own voice-enabled assistant, similar to Amazon Alexa or Google Assistant.
- Accessibility Solutions: The Voice Recognition Module can be used to develop assistive technologies for individuals with disabilities. For example, you can create a voice-controlled wheelchair or a hands-free communication device for people with limited mobility.
- Educational Projects: Incorporate voice recognition into educational projects to make learning more interactive and engaging. Students can use voice commands to control simulations, answer quiz questions, or interact with virtual characters.
Conclusion
The Voice Recognition Module V3 provides a simple way to control devices using your voice. Since it does not rely on a server with an internet connection for the voice recognition, the recognition is fast and privacy concerns are not an issue.
On the other hand, the voice recognition is speaker dependent and the recognition is limited to simple phrases. Also, I found the recognition accuracy of very low, definitely below the 99% stated. However, your experience might be different.
In any case it is a fun project to try and there are plenty of interesting applications.
If you have any further questions or need additional guidance, please refer to the Frequently Asked Questions section or check out the provided links for more resources and tutorials. Happy making!
Frequently Asked Questions
Here are some frequently asked questions about using the speech recognition module.
Can I use the voice recognition module with any Arduino board?
Yes, the voice recognition module V3 is compatible with most Arduino boards. It communicates with the Arduino using serial communication, so as long as your Arduino has a serial interface, you will be able to use the module.
Why can’t I connect to the voice recognition module?
To connect the voice recognition module to your Arduino, you will need to make the following connections: VCC pin of the module to the 5V pin of the Arduino. GND pin of the module to the GND pin of the Arduino. RX pin of the module to pin 3 of the Arduino. TX pin of the module to pin 2 of the Arduino.
This worked fine for me but others have reported problems. Try different pins if you encounter issues with the connection. Just make sure you adjust the code accordingly. Maybe also play with the baud rate for the serial connection.
How do I train the voice recognition module to recognize my voice commands?
To train the voice recognition module, you will need to use the Arduino IDE and upload a sketch to the Arduino. The sketch will guide you through the process of recording and saving your voice commands. Once the commands are saved, the module will be able to recognize them.
How accurate is the voice recognition module?
The datasheet states a recognition accuracy of 99% under ideal conditions (no noise, close to microphone, …). In my experience, I didn’t even got close to this accuracy, however.
Why is the voice recognition module is not listening?
You may experience the case that the yellow LED of the module is not blinking as it is supposed to when listing. I encountered this problem a few times. What helped was to remove and reattach the power supply quickly. A soft reset of the Arduino did not help.
Why can’t I train the voice recognition module?
Make sure that baud rates for the serial communication are set correctly in code and in the serial monitor. Also ensure that the RXD and TXD pins of the module are connected to the correct pins on the Arduino. It is easy to swap them by accident.
Can I control other devices besides lights with the voice recognition module?
Yes, the voice recognition module can be used to control various devices besides lights. You can modify the Arduino sketch to control motors, servos, or any other device that can be controlled by the Arduino.
Is the voice recognition module suitable for commercial applications?
The voice recognition module V3 is primarily designed for hobbyist and educational purposes.
Links
Here are some links to additional resources and tutorials.
- Introduction to Voice Recognition With Elechouse V3
- Speak Recognition, Voice Recognition Module V3
- Arduino library for elechouse Voice Recognition V3 module
- Voice Recognition Module
Stefan is a professional software developer and researcher. He has worked in robotics, bioinformatics, image/audio processing and education at Siemens, IBM and Google. He specializes in AI and machine learning and has a keen interest in DIY projects involving Arduino and 3D printing.
Bill
Saturday 2nd of March 2024
Sorry, using the VR and Uno R3
Bill
Saturday 2nd of March 2024
Thank you for doing these projects. Would you have one complete downloadable code file that would trigger a relay? I'm having trouble understanding the code as to what each instruction is actually doing, and if I can cut and paste in the sketch. Thanks, Bill
Stefan Maetschke
Saturday 2nd of March 2024
Hi, the code in the tutorial could be used to trigger a relay as well. Just replace the LED with a relay module. More info on how to do that can be found here: https://www.makerguides.com/how-to-use-a-relay-with-arduino/
But if don't want to write code then you are better of with pre-made home automation system like Alexa that can control power points: https://amzn.to/3wxumTo The voice recognition of an Alex system will also be much better than what you can get with the V3.