Sensors are the eyes and ears of an Arduino system, transforming the analog and digital world around us into a language that microcontrollers can understand. Here we will give you an overview of all the different sensors you can use with an Arduino and similar microcontrollers (MCUs).
Makerguides.com is a participant in the Amazon Services LLC Associates Program, an affiliate advertising program designed to provide a means for sites to earn advertising fees by advertising and linking to products on Amazon.com. As an Amazon Associate we earn from qualifying purchases.
Sensors
Temperature Sensors
Temperature sensors help Arduino boards detect how hot or cold it is. Some popular ones are the LM35, DS18B20, and DHT11. Once connected to an Arduino, these sensors give information that can be used in things like weather stations or home heating systems. In short, they let your Arduino project “feel” the temperature and act on it.
The come in various shapes and size. The LM35 shown below looks like a transistor:
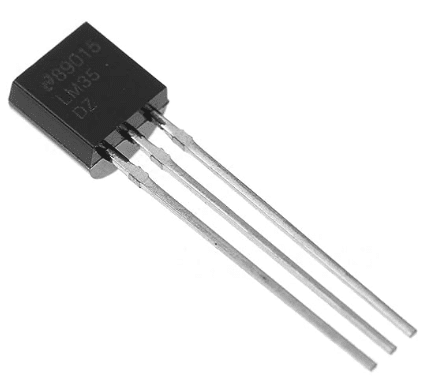
Bridgold 5pcs LM35DZ LM35 Analogue Precision Centigrade Temperature Sensor IC,To-92
The DS18B20 is a waterproof, temperature sensor with a cable:
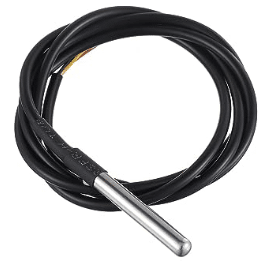
BOJACK DS18B20 Temperature Sensor Module Kit with Waterproof Stainless Steel Probe
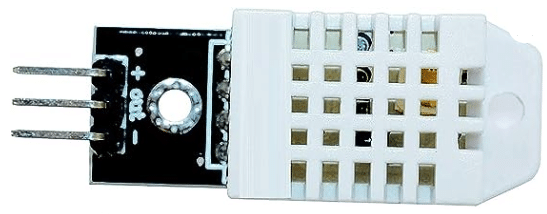
And the DHT11 can measure humidity in addition to temperature
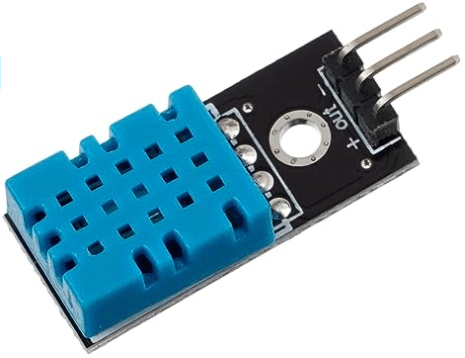
Songhe DHT11 Digital Temperature and Humidity Sensor
Key considerations
The LM35 produces an analog voltage output proportional to the temperature. Make sure the output doesn’t exceed the voltage level that the Arduino analog input can handle. See our tutorial on how to connect the LM35 to an Arduino.
The DS18B20 can work in “parasitic power mode” (two-wire) or with an external power supply (three-wire). Ensure that it’s correctly wired for your intended mode. Also don’t forget the required a pull-up resistor (typically 4.7k ohms) on the data line. See our tutorial on how to connect the DS18B20.
The DHT11 is typically a 3.3V sensor, though there are 5V tolerant versions. Ensure you don’t exceed its voltage level. Like the DS18B20, the DHT11 requires a pull-up resistor (typically 10k ohms) on its data line. Finally, the DHT11 is not very accurate and fairly slow. Don’t query it too frequently. The DHT11 needs about 1-2 seconds between readings. Have a look on our tutorial on how to use the DHT11 and DHT22 with an ESP32.
Generally, analog temperature sensors can be sensitive to electrical noise. Use twisted pair cables, shielded cables, or add a small capacitor (e.g., 10nF) across the sensor’s output and ground (close to the sensor). You also will need to calibrate the sensor reading against a known temperature source for accurate measurements.
Humidity Sensors
Humidity sensors measure the moisture content in the atmosphere. They essentially equip an Arduino with the capability to “sense” and quantify how humid the surrounding environment is. You could use these sensors to activate devices like dehumidifiers or fans when certain thresholds are reached.
We already mentioned the DHT11 temperature and humidity sensor before. Another popular humidity sensor is the DHT22 (or AM2302). It is an improved version of the DHT11 with a wider measurement range and higher accuracy. Below you can see a picture of the DHT22. You can easily distinguish them, since the DHT11 is blue and the DHT22 is typically white.
HiLetgo DHT22/AM2302 Digital Temperature And Humidity Sensor Module Temperature Humidity Monitor Sensor
There is the excellent Adafruit DHT library for reading measurement from these sensors. Also have a look our tutorial on how to use DHT11 and DHT22 sensors with an Arduino.
Key considerations
Apart from the same considerations as for temperature sensors, you should also ensure that the humidity sensors are not placed close to water or areas with high condensation. Prolonged exposure to high humidity can damage the sensors.
Soil Moisture Sensors
Soil moisture sensors are related to humidity sensors. However, they measure the water content in soil and can directly be exposed to water. This is especially valuable for gardening or agricultural projects, where optimal soil moisture levels are crucial for plant health. By “feeling” the wetness or dryness of the soil, they can trigger actions such as turning on irrigation systems when the ground gets too dry. See our tutorial on how to build an automatic watering system.
A common sensor that uses a resistive fork, is the YL-69 depicted below. While they are cheap, they corrode very quickly when constantly running.
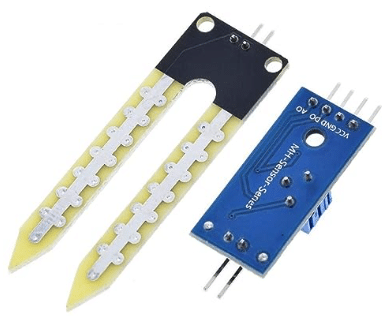
ARCELI Soil Hygrometer Moisture Detection Water Sensor Module Soil Moisture Sensor YL-69 Sensor and HC-38 Module
A better option in most cases is the EK1940, shown below. It is a capacitive soil moisture sensor and more corrosion resistant. For more details read our tutorial on how to use a capacitive soil moisture sensor with Arduino.

Gikfun Capacitive Soil Moisture Sensor for Arduino Moisture Detection Garden Watering EK1940
Key considerations
As mentioned above, moisture sensors based on resistance measurement tend to corrode very quickly and become unusable. You can avoid this to some degree by activating the sensor infrequently, for instance every second day. A better option are capacitive soil moisture sensors but even those ones will degrade over longer periods of time.
Finally, those sensors are also somewhat temperature dependent and you may want to add a temperature sensor to compensate for fluctuations in moisture reading due to ambient temperature.
Rainfall Sensor
Rainfall sensors for Arduino are essentially the same as resistive moisture sensors, just with a smaller distance between the electrodes. Changes of resistance between the electrodes because of water droplets let the sensor detect rain. Below you will find the picture of such a rainfall sensor:

HiLetgo LM393 Rain Drops Sensor Weather Moisture Monitor Sensor Humidity Sensitivity Module Nickeled Plate
Key considerations
Rainfall sensors base on resistance measurement suffer from the same problem as moisture sensors; they corrode very quickly and stop working reliably. A more suitable application than rain detection might be the detection of flooding, for instance to alert if the washing machine is leaking.
Water Flow Sensors
Water flow sensors, such as the YF-S201, measure the rate at which water flows through a pipe. Internally the contain a magnetic rotor and a Hall sensor that outputs pulse signal. The frequency of the pulse increases with the flow rate of the water.
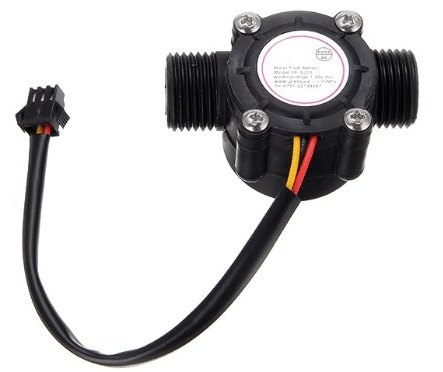
Taidacent YF-S201 Hall Effect Water Flow Sensor 4/6 Points G1/2/3/4 Interface Water Flow Measurement Sensor
You can use such a sensor to monitor water usage, detect leaks, or regulate flow in systems like irrigation setups.
Key considerations
Make sure to install the sensor with the correct orientation. There is an inlet and an outlet. For accurate measurements, You will also need to calibrate the sensor output, so that it relates to the flow rate. Note that the YF-S201 outputs a 5V signal (when connected to 5V). Finally the water flow can be “bursty” and there is electromagnetic noise to consider as well. Usually, you will need to implement some debouncing or smoothing for stable readings.
Gas Sensors
A very common type of gas sensors used with Arduinos are the sensors of the MQ series. They can measure a range of different gases: MQ-2 Smoke sensor, MQ-3 Alcohol sensor, MQ-4 Methane sensor, MQ-5 LPG Natural Gas Sensor, MQ-6 Isobutane propane sensor, MQ-7 Carbon Monoxide sensor, MQ-8 Hydrogen sensor, MQ-9 Carbon Monoxide sensor, MQ-135 Air quality sensor. There is a nice kit at Amazon that has all of them:
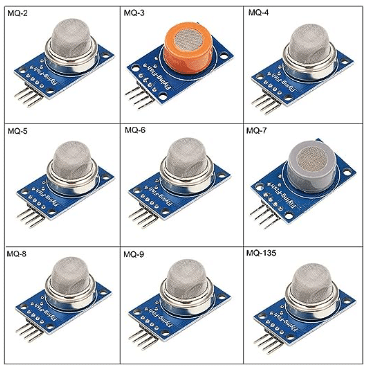
BONATECH 9 in 1 MQ Sensor Modules Kit Project Super Starter Kits for Gas Detection
When hazardous gas levels are detected, they can trigger alarms or activate ventilation systems. We have several tutorials on how to use these gas sensors with an Arduino.
Key considerations
If you are trying detecting harmful gases, make sure you’re operating in a well-ventilated area or using protective measures.
MQ sensors usually have a built-in heater. You will have to wait for a while (> 5 mins) before you get stable readings. As with most sensors you also will need to calibrate the sensor for accurate measurements.
Finally, the MQ sensors operate at 5V. However, some Arduino boards, like the Arduino Due, operate at 3.3V. So watch out for the correct logic levels.
Barometric Pressure Sensors
Barometric pressure sensors measure the pressure exerted by the weight of the atmosphere. The barometric pressure is correlated with altitude and weather conditions. The BMP180 and the BMP280 are widely-used sensors for this purpose. Below a picture of the BMP280:
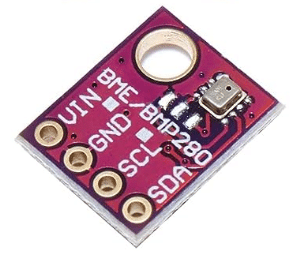
DEVMO BME280 Digital Temperature Humidity Barometric Pressure Sensor Module, 5V with IIC I2C Breakout
The BMP280 is an improved version of the BMP180 but slightly more expensive. There is a nice comparison of these two and other pressure/temperature sensors. And here is our tutorial on how to use the BMP280 with an Arduino.
Key considerations
The BME280 comes as a 3.3V or 5V version. Pick the one that matches the logic levels of your board. The BME280 communicates via I2C and you can use the Adafruit BMP280 library to handle that. Finally, the BME280 not only measures pressure, but also temperature and humidity, which makes it a very nice sensor for weather stations, for instance.
Light Sensors
Devices like the LDR (Light Dependent Resistor) or the BH1750 allow Arduino setups to gauge the intensity of ambient light. They work by varying resistance or producing an output voltage in response to light exposure. Such sensors are fundamental in applications like automatic lights, where light intensity determines if the lights should be switched on or off.
Below you will find a picture of a typical LDR sensor module for Arduinos.
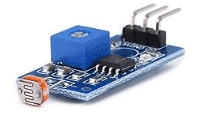
Songhe 5MM LDR Photosensitive Sensor Module Light Dependent Resistor Sensor Module
It has a potentiometer and a differential comparator (LM393) to produce a digital output when the light intensity exceeds a set threshold. See our tutorial on how to use such a sensor module with an Arduino.
Key considerations
Note that some LDR modules have an analog and a digital output or only one of them. Depending on your application, you want either a analog signal (dimming lights) or a digital signal (switching lights). Also make sure you are using the right logic level (5V or 3.3V).
LDRs respond differently to different wavelengths of light and are usually not perfectly linear. Their resistance also depends on the angle of the light source and to a small degree on the ambient temperature.
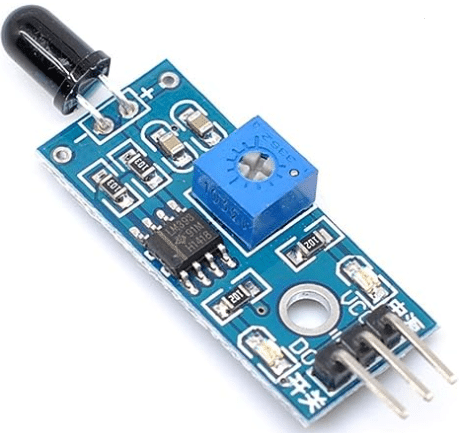
Infrared Sensors
At the core of an Infrared (IR) sensor is a photodiode or a phototransistor that is sensitive to infrared light, typically in the wavelength range of 700 nm to 1 mm. The primary principle behind these sensors is that they detect and measure the light that is reflected off an object. You can use them for a variety of applications such as proximity detection, object detection, or line-following robots.
Below a picture of a typical Infrared obstacle avoidance sensor module:
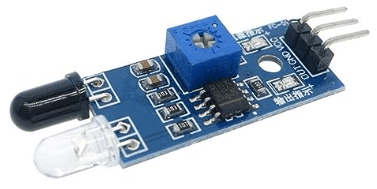
HiLetgo IR Infrared Obstacle Avoidance Sensor Module 3-Wire Reflective Photoelectric
Key considerations
Note that IR sensors are susceptible to interference from other (IR) light sources, which can lead to false readings. In tight spaces reflections can also cause problems.
The detection range of different sensors varies. The IR sensor listed above has an adjustable range between 2 and 30cms. However, the switching distance will depend on the reflectivity of the object and potentially also by ambient temperature.
IR sensor modules produce digital and/or analog outputs. For object detection you want a digital output, while for distance measurement, you need an analog output.
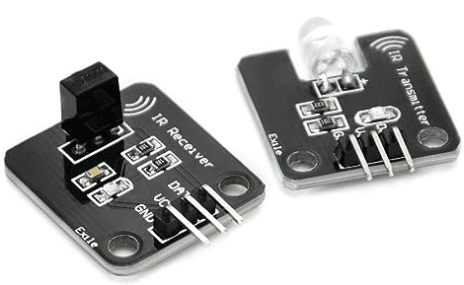
IR Receivers
IR receivers are essentially IR sensors with additional electronic, which allows them to the decode the modulated signals sent from an IR transmitter (typically at 38kHz). You can often buy them in pairs; the receiver and the transmitter module:
Gikfun Digital 38khz IR Receiver IR Transmitter Sensor Module
We have a tutorial on how to use an IR receiver and remote with an Arduino.
Key considerations
IR receivers suffer from the same potential issues as IR sensors. In addition, if you want to communicate with an existing transmitter, make sure that the modulation frequencies of transmitter and receiver match. The communication protocol of the various receivers can be quite complex. Luckily there is the IRremote library, which covers many protocols and runs on most boards.
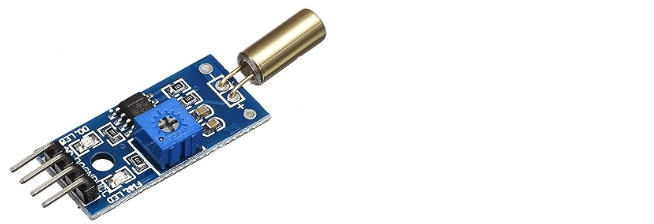
Flame Sensors
Flame sensors are similar to light and IR sensors. However, they are specifically designed to detect light in the wavelength range of visible and infrared light produced by flames. You can use them to detect fires and activate fire alert systems.
The usually come as modules with an integrated differential comparator and potentiometer, which allows you to set the activation threshold:
Oiyagai 5pcs IR Flame Sensor Module Detector Smartsense
Key considerations
Note that the range of these sensors is quite limited and you typically wont be able to reliably detect a small flame, if it is more than 1m away. Furthermore, sunlight or certain artificial lights, can cause false alarms. You should place the sensor in a spot that is protected from other light sources.
Color Sensors
Color sensor detect and differentiate between various colors. In the case of RGB color sensors, the output will be be three analog signals corresponding to the intensity of red, green, and blue light. A common RGB color sensor is the TCS-34725 depicted below:

HiLetgo TCS-34725 TCS34725 RGB Light Color Sensor Colour Recognition Module RGB Color Sensor with IR Filter
Have a look at our tutorial on how to use TCS34725 RGB color sensor with an ESP32.
Key considerations
RGB sensors can be affected by ambient lighting conditions. Also the internal filters of the sensor for red, green, and blue light might not be perfectly distinct, resulting in some overlap. Typically, you will need to calibrate the sensor for accurate color readings in a given environment. Finally, note that temperature fluctuations can impact the sensor.
Magnetic Field Sensors
Magnetic field sensors, or magnetometers, are used in compass applications, navigation systems, or projects that involve detecting the presence of magnetic materials. The picture below shows a magnetometer sensor module based on the HMC5883L chip, that allows the measurement of magentic fields along three axes:
HiLetgo GY-271 HMC5883L 3-5V IIC Triple Axis Compass Magnetic Sensor Module Electronic Compass Module
Key considerations
Nearby electronics or magnetic sources can interfere with readings. You have to place the sensor away from speakers, motors, metallic objects, and other sources of magnetic interference. Furthermore, you will need to calibrate the sensor for accurate measurements.
Hall Effect Sensors
While Hall effect sensors, like magnetometers, can detect magnetic fields, they are more commonly used for other application such as speed detection and position sensing. For instance, if you mount a small magnet on a rotating object you can count the number of revolutions per minute using a Hall effect sensor. See our tutorial on how to use a hall effect sensor to build a tachometer.
Below you will find a picture of the A3144 sensor module used in this tutorial:
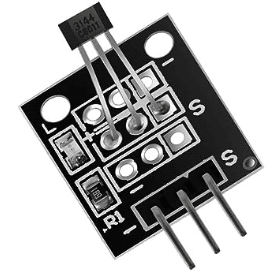
Hall Effect Magnetic Sensor Module, 3144E A3144 KY-003
Key considerations
Note that the A3144 is sensitive to south-polarity magnetic fields. Ensure you’re using the correct magnetic pole to activate the sensor. Also the magnet must be strong enough to activate the sensor.
Check the recommended voltage range for the A3144. and you typically need an external pull-up resistor for proper operation.
Finally, Hall effect sensors are influenced by external electromagnetic interference. Ensure good placement or shielding. In addition, a bypass capacitor close to the sensor’s power supply pins can help filter out noise.
Current Sensors
The Hall effect can also be used to measure the flow of electric current in a circuit. This has the advantage providing electrical isolation between the measured circuit and the sensor. Common applications for current sensors are the safeguarding electronic equipment from over currents and the monitoring of energy consumption.
The ACS712 displayed below, is a Hall effect based current detector. See our tutorial on how to use the ACS712 current sensor with an Arduino.
HiLetgo 2pcs ACS712 30A Current Sensor Module
Key considerations
The ACS712 comes in different variants based on the maximum current they can measure (e.g., 5A, 20A, 30A). Always ensure you’re using the right variant for your application.
External electromagnetic interference can affect readings and extra shielding might be required. Similarly the sensor’s measurement can be impacted by the ambient temperature.
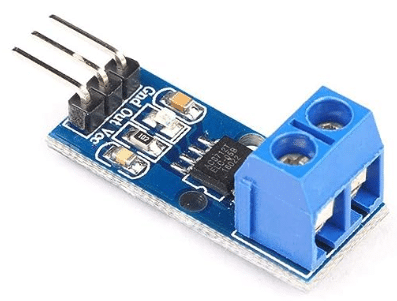
Voltage Sensors
Simple DC voltage sensors are realized as voltage dividers that scale down higher voltages to a level safe for the Arduino to read. They are useful in battery management applications to monitor battery health and charge levels. Below is an image of such a sensor for small DC voltages:
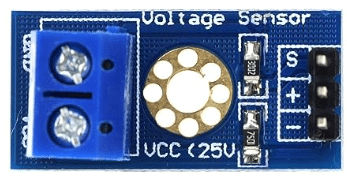
HiLetgo 5pcs Voltage Detection Module DC 0~25V Voltage
Key considerations
Make sure that the voltage sensor is rated for the voltages you plan to measure! If you want to measure high voltages, opt for sensors with galvanic or optical isolation to protect the Arduino from potential harm.
Finally, voltage sensors can be influenced by electromagnetic noise from nearby devices or wires. You may need extra shielding and proper grounding.
Tilt Sensors
Tilt sensors, often made with a simple ball switch or mercury, determine the orientation or inclination of an object. When connected to an Arduino, they can notify the system if something has been tilted or has surpassed a particular angle. They’re commonly used in alarms, toys, and as simple orientation detectors.
The picture below show a tilt sensor module with an additional comparator chip for a clean output signal:
uxcell Angle Sensor Module SW-520D Golden Ball Switch Tilt Sensor Module
Have a look at our tutorial on how to interface a tilt switch sensor with an Arduino.
Key considerations
Tilt sensors without additional electronics are prone to generate a noisy output signal and will need debouncing or smoothening. Some tilt sensors might also require pull-up resistors.
Simple tilt sensors produce a digital output (tilted or not), while more advanced sensors provide an analog signal proportional to the tilt angle. Also note, that some sensors detect tilt only in one plane, while others might detect in multiple planes.
Vibration Sensors
Simple vibration sensors are similar to tilt sensors. They contain a small spring that touches a contact, when the sensor is shaken. However, they are not activated by tilting, only by vibration. Typical applications are bounce detection for robots or detection of window breakage in alarm systems.
Typical vibration sensor modules such as the one shown below, have additional electronic to switch a digital output to high, when vibrations are detected.
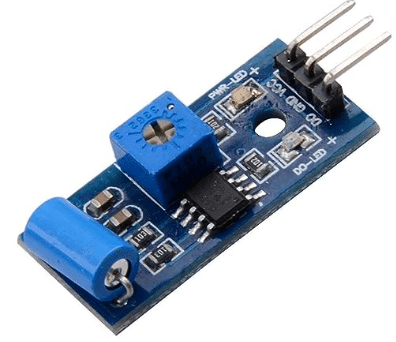
Hiletgo SW-420 Vibration Sensor Module Vibration Switch Alarm Sensor Module
Key considerations
Plain vibration sensors, without detection electronic, generate a very noise output signal and will require more complex code for smoothening and detection. Note that in contrast to tilt sensors, vibration sensors are usually non-directional.
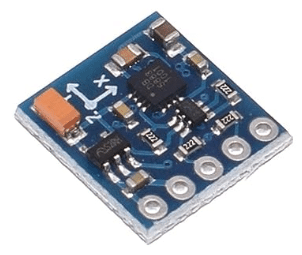
Accelerometers and Gyroscopes
c are essentially more advanced versions of vibration and tilt sensor switches. Instead of digital signals, they return analog signals proportional to acceleration and tilt or angular velocity. They are frequently used in in applications like game controllers, drones for stabilization, or wearable fitness devices to track activities.
The picture below shows a typical accelerometer and gyro module for the Arduino, based on the MPU-6050 chip. See our tutorial on how to use a MPU-6050 for more details.

Mixse MPU-6050 GY-521 3 Axis Accelerometer Gyroscope Sensor Module 6DOF 16 Bit AD
Key considerations
Accelerometers and gyroscopes might require calibration for accurate readings. The MPU6050, for instance, can have gyroscopic drift which needs to be compensated for.
GPS Modules
GPS modules, such as the NEO-6M, allow Arduino systems to receive location data from satellites. They provide information like latitude, longitude, altitude, and even time. When combined with Arduino, they enable location-based functionalities, which are essential for tracking devices, drones, vehicle navigation systems, and various location-aware projects.
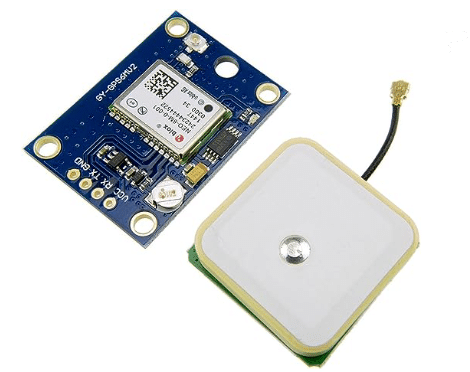
HiLetgo GY-NEO6MV2 NEO-6M GPS Flight Controller Module 3V-5V with Ceramic Antenna
For more details see our tutorial on how to use the NEO-6M for GPS navigation.
Key considerations
The accuracy of the NEO-6M GPS module depends on the number of satellites it tracks and it may take a while for the module to get a satellite fix. If the GPS module has not been powered on for a long time, it may take much longer to get a satellite fix due to a “cold start.” A “hot start” (when powered on after a short time) is quicker.
Furthermore, GPS modules typically don’t work well indoors due to the weak satellite signals. It’s best to test and use them outdoors with a clear view of the sky.
Ultrasonic Sensors
Ultrasonic sensors use sound waves to measure distances. They are often seen in obstacle avoidance systems in robotics or in parking sensors for vehicles. A very popular ultrasonic sensor is the HC-SR04 shown below:
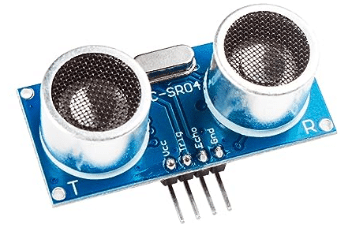
Smraza Ultrasonic Module HC-SR04 Distance Sensor
Have a look at our tutorial on how to use the HC-SR04 ultrasonic sensor for distance measurements.
Key considerations
The HC-SR04 has a typical range of 2cm to 400cm. Measurements outside this range will not be reliable. Furthermore, ambient conditions such as temperature, humidity and airflow will affect the measurement. In addition, the shape of the target plays a role as well. The ideal target is a hard, flat surface perpendicular to the sensor. Soft, angled, or curved surfaces might absorb the sound or reflect it away from the sensor. For more reliable distance readings laser distance sensors are better suited.
Laser Distance Sensors
Similar to ultrasonic sensors, laser distance sensors are used to measure distance. However, instead of sound they are using light. In comparison to ultrasonic sensors, they are much more accurate and faster.
The VL54L0X is a tiny and commonly used chip for the so called Time-of-Flight (ToF) measurement. It measures the time it takes for an emitted laser pulse to be reflected back from a target.
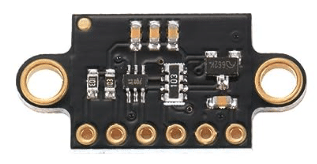
HiLetgo VL53L0X Time-of-Flight Distance Measurement Sensor Laser Range Finder
Key considerations
While laser distance sensor are much more accurate and robust than ultrasonic distance sensors, they are still impacted by ambient conditions such as bright sunlight, dust and or IR emitting devices. Furthermore, the range of the sensor will be affected by the reflectivity of the target object. Darker materials absorb more of the emitted light, reducing the sensor’s effective range.
PIR Motion Sensors
Motions sensors, like Infrared sensors, detect infrared radiation. However, motions sensor are specifically designed to detect changes in infrared radiation caused by the movement of human (or animal) bodies. When interfaced with an Arduino, they can trigger actions like turning on lights when someone enters a room or activating security systems when unexpected motion is detected.
The picture below shows a very common motion detection module, based on the HC-SR501 chip. See our tutorial for more details on how to use this module with an Arduino.
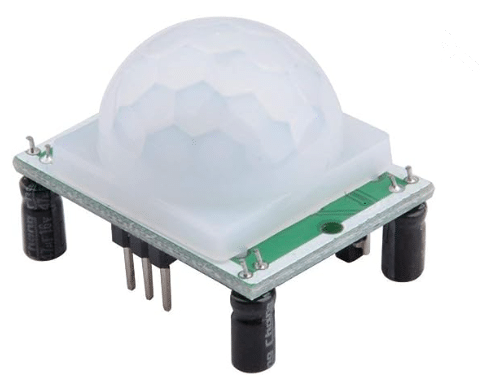
HiLetgo HC-SR501 PIR Infrared Sensor Human Body Infrared Motion Module
Key considerations
PIR sensors usually need a warm-up time (often about 30 seconds to 1 minute) after powering up.
During operation, rapid changes in ambient temperature or bright sunlight can result in false triggers. Similarly, devices that emit heat or infrared radiation can interfere with the sensor. Finally, the sensor will not work if placed behind material that absorbs infrared radiation, such as thick glass for instance.
Radar Motion Sensors
Radar sensors, in contrast to PIR motion sensors, can be placed behind non-transparent material and still can detect motion reliably. They employ radio waves to detect the presence of (moving) objects.
One common radar module compatible with Arduino is the RCWL-0516, a microwave proximity sensor that’s popular due to its low cost and relatively long detection range.
DIANN RCWL-0516 Microwave Radar Sensor Human Sensor Body Sensor Module
Key considerations
Radar sensors, such as the RCWL-0516 can detect motion through wall and have a 360 degrees detection radius. Though they will be blocked by metallic shielding. Due to the long range (several meters) and the wide detection angle, you should not place multiple sensors close together. They will interfere with each other.
Force Sensors
Force sensors, like the FSR402, are Force-Sensitive Resistors (FSR) that change their resistance based on the pressure exerted upon it. These sensors are thin, lightweight, and easy to integrate, making them ideal for interactive projects, ranging from simple pressure-triggered interfaces to more intricate setups like touch-sensitive pads or weight-detection systems.
Thin Film Pressure Sensor FSR402 Resistance Type Pressure Transducer Force Sensing Resistor Long Tail 0-10kg 1.27cm Diameter
See our tutorial on how to use the FSR402 force sensor.
Key considerations
Don’t apply a force beyond the sensor’s maximum rated capacity (10kg for the FSR402), as this could permanently damage or alter its calibration. Over time, the sensor’s output might drift due to changes in the material properties or other factors. Furthermore, force sensors are not necessarily linear across their entire range.
Weight Sensors
Weight sensors, also known as load cells, are force sensors specifically designed to measure weight. Typical applications are scales, automated vending machines, or other applications that need to detect or measure the weight of objects.
The picture below shows a typical load cell. You typically can buy them in sets of 4 with an amplifier module.
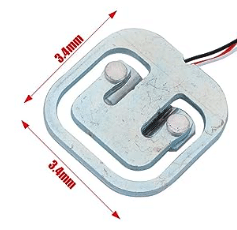
4pcs 50kg Half-bridge strain gauge Load Cell Body Scale Weighting Sensor Amplifier+ 1pcs HX711 AD Weight Module Geekstory
Key considerations
Similar to force sensors, avoid overloading the cell. Also repeated loading and unloading can lead to fatigue, drift and reduced accuracy. For accurate reading you will need to calibrate the sensors with a known weight and implement smoothing when measuring.
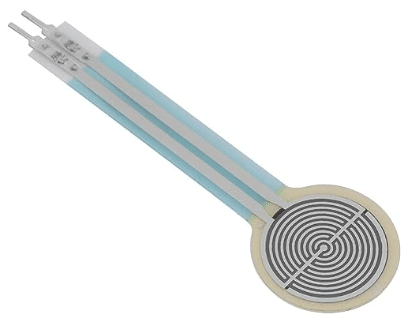
Flex Sensors
Flex sensors are another type of force sensor that change their resistance as they are bent. When paired with Arduino, they can monitor the extent of bending, which can be valuable in wearable tech, robotics for joint angle measurement, or gaming gloves that detect hand movements.
Below you can see a picture of a flex or bend sensor:

Thin Film Pressure Flex Sensor Bend Sensor ZD10-100 500g Resistance Type
Key considerations
Flex sensors have a maximum bend radius. Ensure you do not exceed this, otherwise you will damage the sensor!
Typically, you will need a voltage divider setup with the flex sensors to convert the changes in resistance into voltage variations that an Arduino can read.
Sound Sensors
Sound sensors are designed to detect sound waves in their environment. When integrated with Arduino, they can be used to measure sound intensity, triggering responses to claps, shouts, or specific noise patterns. These sensors are often found in voice-activated devices or noise monitoring systems.
There are many sound detection modules available that are easily connected to an Arduino. As an example, see the common module shown below.

DEVMO Microphone Sensor High Sensitivity Sound Detection Module
Key considerations
Sound detection modules either return a digital signal when the sound exceeds a set threshold or an analog signal that is proportional to the sound volume. Simple modules, such as the one shown above, do not distinguish between frequencies and cannot be used to detect specific words either.
Heart Rate Sensors
Devices like the pulse sensor or the MAX30102 are designed to monitor the heartbeat. When interfaced with Arduino, they can read and analyze heart rate, providing insights into a person’s health or fitness levels. They are widely used in wearable health monitors, fitness trackers, or DIY health diagnostic projects.
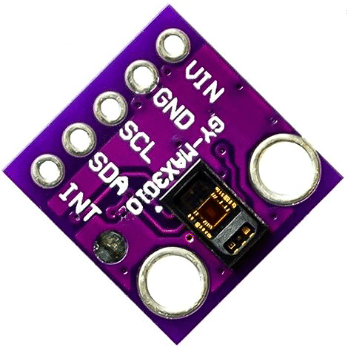
HiLetgo MAX30102 Low Power Heart Rate Sensor Module Pulse Oximetry Solution SpO2
For an example application read our tutorial on how to use the MAX30100/MAX30102 with an Arduino.
Key considerations
The MAX30102 uses both red and infrared LEDs to measure oxygen saturation. Ambient light, especially direct sunlight, can interfere with these measurements. Ensure the sensor is shielded from external light sources.
Summary
Here we have provided you with an overview of all the different types of sensors commonly used with Arduino and similar microcontrollers. For more details on how to connect these various devices have a look at our Articles on inputs and sensors and the links in the post. We also have an overview article on all the different types of sensors you can connect to an Arduino.
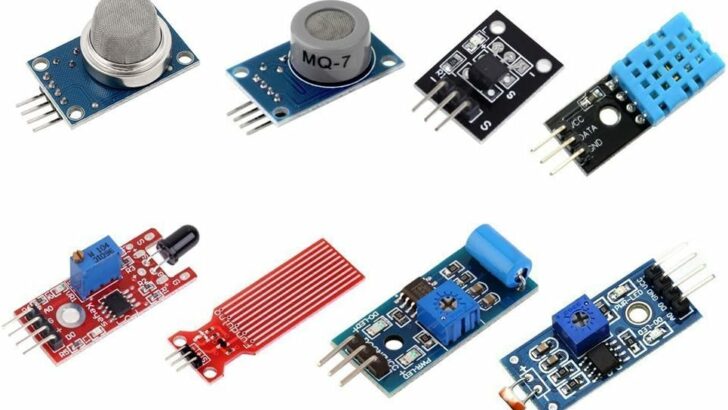
If you want to explore a wide variety of these sensors, here is a kit with a massive range of sensor:
HiLetgo 37 Sensors Kit Sensor for Arduino
Related links
- The Geek Pub: List of Arduino sensors and modules
- Tutorial45: Top Arduino Sensors
Stefan is a professional software developer and researcher. He has worked in robotics, bioinformatics, image/audio processing and education at Siemens, IBM and Google. He specializes in AI and machine learning and has a keen interest in DIY projects involving Arduino and 3D printing.